Recovering Files After Formatting vs. Deleting: Understanding the Difference
Curious About Data Recovery? Learn the Difference Between Recovering Files After Formatting vs. Deleting! In this essential tutorial, we’ll clarify the distinction between these two processes and help you understand how they impact your data recovery efforts. From explaining how formatting and deleting affect data retention to providing tips for successful recovery, we’ll cover everything you need to know to navigate the world of data recovery with confidence. Whether you’re a novice or an experienced user, this article will empower you to make informed decisions when recovering lost files.
- Different Ways to Delete Files
- Recovering Files After Formatting or Deleting
- Conclusion
- Questions and answers
- Comments
Different Ways to Delete Files

How to Delete Files Without the Opportunity to Restore Them – Software Encryption 📁🚫⚕️
Generally, there are two main ways to delete a file:
- ordinary deleting (soft delete);
- permanent deleting (hard delete).
All versions of the Windows operating system feature Windows Recycle Bin, a protected location for deleted files, where they end up after you delete them and are stored for some time (all of that is possible if you configure its settings in a corresponding way). By default, this protected storage will keep all files deleted from the hard disk of your computer until a certain system condition is satisfied, or until a user performs certain actions.
Find the Recycle Bin icon on the desktop and right-click on it. From the list of available actions, select Properties.

In the window that opens, find the tab General and the section Settings for selected location: the default option is Custom size: Maximum size (MB): where you can set the size of the Windows Recycle Bin reserved for storing deleted files.
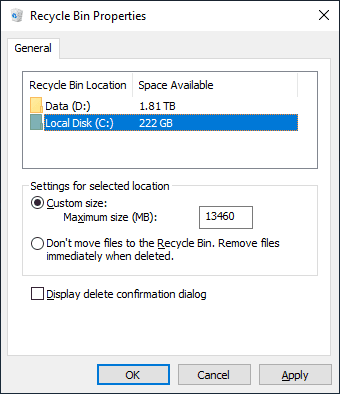
For ordinary deleting, there are two easy ways: press Delete on the keyboard, or right-click on a file (several previously selected files) and select Delete from the context menu.

When going for hard delete, you can use a shortcut involving the Shift key (for example, Shift + Delete). This key combination removes a file or a group of files immediately, without the interim stage of placing them into the Recycle Bin.
You can also remove files permanently after you have changed some settings for the Windows Recycle Bin. Open the properties window for Windows Recycle Bin just as you did it before and check the option Don’t move files to the Recycle Bin. Remove files immediately when deleted, and then click Apply and ОК for the changes to take effect.
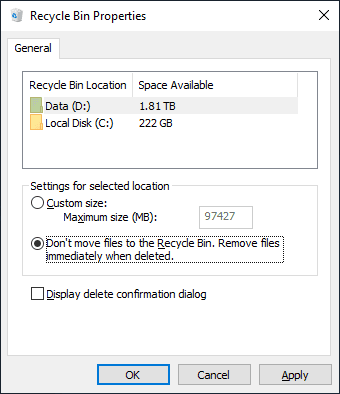
Additionally, files deleted in an ordinary way and placed into the Windows Recycle Bin, will be deleted permanently when the Windows Recycle Bin runs out of the size assigned to it and is filled with previously deleted files. In this case, when a new file is deleted, the Windows Recycle Bin will remove permanently the oldest files to make room for the recently deleted data.
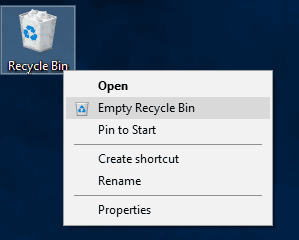
Also, when the Windows Recycle Bin is emptied by the user, all files stored there will be deleted for good. This process starts when you select Empty Recycle Bin from the context menu as you right-click on the Windows Recycle Bin desktop shortcut.
It should be noted that when deleting files from USB flash drives and memory cards, all files will be removed immediately without Windows Recycle Bin, regardless of what way of deleting you may choose.
You can learn more about recovering user data lost from USB drives by watching a video tutorial How to Recover Deleted Files from a USB Drive after Formatting the Drive or a Virus Attack.
Sometimes, files can be deleted dues to some external factors such as system failures, read or write errors, file system damage, malware effects and so on. yet almost in all cases you can still recover the removed files with the help of professional data recovery tools – which we will cover in the final part of this article.
To secure your computer and all of its data from harmful effects of viruses, make sure you know how to clean your system from all kinds of malware: a video guide on our channel should be most helpful – 100% Guaranteed Removal of Any Virus: Trojan, Rootkit, Ransomware, Spyware.
Deleting Files by Formatting the disk
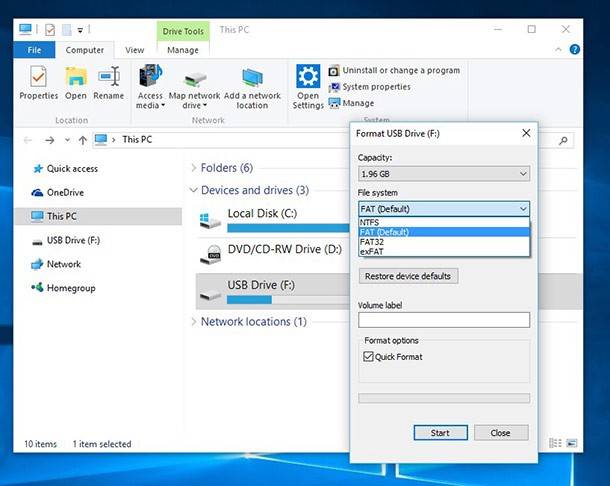
Before you actually begin using a hard disk, it is recommended to configure it properly. In other words, you need to create a certain structure to allow the operating system use all of the disk space to write and process data. This process is known as formatting.
There are two kinds of formatting, low-level and high-level. In one of the previous articles we already described the process of low-level formatting performed once when a hard disk is manufactured.
| Characteristic | Low-Level Formatting | High-Level Formatting |
|---|---|---|
| Definition | The process that creates the physical structure of the disk. | The process that creates a file system on the disk. |
| Purpose | Formatting that prepares the disk for data writing. | Formatting that organizes data for the user. |
| Components | Includes marking sectors and tracks on the disk. | Includes creating a partition table and file system. |
| Execution Time | Tends to take longer due to process detail. | Usually faster as it does not require physical preparation of the disk. |
| Example | Manufacturing new hard drives. | Formatting a USB flash drive to FAT32 or NTFS. |
| Availability | Typically not available to users. | Available through operating systems. |
| Data Type | Operations with magnetic or optical data. | Operations with files and folders. |
The high-level formatting is the process of marking the hard disk space by creating a file allocation table – a logical structure in charge of processing and storing data properly.
Within a Windows operating system, we can use high-level formatting to break the hard disk into logical volumes (partitions) or clean the disk space to update the file allocation table and prepare the disk for new entries.
When you start the formatting process, the old file allocation table is replaced by a new one. After such an operation, all information on the data stored in such disk is erased, and the operating system will see such disk as empty and good for writing new entries. However, all the data that existed in such disk is still there and available for recovery until it is overwritten with new data.
Visit our YouTube channel for a detailed video guide on recovering data after working with partitions: «How to Recover Data After Formatting, Deleting or Creating Partitions».

How to Recover Data After Formatting, Deleting or Creating Partitions in 2020 📁🔥⚕️
Peculiarities of Deleting Data from SSDs
Solid-state drives, also known as SSDs, require special attention, as their process of deleting a file follows a different scenario.
An SSD is a storage device based on NAND flash memory with a separate controller chip. Such drives have no moving parts, which makes them absolutely noiseless and extremely durable. In addition, they have considerably higher read/write speeds and can perform significantly more input and output operations per second than any conventional hard disk.
All these benefits come from using the hardware command known as TRIM. The operating system tells the solid-state drive which sectors in the flash memory cells can be cleaned, so the TRIM command does it making more room for new entries. This way, a file is removed immediately after being deleted – which almost excludes its subsequent recovery. Using TRIM allows an SSD to reduce accumulation of non-used data (because storing it affects the disk’s overall performance), but doesn’t give users a single chance to recover the deleted data.
Recovering Files After Formatting or Deleting
Method 1. Recovering Deleted Files with Windows Recycle Bin
If you didn’t change the default settings of the Windows Recycle Bin you can recover any deleted files easily from there.
Open the Recycle Bin – for example, by double-clicking on the Windows Recycle Bin shortcut or by right-clicking on the shortcut and selecting Open from the menu.

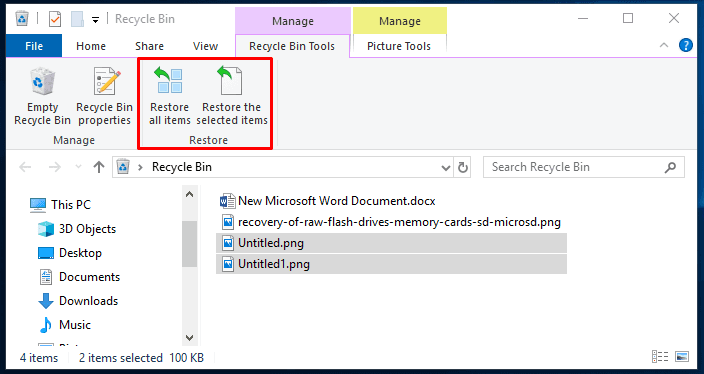
You will see several options for file recovery. Select a file or a group of files to be recovered, and right-click to open a menu: choose Restore. The selected files will immediately be returned to their previous location where they were stored right before being deleted.

Otherwise, use the button on the panel above to select either selected elements or all of the files currently stored in the Windows Recycle Bin.
Method 2.Recovering Files After Formatting or Deleting
There are different ways to recover files after they were deleted, or a logical volume (or an entire hard disk) was formatted. The common factor for both cases is that files can be recovered and with a good chance of success. The difference is, though, that complete recovery will be more likely after files being deleted than after a disk being formatted. It happens so because after formatting all sectors of the hard disk are considered free and available for writing, so they can be overwritten with new data as you continue using the hard disk. This way, the chances for being overwritten are immense compared to the case of a file being deleted.
Logically, you should try to use the formatted disk as little as possible if you are still interested in recovering the deleted data. Do not do anything that involves much hard disk activity like saving new files, downloading large amounts of information and so on to reduce the risk of your old data being overwritten.
On the contrary, you should hurry up with data recovery – and a few tips on that matter are right below.
Method 3. Recovering Files with Windows Integrated Tools
For both cases – either files removed permanently, or files lost after formatting the hard disk – there are ways to restore the lost data (provided you have enabled certain settings in your operating system) with the help of the integrated system tools. You can use any of the methods you like to have your files back. An important condition for using the suggested file recovery methods is to enable the corresponding settings in your operating system so that it will be possible to create data archives to work with. If these settings were disabled at the time of deleting files or formatting the disk, there is no way they could help you out. It is also important not to keep the archives on the same disk that has been formatted. Otherwise, you should scroll down to the final part of the article and recover data after deleting or formatting with specialized professional software.
Recovering Files from a Backup to the Current Directory.
This method suggests recovering user data from a previously created backup file – provided that you have enabled this option beforehand.
Open the Settings app which contains all basic settings of a Windows operating system – and there are a few ways how you can do it. For example, click on the Start button in the lower left corner of your desktop, on the Taskbar, and open the main Windows menu. On the left vertical panel, click on the Settings button shaped as a gearwheel, and open the app.

In the main window, scroll down and click on Update & Security.

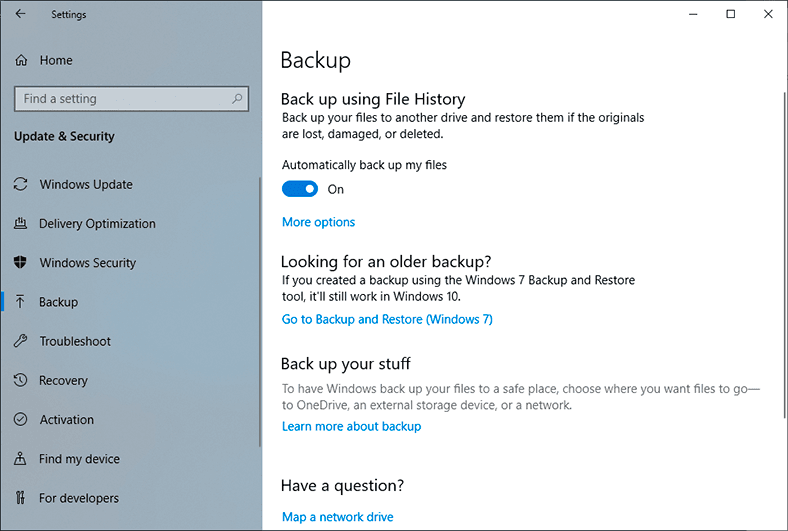
In the new page, look at the left panel and select Backup, and on the right, find Looking for an older backup?, and click on Go to Backup and Restore (Windows 7).
You will see a new window open; scroll down to Restore and click on Restore my files.
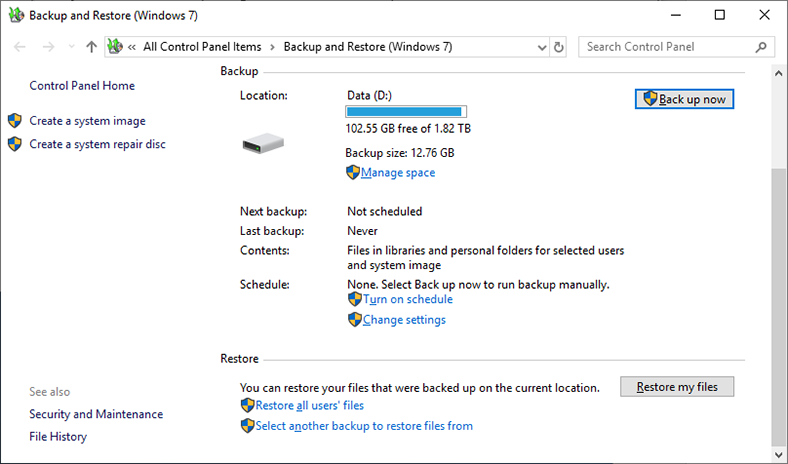
It will start a system-integrated file recovery tool working with a backup copy. Use the control buttons Search, Browse for files and Browse for folders to add the files and folders to be restored from the previously created backup. When it’s over, click Next.

Now specify where you want to restore the selected files. You can choose between restoring them to the original location or a new directory. In the first case, files will be restored to the last location where they were kept before being deleted. In the other case, you can choose a new directory for them. Check the option you prefer and click Restore to finish the process.
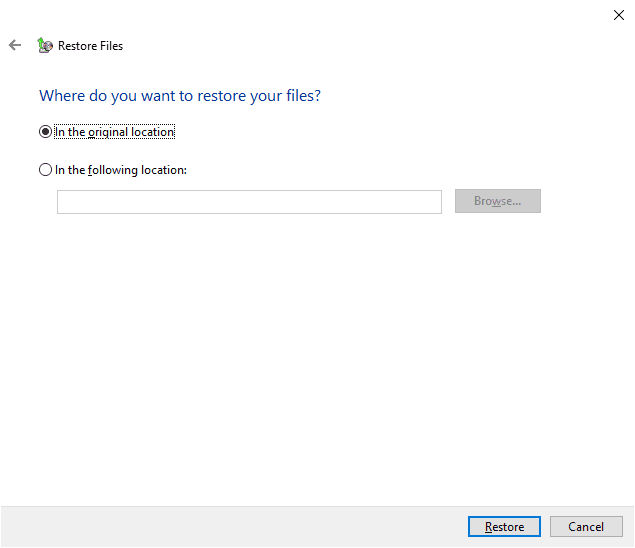
In the end, all selected files and folders will be restored according to the active settings.
Recovering files with File History.
This tool allows creating backups, saving them to any device and using them to restore files when original copies are lost, damaged or removed. An important condition is to enable the automatic file backup function in time.
As described before, open Update & Security in the Settings app. In the left panel, select Backup, and in the right panel Back up using File History click on the link More options.
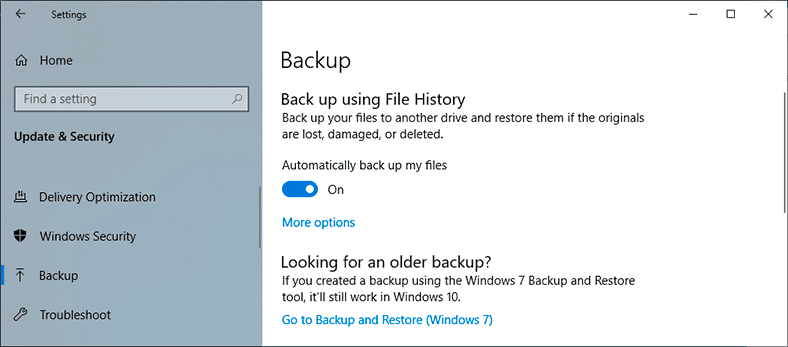
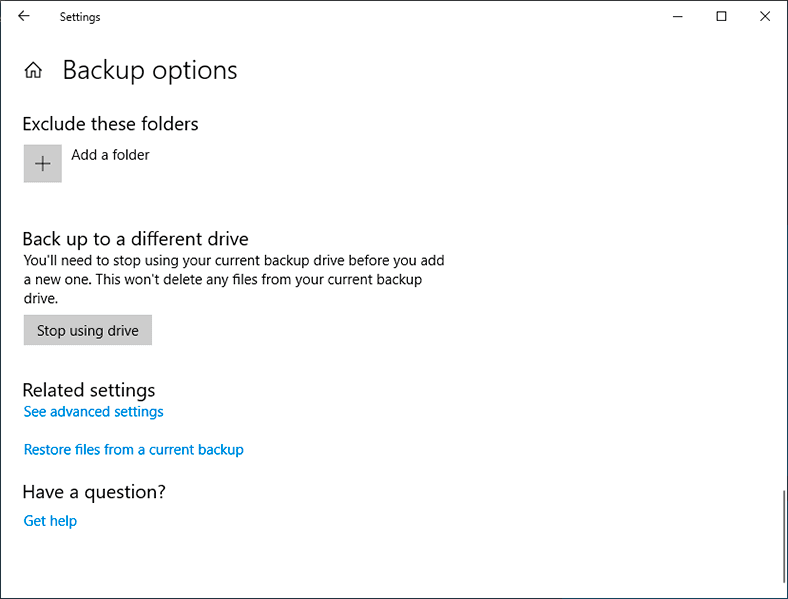
In a new window, you will see all backup options with the folders where backups will be created. In the Backup options window that opens, scroll down to Related Settings and click on the hyperlink Restore files from a current backup.
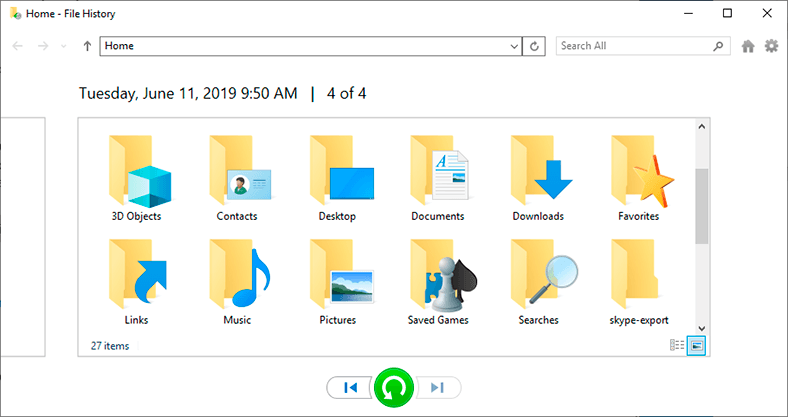
In the new File History window, you will see backup of saved files and folders specified previously in the tool settings. Using the navigation buttons in the lower part of the window you can switch between versions of backups saved for a certain date. In the central window, select the necessary folder and find the files you need, choose them, then click on the green button Restore to original location and finish the file restore process.
Method 4. Recovering Files with Professional Software
The opportunities provided by integrated security tools of the Windows operating system are not always sufficient to restore user files when they are lost. If corresponding settings were not enabled in time, or they didn’t cover all important user files, or the integrated tools haven’t completed data backup before the data was lost (or for any other reasons, your files became unavailable for recovery with standard Windows tools), there is still a universal method to recover deleted files if you use specialized tools.
The leading position in recovering lost data belongs to the well-known professional utility, Hetman Partition Recovery by Hetman Software.
With its up-to-date progressive algorithms for data search and recovery, the program can easily handle tasks in finding and restoring files deleted for a variety of reasons on any devices and in any file systems – and restore successfully almost every bit it can find.
As the flagship product of the company, Hetman Partition Recovery is designed to restore user data lost as a result of various actions that can be classified as follows:
Deleting files accidentally or by mistake: the program will restore any user files deleted by mistake from any HDDs, memory cards of various formats (SD, MiniSD, MicroSD etc.), USB drives and other digital media regardless of their capacity and manufacturer. Similarly, it recovers data from all kinds of computer devices such PCs, laptops, ultrabooks and netbooks, digital cameras etc.
Files lost after disk formatting: quick data recovery from formatted hard disks and other storage devices, deleted or modified partitions, after file system update or modification. Due to the advanced signature-based algorithm the program can restore information completely even when file allocation tables are damaged or missing.
Deleting files permanently: the utility recovers any files deleted with the key shortcut Shift + Delete or in any other of the ways described previously in this article, and after cleaning files with any third-party apps.
Malware effects: the program can successfully analyze and extract user data from infected storage devices, recover data which was corrupt, damaged, blocked or removed after virus attacks and other harmful effects on the hard disk.
Unexpected failures in the work of the operating system: data recovery after system errors and hardware failures, power surges, system app errors, and memory device issues involving firmware errors.
Damaged storage devices: the program can read user data from inaccessible, unreadable, damaged and failed hard disks, and restores access to them regardless of the cause of the problem to enable subsequent data recovery lost or inaccessible due to such problems.
You can learn more about the opportunities provided by Hetman Partition Recovery, and the algorithm applied to recover all kinds of data by watching our step-by-step video guide on YouTube: «How to Recover Deleted Files in 2018 With Hetman Partition Recovery Software».

How to Recover Deleted Files in 2020 With Hetman Partition Recovery Software 📁🔥⚕️
Hetman Partition Recovery has a simple and user-friendly interface made to look very similar to Windows File Explorer so that even novice users with zero experience in data recovery can find their way through the menus.
The program is available for download from the Hetman Software official website. The step-by-step wizard will help you install it to any computer in a quick and efficient way.
When the installation is over, start the program. When started for the first time, Hetman Partition Recovery will run a complete system scan to find all connected storage devices and identify their characteristics for subsequent analysis. By default, the program launches the file recovery wizard to take you step-by-step through the settings required to begin restoring your files.
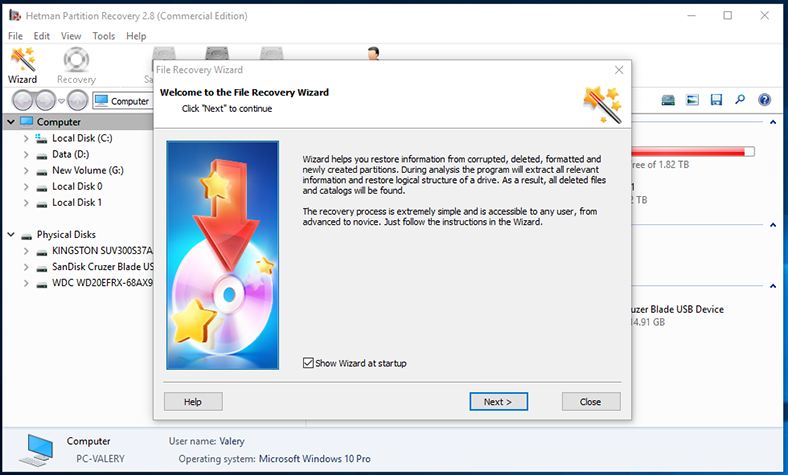
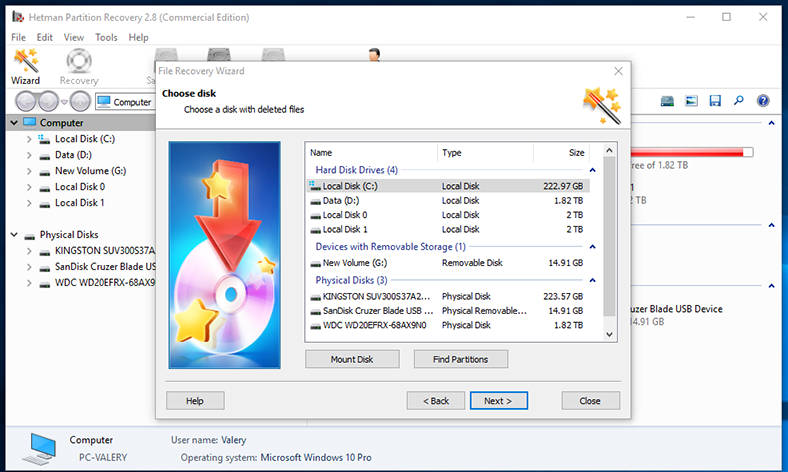
Follow the wizard directions to select a logical volume or entire hard disk to recover files from and click Next to continue.
The following step is to decide on the analysis type for the program to use when searching for deleted information. If you are looking for a way to recover recently deleted files regardless of how exactly they were deleted, the program will offer you a fast scan to find and recover the files. On the contrary, if you need to restore data after formatting a hard disk or other complicated operations on the hard disk, it is better to choose full analysis to find all available data and recover it.
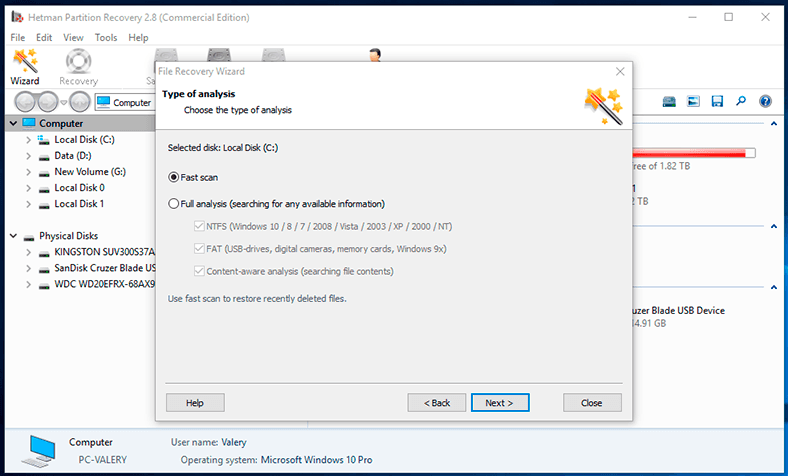
Click Next and start the process of analysis for the storage device with the selected settings.
The progress bar and the estimated completion time will give you an idea on how long the analysis will take. Depending on various factors (disk capacity, extend of the damage to its data, reasons for deleting files etc), the analysis may take from a few minutes to several hours.
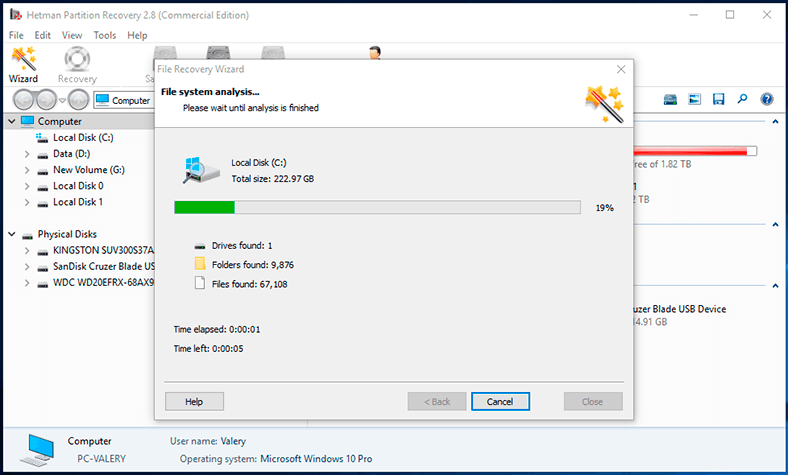
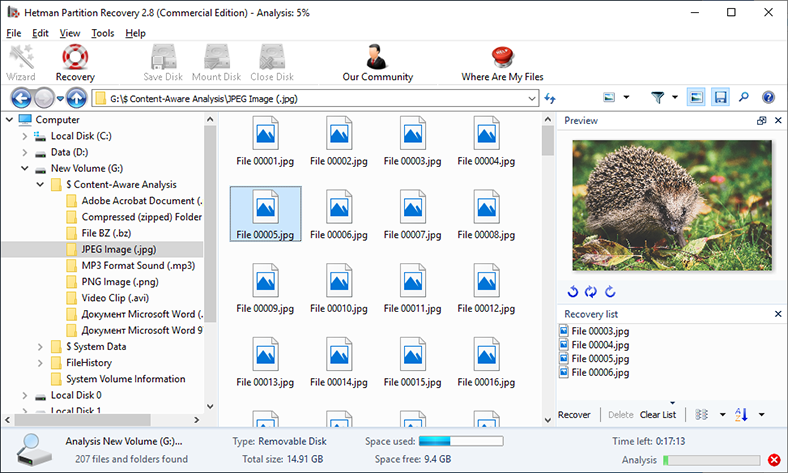
When the analysis is over, the program will display all the files it has found and their directories so that you can choose the ones you would like to restore. The preview function will help you see the contents of each file before you decide on recovery. You can even watch or listen to files in the Preview window. Drag the selected files to the Recovery List and click on the Recovery button.
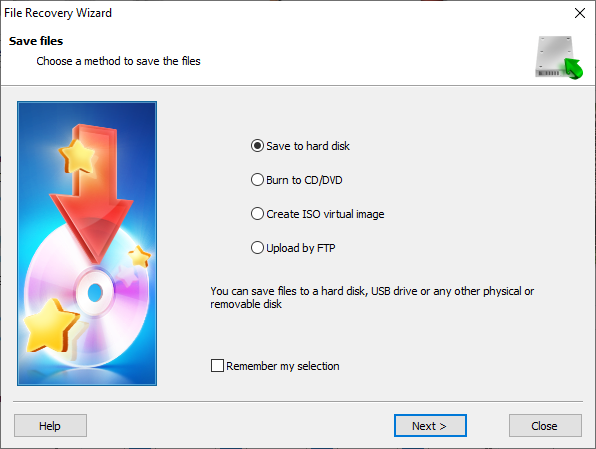
The File Recovery Wizard will ask you to decide on the way you would like to save your files with Hetman Partition Recovery: upload them with the integrated FTP client, create an ISO virtual image containing the files, save the files to an optical CD/DVD or write them to a hard disk or any other media. Check the option you prefer and click Next to continue.
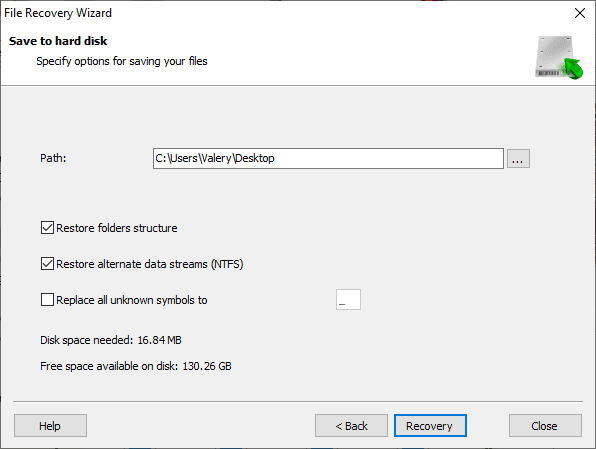
After that, you will need to specify several extra settings depending on how you decided to save the files. Finally, click on the Recovery button to recover and save the files according to the options you have chosen.
Conclusion
The growing amount of information in the present-day world used in everyday activities makes people use all kinds of computer devices capable of processing large portions of data and having high-capacity storage elements to keep it. Therefore, all important data is stored inside computers and takes up enormous amount of their disk space.
No wonder that important data can be deleted by mistake or accidentally while a user is trying to make some more room for extra information. Otherwise, data can be lost due to external influences or after formatting a disk or partition accidentally.
This way or another, any of these scenarios can become an emergency if you have no opportunities to recover the lost data. However, modern versions of Windows have special mechanisms to restore deleted user data as long as certain settings are enabled.
Even if they fail to bring your data back, you can always rely on the multifunctional professional tool, Hetman Partition Recovery, to restore the deleted data regardless of how exactly it was lost.
If you have any questions concerning file recovery after formatting or deleting, don’t hesitate to post a comment under this article. We will do our best to give you a most detailed answer.


