How to Fix ‘The File or Directory is Corrupted and Unreadable’ Error
Resolve “The File or Directory is Corrupted and Unreadable” Error: Fix it Quickly with This Step-by-Step Guide! Encountering the dreaded “The File or Directory is Corrupted and Unreadable” error? In this troubleshooting article, we’ll walk you through the steps to fix this frustrating issue. Whether you’re dealing with corrupted files or directories, our simple solutions will help you get back on track in no time. From checking disk integrity to repairing corrupted files, we’ve got you covered with expert tips and tricks.
- Typical signs of this error
- The main causes behind the “corrupted and unreadable” error
- Solutions to fix the problem with unreadable data and inaccessible partitions
- Advice on safe application of external data storage devices
- Conclusion
- Questions and answers
- Comments
All kinds of information are stored in memory devices and it is important to make sure that users can always access it when addressing the memory device. However, in spite of modern storage devices being very reliable, sometimes there are situations when you can’t do it. Quite often, you may see a notification that a file or directory cannot be accessed because it is damaged or there is a read error. Vitally important information can be damaged or even lost forever which is a serious problem for an ordinary user – frankly speaking, most of us still tend to neglect regular backups. Later in this article, we will focus on the signs and causes of this problem with accessing or reading data from various devices, and offer simple and effective methods to solve the issue.
Typical signs of this error

How to Delete a File That Can’t Be Deleted Because of Write Protection or Denied Access 📁🔥🤔
At least once, most users have faced a system notification for an error saying that a file or directory can’t be read because they are damaged, while trying to connect a USB flash drive, an SD card or another storage device working in Windows 10/8/7/XP/Vista or an earlier version of this operating system.
This is a general way to notify users of a simple error that usually emerges because of removable drive issues when, for certain reasons, Windows can’t process the information stored on such device and display it to the user, or when there is no access to the external memory device.
The direct consequence of such error is that you can’t use this device, the information stored on it, and there is a risk of losing it for good.
There are several causes that may trigger this unpleasant error, and we are going to focus on these below.
The main causes behind the “corrupted and unreadable” error
Main causes of the error indicating inaccessibility of a memory device or problems with reading data from a connected memory device are related to the data itself of possible damage to the storage device, both in terms of hardware of software components.
Errors related to connection issues are less common. For example, a USB port of a computer (which is used to connect the external hard drive) may not work properly, provide only poor contact or be damaged physically. To fix this kind of error just use another, properly working USB port and the access will be restored.
| Cause | Description |
|---|---|
| File System Corruption | The file system of the disk may be corrupted due to improper shutdown, power failure, or system crash. |
| Bad Sectors on Disk | The presence of bad sectors on a hard drive or flash drive can lead to loss of access to files. |
| Virus Infection | Malware can damage files and folders, making them unreadable or inaccessible. |
| Connection Errors | Problems with disk connections (ports, cables) can cause errors when reading files and folders. |
| Hardware Failures | Damage to the hard drive or storage controller can result in the inability to read data. |
| Unexpected System Failures | System crashes during file writing or moving can cause file corruption, making them inaccessible. |
Below, we will analyze the most widespread cases.

Converting NTFS, FAT32 or exFAT USB Flash Drive, External Drive Without Losing Data
Сause 1. Damaged file tables (MFT or FAT)
Talking of Windows operating system which is the most widespread platform in the world providing multiple options to organize full-fledged operation of personal computers and management of computing services, the most widely used file systems are NTFS and FAT.
The main file system MFT (Master File Table) is the cornerstone for NTFS file system which is currently used in the majority of home and office computers and is in charge of most important functions in file storage devices.
It is a kind of a database in the form of a table made up of hidden system files that contain various information vital for full-fledged operation of the OS. For example, tables containing data on the clusters occupied by files and on file attributes, the list of operations involving files, root directory data, information on data segments and mirror files etc.
Also, MFT stores all information on saved folders and files such as size, time, date and permissions. When users remove files from an NTFS partition, entries for such files in the MFT table are marked as free and can be used for writing new data.
The operating system analyzes the MFT data and displays the corresponding files when you access the device. Therefore, if the MFT table is damaged, the operating system won’t be able to access data from NTFS partitions.
The FAT file system is used in flash drives which are mostly known in the form of USB drives and SD cards. At the moment, the widely used file systems are FAT 32, FAT 16 and FAT12. The FAT file system stores and manages data with the help of the special table (File Allocation Table) in the initial part of the system. Put simply, its main function is to show the operating system the location of the files stored on the device. Files are stored in clusters, and every cluster contains an indicator to the next connected cluster so the file can read all file data. Therefore, an FAT error will result in damage to the partition and the impossibility to read data.
Сause 2. An external hard drive or USB drive infected by a virus

How To Remove Pendrive Shortcut Virus From Your USB Drive and PC 💥📁💻
The Internet as a global information network influences greatly the spread and interaction of all kinds of computing devices. People use the Internet daily for all kinds of tasks: view websites for work, study or entertainment purposes, download or install various software, exchange business or personal files, archives, documents, images, receive and send emails, communicate via different messengers and similar apps etc. Thus, it is quite possible that a computing device may be infected by a virus if users visit suspicious websites that may contain malware, or install unknown apps from doubtful sources. Most users are relatively well-informed on the malicious effects of viruses on computing devices and the data they store. Viruses can secretly remove, modify or copy important files, affect or disrupt working processes of an operating system, block execution of programs including antivirus applications, gain control of user devices, erase partitions and volumes, and cause irreversible changes at the software and hardware levels.
In addition, viruses can create their own copies and infect other disks and rives connected to the virus-ridden computer. Therefore, having an antivirus installed on your computer doesn’t mean that your USB drives are free from viruses, because such drives could be also used with other computers lacking antivirus protection or already infected by some malware.
You can learn more about advanced methods for elimination and detection of various malware, and protection strategies for personal computers by watching a video tutorial in our channel: «100% guaranteed removal of any virus: Trojan, rootkit, ransomware, spyware».

How to Delete Any Viruses: Trojan, Rootkit, Ransomware, Spyware For Sure ☣️🛡️💻
As soon as a virus damages the file system of a disk, the partition becomes unreadable and all files on it will be inaccessible for use. To make things even worse, an antivirus cannot extract data from the disk even after the virus is cleaned. That is why it is important to upgrade antivirus software timely and keep its virus signature banks up to date, and scan the USB drives regularly especially when you deal with drives used with somebody else’s devices. What is more, try to avoid using suspicious or unreliable flash drives to reduce the chance of infecting your PC or losing data.
Сause 3. Physical defects in the storage device
Any removable storage device may have difficulties in accessing and reading data. The most widespread cause of the trouble is damaged sectors. A damaged (bad) sector is an unreliable (failing or unreadable) minimal disk space unit of a storage device (hard disk, USB flash drive etc) that can’t be accessed when addressed by the operating system or can’t support read / write functions because of irreparable damage. Often, a bad sector (or cluster containing a damaged sector) appears when writing a block of data is interrupted because of a power failure or errors during the device manufacturing.
Important system information, for example, the file system table, is located in a certain area of the storage device. If such area containing critical data includes damaged sectors, the operating system won’t be able to access the device and read the saved data. As a result, users see system notifications about errors telling that a file or directory is damaged, or that a disk or partition needs formatting.

How to Fix Flash Drive Errors: The Drive Can’t Be Recognized, Wrong Size, RAW File System 🛠️👨💻🤔
Сause 4. Removable drives are not safely removed from a PC
A removable drive may lose vitally important information about the file system due for a number of reasons, the main one among them being a USB drive disconnected form the computer while data is being copied or read.
Most external and removable drives can be safely disconnected using preinstalled options of the operating system. Click on the icon Safely remove hardware and eject media in the system tray (find it in the right lower corner of the desktop next to the Taskbar, and use the context menu to select Eject USB drive.
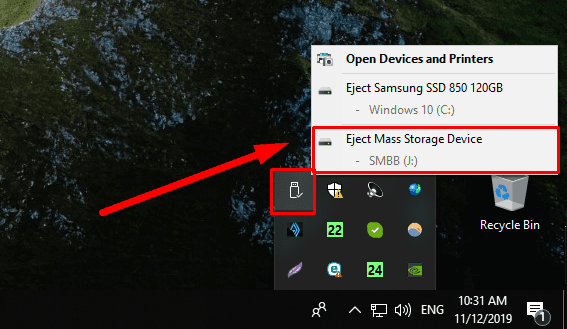
Before doing that, make sure the operating system saved the data or finished transferring data to the drive. If there is a light indicator on the removable drive and it shows the disk is still in use, wait a little until the indicator stops blinking, and go on with removing it safely.
Solutions to fix the problem with unreadable data and inaccessible partitions
The Windows operating system includes all kinds of preinstalled tools meant to ensure safe operation of the computer and effective troubleshooting. To fix an error related to inaccessible external storage device or impossibility to read / write data, Windows has two effective options, and we will have a closer look at their functionality a bit later.
Solution 1. Checking and recovering damaged file system, fixing disk errors

How to Check Your Hard Disk for Errors and Fix Them in Windows 10 🔎🛠️🗄️
The first thing to be done when you encounter an error of file / directory being damaged and unreadable is to runs a system check to find and fix any issues. For this purpose, the Windows operating system includes a standard tool, CHKDSK, which can check the hard disk or any other storage device for file system errors and fix any issues it can find, detect lost clusters, diagnose directory problems, identify physically damaged sectors and restore their contents.
By default, the CHKDSK application does not correct errors and does not check the drive for damaged sectors. To fix the errors, you should give certain commands (flags), each of them initiating a certain action.
Generally, the CHKDSK application looks like this:
CHKDSK (volume name:) (flag)
- CHKDSK – the command tells the system that is is necessary to check the drive with this application, and when run without extra attributes, only runs a general check on the selected drive.
- [volume name] – it sets the partition name for the checked drive or the entire drive name with a colon (for example, Е:);
- [flag] – the command to perform a specific action.
The CHKDSK command for correcting drive errors and file system damage will look like this:
CHKDSK D: /F /R
-
CHKDSK – the command to start the application;
-
D: – the name of the faulty drive;
-
/F – the flag tells the application to run disk diagnostics, find errors and fix them automatically;
-
/R – this flag is only used with the previous flag /F, and it makes the application look for damaged sectors and restore their contents.
Check the drive with the CHKDSK application in Windows 10 / 8.1 / 8 / 7, using the step-by-step algorithm demonstrated here.
Step 1: Open the Run window in any way you like. For example, click on the Start button in the lower left corner of your desktop on the Taskbar and open the main Windows menu. Use the scroll bar to examine the list of available apps, find the group Windows System and open the nested menu to select Run.

Otherwise, use the keyboard shortcut Windows + R to open the Run dialogue box.
Step 2: In the Open filed of the Run dialogue box, type cmd to start Command Prompt, then click ОК or press Enter on the keyboard.
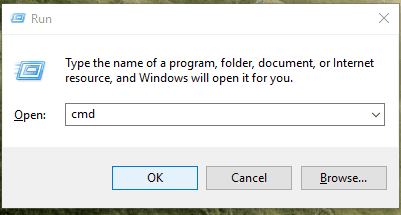
For Windows operating systems in versions 8.1 / 8 / 7 you need to start Command Prompt with administrator rights. Click on the Start button in the Taskbar, type cmd in the search field, right-click on the result cmd.exe, and select “Run as administrator” from the menu.

Step 3: In the Command Prompt window, type the command CHKDSK D: /F /R to search and eliminate errors by replacing the disk letter D: in our example with the corresponding disk letter of your device, and then press Enter on the keyboard to set things going.
CHKDSK D: /F /R

Finishing the process of diagnosing and fixing errors may take some time which depends directly on the number of files and folders, the read / write rate of the specific drive, system resources, volume capacity and other things.
When the command is performed, Windows will show you the report on detected errors and correction results.
Solution 2. Formatting a partition or volume without losing data
Before you move on to another method of correcting errors in accessing the disk or reading data from there, you should decide on the importance of the information that the faulty device contains.
If the files in the unreadable partition are not too important, formatting it is the quickest and easiest way. The process of formatting builds a new file system in the memory device and replaces the old and damaged file system, at the same time fixing most possible errors. The drawback of formatting is that it removes all existing data from the partition and affects prospects of future data recovery - if it becomes necessary. If you are not worried about ensuring data integrity for all the files on the faulty memory device, skip this stage and move on to the next one.
On the contrary, if the data in the inaccessible partition is important and losing it is a critical issue, you should use third-party tools to recover the files.
Stage 1: Recover data with specialized software
In the market of data recovery software, there are many interesting offers from various developers that promise recovering data after removal or other mishaps. Depending on the qualifications of programmers, tools and algorithms used to detect and recover data, the list of software products is very long. However, by the percentage of successfully restored data and recovery opportunities as well as by results of independent tests by trusted companies and positive feedback from end users, the leading position belongs to Hetman Software and its flagship product, Hetman Partition Recovery.
With the progressive scan methods, innovative approaches to locating lost data and signature algorithms applied to find the beginning and the end of file under most complicated circumstances allowed Hetman Partition Recovery to gain global recognition and recover lost or removed data successfully in the vast majority of cases.
The program includes a variety of pre-installed tools and their combined work lets you recover any files removed from a hard disk or other storage devices regardless of their capacity and manufacturer, restore data from desktop computers, laptops and other personal computing devices even if hard delete methods were applied (for example, key shortcuts Shift + Delete and emptying the Windows Recycle Bin) or files were erased with a third-party specialized app.
The program’s additional advantage is restoring user information after formatting disks and partitions, their removal or modification of their file system, even if file tables are empty or missing, recovering data from unreadable, inaccessible, damaged or corrupted disks and providing access to lost and inaccessible files and folders.
Similarly, Hetman Partition Recovery can cope with restoring data after an operating system crash, hardware failures, physical defects of a memory device, and can save destroyed, removed, blocked or damaged information after virus attacks or damage to the system structure of a drive.
The algorithm for recovering inaccessible data is pretty simple and includes several steps.
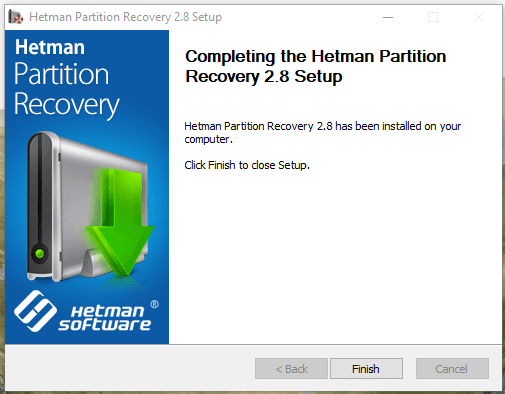
Step 1: Visit the official website of Hetman Software to download a setup file for Hetman Partition Recovery and launch it on your computer. The step-by-step installation wizard will help you quickly deal with the program settings and install it.
Step 2: Double-click on the program’s shortcut on the desktop or in the Start menu and open the program. When it starts for the first time, it scans the computer and searches for all connected storage devices including disks with inaccessible information. The program’s interface is very similar to that of Windows File Explorer, which makes it easy to use even for beginners who lack expertise in the field of data recovery.
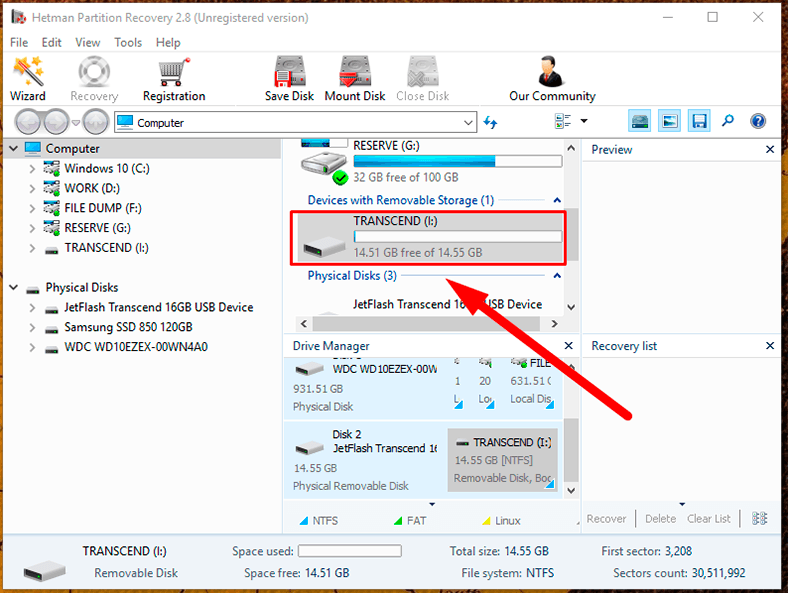
Step 3: In the main window, select the necessary disk and double-click on it. It starts the File Recovery Wizard, which will suggest you to specify the required analysis type for the selected disk. Hetman Partition Recovery lets you choose between the two options, Fast scan and Full analysis. Fast scan is good for locating and recovering recently deleted files. In case of damaged file system, inaccessible memory device and data that can’t be read, go for full analysis able to find and recover all the data. Select the analysis type and click Next to start the process.
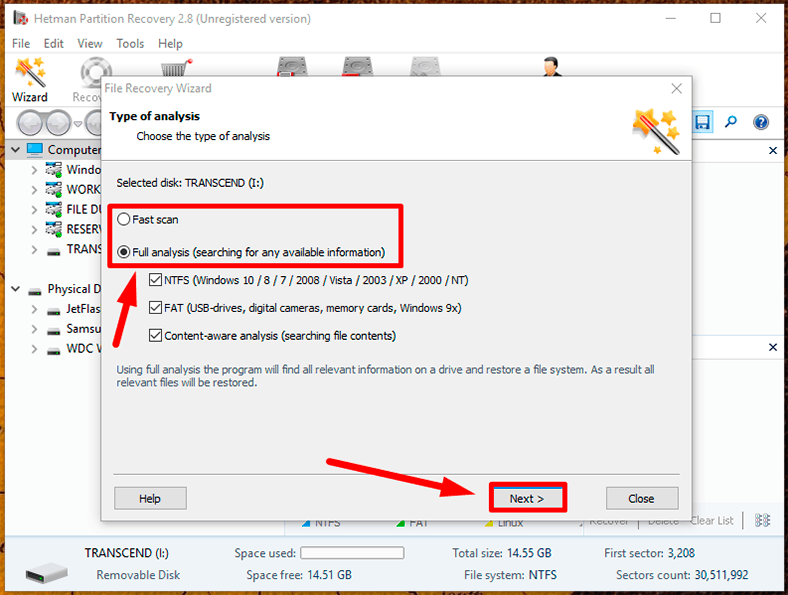
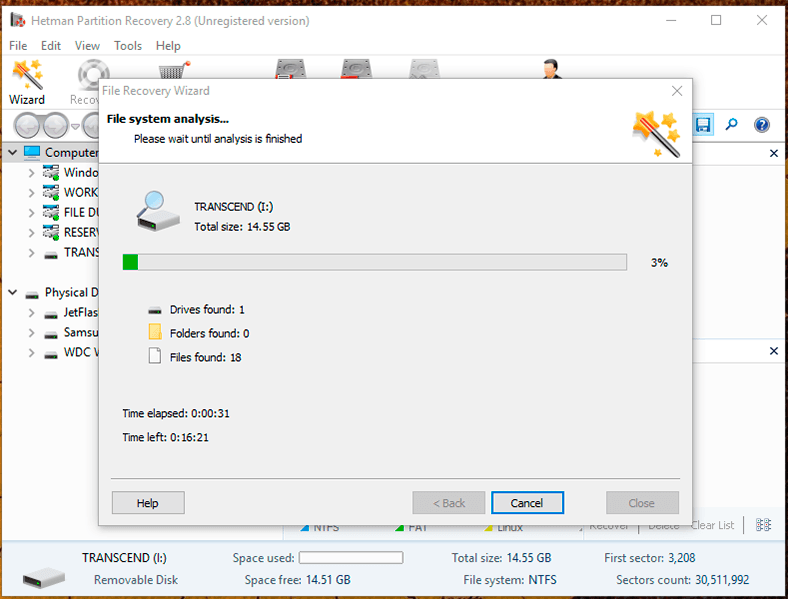
Step 4: Wait until the selected disk is analyzed. The time required for the analysis may differ greatly depending on many factors, such as drive capacity, extent of damage to the data and the device, the cause of the problem, read and write rates etc. You can watch the analysis progress bar in real-time mode and see the estimated time need to complete it.
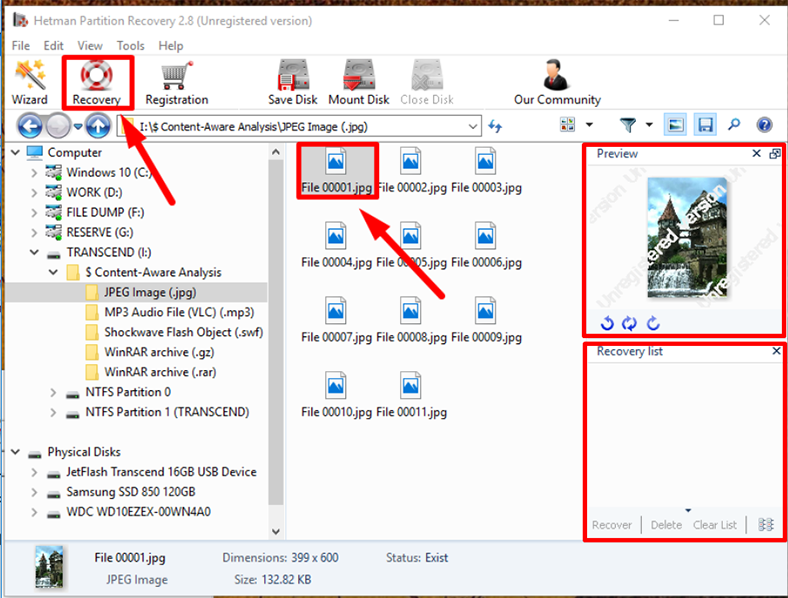
Step 5: When the analysis is over, the program will show you all discovered files and folders in its main window. Click on any file to see its contents in the auxiliary Preview window. You will be able to view any documents, archives, databases, images and even watch videos or listen to music files and select the ones you need to bring back. Having selected the necessary files and placed them onto the Recovery List by dragging and dropping, click on the Recovery button fashioned like a life ring and located in the main panel.
Step 6: Hetman Partition Recovery launches the File Recovery Wizard, and it will suggest you to decide on the method for saving the selected files.
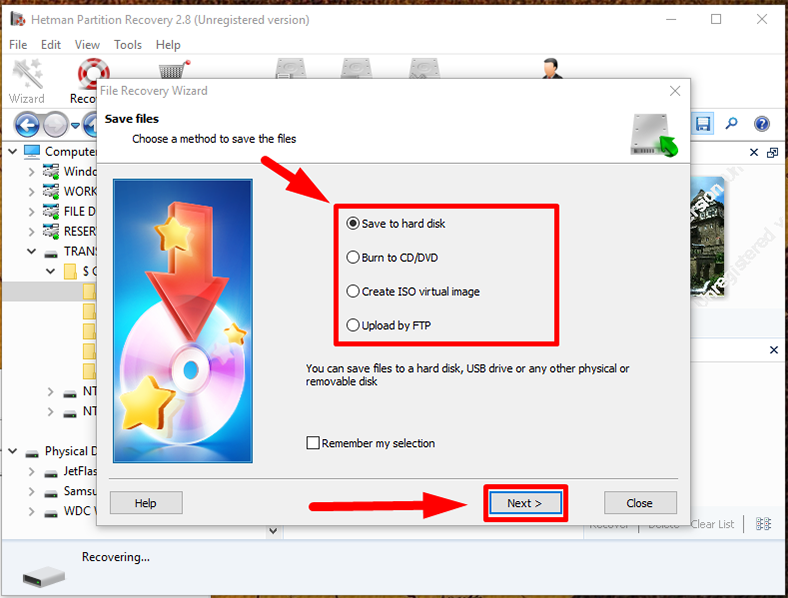
Check the option you prefer and click Next to continue and save the files.
Step 7: Give the path to save the files and specify several settings depending on the saving method you have chosen.
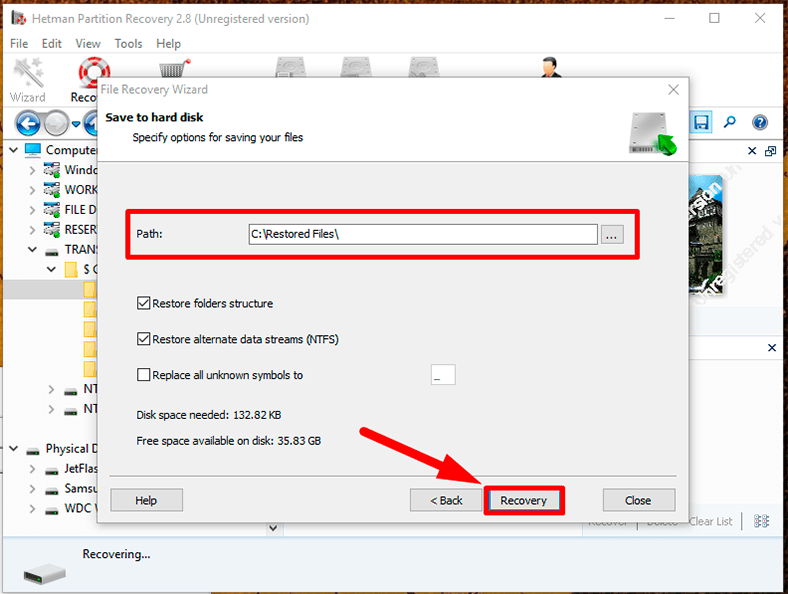
Then click Recovery and wait for the process to be over. Now all the files have been recovered and saved according to your preferences, and are available for any actions you’d like to take.
Now that the files are recovered, you need to move on to the next stage and format the device to restore its operability.
Stage 2: Format the inaccessible disk
You can use various methods to format a memory device, the easiest and fastest being to use the Windows File Explorer. Of course, you can use third-party apps which are aplenty on the Internet but the features offered by the Windows operating system are quite sufficient to format the disk and write user data. That is why it is hardly recommended to additionally install other tools as long as they perform the same functions as you can find inside your Windows.
Here is the sequence of actions in formatting an inaccessible disk:
Step 1: Open the Windows File Explorer in any way you like, for example, by double-clicking This PC on the desktop, and select the disk you want to work on.
Step 2: Right-click on it and open a pop-up menu, and select Format from the list of possible actions.

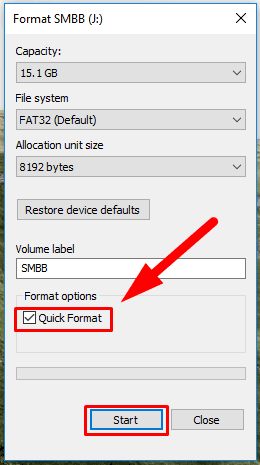
Step 3: In the window that opens select the file system type and allocation unit size. Otherwise, leave the default format settings suggested by the operating system (Windows suggests most suitable settings for every device based on its hardware features). Also, enable quick format by checking the box for Quick format. Then click Start to begin disk formatting.
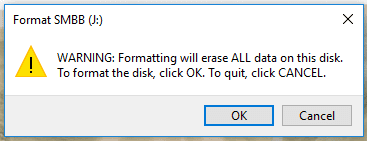
Windows will remind you of the danger to remove all data permanently from the selected device and will ask you once more if you really want it. Confirm your decision to format the drive by clicking ОК in the notification, and the drive will be formatted.
When the process is over, the issues in accessing the disk and reading its data will be fixed, so the memory device will be ready to use again.
Advice on safe application of external data storage devices
- Using a backup option regularly will reduce the chances for permanent loss of files after an error notification appears. As long as there is a backup for your files, you can also use it to restore the missing files as of the date when they were last saved. Hence, creating backup files is an essential element in protecting important data from unforeseen damage.
- Do not start formatting operations if the damaged partition contains important data. The primary purpose of restoring files and directories is to improve their chances for successful recovery. The matter is, after formatting some part of data may be overwritten, and a certain portion of information won’t be recovered.
- Treat your removable drives carefully and protect them from physical damage or impact. Don’t expose them to high temperatures, do not apply too much force when connecting or disconnecting them from the computer, protect them from excessive vibration or physical effects. Try to use a protective cover when you need to transport them.
- Update your antivirus to the latest version to avoid file damage by viruses or other malware.
- Use the function Safely remove hardware and eject media when disconnecting devices from the computer to prevent possible issues and avoid loss of data.
Conclusion
Removable drives are more prone to risks of getting damaged due to being often connected and disconnected to various devices and used on the go, unlike the hard disks which spent their lifetime fixed inside the system unit. Hence, removable media experience problems with access or reading / writing data more often than other storage devices.
The error indicating problems with access or reading / writing files or directories may be especially dangerous as it prevents users from accessing the storage device and makes all data inside it permanently lost, which is especially nasty if that data exists in the only copy.
Regardless of the causes that triggered the error, you can always fix the issue with the integrated CHKDSK app you can find in any version of Windows.
In some cases, when the error can’t be fixed, using the standard format function will eliminate the error and prepare the storage device for writing new data.
However, if you need to recover lost information from an inaccessible device, don't start formatting until you have used the effective third-party data recovery tool, Hetman Partition Recovery, and restored the lost information.


