How to Retrieve Your Data From a Windows Image Backup
Discover the essential guide to restoring files from a Windows image backup in this comprehensive tutorial. If you’ve lost important data or need to recover files from a previous Windows image, don’t worry. We’ve got you covered with expert solutions and step-by-step instructions to retrieve your data effortlessly.

How To Create a Recovery Image and Restore Your System From Windows 10 Image ⚕️💻🤔
- Overview of the Problem
- Connecting a VHD Disk Containing a Backup System Image Copy
- Questions and answers
- Comments
Overview of the Problem
It is recommended to create a backup system image copy before modifying the hardware configuration of a computer, when updating the system, installing new drivers and so on. If something goes wrong, a backup system image copy will allow you restoring the system to the operable condition of Windows. However, when restoring from such image all the information on the system disk is erased by the image files. What should we do if we need only some files to be restored from the system image?
Fortunately, this task is rather easy. The matter is that the standard system of creating a backup system image copy in Windows 10 is based on the concept of virtual disks (Virtual Hard Drive). That is, images are recorded and stored as virtual drive files in the format vhdx (Virtual Hard Drive). Such virtual drives can be easily mounted with standard features of Windows 10 and be operated as ordinary drives within the system. Attaching such disk to the system, a user can restore from the backup system image separate files and directories.
Connecting a VHD Disk Containing a Backup System Image Copy
System image is usually backed up to a separate physical disk or a network folder. That is why the first thing to do is to connect to the computer a media containing a backup copy of Windows 10 image (or connect a network folder).
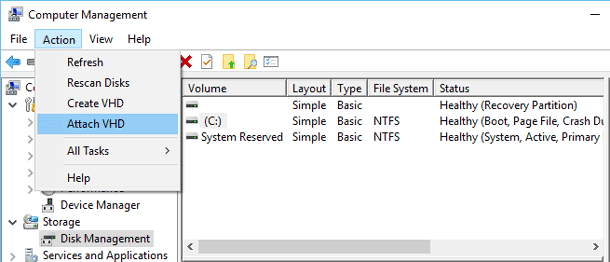
Open the computer management console Computer Management and go to disk manager Storage -> Disk Management (this console can be launched from the menu WinX by pressing the key combination Win + X and selecting the item Disk Management). In order to mount a vhd virtual disk select the item Attach VHD in the Action menu.
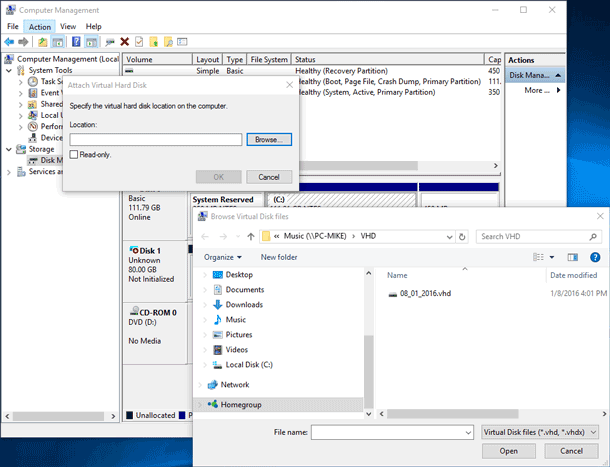
In the window that appears click Browse and specify the path to vhdx file. This file is usually stored on a drive that contains a backup system image copy in the directory with a name in the following format:
[Backup_Drive]:\WindowsImageBackup\[PC_Name]\Backup xxxx-xx-xx xxxxxx
In our example, complete path to the vhdx file is as follows:
\\[PC_Name]\VHD\08_01_2016.vhd
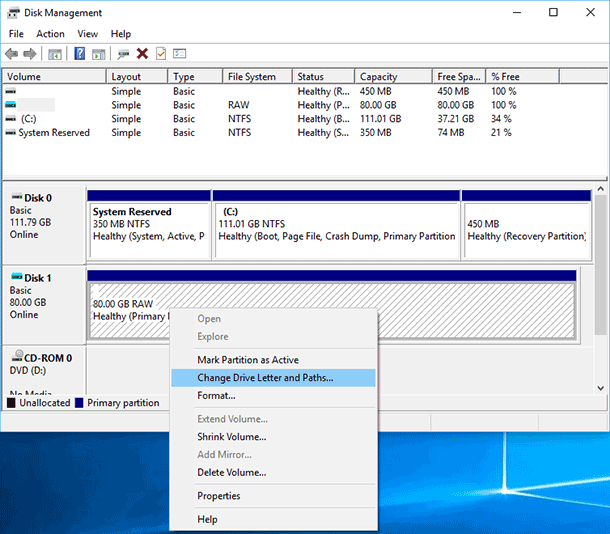
After the virtual drive has been mounted it has to be assigned a drive letter. To do it, click the right mouse button on the drive and select the menu item “Change Drive Letters and Path”.
In the window that opens click Add and assign any letter to the drive, for example, E:
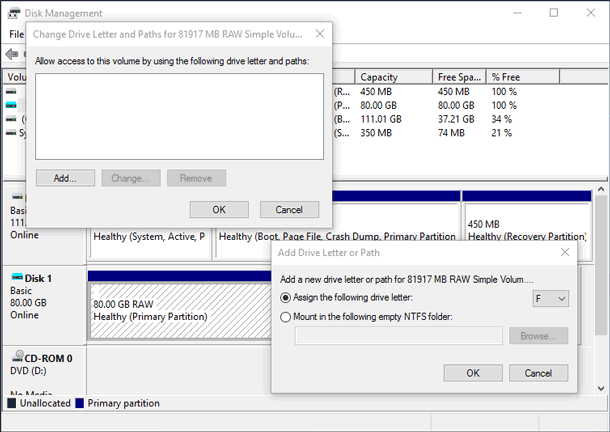
After this operation, a new drive will appear in the system, to which letter E:\ is assigned. Open in with Windows Explorer or any file manager and find the files that need to be restored.
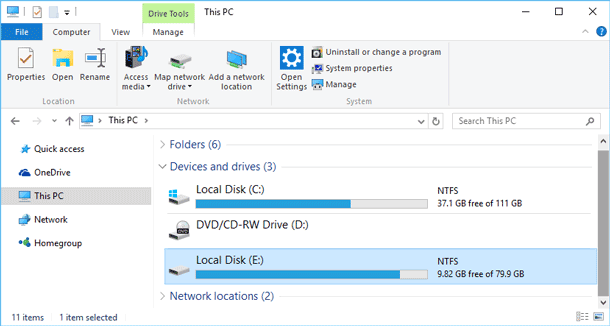
Advice. User documents (photos, videos, music and other documents are usually saved to user’s profile in the directory E:\Users\{user_name}.
After you have found and copied the necessary files, the external disk can be disconnected and as a result, the virtual vhd disk will also disappear from the system. Separate files from the system image can be recovered in the same way in Windows 7 and 8 as well.
If suddenly happened the lost of VHD image of Windows (for example, accidentally or intentionally deleted) it can be recovered by Hetman Partition Recovery. After recovering it with data recovery software you can restore individual files by stated above algorithm.
| Step | Action | Description |
|---|---|---|
| 1 | Install Hetman Partition Recovery | Download and install Hetman Partition Recovery. |
| 2 | Attach VHD Image | Mount the lost or corrupted VHD file to the system using Disk Management or any third-party tool. |
| 3 | Select the Virtual Drive | Launch the software and choose the mounted VHD image from the list of available drives. |
| 4 | Scan the VHD Image | Perform a quick or deep scan to locate deleted or lost files within the VHD image. |
| 5 | Preview Files | After the scan, review the list of recoverable files and preview their contents to ensure integrity. |
| 6 | Recover Files | Select the required files and save them to a secure location on a different drive. |
| 7 | Ensure Backup | After recovery, ensure regular backups of VHD files to prevent data loss in the future. |


