Save Your Work: How to Swiftly Recover an Unsaved Microsoft Word Document
In this article, learn how to instantly recover an unsaved Microsoft Word document. Losing your work can be frustrating, but with our expert tips and techniques, you’ll never have to worry about lost data again. Whether you’re a student, professional, or anyone who uses Word, this guide will save you time and stress.
Let us consider several simple ways to recover unsaved Word documents.
- Method 1. Automatic Recovery in MS Word
- Method 2. Recovery With Autosave Folder
- Method 3. Recovery of an MS Word Document Deleted From The Disk
- Questions and answers
- Comments

📖 How to Recover an Unsaved or Lost Word, Excel Document or PowerPoint Presentation in 2021 ⚕️
Method 1. Automatic Recovery in MS Word
Whatever happens – a common error, a sudden reboot (without warning you), a power failure and a total blackout for your entire block of flats – the most important thing is never give way to panic!
By default, Microsoft Word is “smart” enough to try automatic recovery of the document (in case of a disorderly close-down, i.e. close-down without the user’s permission).
After a PC is suddenly shut down and then started again, the application usually suggests saving any unsaved documents. The picture below shows how it looks in MS Word 2016 (in other versions of MS Word, the picture will be similar).
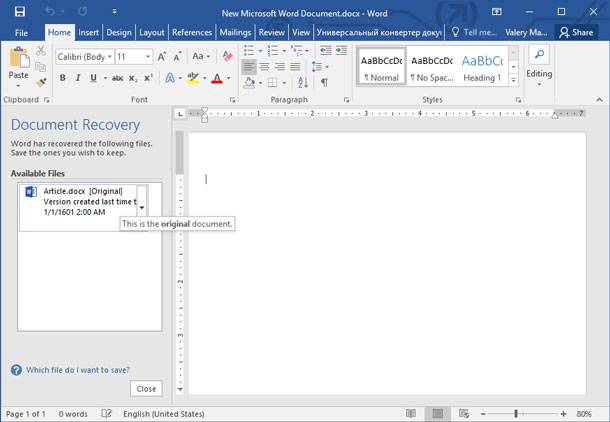
Important notice! MS Word suggests recovering files only after the first restart after a disorderly closedown. That is, if you opened MS Word, closed it and then opened it again, it will not ask you about recovery options again. That is why I recommend you to save everything you need for further work, as soon as the application offers you to do so.
Method 2. Recovery With Autosave Folder
Above, we mentioned that Microsoft Word is smart enough by default. If you haven’t modified its settings, the application will save the document automatically every 10 minutes to a “backup” folder (a kind of protection against emergency situations). It seems completely logical that the second thing you should do is to check if the lost document is in that folder.
How do you find it? Here is an example with MS Word 2016.
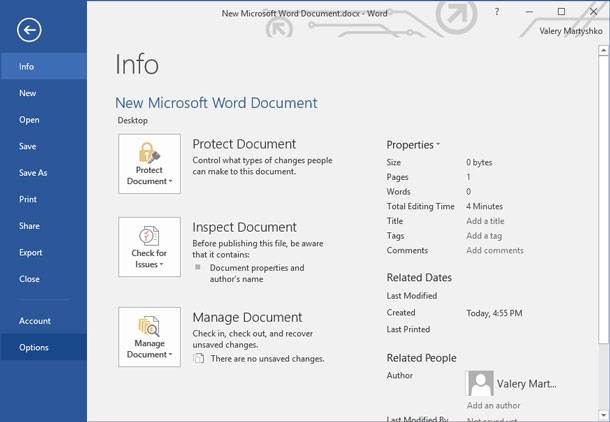
Click the menu “File / Settings” (see the screenshot below).
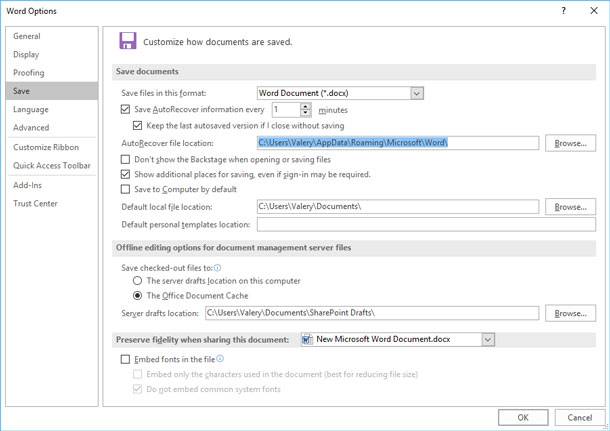
Then, select the “Save” tab. There we can find checkboxes we are interested in:
- automatic saving of documents every 10 minutes (you can modify it to the value of 5 minutes, if you experience frequent power failures);
- data directory for autosaving (that is what we need).
Just highlight and copy the address, then launch Windows Explorer and paste the copied data into the address bar. You may be lucky enough to find what you need in the directory that opens.
Method 3. Recovery of an MS Word Document Deleted From The Disk
This method will help you in the worst cases, when you used to have a file on the disk but it has disappeared now. It can happen for a number of reasons: a viral attack, accidental deletion (all the more that Windows 8 and 10, for instance, do not ask by default if you really want to delete the file when you press Delete button), disk formatting etc.
There are a vast number of applications designed to recover files, but there only a few of them specialized to work with office document formats or Microsoft Word in particular.
| Feature | Hetman Partition Recovery | Hetman Office Recovery | Hetman Uneraser |
|---|---|---|---|
| Purpose | Data recovery from damaged, deleted, or formatted disk partitions. | Recovery of deleted or damaged Microsoft Office documents, PDF files. | Recovery of deleted files of popular formats. |
| Target Audience | Users who have lost access to partitions or entire disks. | Office workers, scientists, students. | Users who have lost files. |
| Supported File Types | All file types (documents, photos, videos, etc.). | Documents: DOC(X), XLS(X), PPT(X), PDF, RTF, TXT, CSV. | All known file formats. |
| Recovery Methods | Quick and deep scan, partition structure recovery. | Quick and deep scan focused on office files. | Search and recovery of deleted files. |
| File Systems | FAT/exFAT, NTFS/ReFS, APFS/HFS+, Ext2/3/4/ReiserFS, XFS/UFS, ZFS/Btrfs, VMFS, HikvisionFS. | FAT/exFAT, NTFS/ReFS, APFS/HFS+, Ext2/3/4/ReiserFS, XFS/UFS. | FAT/exFAT, NTFS/ReFS, APFS/HFS+, Ext2/3/4/ReiserFS, XFS/UFS. |
| Interface | User-friendly graphical interface with step-by-step wizard. | Simple interface focused on office files. | Optimized for working with deleted files. |
| Additional Features | Virtual machine recovery, disk image creation. | Document preview before recovery. | Preview of photos, videos, and documents before recovery. |
Within this article, we would like to mention one of the best and at the same time simplest software products, and its more comprehensive version designed to deal with all office file formats, Hetman Office Recovery.

🔥How to Recover Deleted Word (DOC, DOCX) Documents With Hetman Word Recovery Software in 2021⚕️
What you should not do before recovery:
- do not copy to the disk (where some documents/files were lost) any files, and try not to work with it;
- do not format the disk (even if it is shown as RAW and Windows suggests that you should format it);
- do not recover files to that disk.
Many people recover files to the same disk where they were lost from and which is scanned for lost files: it’s something you mustn’t do! The matter is that when recovering a file to the same disk it may be overwritten onto files which are not recovered yet. As a result, a part of such files may become unreadable (or partially unreadable).

🔝 Top Tools to Recover Deleted Documents (Microsoft Office, OpenOffice, LibreOffice and Others)


