Understanding Disk Usage: Where Has The Free Space on Your HDD Gone?
In this article, we’ll unravel the mystery of disk usage and help you understand where your free space has gone. From hidden system files and temporary caches to large media files and forgotten downloads, we’ll explore the common culprits behind disappearing disk space. Understanding these factors can empower you to reclaim lost space, optimize your storage usage, and prevent future disk space shortages.

How to Clean The System Drive in a Computer or Laptop With Windows 10, 8 or 7 🔥💻⛏️
Usually such loss of space is not connected to any malware or viruses. More often, Windows itself is the reason, because it tends to use any free space for a variety of purposes, such as storing backup setting copies (to enable restoring Windows in case of a failure), swap file, remaining junk files etc. This article is going to deal with these causes and ways to eliminate them.
- Step 1. Searching For Big Files and Folders
- Step 2. Windows Restore Settings
- Step 3. Paging File (Swap File)
- Step 4. Deletion of Junk and Temporary Files
- Questions and answers
- Comments
Step 1. Searching For Big Files and Folders
This is the first issue to be faced in case of free space shortage. Certainly, you can try searching manually for the folders and files that take up the most space on your hard drive, but it can be long and ineffective.
Things look quite different when you apply special utilities to analyze the used space in your drive. There are many of them to help you find the folders and files that clog your precious space.
The usual culprits are most often as follows:
- system functions: system restore, page (swap) file;
- system folders containing various junk files (that nobody cared to clean for such a long time…);
- games installed and forgotten, that none of the computer’s users is going to play;
- folders with music, films, pictures and photos. By the way, so many users have hundreds of music and picture collections that contain duplicated files. It is recommended to delete such duplicates.
How can you eliminate the abovementioned problems?

🚀 How to Increase C Drive Space By Taking Space From D Drive in 2021 🗄️
Step 2. Windows Restore Settings
Generally, having system backup copies is good, all the more when you sometimes have to use system restore points. Yet work becomes not too comfortable when such backups are beginning to take up more and more space on your hard disk: regularly, Windows would notify you that there is very little free space left on your system disk, and in addition, this can affect overall system performance.
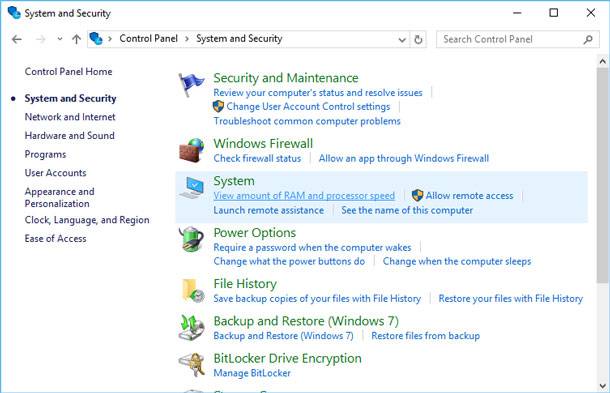
To disable creation of system restore points (or limit the space they will take up on your HDD) in a Windows OS, go to Control Panel, select System and Security, then go to System tab.
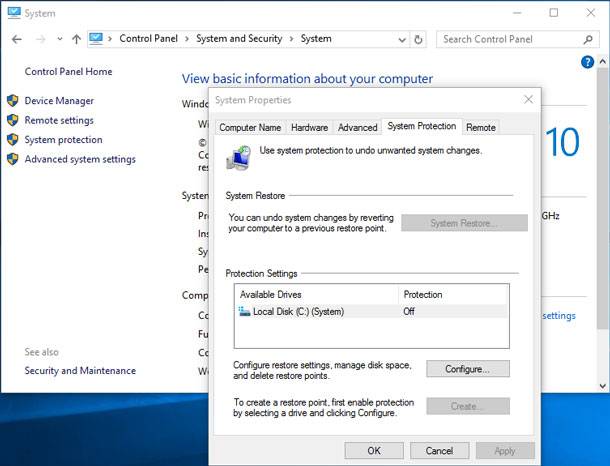
In the sidebar on the left, click “System Protection.” The window “System Properties” should appear.
This is where you can set (by choosing a disk and clicking “Configure”) the amount of space allocated for system restore points. With the help of Configure and Delete buttons you can quickly reclaim more space in your hard drive and limit the number of megabytes allowed for restore functions.
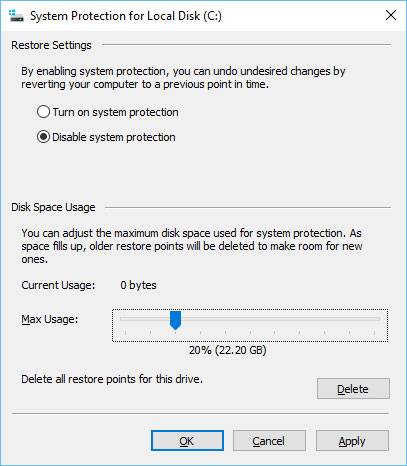
By default, such operating systems as Windows 7, 8, 10 enable system restore points on the system disk and set the value of the space allowed for them about 20%. That is, if the volume of your system disk where you have installed the system is 100 GB, then about 20 GB will be allocated for restore points.
If there is not enough space on your HDD, it is recommended to move the slider to the left in order to reduce the amount of space allocated for system restore points.
Step 3. Paging File (Swap File)
Paging file is a special area on the hard disk that your computer uses when it runs out of RAM – for example, when working with high-resolution video, graphic editors or playing resource-intensive games etc.
Naturally, reducing the size of this file may pull down your computer’s performance, but sometimes it is expedient to transfer the paging file to another hard disk or set its size manually. By the way, usually its recommended size is about twice as large as the size of your actual RAM installed.
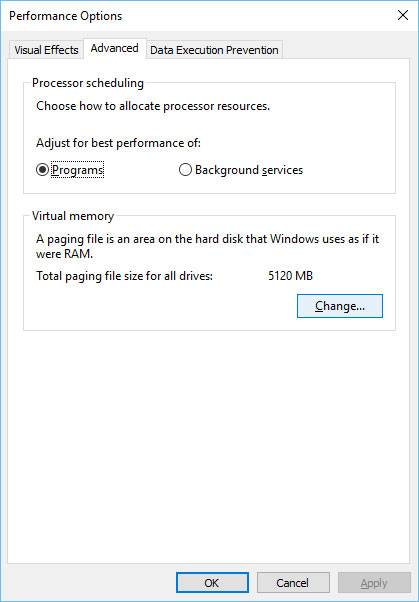
To edit the paging file, go to Advanced tab (it can be found next to Windows restore settings). Click on the “Settings” next to Performance.
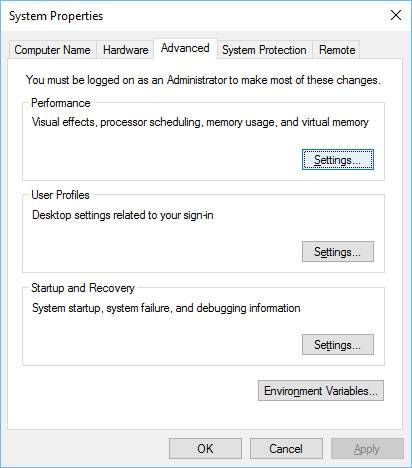
In the Performance Options window that opens select Advanced and click “Change”.
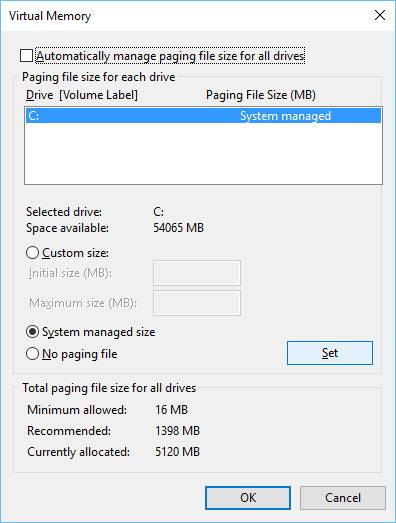
After that, uncheck the box “Automatically manage paging file size” and set its size manually. At the same time, you can specify the hard disk where the paging file should be located – it is recommended to have it on the other disk than your system disk (this can help to improve your computer’s performance a little). Then you should save the new settings and reboot your PC.
Step 4. Deletion of Junk and Temporary Files
Such files are usually understood to be:
- Browser Cache. When you view web pages they are copied to your hard drive in order to enable quick download of frequently visited websites. It sounds reasonable to do without downloading the same elements again and again but just compare them with the authentic ones, and if everything is similar, they will be uploaded to memory from the disk instead of from the web.
- Temporary Files. Here are the folders with temporary files that take up most space:
C:\Windows\Temp
C:\Users\Administrator\AppData\Local\Temp (where “Administrator” is the name of the user’s account)
These folders can be cleaned as they store the files required for a program to work at a certain time: for example, during installation.
- Various Log files and So On. Cleaning all this junk manually is neither quick nor easy. There are special utilities that make a quick and clean job of getting rid from all kinds of junk. I would like to recommend using them, from time to time.
Even antivirus software can eat away your precious space… First of all, check their settings, see what you have in the quarantine folder, log files etc. Sometimes there are many files infected by viruses and sent to the quarantine, and then the quarantine begins taking away so much space.
After all, antivirus software also has all kinds of log files, dumps etc. if space shortage is your problem, we recommend paying some attention to them as well…

Programs to Clean Your Hard Disk and Registry from Junk Files in Windows 10, 8, 7 💻🔥📁
In conclusion, we would like to add that before getting down to cleaning your hard disk, try to estimate how much free space you need and what files can be deleted without the risk of needing them in the future or affecting your work or overall system performance.
Keep in mind that the files deleted by both Windows standard tools and third-party cleaners do not go to the recycler, and therefore cannot be restored.
Yet if you find yourselves caught up in the cleaning process and suddenly face absence of necessary files, you can always use one of the file recovery programs.


