Boot Configuratin Data (BCD): Backup and Recovery in Windows
Explore the essential guide to BCD backup and recovery in Windows in this comprehensive tutorial. Whether you’re a novice or an expert, understanding how to safeguard and recover your system’s boot configuration data is crucial. Join us as we demystify the process and equip you with the knowledge to protect your Windows system effectively.

The System Won’t Boot. Recover Windows Bootloader with bootrec, fixmbr, fixboot commands 👨💻⚕️💻
- Step 1. Overview of the Problem
- Step 2. BCD Storage Backup
- Step 3. Re-creating BCD Storage
- Step 4. Recovering BCD Storage From a Backup File
- Questions and answers
- Comments
Step 1. Overview of the Problem
The boot manager executes the loading procedure in accordance with the existing configuration which is kept in a special storage of configuration data, BCD (Boot Configuratin Data). This storage is a special binary file named BCD, located in the BOOT directory of the active partition (it is the same “hidden” partition marked as a “System Reserved”).

How To Create a Recovery Image and Restore Your System From Windows 10 Image ⚕️💻🤔
The boot manager bootmgr loads the core of Windows OS installed on the computer, in accordance with the loading into BCD storage. Besides that, based on the BCD configuration the loader can load other Windows OS which are installed on this computer, Linux-type OS, mount and load from a virtual drive file (if the system is installed on a vhd disk) or from .wim image.

BCD storage is somewhat similar to the boot.ini file that contains loading parameters which we know back from the days of Windows XP /2000. Yet you cannot modify the file with the help of a text editor. Modifying the BCD storage editor is possible with a special command prompt utility, Boot Configuration Data Editor — bcdedit.exe (it is located in the directory c:\Windows\System32).
It should be understood that correctness of loading Windows OS depends on accuracy and consistency of the information in BCD storage. If this file is damaged or deleted, Windows will not able to load correctly. That is why in any experiments with BCD storage (installation of an additional OS with dual-boot or multi-boot options, adjustment of additional loading parameters), it is recommended to backup the BCD storage configuration so that you can recover it if something goes wrong.
In this article, we will consider the methodology for BCD storage backup and recovery in Windows 10.
Step 2. BCD Storage Backup
Launch the command prompt with administrator privileges and execute the following command:
bcdedit /export e:/bcd_backup.bcd
In this example, BCD storage configuration will be exported to disk E:\ (it is ideal that this disk should be an external storage media or a USB drive) into the file bcd_backup.bcd.

How to Run Command Prompt as Administrator in Windows 10, 8 or 7 💻⌨️👨💻
Step 3. Re-creating BCD Storage
In case there was an error in modifying BCD or a failure happened, and the system can no longer load properly (for example, there are errors like BOOTMGR is Missing or BOOTMGR is compressed) it is necessary to re-create BCD storage. For this purpose:
- Boot from an installation / boot DVD disk or a USB disk containing Windows 10.
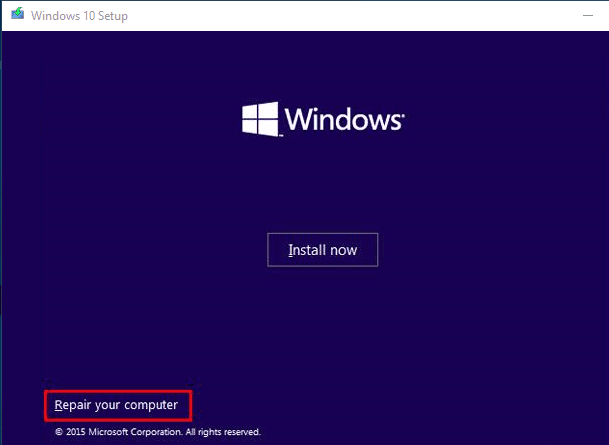
- If you use an installation disk, select the option Repair your computer.
- Launch command prompt by going to Troubleshoot -> Advanced Option ->Command Prompt.
- In command prompt, execute the commands:
- bootrec /FixMbr – overwriting master boot record in the system partition.
- bootrec /FixBoot – re-creating the boot sector in the boot partition.
- bootrec /ScanOS – scanning all disks to search for Windows-compatible systems installed in these disks.
- bootrec /RebuildBcd - this command should try to find a Windows OS installed on this computer and add a record on the discovered OS into BCD. Besides, there are the following launch parameters of bootrec.
bootrec /FixMbrbootrec /FixBootbootrec /ScanOSbootrec /RebuildBcd
Step 4. Recovering BCD Storage From a Backup File
You can replace the current configuration of BCD storage by importing a previously saved configuration into it with the help of the command: bcdedit /import e:\bcd_backup.bcd
bcdedit /import e:/bcd_backup.bcd
After importing BCD, restart the computer and make sure that all previously existing boot variants are available and work correctly.


