Instagram Recovery: Recovering Deleted Photos
Accidentally Deleted Your Favorite Photos on Instagram? Did you accidentally delete photos on Instagram that you wish you hadn’t? Don’t panic! In this essential tutorial, we’ll show you how to recover deleted photos from Instagram effortlessly. From understanding Instagram’s “Recently Deleted” feature to learning how to restore photos within the app, we’ll cover everything you need to know to get your precious memories back. Whether you’re a casual user or an Instagram aficionado, these step-by-step instructions will help you recover your deleted photos in no time.
- Method 1. Recover Photos from the Drafts
- Method 2. Find Digital Materials Removed from Instagram in the Local Storage of Your Mobile Device
- Method 3. Check the Archive in the Instagram Mobile App
- Method 4. Recover Deleted Data with Your Google Account
- Method 5. Find Photos from the Instagram App with the Web Archive
- Method 6. Back Up Your Data Regularly
- Method 7. Restore Deleted Images and Video Files with a Specialized Data Recovery Tool
- Conclusion
- Questions and answers
- Comments
The Instagram social network is the second most popular platform for online communication after Facebook, and its active online audience exceeds one billion users every month. It provides people with a unique set of opportunities to create, store, exchange and distribute photos and video compositions. The main tool to ensure permanent access to the social network and online communication is certainly the wide variety of mobile gadgets (such as smartphones. communicators, camera phones etc). This social network is available for all main operating systems and works steadily on Android, iOS and Windows.
Of course, recovering photos and videos lost from the Instagram social network is quite possible. Below, we will cover several easy but effective methods to bring the deleted files back.

Transferring Files from an Android 📱 Phone to PC 💻 by Cable, WiFi, Bluetooth
Method 1. Recover Photos from the Drafts
The undeniable advantage of Instagram is that user pictures can now be saved as drafts and uploaded from the corresponding folder at any time.
To save any image as draft, here is what you should do. Open the Instagram app on a mobile device, and at the bottom of the screen, tap the Camera button fashioned like a box with a plus sign inside it.

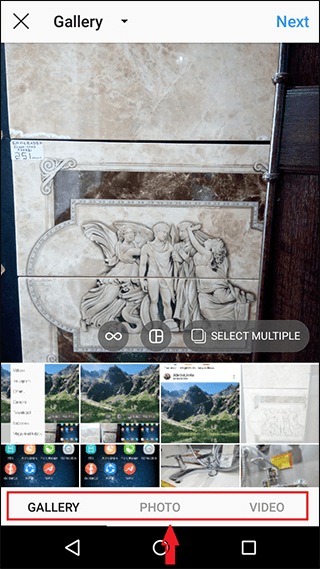
In the new page, you will see the entire list of photos and videos. Use the control buttons below to add a previously saved file or create a new image or video.
By tapping on the black triangular button next to the Gallery button in the upper part of the screen, you can choose and add existing images from various sources.
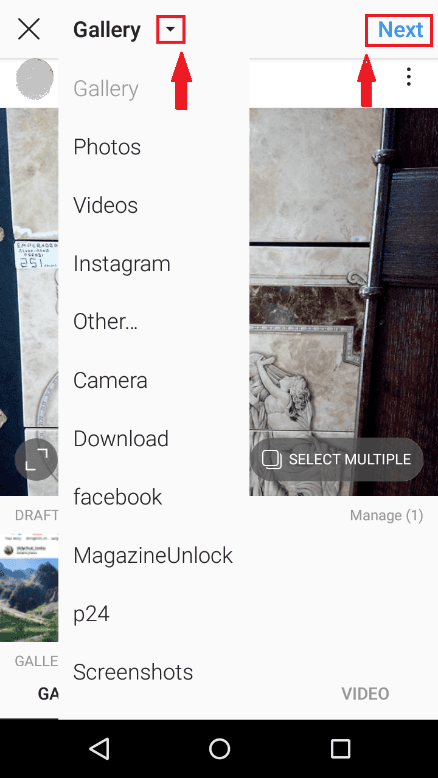
Check a photo, tap Next in the upper right part of the screen and tap Next again if there is no need to edit or apply a filer to the image you have selected.
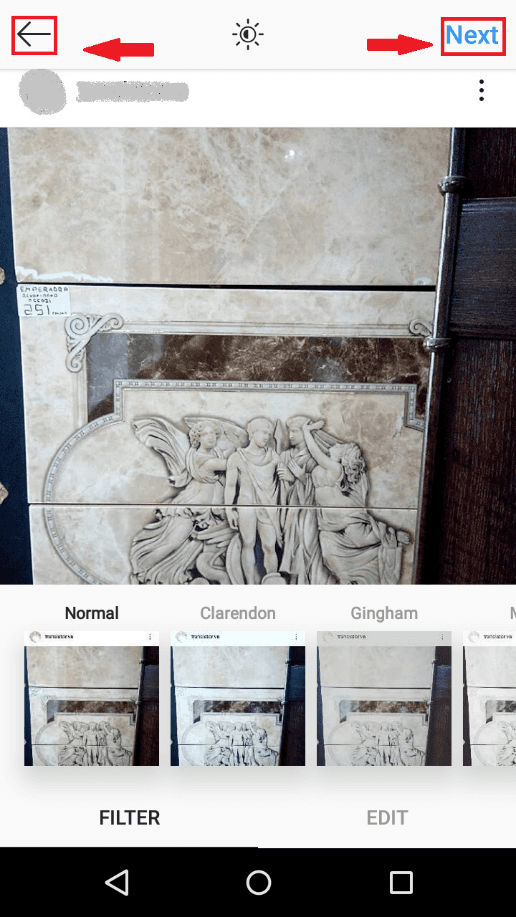
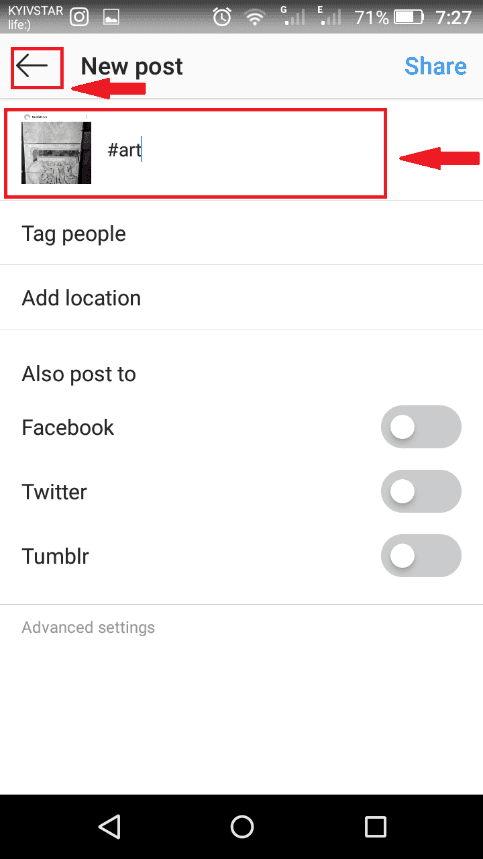
When the image is shown in the New post page, fill in the line Write a caption, that you can see next to the thumbnail of the selected image, and double-tap on the Back button looking like a left-pointing arrow.
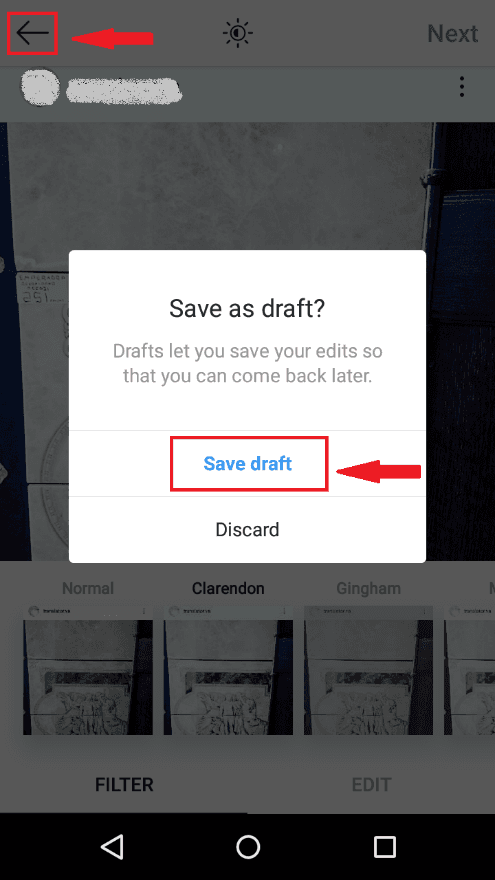
The Instagram app will instantly suggest saving the image as draft. Tap the corresponding option and the image will be saved to Drafts.
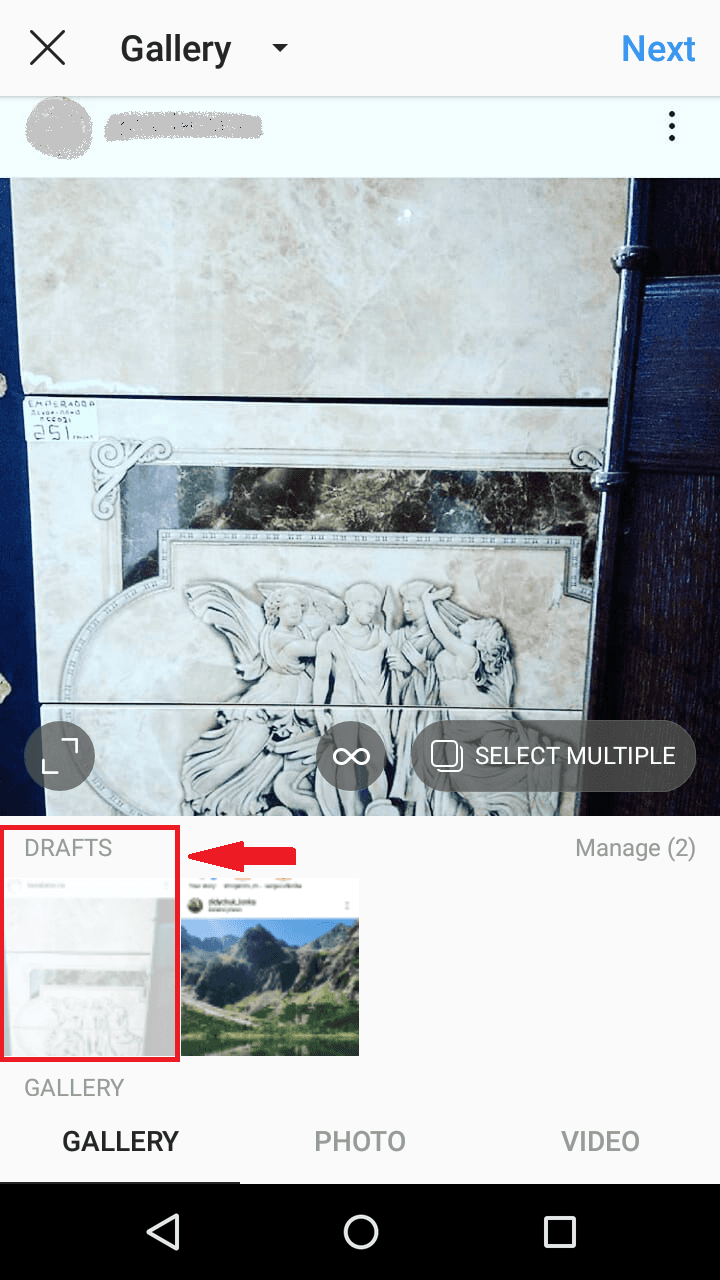
Now this image will be shown in the chosen folder, so you can share it, send to friends or followers, move to the Gallery folder of your mobile device or do any other actions as you think fit. The main idea is that the image won’t disappear and will be available for recovery in a number of ways.
Method 2. Find Digital Materials Removed from Instagram in the Local Storage of Your Mobile Device
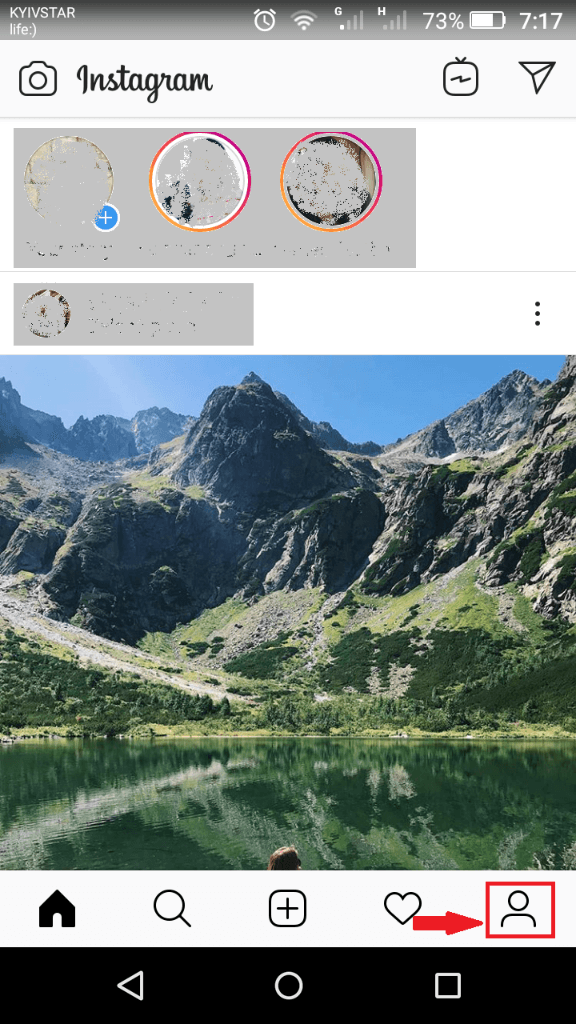
When you install the Instagram mobile app, its default settings set up a service to have all your posts saved automatically to your phone’s storage. To make sure the service is running as it should, open the Instagram app and look at the navigation panel below: tap on the user profile button (it’s on the right and very similar to a man’s torso).
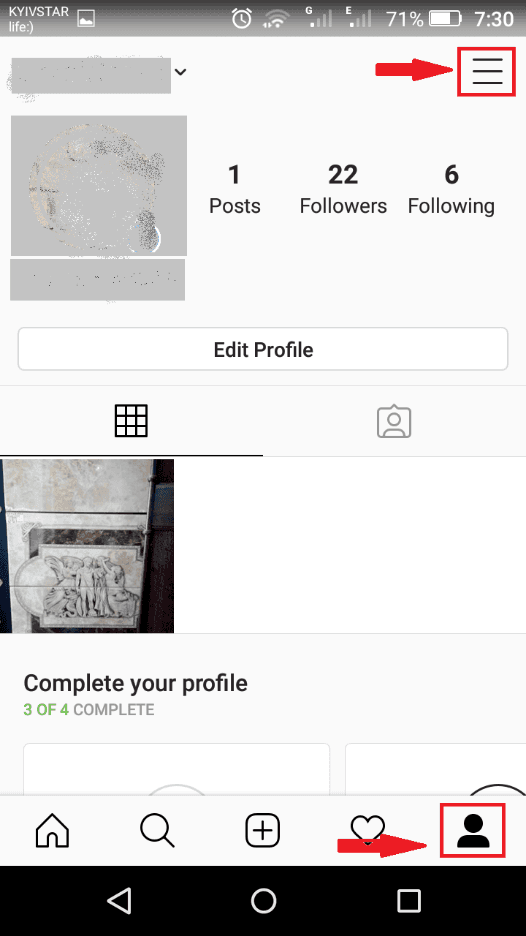
In the profile page, tap the menu button in the upper right corner (fashioned like three horizontal lines).
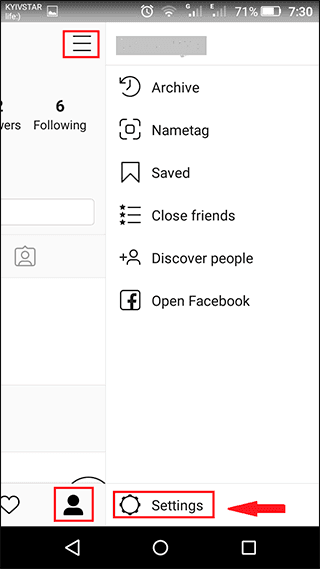
Select Settings from the list of options.
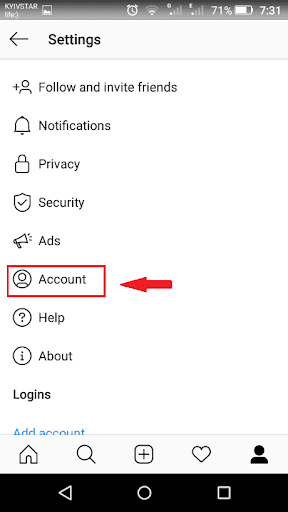
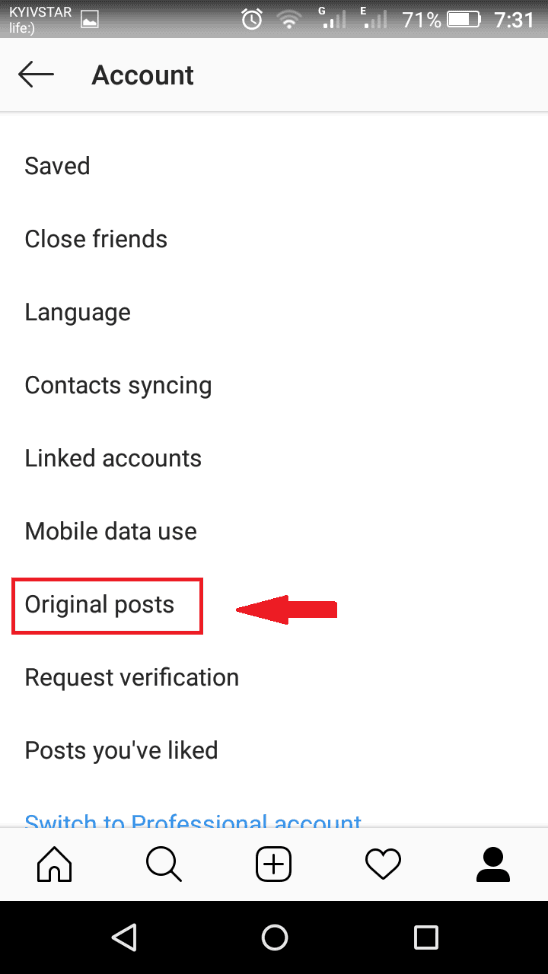
In the Instagram app settings page, go to Account.
This time, choose Original posts from the list of available actions.
Make sure that the sliders for Save original posts, Save posted photos and Save posted videos are enabled and active. If everything is that way, it means every photo and video you published will be saved to your phone’s storage. However, keep in mind that such settings require quite a lot of free space to save the stuff, but in exchange, all materials will be stored in the local memory of your gadget.
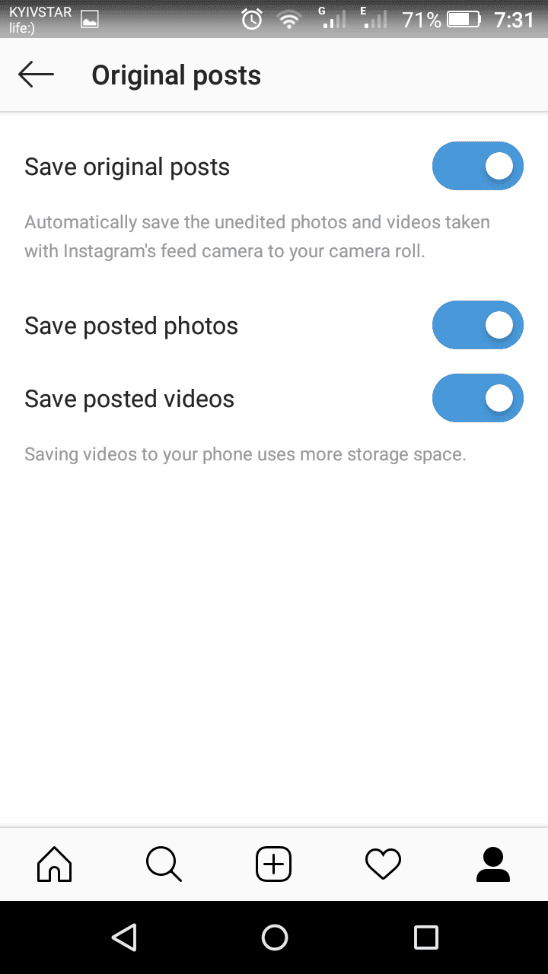
With the settings enabled, all user pictures and videos will be saved and available in corresponding albums of your mobile device.
People using Android mobile devices can view and restore photos lost or deleted from the Instagram app in the smartphone’s system application, Gallery, which contains various albums. If the removed Instagram photos were taken with the camera of your smartphone, finding the original images is not going to be difficult. In the Gallery, find the Instagram subfolder, which contains social media images sorted by date. Additionally, the Gallery app may contain the Recent folder which features images from various sources, including the Instagram mobile app.
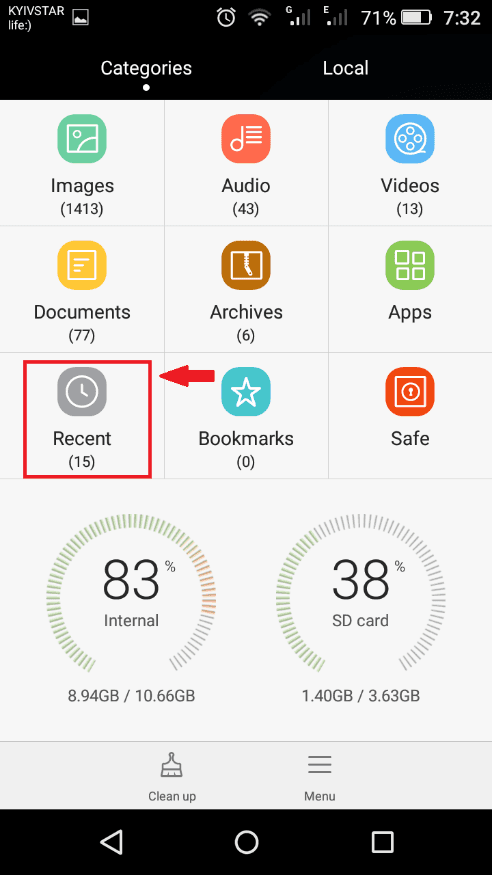
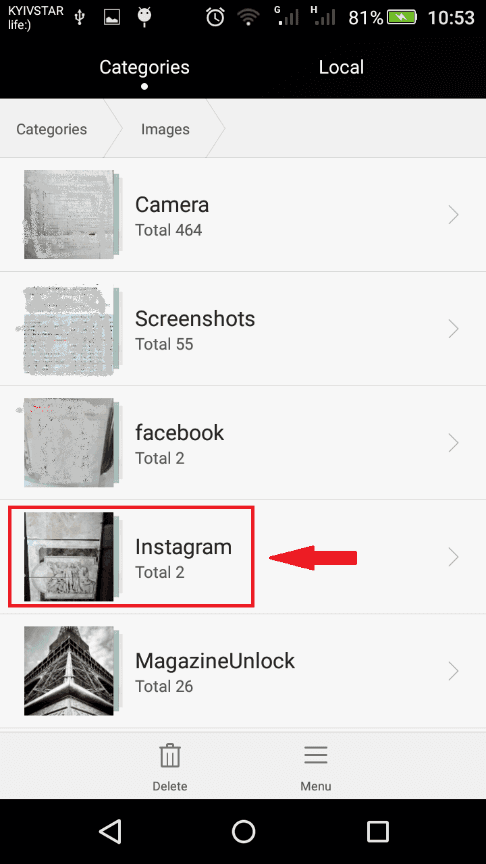
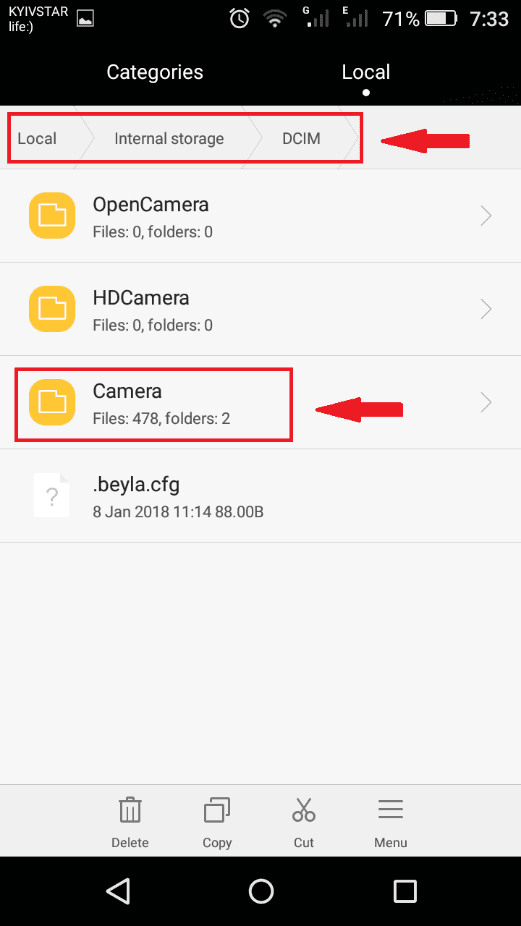
Moreover, check the DCIM folder on your phone and look for deleted photos and videos in the Camera subfolder.
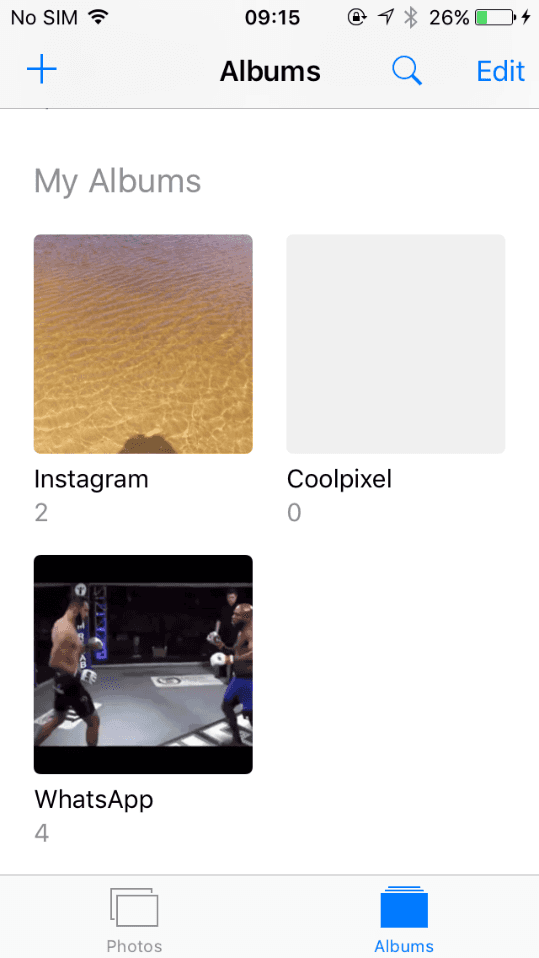
If your mobile device works on iOS, you can find images deleted from the Instagram social network in the Albums folder of the Photos app. Open this app on iPhone, go to the Instagram folder and check if you can see the deleted photos there. If they are still available, you can upload them to Instagram again.
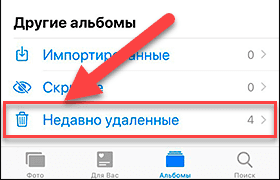
If you still can’t find the image you are looking for, try the location where removed photos are stored – the album Recently deleted. This folder has a limitation on the period of time that a deleted image can be kept there – no longer than thirty days. As soon as this period expires, the image will be removed forever. If there is still some time left before it happens, and this image is what you need – check and restore it. The image will appear in the album or folder where it used to be before being removed.
Method 3. Check the Archive in the Instagram Mobile App
In 2017, Instagram integrated a new function, Archive, as an equivalent of Trash, a temporary protected storage for deleted files, in other popular applications (for example, Google Photos). It lets users not only hide any photos and stories from view, but also instantly restore a deleted image. As long as you don’t clean the Archive, images and videos will be available for quick and guaranteed recovery and exchange.
Open the Instagram mobile app and sign in to your account. In the navigation panel below, go to the user profile page.
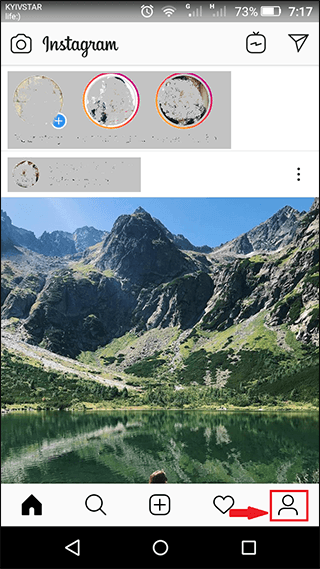
In the upper right corner, tap on the menu button (three horizontal lines) and select Archive from the list.
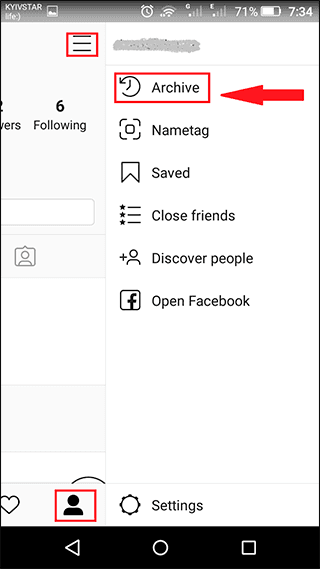
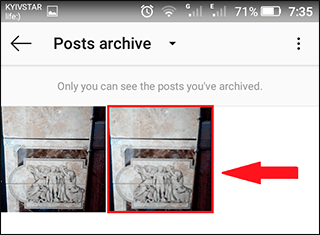
This page will show you all photos and videos available at the moment.
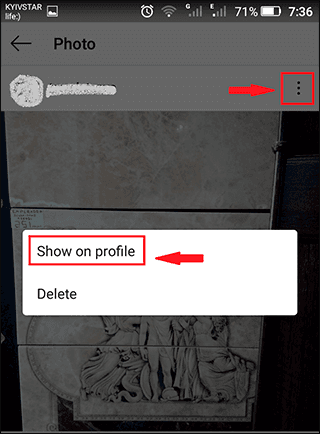
Select the image you were looking for and tap on the menu button (the three vertical dots in the upper right corner of the image), then select Show on profile for instant recovery from the archive.
Additionally, you can have a look at the Stories archive (temporary pictures and videos that users don’t plan to share all the time and they disappear after twenty-four hours) and restore the image you were looking for in a similar way. To access Stories archive, tap on the black arrow to open the menu and select the corresponding option.

Method 4. Recover Deleted Data with Your Google Account
Many people who own devices with Android operating system use Google Photos to store their pictures. That is why it is necessary to check if there is a backup copy of your data in the cloud storage which can help to recover the lost images quickly.
To do it, go to Google Photos from your account and examine the contents of all published albums available there. Google Photos settings let you select a mode when all photos and videos will be saved to the storage even after their original copies are removed from your gadget.
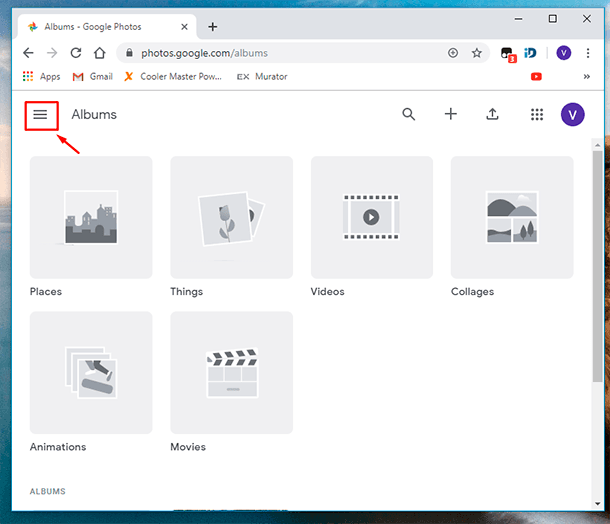
The next step is to check if the Trash in Google Photos contains any of the photos you have posted on Instagram. In the upper left corner, use the menu button (three horizontal lines) and select Trash from the list.
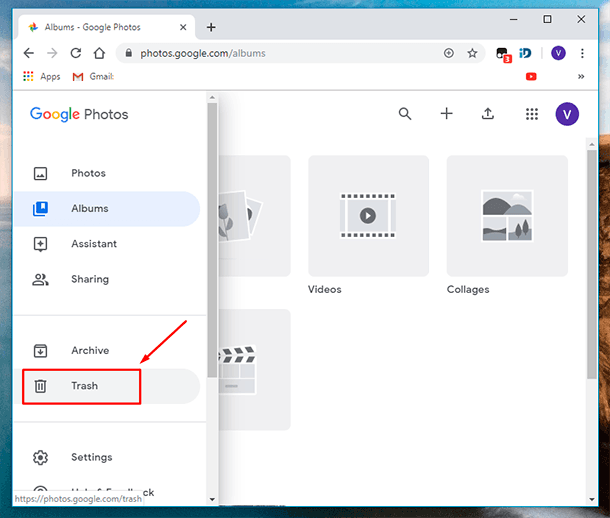
Find the lost images, check them (so that they have a colored tick on them) and click on the Restore button shown as a clock with a round arrow.
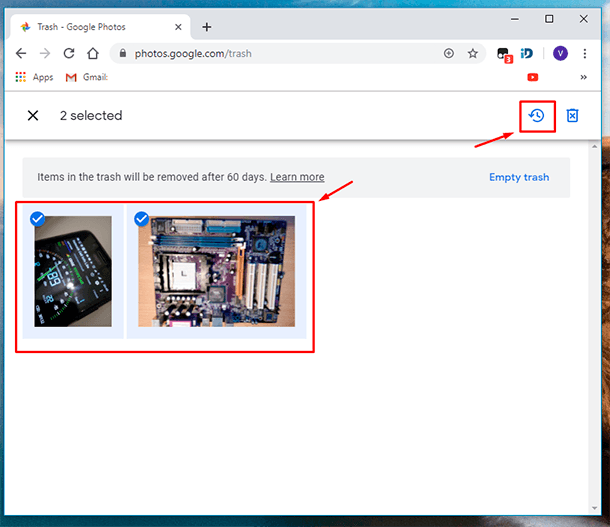
All the selected files will be restored in a second.
You can learn more about setting up and restoring the Google Photos app for mobile and stationary computer devices by reading our previous article: «How to Recover Deleted Images With Google Photos».
Method 5. Find Photos from the Instagram App with the Web Archive
The web archive service will come in handy if you need to see previous versions of a website and restore the previously saved contents. This trick works with many websites, and it should be all right for Instagram too. However, if you joined this social network only recently and your registered time with Instagram is relatively short, you are unlikely to find your materials. However, it takes very little time to try, so don’t hesitate to have a go.
Go to the main page of the website web.archive.org and type your Instagram account address into the text field.

When your request is processed, the archive service will display a calendar with possible dates when the website contents were saved. Choose a date and view the corresponding website version.
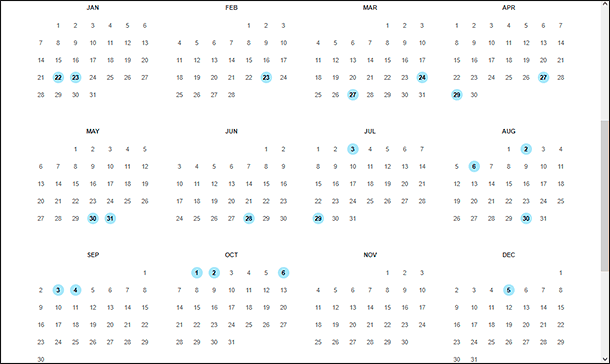
Most calendar dates will contain no data and show an empty page instead of your photos. In spite of more than 371 billion webpages saved by this service, your chances to find the things you need are very slim, but that’s an option you can still use, if necessary.
Method 6. Back Up Your Data Regularly
Many mobile devices let users back up their data to a cloud storage. Depending on the manufacturer and version, gadgets may use different services. As long as this option is enabled timely, any data at your choice including photos and videos may be saved to Google Photos, or to manufacturer-featured cloud services. For example, iCloud or iTunes for iOS operating system, or cloud storage offers by Samsung, Mi Cloud and others – for Android. That is why it is recommended to back up your data regularly in order to secure your media data, avoid unexpected loss of photos and videos from Instagram, and always have a chance to restore your files in case they are lost. With all of that, safety of your data will be greatly improved.
Method 7. Restore Deleted Images and Video Files with a Specialized Data Recovery Tool

How To Recover Deleted Data From Android Smartphone: photos, contacts, aps 💥 🥇 ⚕️
On the Internet, there are numerous products advertised as capable of restoring lost images and videos. Most of them have similar functionality. However, by several important criteria such as the amount of successfully restored data, ability to process all kinds of storage media, effective scan techniques and file search algorithms, ease of use and performance, the leading position is shared only by a few globally recognized programs, one of them being a product by Hetman Software. This company offers a wide range of data recovery tools that suit every scenario you can think of and feature a perfect combination of the advantages listed above. The best choice to restore lost photos and videos should certainly be «Hetman Photo Recovery».

| Feature | Description |
|---|---|
| Developer | Hetman Software |
| Program Purpose | Recover deleted photos from various storage devices |
| Supported File Systems | FAT16, FAT32, exFAT, NTFS, NTFS5, ReFS |
| Supported Image Formats | JPEG, PNG, BMP, TIFF, GIF, PSD, RAW (Canon, Nikon, Sony, Fuji, etc.) |
| Supported Media | Hard drives (HDD, SSD), memory cards (SD, microSD, CompactFlash), USB drives |
| Recovery from Damaged Media | Yes, including formatted, damaged, and inaccessible devices |
| Disk Image Creation | Yes, for safe data recovery without risks |
| Interface | User-friendly, with a step-by-step recovery wizard |
| File Preview | Yes, view recovered photos before saving |
| Operating Systems | Windows, Linux, MacOS. |
| License | Paid, with a free trial scan available |
The program has a wide range of functions and can restore media data lost for a number of reasons. Recovering photos and videos lost after deleting them accidentally or by mistake, recovering data after erasing it or formatting the drive, bringing files back after access to the drive or memory card has been lost (that is, when they are not displayed in the Windows Explorer), after cleaning the Recycle Bin or using the hard delete method (using the key shortcut Shift + Delete, or specialized software etc) – all of these tasks can be handled easily by Hetman Photo Recovery, which is designed to quickly restore as much data as possible, with the best quality.
Another important element adding more popularity to this product is its ability to recover data after harmful effects of malware, virus encryption, failures in the work of computing devices and power surges. The convenient user-friendly interface will help novice users to make the most of it, even with zero experience in file recovery.
Visit the official website of Hetman Software to download the Hetman Photo Recovery installer, run it and follow the step-by-step wizard directions to get the program ready for work.
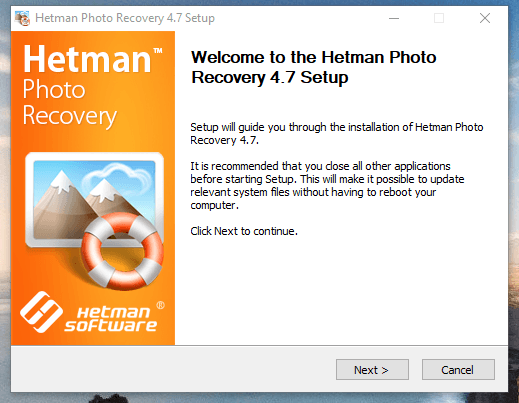
When the installation is over, open Hetman Photo Recovery, follow the recovery wizard directions and click the Next button to begin searching for data and restoring it.
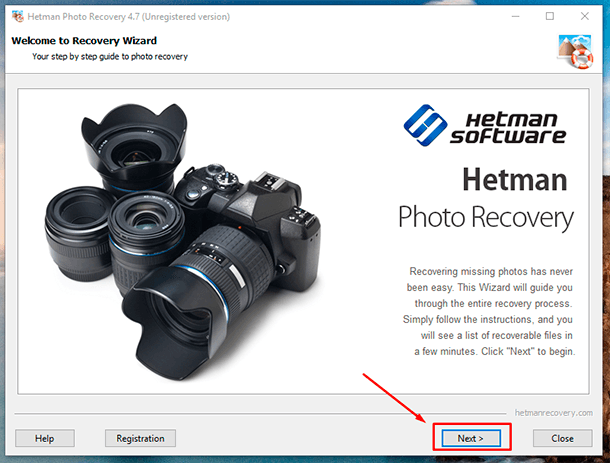
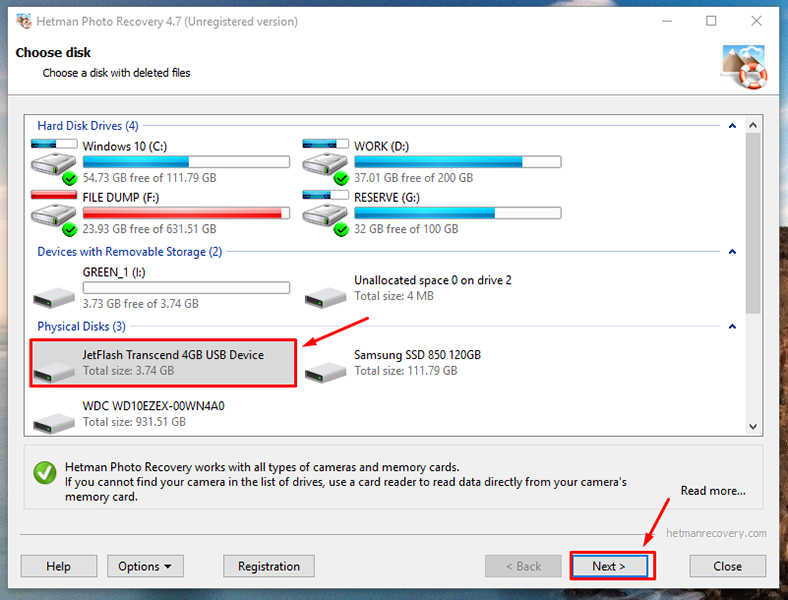
The program will run a primary analysis automatically and show all storage devices it can find. Select a device by left-clicking on it, and click Next to continue.
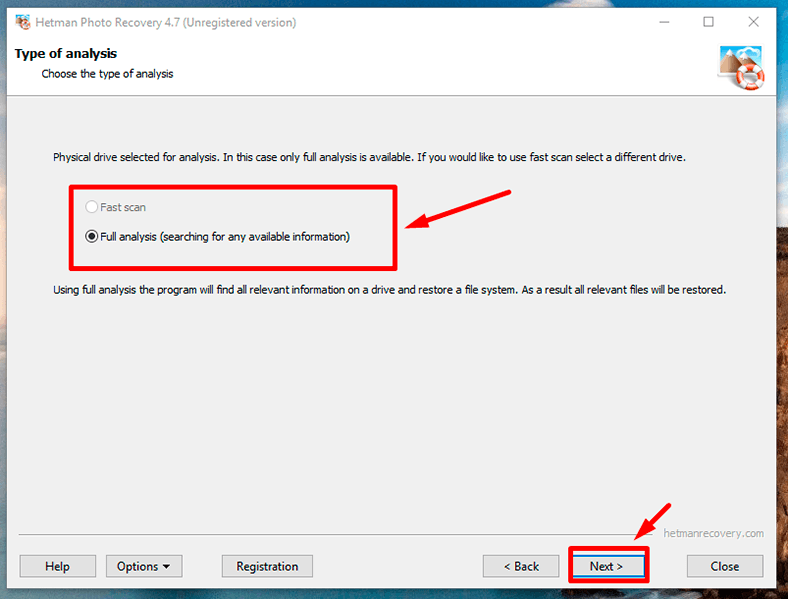
You will be suggested to decide on the analysis type to be used for scanning the storage and recovering deleted files. The Fast scan is good for finding and restoring recently deleted data. The second option, Full analysis, will help you find as much information as possible and restore the vast majority of data lost for other reasons. Choose the analysis type that fits your actual situation best and click Next.
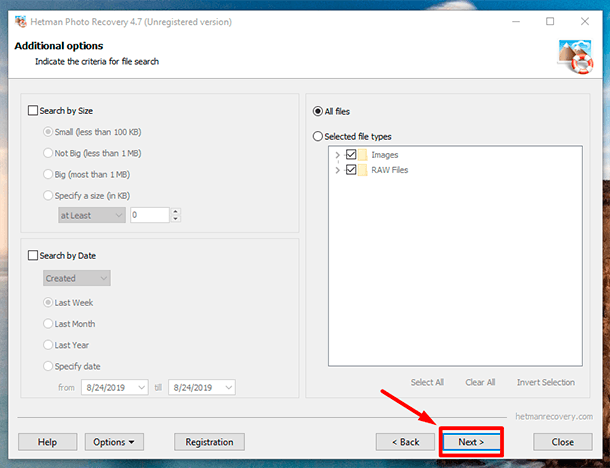
With Hetman Photo Recovery, you can change search criteria by setting certain limitations. You can make the program search for files by their size, date when they were created, modified or opened in order to select the files you need. Also, you can choose certain file formats to be recovered by selecting certain values, or make the program search for all files ever deleted from the selected storage device. After you have chosen the file search criteria, click “Next” to start the process of analysis and recovery.
The time required for the analysis depends on several factors such as the drive capacity, file system, how damaged the data is etc. The process is displayed in real-time mode, with detected files showing up in the program window.
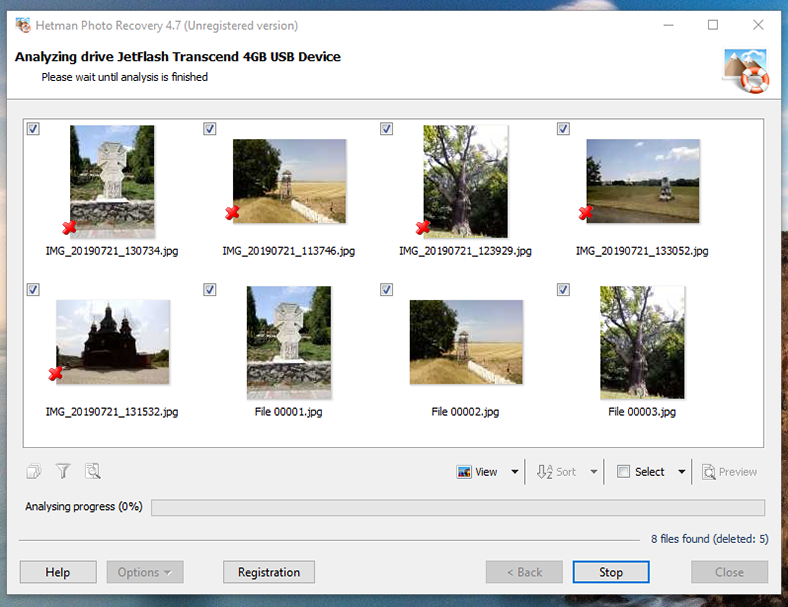
When the analysis is over, a new window will open for the user to select from the list of files the elements to be recovered by checking their thumbnails. When you select a file, the side panel will show you its thumbnail and detailed description.
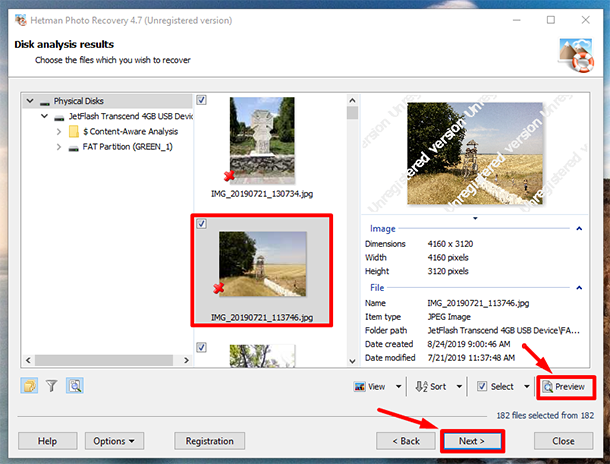
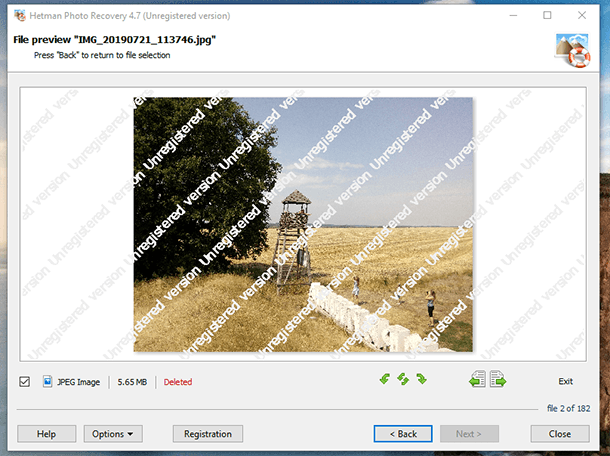
By clicking the Preview button you can see a larger image of the deleted file. Use the navigation buttons to rotate the picture, move to the next image or video, or return to the previous window.
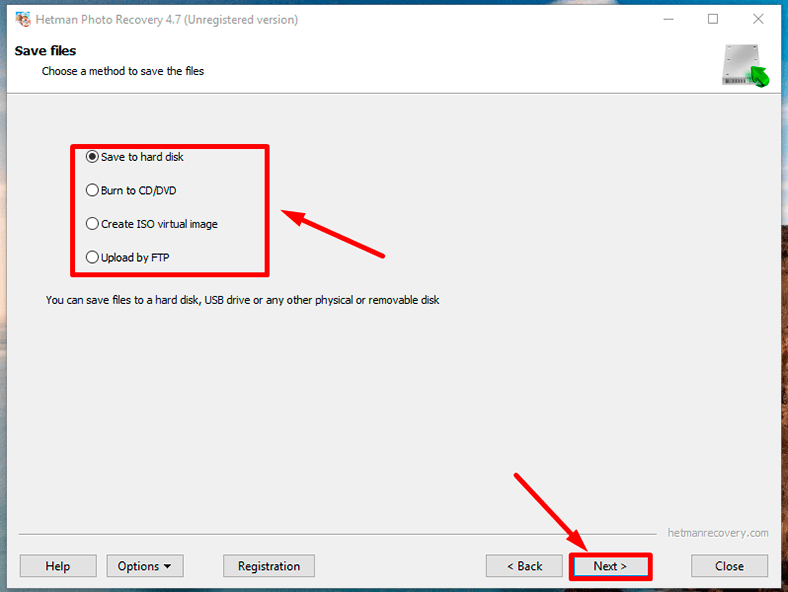
Having selected the necessary files in the Disk analysis results window, click Next. In the next page, the program will ask you to select a saving method for the files you have just selected. By default, you can choose from among four options.
Choose one of the options for saving the files and click Next.
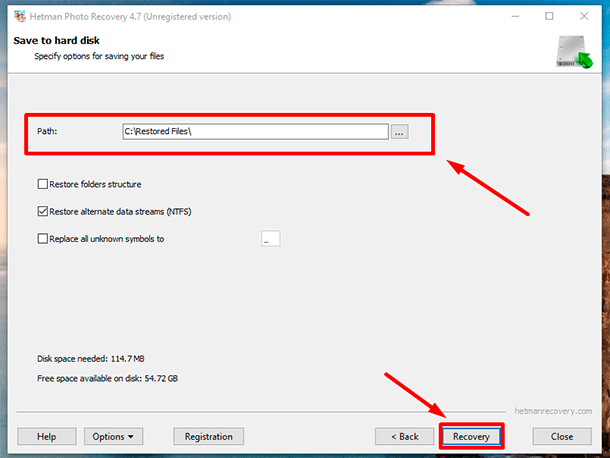
In the last page of Hetman Photo Recovery, specify the path for saving the files and other settings which may differ depending on the saving method you have chosen, and click Recovery. All the files selected for recovery will be restored in accordance with the settings.
You can learn more about the opportunities provided by Hetman Photo Recovery, its methods and advantages in our video tutorial on YouTube: How to Recover Deleted Photos in 2019 With Hetman Photo Recovery.

How to Recover Deleted Photos in 2020 With Hetman Photo Recovery Software 📁🔥⚕️
Conclusion
Social media are extremely popular nowadays and people often use them to communicate, exchange data and instant messages. Instagram is a leader among other social media mostly because of its main feature – creating, storing and promoting user-created images, photos and videos, freely published and shared over the network of friends and followers.
However, user photos and videos often get damaged, removed or lost for various reasons. Modern recovery methods described in this article offer a chance to avoid irreversible loss of data and bring the lost files back.
No matter if you decide to use integrated functions of Instagram for getting the images from Drafts or Archive, find the photos and videos in the Windows Explorer or in your phone’s Gallery, extract them from a backup copy or restore the files using a specialized tool – Hetman Photo Recovery – the photos and videos will be back again, available for any action you would like to take. Meanwhile, regular backup plan for your images and videos will help reduce the risk of losing your data forever.


