Skype Data Recovery: Password and History
Learn how to retrieve your valuable data in Skype with ease in this comprehensive guide. Whether you’ve forgotten your password, lost chat history, or need to recover important conversations, this tutorial covers everything you need to know. Dive deep into step-by-step instructions and essential tips for recovering passwords and history in Skype. Don’t let data loss disrupt your communication!

How to Restore Deleted History, Sent Files, Contacts and Password in Skype ⚕️💬🔑
Such information is very important, but users often do not see its significance. However, as soon as they lose access to the program account or reinstall it for some reason (for example, after reinstalling the operating system), they come to realize they need to recover Skype history. It is especially the case with accounts used for work or business.
Luckily, there are methods to recover Skype history, as well as to regain access to a Skype account and sent files, and we are going to describe them in this article.
- How to Activate Saving Skype Data on Your Computer
- Create a Backup Copy of Skype Data
- Recovering Skype From a Backup Copy of User Account Files
- Recovering Skype Without a Backup Copy of User Account Files
- Questions and answers
- Comments

How to Restore Chat History and Media Files in WhatsApp 💬📁⚕️

How to Restore Chat History, Contacts and Files for Viber in Android or Windows 💬📁⚕️
How to Activate Saving Skype Data on Your Computer
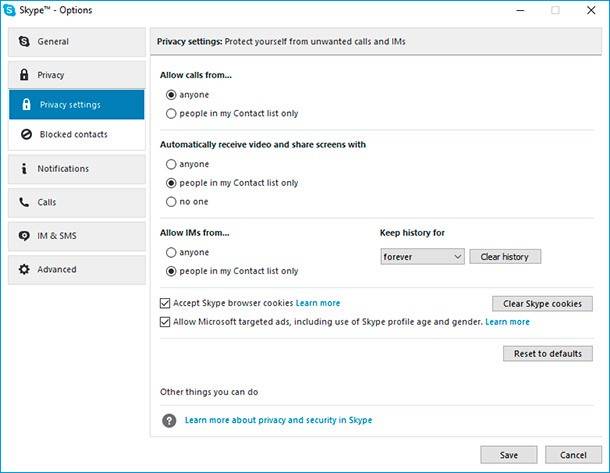
In order to be able to recover correspondence history and files sent via Skype you need to make sure that your copy of the program has data saving function activated.
To make sure if Skype saves its history on your computer, open the program and choose the menu Tools / Options / Privacy Settings / Show Advanced Options. Find the section «Keep history» and when in the menu, choose the period for which it should be kept.

Create a Backup Copy of Skype Data
After your Skype account history was created, you can create a backup of it.
To do it, close Skype and go to the folder
C:\Users\UserName\AppData\Roaming\Skype\
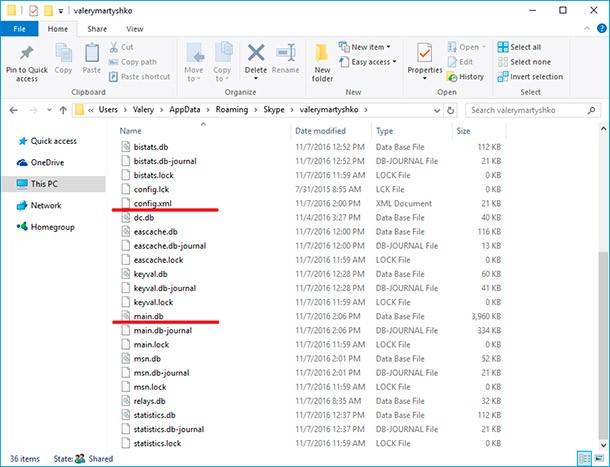
This folder keeps all Skype data of your computer, including all accounts that logged in Skype from this computer. The ideal option would be to create a backup copy of the entire folder.
In this folder, there are two files and a folder that are of crucial importance for keeping your Skype data; they are:
- main.db – the file containing the entire history of your Skype account chat. It is located in this folder:
C:\Users\UserName\AppData\Roaming\Skype\YourLoginSkype - config.xml – the file containing information on the Skype login and password of the user whose name is the name of this folder:
C:\Users\UserName\AppData\Roaming\Skype\YourLoginSkype - My Skype Received Files – the folder which contains all files ever sent or received by Skype. You can find it:
C:\Users\UserName\AppData\Roaming\Skype\
Recovering Skype From a Backup Copy of User Account Files
If the user has created a backup copy of Skype account files, it is very easy to restore its operability after reinstalling the operating system or formatting the hard disk.
What you have to do is to go to the folder C:\Users\UserName\AppData\Roaming\Skype\YourLoginSkype and replace the file main.db and the folder My Skype Received Files with their previously created backup copies. As a result, your reinstalled Skype will show the chat history and all sent and received files that existed at the time of creating a backup copy of such files.
Recovering Skype Without a Backup Copy of User Account Files
If the user has not created a backup copy of Skype files beforehand, such files can be recovered as follows:
Method 1. How to Recover Skype Chat History
After reinstalling the operating system or the application itself and when starting for the first time, Skype automatically downloads a part of its chat history and user data that is stored in the cloud. This data covers the last 30 days.
In order to recover Skype history for a period longer than the last 30 days, a user will have to replace the existing file main.db with the same file containing the entire Skype history. To get such file, let us recover Skype history file from the disk where the copy of the program with entire history was installed before.
Run Hetman Partition Recovery and scan the hard disk.
Note. If you need to recover Skype history after deleting the program and reinstalling it, running a quick scan of the hard disk will be enough. If the operating system was reinstalled and/or the hard disk was formatted, scan the disk using the full scan.
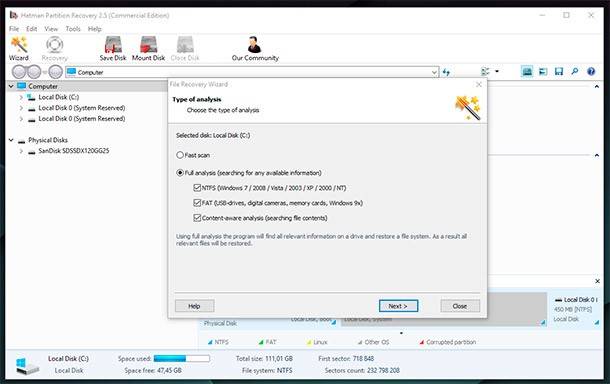
After the analysis is complete, the program will find a number of files. In order to find the necessary file quicker, use the search function: just click on the magnifying glass icon in the upper right part of the screen, enter the file name in the appearing «Find File» window and click on «Find».
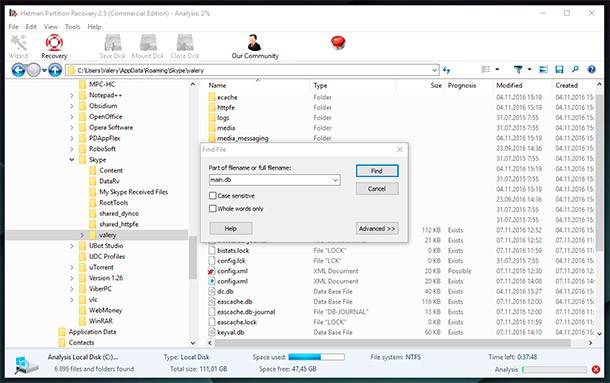
As a result, the program will show the files similar to the one you are looking for. Select the necessary file from the list. In our case, the program shows several files main.db, and we choose the one having the oldest date of creation, and recover it.
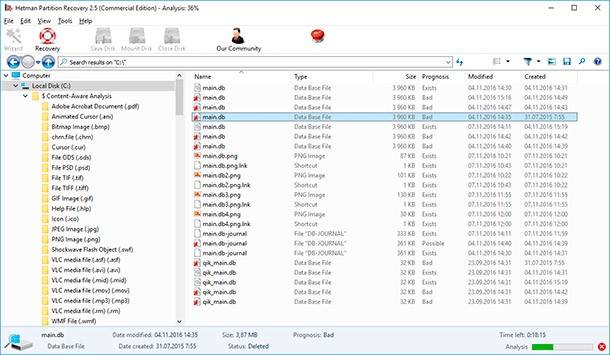
Go to the folder C:\Users\UserName\AppData\Roaming\Skype\YourLoginSkype and replace the existing file main.db with the recovered one. After that, start Skype and check the history for the period of more than 30 days.
Method 2. How to Recover Files Received or Sent via Skype
However, the restored Skype history will not be complete because (as we have said before) the file main.db does not contain the files sent and received via Skype. That is why they will not be available in the chat and will be shown like this:

To restore the opportunity to see files sent and received via Skype, or one of such files, you need to recover the folder My Skype Received Files, which is located here: C:\Users\UserName\AppData\Roaming\Skype\, and where all necessary files are saved, or recover a specific file necessary for the user.
To do it, wait for the hard disk scanning process of Hetman Partition Recovery to be over, and then find the required file among the recovered files, recover it and save it to the folder C:\Users\UserName\AppData\Roaming\Skype\My Skype Received Files. As you do it, it will be shown in Skype again.
Yet, if you want just this file, there is no need to place it in Skype – you can just recover and use it.
Method 3. How to Recover Access To a Skype Account
Often, Skype users do not start it manually. By default, the program is set to start automatically with Windows. It means that Skype login and password are entered only once when installing the program, and may be forgotten later.
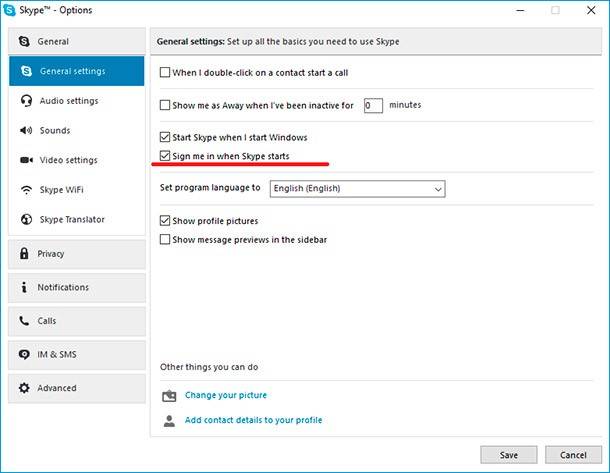
If a user cannot restore access to a Skype account for some reason, or if the password or even login was lost, access can be restored as follows.
As we have already said before, Skype has got a file config.xml, which contains data on the user’s login and password. You can restore access to your Skype account after reinstalling the program by just recovering this file. You can do it from a previously created backup copy or by using Hetman Partition Recovery.
Recovering the file config.xml with Hetman Partition Recovery can be done in the same way as with recovering the file main.db. Run Hetman Partition Recovery and scan the hard disk.
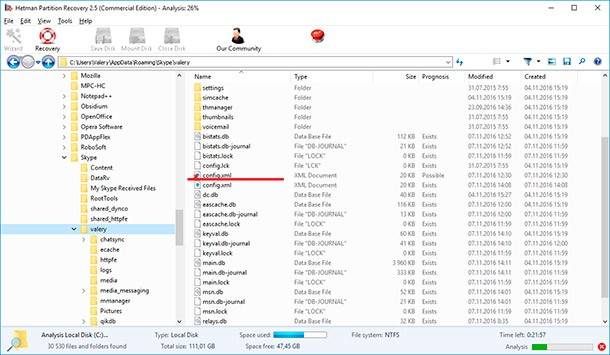
Recover the file config.xml and save it to the folder C:\Users\UserName\AppData\Roaming\Skype\YourLoginSkype. After that, if you have the program’s settings to allow Skype run automatically without checking the login and password, Skype will start in the usual mode.


