Data Recovery from a Crashed RAID LaCie 5big Network2 NAS with Third-Party Firmware, FVDW-SL
In this article, learn how to recover data from a crashed RAID on a NAS LaCie 5 Big Network 2 with third-party firmware, FVDW-SL. Whether you’re a system administrator or a user facing data loss due to a RAID failure, we’ll walk you through the entire recovery process step by step. From identifying the issue to implementing effective recovery strategies, this tutorial equips you with the knowledge and tools needed to successfully retrieve your valuable data and minimize downtime.
- 1. How to install third-party firmware fvdw-sl on LaCie 5big Network 2
- 2. How to update LaCie 5big Network 2 with the fvdw-sl firmware
- 3. How to create a RAID on LaCie 5big Network 2 with the fvdw-sl firmware
- 4. How to Recover Data from a RAID on LaCie 5big Network 2 with firmware fvdw-sl
- 5. How to rebuild a RAID manually with the RAID Constructor
- 6. Conclusion
- Questions and answers
- Comments
LaCie 5big Network 2 is a popular network storage system with a RAID feature that provides sufficient safety and fault tolerance for your data storage needs. However, if the NAS device suffers from a failure and is out of order, the RAID becomes inaccessible, and all the data on its disks is actually lost. In my case, the situation is even more complicated, because I have installed a third-party firmware – fvdwsl – on this NAS. In such cases, it is important to know how to retrieve files from the crashed RAID system.
| Feature | Description |
|---|---|
| Firmware Name | FVDW-SL |
| Device | LaCie 5big Network 2 |
| Firmware Type | Third-Party |
| Functionality | Adds new features or improves NAS functionality, enhances compatibility, or fixes bugs. |
| Update | Usually includes new features, bug fixes, or performance improvements. |
| Update Process | Updating via the NAS web interface or through a special firmware tool. |
| Risks | Possible compatibility issues or data loss if the update is done incorrectly. It is recommended to create a backup before updating. |
| Firmware Source | Typically provided by the developer or can be downloaded from community websites. |
| Documentation | It is recommended to review the instructions and recommendations provided with the firmware before starting the update. |
In this article, we’ll follow the steps required to restore the information from the crashed disk array on a faulty NAS, LaCie 5big Network 2. We will also explore the variant where third-party firmware is used to provide more advanced options for this network-attached storage.
As we know, this NAS model will never boot if you replace its hard disks. The matter is that its operating system is installed on a hard disk so if it is replaced, the device cannot boot. Restoring the native operating system for LaCie NAS is not easy either, since the manufacturer doesn’t provide any software to recover it. That is why in this article we’ll tell you how to install third-party firmware, how to create a RAID, how to configure the network storage device, and what to do if the NAS is down, but you need to recover information from its hard disks.

How to Recover Data from a Crashed RAID on LaCie 5big Network2 NAS with a Third-Party Firmware
1. How to install third-party firmware fvdw-sl on LaCie 5big Network 2
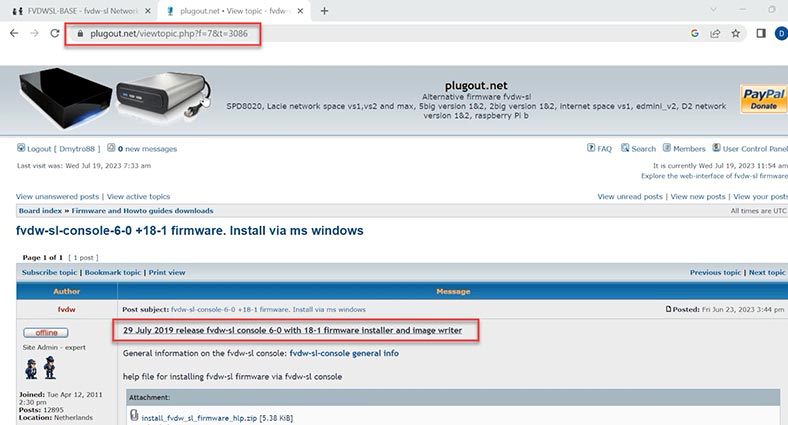
For starters, download the firmware – you can find it on the official website.
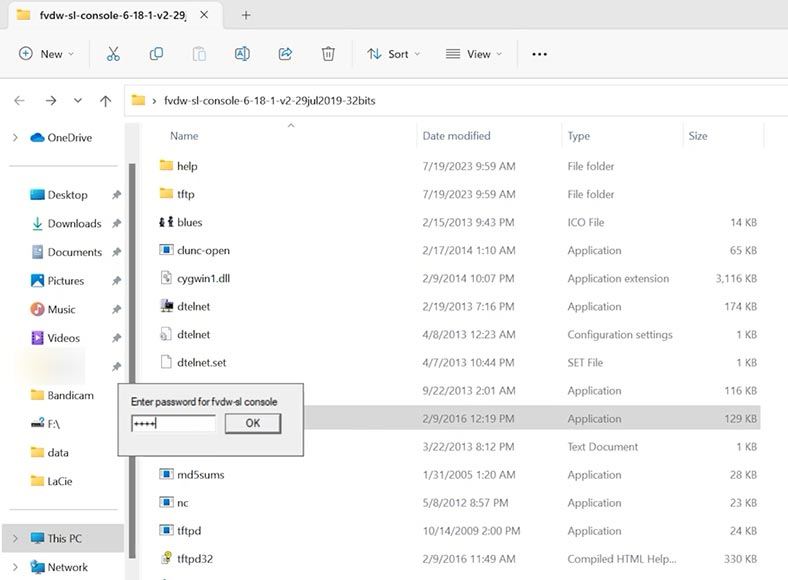
While you’re doing that, the NAS should be turned off. Extract the archive, open the folder and run the console app – fvdw-sl-console. To protect the device from accidental actions, there’s a password – 33305.
In the window that opens, click on the Action button and select install fvdw-sl firmware from the list. To confirm, click Ok, Yes.
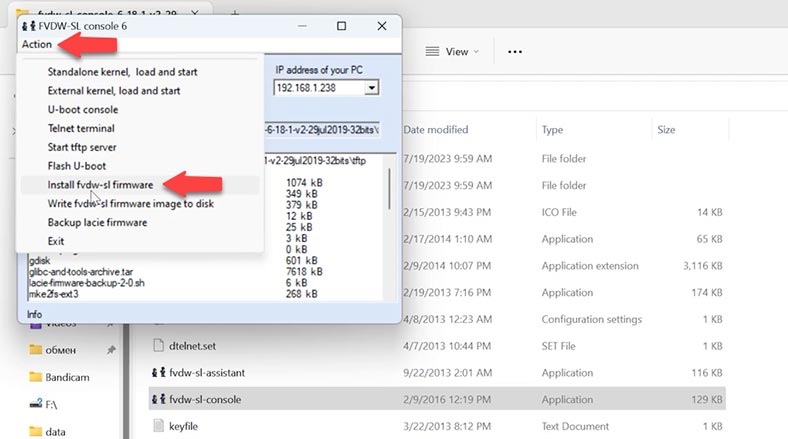
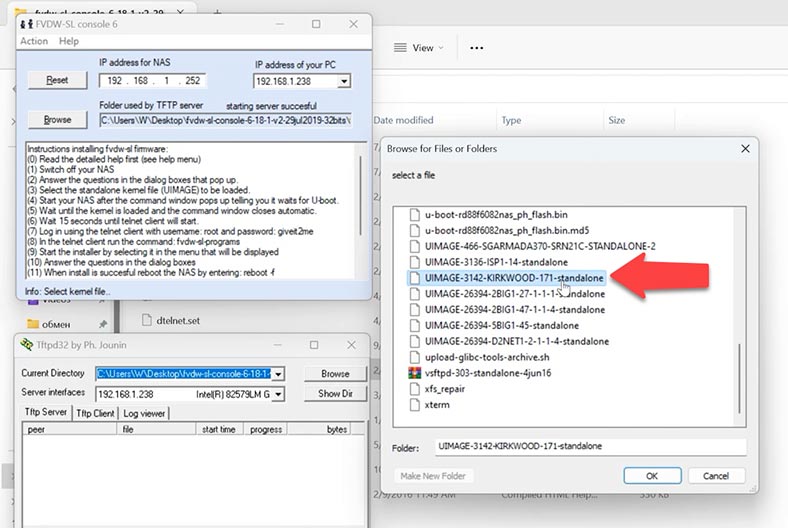
After that, choose this file – KIRKWOOD-171, and click OK.
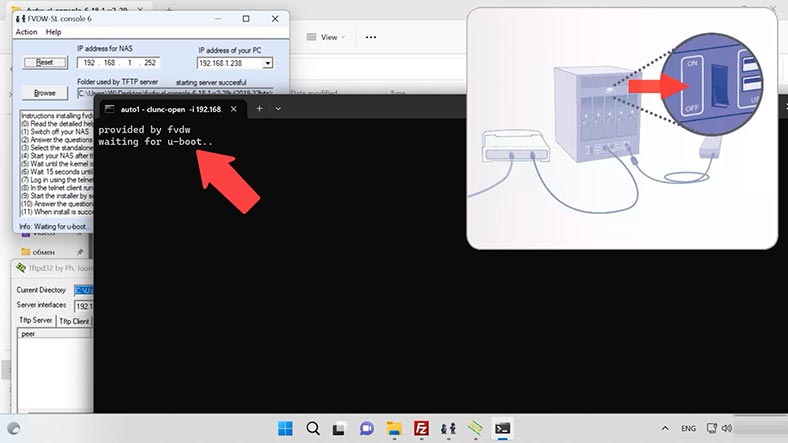
This will start the Lacie boot waiting window; Turn it on and wait until the system finds it on the network.
As a result, you should get connected to it by Telnet.
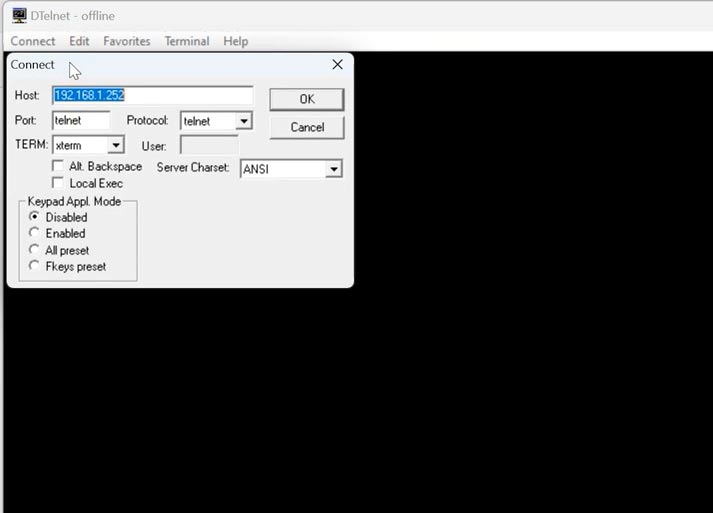
Enter the login – root and password – giveit2me. For installation, run this command:
fvdw-sl-programs
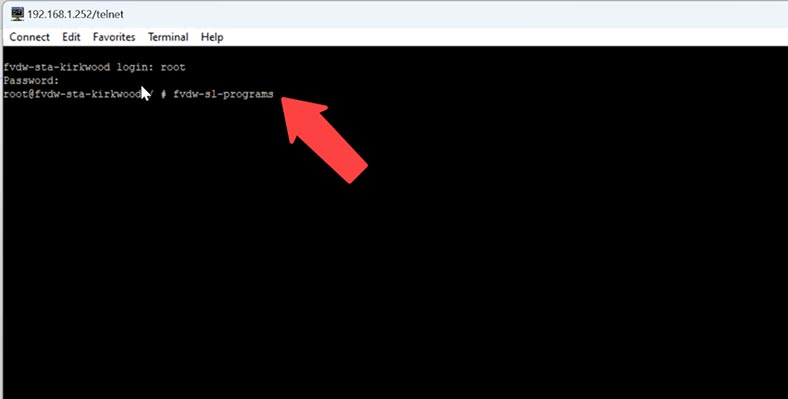
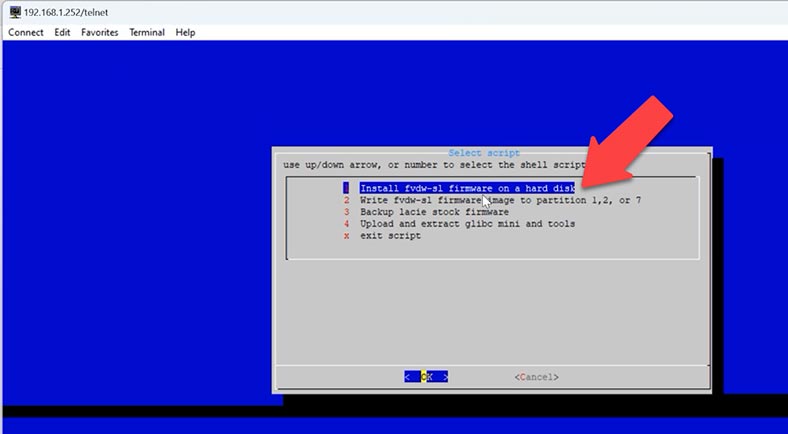
In the installer window, choose the first item – Install fvdw-sl firmware on hard disk - Ok.
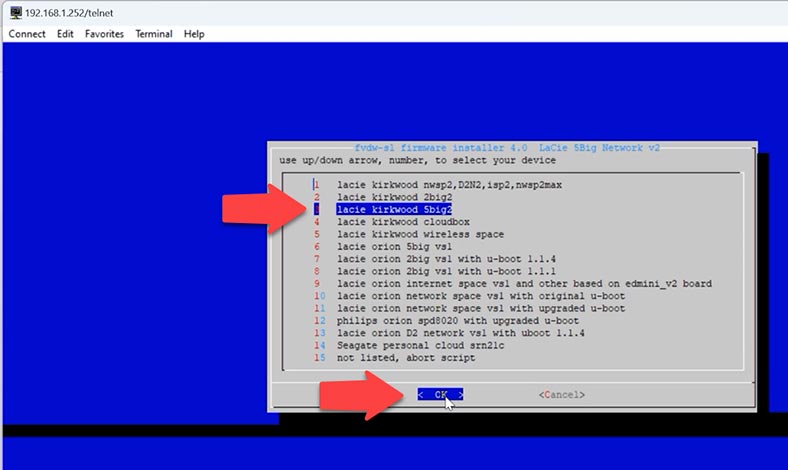
Now select your device from the list - Ok. In the window with a warning that all data will be lost, click Yes.
Now you need to choose a disk partition style; if your disks are larger than 2 TB, choose GPT partition table.
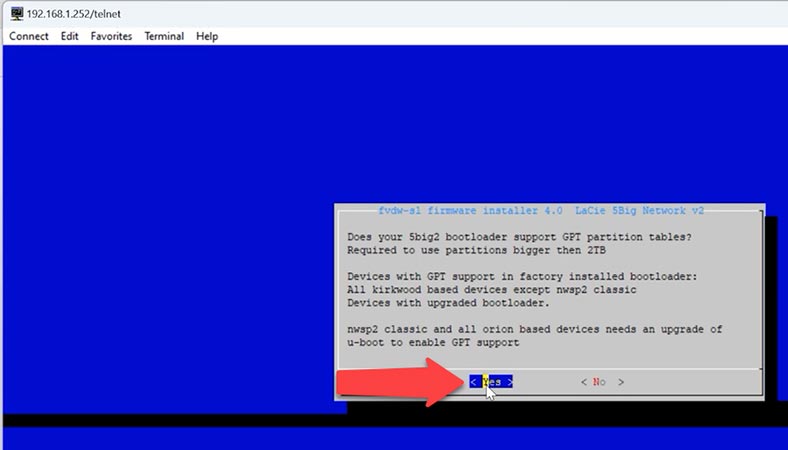
The installer will ask you if your hard disk capacity is bigger than 2 TB - and I choose No, since my hard disk is smaller. After that, the partition table will be created. Now you should be very attentive: if your hard disk is bigger than 2 TB, go for GPT, and if it’s smaller, choose MBR. As soon as you do it, the process of copying and installing the firmware onto the hard disk will begin. This activity will take some time.
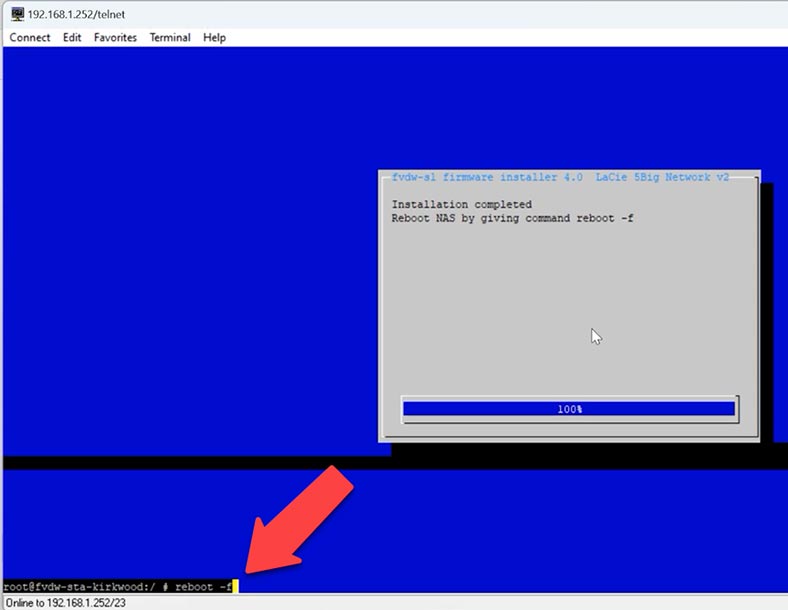
When it’s over, restart the NAS by running this command:
reboot -f
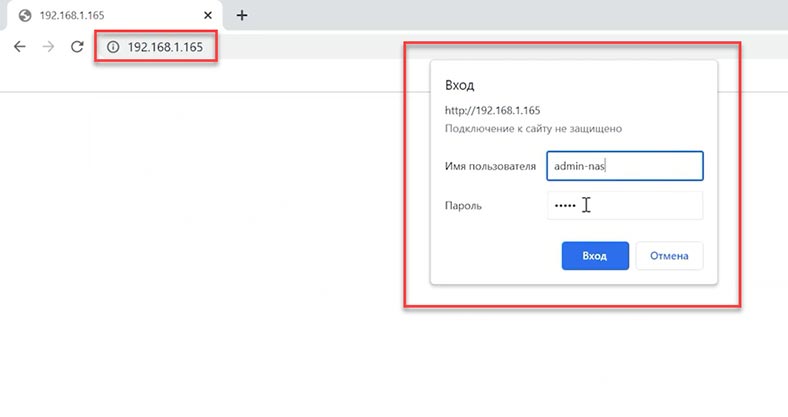
As a result, it will be assigned a new IP address via DHCP; to identify it, go to the router settings or use the assistant - fvdw-sl-assitant.exe. The second way doesn’t always work.
When you know the IP address of your device, you can access it from your browser by typing this IP into the address bar. The default credentials are the login admin-nas and password admin.
2. How to update LaCie 5big Network 2 with the fvdw-sl firmware
Now your device can be configured. If you have installed an earlier version of the firmware, it’s recommended to update it, because it may lack support for some features including creating a RAID system. To update, access the section Firmware update and click on the button Update firmware via fvdw-sl server (latest version).
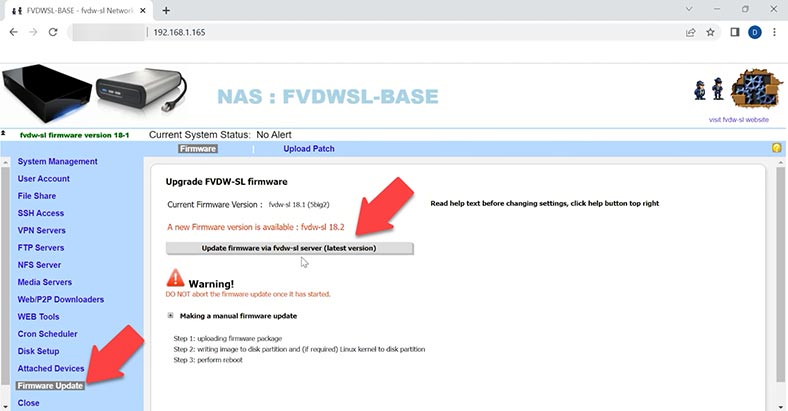
If you get an error with the name Error 200, download the update file from the website and install it manually. Go to the website and download the corresponding patches and update files. You can also find detailed guides for all versions of updates.
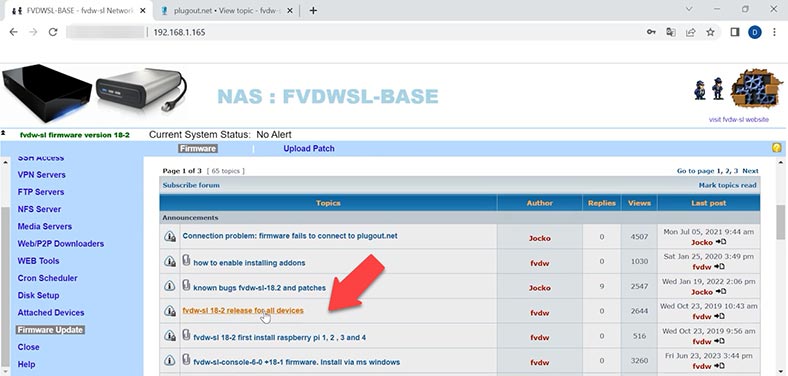
The downloaded files should be uploaded to your NAS, so let’s configure FTP access. For starters, let’s add a user.
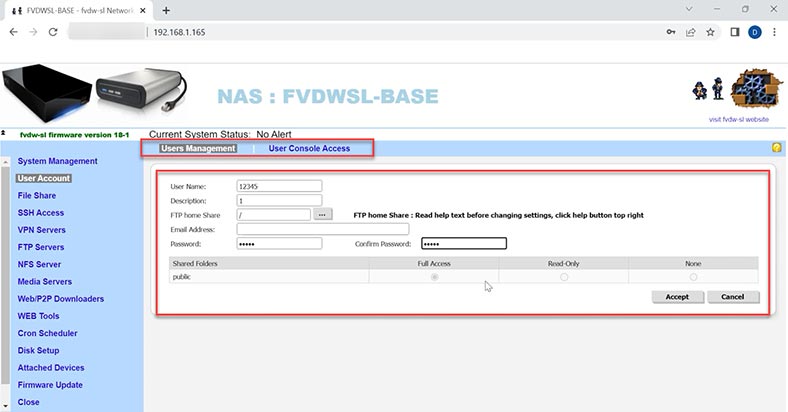
After that, add a shared folder with the name fvdw.
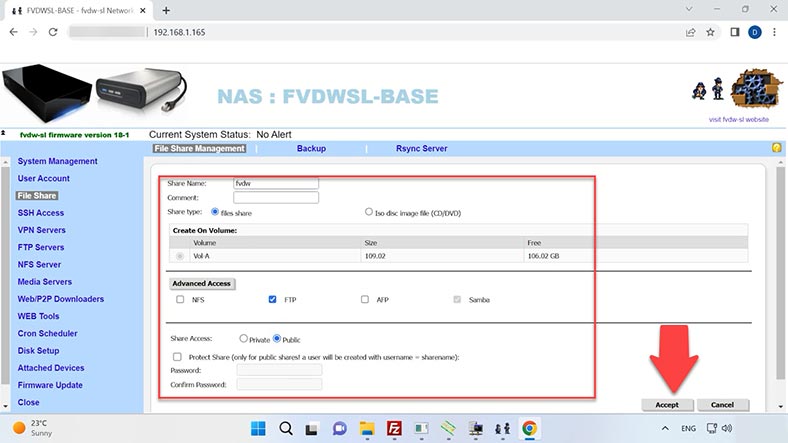
Enable the FTP server.
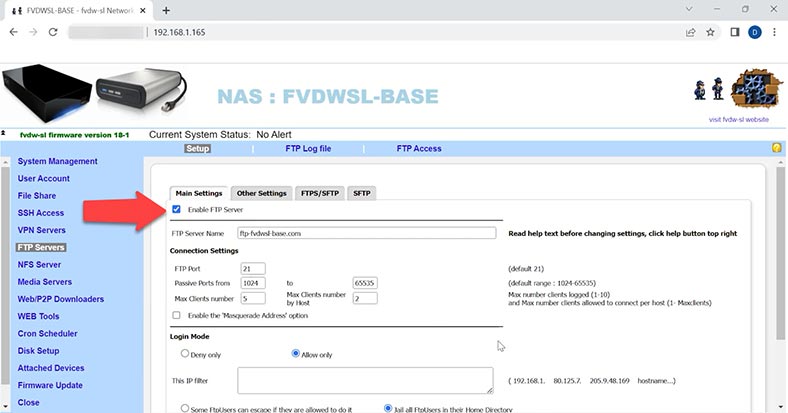
Now use the FTP client to connect to the storage and put the update files into the folder you have just created - fvdw.
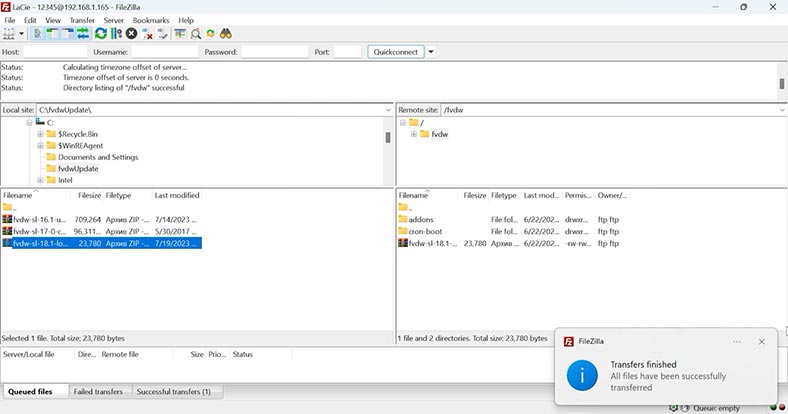
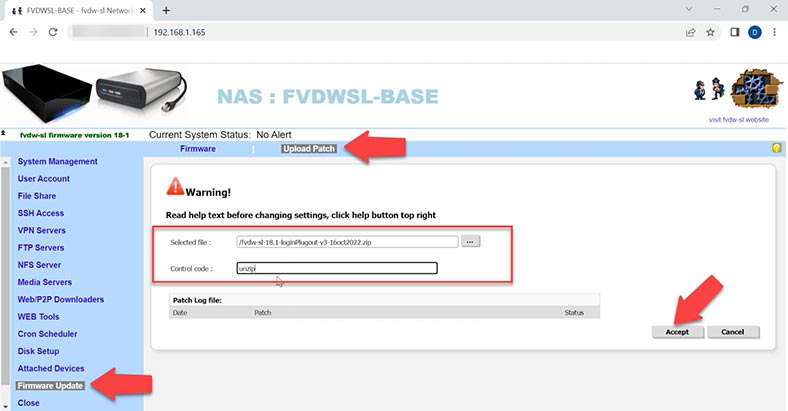
After that, go to the web interface and open the section Firmware Update. I have firmware version 18.1, and I need to download a patch to update it to version 18.2. To do it, open the tab Upload Patch, click on the three dots and choose the patch file. Then look down, find the line – Control code – type - unzip, and click Accept.
After that, open the Firmware tab again. Click on the button Update firmware via fvdw-sl server (last version). When step one is complete, click Start step 2 and wait until the installation is over. Now you have to reboot the device, so click on the button which says Start step 3.
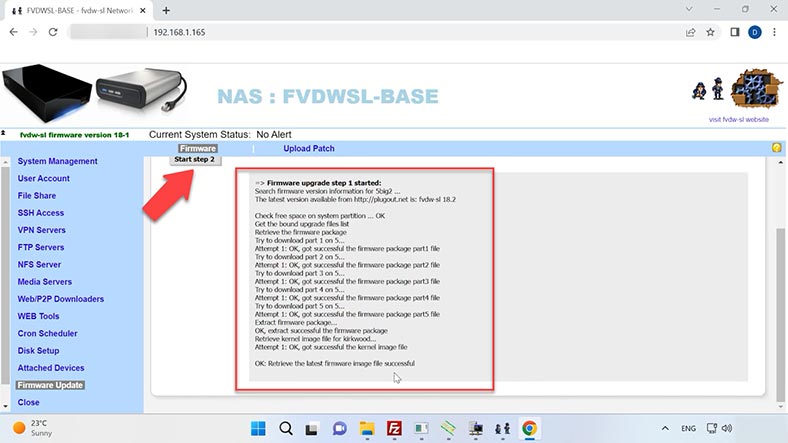
This way, you can update your device to the latest version available. After the NAS boots, you can see the version has changed, and now you can start building a disk array.
3. How to create a RAID on LaCie 5big Network 2 with the fvdw-sl firmware
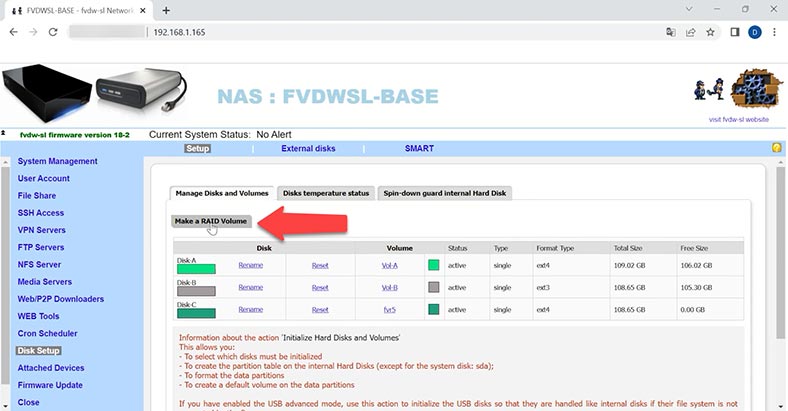
To create a RAID, open the section Disk setup. I have only one active disk at the moment, and if you click on the button Make a RAID Volume, other disks can’t be added. They should be initialized first. Look down to find and click on Initialize Hard Disks.
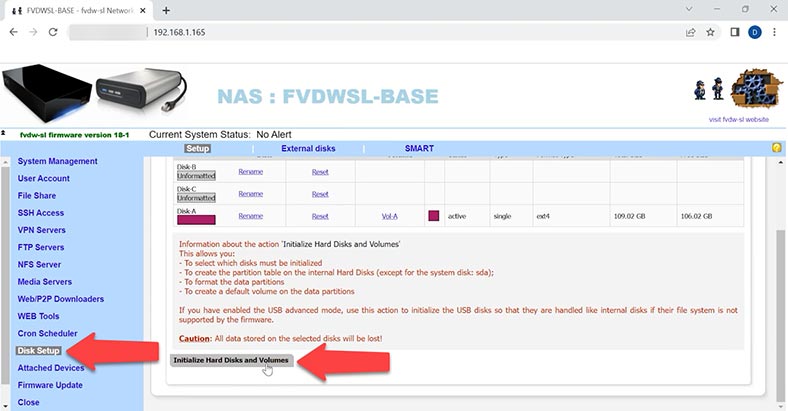
Select them, choose a file system and click Accept, Ok and Start the setup. When it’s over, restart the NAS.
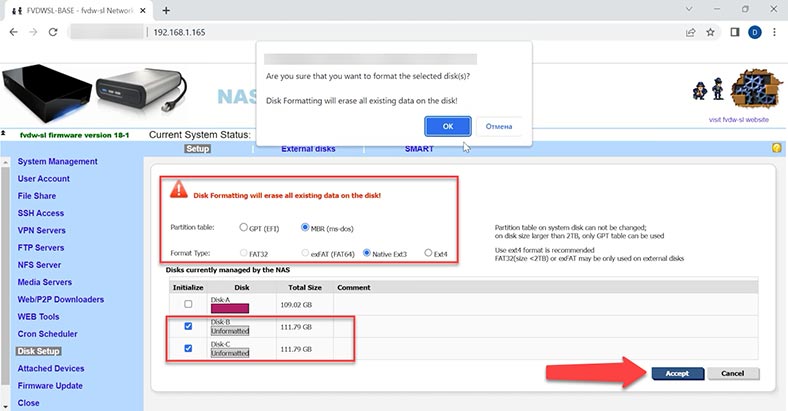
Now the disks are active. Click Make a RAID volume.
Give the volume name, select the volume type, choose the disks it will include, and the file system to be used. Click Accept, Ok and Start the setup task.
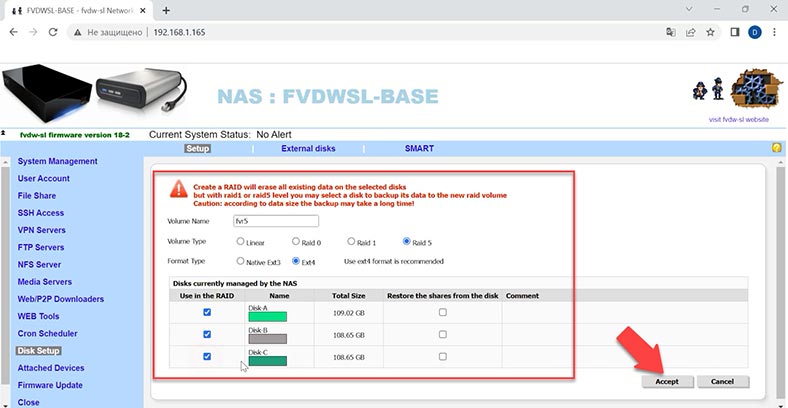
When this process is complete, restart the NAS. Now the disk array is ready for work.
4. How to Recover Data from a RAID on LaCie 5big Network 2 with firmware fvdw-sl
When the storage device is out of order, the RAID becomes inaccessible as well as all of its data.
If you lose access to the network drive when the network-attached storage fails or other hardware breaks down, you’ll need a specialized tool able to rebuild the crashed RAID and retrieve important data.
Hetman RAID Recovery supports all popular file systems and RAID types, including the technology required to build an array with the third-party firmware fvdw-sl. This utility will help you recover files after accidental deletion, formatting, hardware and software failures, and even after a NAS breaks down.
Англійська| Program | Platform | RAID Type | Features | Price | Trial Version | Special Features |
|---|---|---|---|---|---|---|
| Hetman RAID Recovery | Windows | RAID 0, 1, 5, 10, and others | Data recovery, RAID reconstruction, support for various file systems | Paid (depending on version) | Yes | Intuitive interface, support for a large number of RAID configurations |
| R-Studio | Windows, macOS, Linux | RAID 0, 1, 5, 6, 10, and others | Data recovery, RAID reconstruction, support for various file systems | Paid (depending on version) | Yes | Powerful analysis and recovery tools, support for many types of RAID |
| UFS Explorer | Windows, macOS, Linux | RAID 0, 1, 5, 6, 10, and others | Data recovery, RAID reconstruction, support for various file systems | Paid (depending on version) | Yes | Flexible settings, advanced recovery capabilities |
| EaseUS Data Recovery Wizard | Windows, macOS | RAID 0, 1, 5, 10 | Data recovery, support for various file systems | Paid (depending on version) | Yes | Easy to use, support for various types of RAID |
| DiskInternals RAID Recovery | Windows | RAID 0, 1, 5, 6, 10 | Data recovery, RAID reconstruction | Paid (depending on version) | Yes | User-friendly interface, automatic RAID configuration recovery |
To start the recovery process, take the drives out of the storage device and connect them directly to the motherboard of a Windows computer.
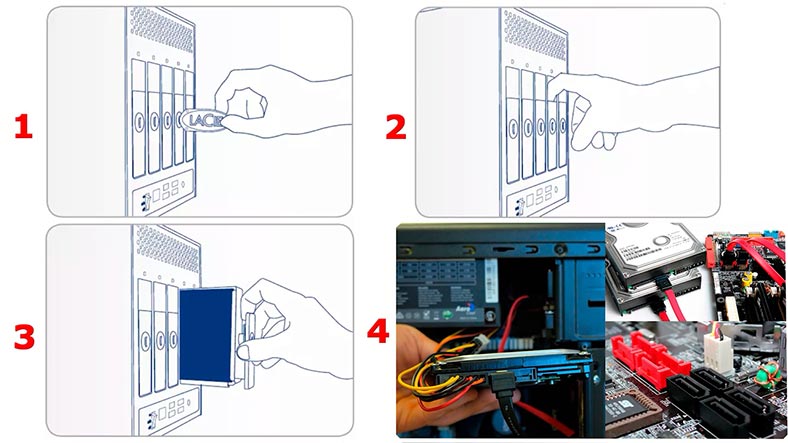
If your motherboard has less SATA ports or power connectors than necessary, use additional adapters and expansion cards. Also, depending on the RAID level, you can exclude one or two hard disks from the array. For example, RAID 5 retains operability if one of its hard disks is missing.
When the hard disks are connected and the program starts, it will automatically scan the disks and rebuild the damaged RAID. You will see the array properties below.
To get more detailed information, right-click on the array and open its properties. In the RAID tab, you can view more data, including the hard disks included into this RAID.
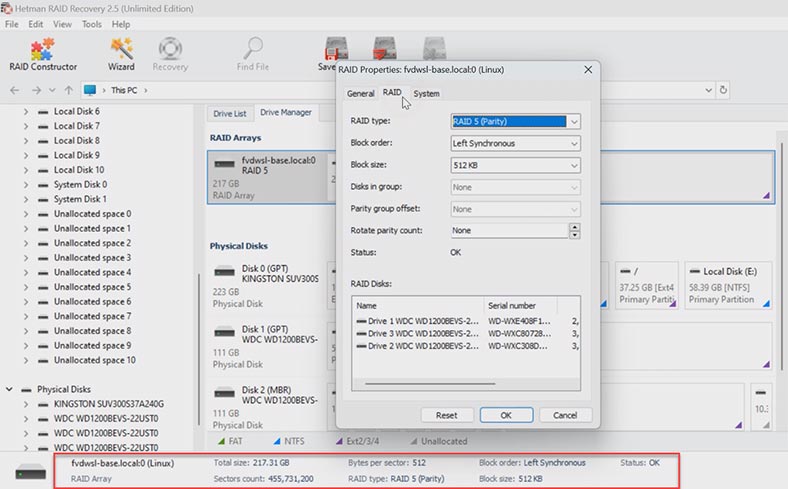
To search for lost files, right-click on the identified volume and choose Open. After that, choose the scan type - Fast scan or Full analysis. If the NAS is down, but the program manages to rebuild the RAID correctly, a Fast scan is enough.
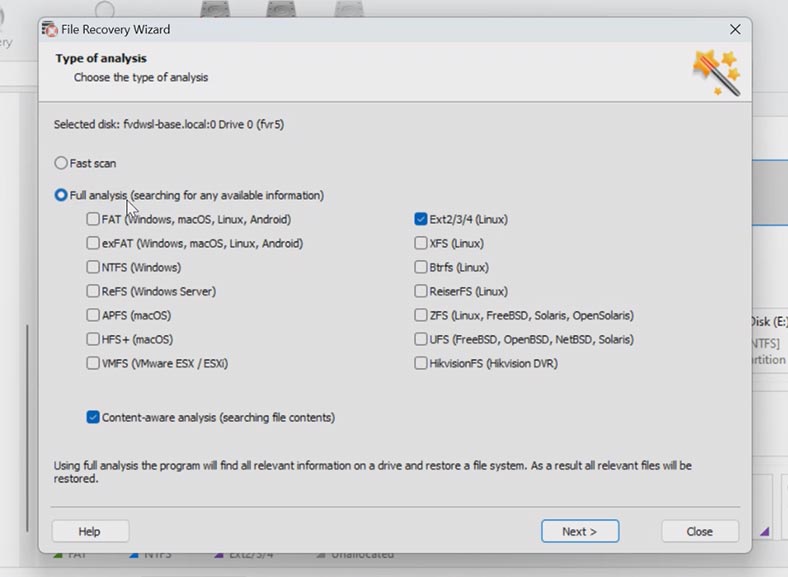
If the program can’t find the required files, then go for Full analysis. To do that, go back to the program’s main window, right-click on the volume and choose - Analyze again - Full analysis - specify the file system for this disk and click Next.
After that, open the folder where the lost files used to be. This program retains the entire structure and file names, so it will be easy to find the required items, and you can use the preview window to see their contents. The preview option is available for photos, documents and videos that have been deleted previously - they are marked with a red cross.
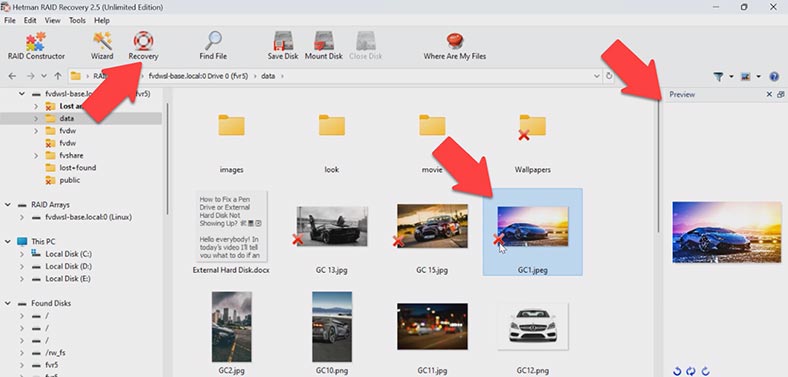
Select all the items you want to recover and click the Recovery button. Specify where to save the data (choose the disk and folder), click Recovery and Finish. You will find the recovered files in the folder you have chosen.
Also, this utility lets you create a disk image (by clicking on Tools - Save Disk) and then run all recovery operations from that image. As a result, the utility managed to rebuild the crashed RAID with the available hard disks, and helped us to restore all the files remaining on the hard disks, and even the items which have been removed before.
5. How to rebuild a RAID manually with the RAID Constructor
In some situations, the program may fail to rebuild the RAID automatically. It can happen when the service information on the disks is erased, so the program cannot identify parameters of the crashed RAID. In such cases, the RAID Constructor with a manual build feature will help you. This tool will save the day when the disk beginning is erased, together with the information about the array parameters.
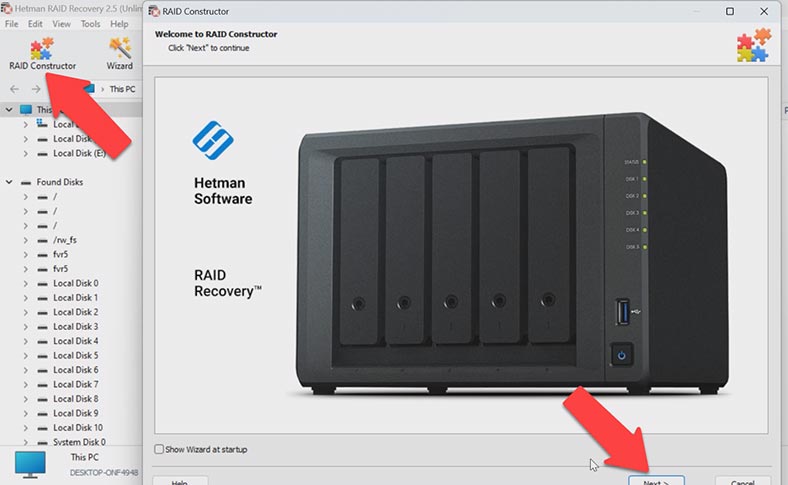
If you know the array parameters, start the Constructor, choose Manual Mode - Next. Specify the array type, block order and size. Add the disks it used to include, and replace the missing disks with empty drives by clicking the “plus” button.
You may have to specify the offset which tells you where the beginning of the disk is located. One more thing to choose is the disk order.
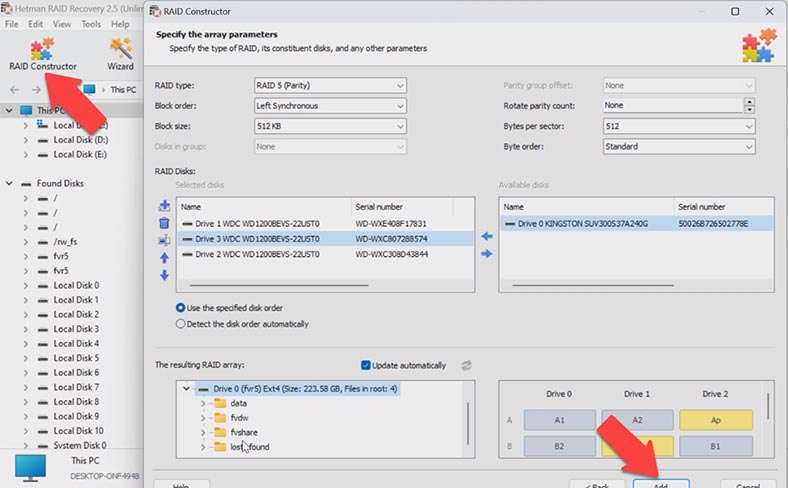
When you give all the parameters you know, you will see the preview of your RAID, and if all information is correct, you can unfold it to see its folders here. Fill in all the properties, and click Add. After that, the RAID system will appear in the Drive Manager. Now start the scan, search for files, and recover the ones you need.
6. Conclusion
Summing up, we can say that restoring operability of a LaCie device can be a challenging task, but it is not so difficult to restore access to files as long as you follow this guide. And don’t forget about backing up your stuff - this will save you from such situations.


