Windows 10 Update Error: Fix ‘Update and Shut Down’ or ‘Update and Restart’ Issue
Resolve Windows 10 Update Stuck: Fix “Update and Shut Down” or “Update and Restart” Issue with This Easy Guide! Is your Windows 10 update stuck on “Update and Shut Down” or “Update and Restart”? In this comprehensive troubleshooting article, we’ll walk you through the steps to fix this frustrating issue and get your updates back on track. From checking for pending updates to resetting update components, we’ll cover all the essential methods to resolve the problem. Whether you’re a beginner or an experienced user, you’ll find valuable tips and tricks to overcome the update stuck issue. Read now and get your Windows 10 updates running smoothly again!
- Method 1. Restart the computer with the Settings app
- Method 2. Run Windows Update Troubleshooter
- Method 3. Run Windows Modules Installer service
- Method 4. Perform a clean boot
- Method 5. Reset the Windows Update service
- Conclusion
- Questions and answers
- Comments
Usually the operating system doesn’t need any additional actions on the part of users to search and install official system updates. Internal settings of Windows 10 let the operating system receive and install necessary updates in time and without problems, so the user’s participation in this process has been reduced to a minimum. With the growing number of new apps and programs and the equally increasing list of possible threats, the automated process of delivering and applying updates is of vital importance to performance, safety and normal operation of any computer.

How to Fix 🛠️ Update Error 0x80070422 🔄 in Windows 10, 8 or 7
Most of the time, updating Windows 10 takes place as smoothly as possible. After downloading and installing an update automatically, the operating system is updated next time when the computer is shut down or restarted. Yet sometimes there are situations when the shutdown menu tells you to update the operating system every time you use the computer so you can’t actually finish the update process.
Users may see this recurring notification as an insignificant and minor issue sometimes affecting the Shutdown menu – and it’s that way most of the time – but there are high chances that the computer will fail to install an update correctly. Then it follows that this update issue has to be eliminated as soon as possible – and below, we’ve got some advice to help you do it in a quick and easy way.
Method 1. Restart the computer with the Settings app
As using the command Update when restarting or shutting down the computer via the Shutdown menu doesn’t actually complete the installation of updates, try using a different approach to restart the computer. To do it, you should open the settings for Windows Update.
Step 1. Use one of the many possible ways to open the Settings app. For example, click on the Search button (looking like a magnifying glass) which you can find in the lower left corner of your desktop, on the Taskbar next to the Start button, and type update, then select Best match – Check for updates. Otherwise, click on the Open link on the right.

Step 2. In the Windows Update tab click on the instant restart button if it’s available, to start installation of the received updates.

Note. If, instead of the button to restart the operating system, you see one of the settings suggesting that you should try again or download prepared updates, then click on it and let Windows Update download and install any official updates available. When it’s over, click the button to restart the operating system and accomplish the process of installing and configuring updates.
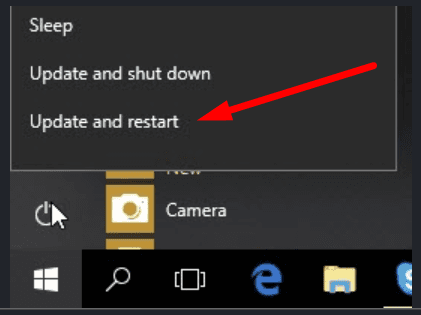
After such actions, Windows 10 usually gets upgraded with the received updates. When you finish the update procedures, you will no longer see the suggestions Update and shut down or Update and restart in the Shutdown menu.
If using forced restart for your Windows 10 from the Settings app did not eliminate the error of the update service, try another method described below.
Method 2. Run Windows Update Troubleshooter

How to Install or Safely Update Device Drivers for Windows 10, 8 or 7 📀🔄💻
The Windows Update Troubleshooter tool offers you a very convenient way to detect and eliminate automatically any issues you may face when updating Windows 10. However, it’s not an integrated utility so you need to visit the Microsoft official website and download it. Don’t worry about its possible impact on the hardware or the free disk space of your PC: it’s pretty small and requires only 1 MB for installation.
Download officially recommended Windows Update Troubleshooter.
Note. Always use a corresponding link to download the Windows Update Troubleshooter for the specific version of the operating system installed on your computer.
When the download is over, just run Windows Update Troubleshooter (installation is not required). You will see the program window suggesting to run a system diagnostics and fix the issues that prevent updating your Windows operating system. Click Next to start the diagnostics.
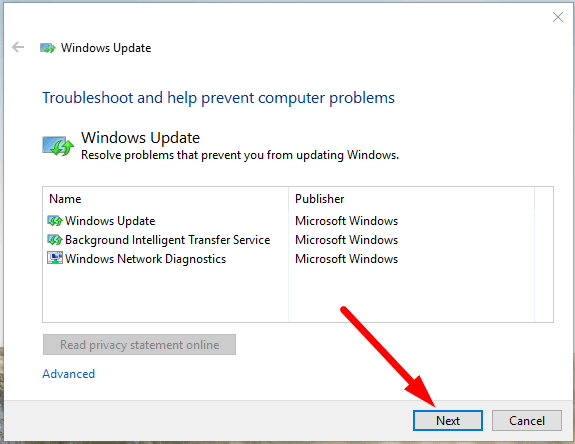
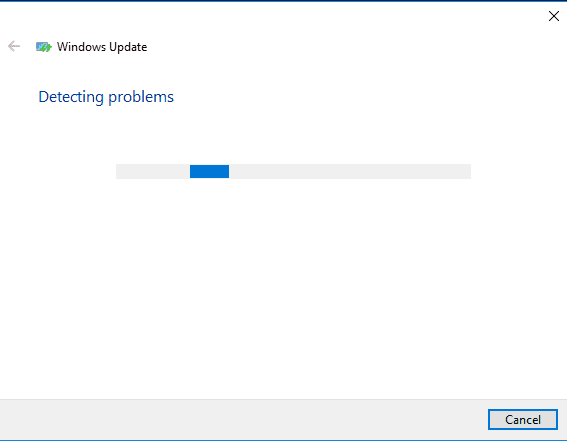
It involves several stages and scans the computer for issues. The entire process will only take a few minutes.
If the analysis can’t find any issues, the diagnostics service will ask you to giveWindows Update administrator rights so that the troubleshooter can run a deeper scan to look for other errors. Click Try troubleshooting as an administrator and give the app the corresponding rights.
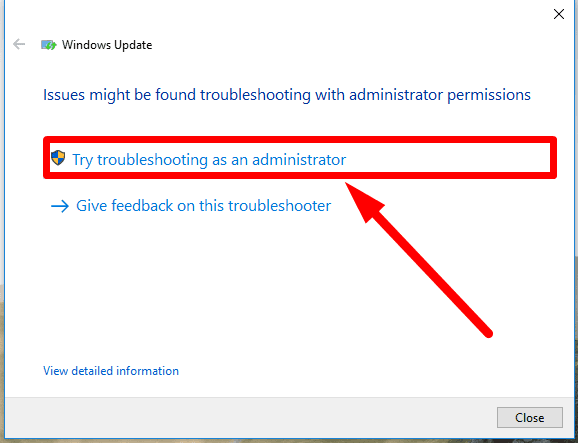
This process is not going to take longer than a few minutes, too.
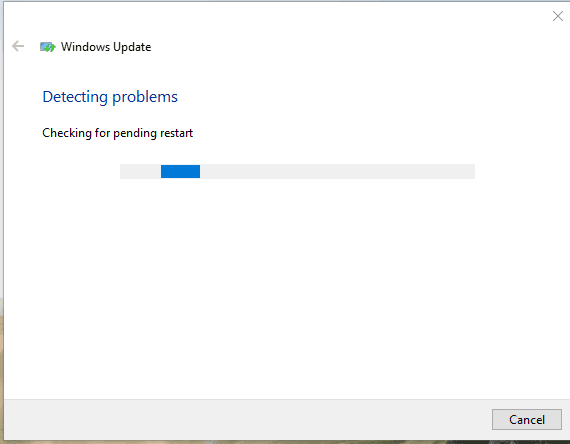
If the diagnostics detects an update problem, just click on the corresponding button to fix the problem automatically.
If it is impossible to solve all issues, try running the troubleshooter again to look for other problems.
When they are eliminated, click Close or Close the troubleshooter.
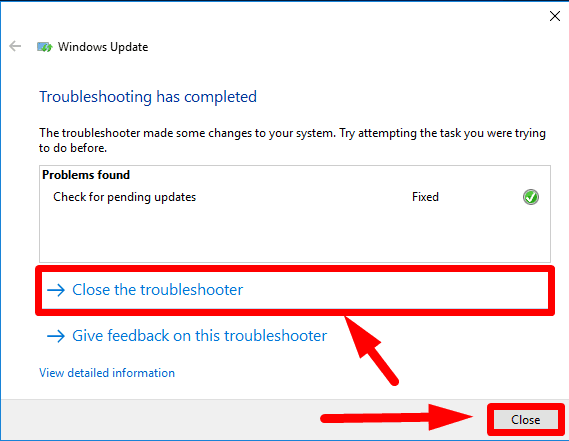
This method should eliminate the recurring problem with updates when restarting or shutting down the computer. If the problem is still there, though, try another method set forth below.
Method 3. Run Windows Modules Installer service
Windows Modules Installer is a built-in service of the Windows 10 operating system used for configuring, status scanning, starting, stopping, adding or removing system services, and it can also fix stuck updates for Windows. With corresponding permissions available, the SC module can be used to manage services both locally or remotely. To run the service, users have to use the command prompt console with administrator rights. The procedure is simple, just carefully follow the steps listed below.
Step 1. Click the Search button on the Taskbar to open the search panel. In the search line, type command prompt or cmd. The Best match section will show you the app you are looking for. Right-click on the result, Command Prompt, and select Run as administrator from the context menu. Otherwise, click on the corresponding link in the side panel.

When the pop-up notification from Windows User Account Control asks Do you want to allow this app to make changes to your device? click “Yes” and the command prompt with administrator rights will open.
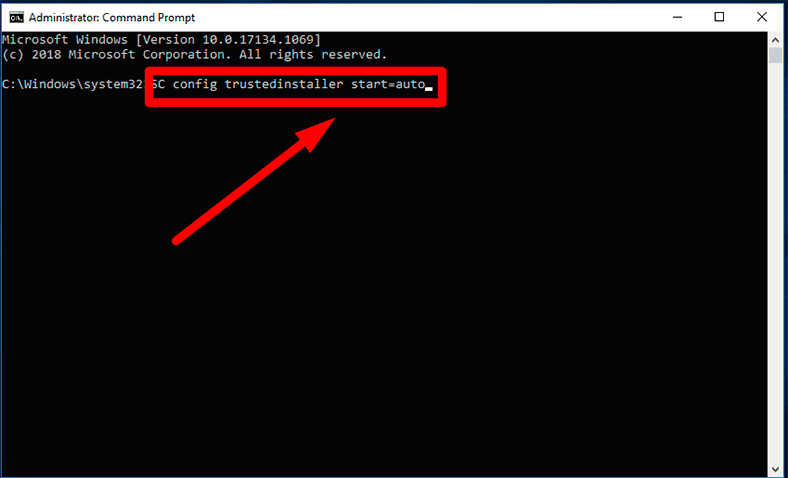
Step 2. In the corresponding line of the Administrator: Command Prompt window, type the command to modify configuration of the service entries in the registry and the database: SC config trustedinstaller start=auto, and then press Enter on the keyboard to perform the command.
SC config trustedinstaller start=auto
Step 3. If everything worked properly, you should see a message saying: [SC] ChangeServiceConfig: SUCCESS under this system command.
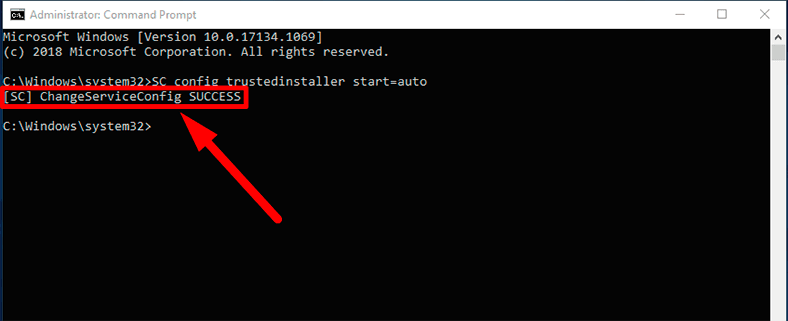
Now you can close the command prompt window.
Step 4. Open the main Windows menu and use the option Update and restart in the Shutdown menu to restart the computer’s operating system. These steps should be enough to fix the problem once and for good. If you don’t see any changes in the Shutdown menu and the notification about having to install an update is still there, restart the computer one more time and the problem will be solved.
However, if the operating system still says it needs an update, and you see this message every time, you will have to perform a clean boot.
Method 4. Perform a clean boot
Most Windows updates are very complicated and installing them has considerable consequences for the entire operating system. Unfortunately, numerous third-party background programs and services which start together with the operating system may cause problems when it comes to installing official updates. Talking of clean boot we mean starting a computer with the minimal set of drivers and programs on the startup list. Hence, doing things this way gives you a good chance to have Windows Update do the job without errors and failures.
Step 1. In the left corner of the desktop, next to the Start button, click on the Search button and type the msconfig command to open the interface for management of Windows boot and programs that start with the operating system. In the Best match section click on System configuration or click on the link Open in the side menu (if available).

Otherwise, use the keyboard shortcut Windows + R to open the Run dialogue box. In the line “Run”, type the command msconfig.
msconfig
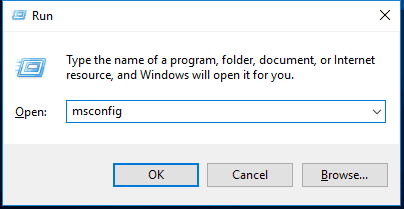
Either way, it will take you to the System configuration window.
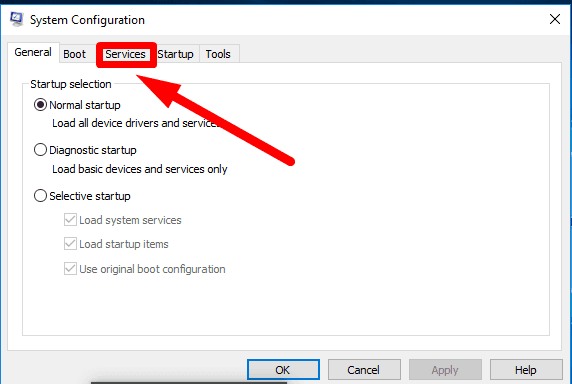
Step 2. Now go to the tab Services. In the lower left corner check the box for Hide all Microsoft services, and click Disable all.
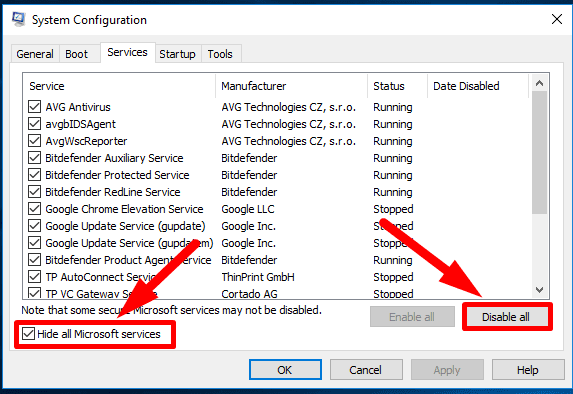
Important note! Checking he box for Hide all Microsoft services ensures that you won’t be able to turn off any important system services so using this limitation is absolutely safe.
Step 3. Switch to the tab Startup and click on the text link Open Task Manager.
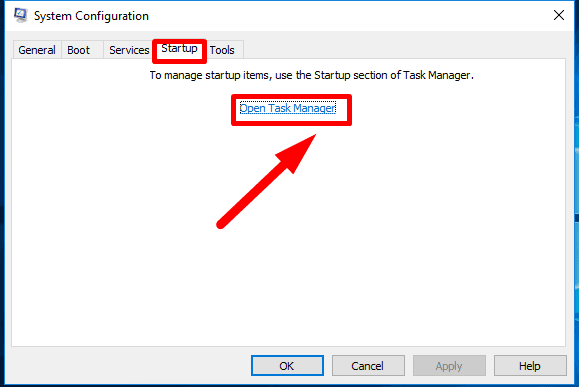
Step 4. The Task Manager app opens, with the Startup tab active. One by one, select and disable all startup items by just clicking on the button Disable, which you can find below the list of programs. If certain programs have been disabled before, don’t change anything for them.

When you are finished, close the Task Manager app.
Step 5. In the System Configuration window, click on Apply and ОК to save the changes you have made and close the system configuration service, and restart the computer.
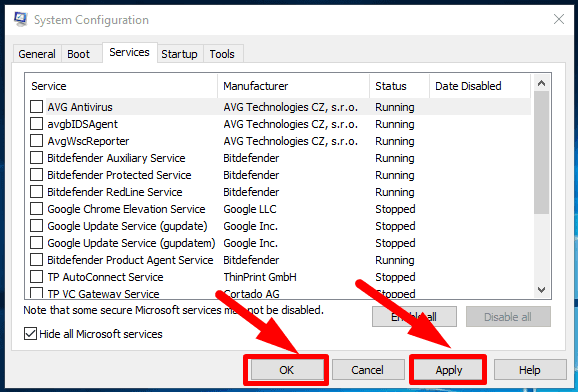
Now the operating system should boot without undesired services or startup items - hence the term clean boot. The computer may temporarily lose some of its functionality when clean boot is used, but everything will be restored when you switch back to default startup settings.
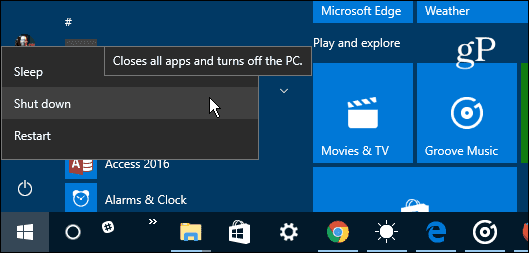
Step 6. If nothing has changed in the Shutdown menu after you restarted the computer, just use the option Update and restart to restart the computer again, this time manually.

Step 7. After your Windows 10 restarts again, you should see the standard Shutdown menu without any elements reminding you about updates.
In order to restore initial settings for booting Windows 10, open the System Configuration window again and enable all services by clicking on the button Enable allin the tab Services under the main list of apps.
This time, uncheck the box for Hide all Microsoft services, so that all available services of the operating system and third-party apps could be displayed.
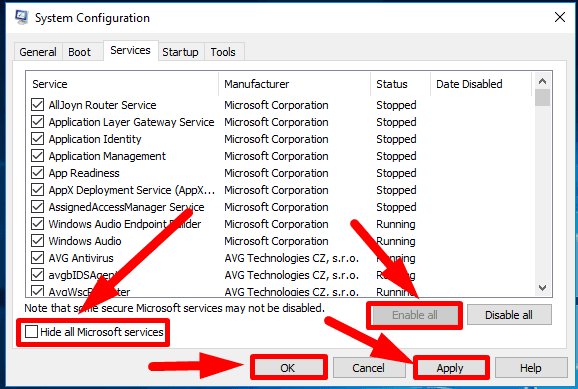
Also, remember to enable the startup items that you have disabled before when proceeding with the clean boot.
Now that you’ve finished modifying startup settings in the Task Manager app and the System Configuration window, close all windows after saving the changes by clicking on the buttons Apply and ОК, and restart the computer to have your Windows 10 operating system boot as usual.
Occasionally, when the clean boot can’t fix the problem, you can use another method described below.
Method 5. Reset the Windows Update service

Three Ways to Disable Automatic Driver Update in Windows 10, 8, 7 🔄🚫💻
Following a scenario to reset Windows Update removes old system update folders, re-registers Windows Update files and resets network connections. Probably, most users won’t have to use this fix but if other troubleshooting methods didn’t work, resetting Windows Updateshould eliminate any problems involving failed or frozen updates.
Note. Resetting Windows Update service doesn’t downgrade the current version of Windows 10 operating system to an earlier build. However, it can remove any failed or pending updates which will require the user to download such updates again.
Step 1. Download Reset Windows Update Tool from the website Microsoft TechNet.
Download Reset Windows Update Tool..
Step 2. When you extracted the contents of the ZIP file, right-click on the file ResetWUEng.cmd, and select Run as administrator from the context menu. Otherwise, click on the Run as administrator button which you can find in the Application Tools tab above. Confirm your decision by choosing Yes when the user account control service asks you Do you want to allow this app to make changes to your device? to start the scenario.

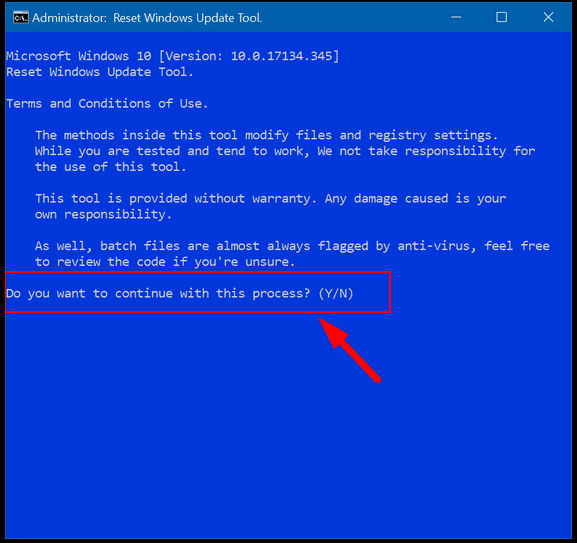
Step 3. In the new command prompt window for Reset Windows Update Tool press the Y key to confirm that you want to proceed.
Step 4. The next page will show you the list of possible actions. To reset Windows Update components enter 2 in the corresponding line.
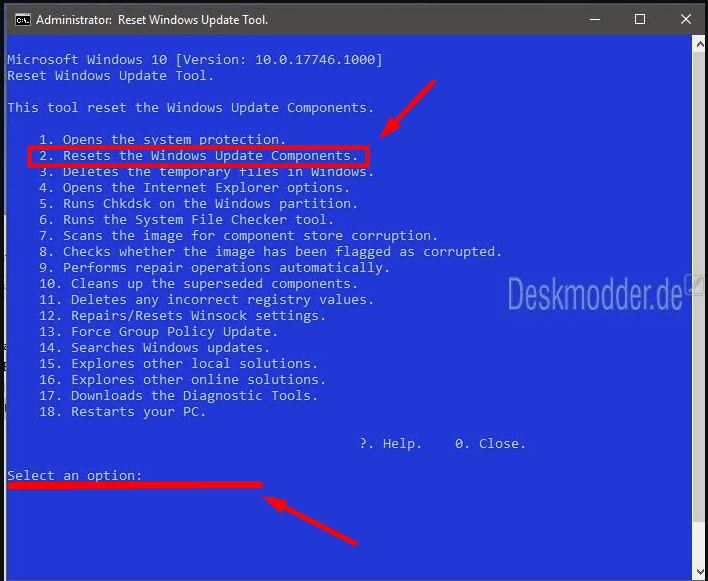
Performing this scenario will take some time so you’ll have to wait a little. If you failed to reset WindowsUpdate in the first attempt, just try again.
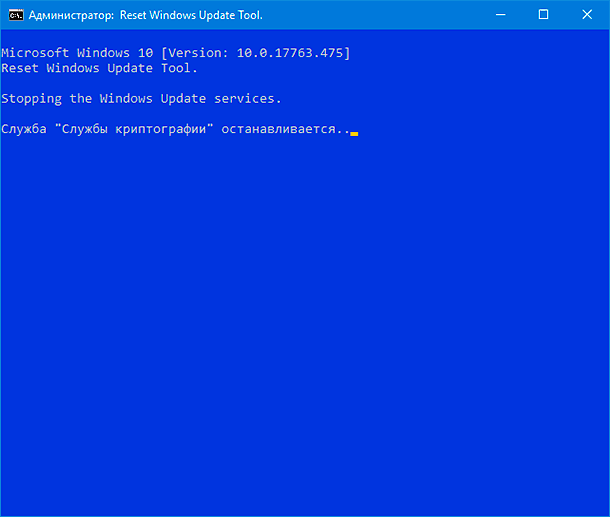
Step 5. When the process is successful, you should see a corresponding notification.
Step 6. In the Settings app, go to the tab Windows Update. See if there are any updates available by clicking on the button Check for updates.
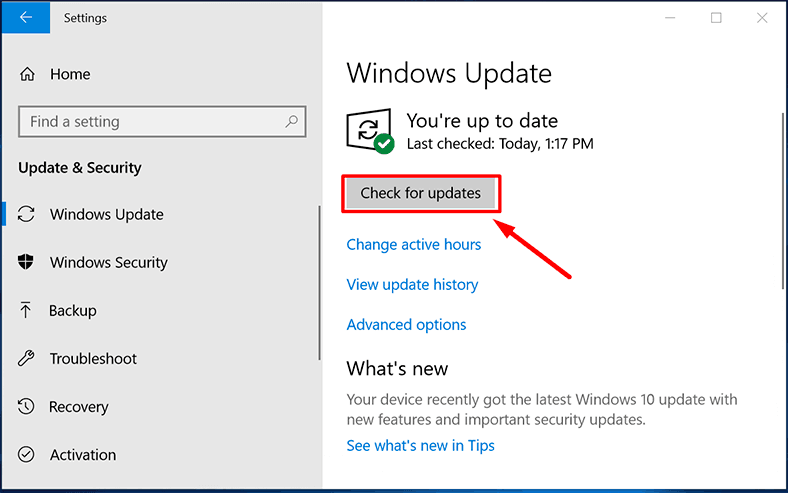
Install them by clicking Restart now.

Now there are high changes that the problem of your computer constantly demanding to update the operating system after restarting or shutting down the computer will go away, and most likely, you’re not going to see it anymore.
Conclusion
Using personal computers in many fields to ensure timely transmission and processing of data as well as for safe storage of information calls for advanced software - and one of its examples is certainly the latest operating system, Windows 10.
In spite of its high reliability, there could be occasional issues involving Windows Update service when the Shutdown menu displays the requirement to install updates after restarting or shutting down the computer.
Using the methods described in this article lets you fix the issue easily instead of ignoring it and add more safety and stability to your computer.
Truly, Microsoft engineers should deal with this issue as soon as possible - as well as with many other drawbacks related to Windows Update service that cause so much inconvenience to end users of their operating system.
We hope our advice helped you fix the problem. Leave a comment to ask a question, suggest a topic or let us know your opinion of the article.








Open Command Prompt as an administrator and type the following commands, pressing Enter after each one:
net stop wuauserv
net stop bits
Navigate to the C:WindowsSoftwareDistributionDownload folder and delete all the files and folders inside.
Open Command Prompt as an administrator and type the following commands, pressing Enter after each one:
net start wuauserv
net start bits
Open the Windows Update control panel and click “Check for Updates” to download and install any available updates.