How to Recover Lost Documents and Spreadsheets on Windows, Linux & macOS
Recover documents and spreadsheets lost after accidental deletion, formatting, file system failure, or an application crash. Restore files created with Microsoft Word and Excel, LibreOffice Writer and Calc, OpenOffice, ONLYOFFICE, and other compatible applications.
Before purchasing a license, scan your storage and preview the files found by Hetman Office Recovery to make sure the documents you need can be recovered and verify their contents and condition. To get started, download and install the program.
Select a Logical Drive or Volume With Deleted Documents
Choose the disk, partition, or storage device that originally contained the lost documents. On Windows, Linux, and macOS, select an accessible logical drive or volume for recently deleted files, or the physical device when recovering documents after formatting, partition loss, or file system damage.

Select a Logical Drive
Select a logical drive or partition when the file system is still accessible and you need to recover recently deleted documents. This is the best starting point after accidental deletion, emptying the Recycle Bin, or losing files from an otherwise working volume.
Select a Physical Device
Select the physical HDD, SSD, USB drive, or memory card when documents were lost after formatting, partition deletion, file system damage, or when the required logical volume is no longer available.
Analyzing the physical device allows Hetman Office Recovery to search beyond the currently available partitions and locate file system information and recoverable documents across the selected storage device.
Find a Deleted or Lost Partition
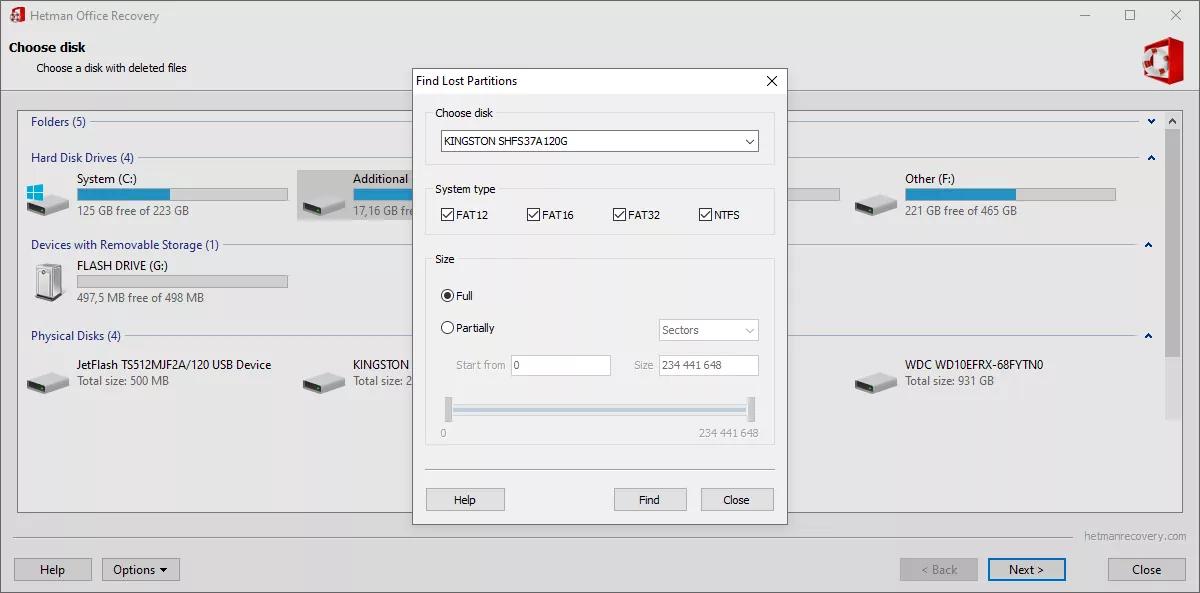
If the partition that contained your documents is missing from the current disk layout, select the physical device and use Options – Find Disks. The program will search the selected device for lost partitions and file systems.
You can specify the expected file system and approximate location of the lost partition, or search the entire device. Start with the fast search. If the required partition is not found, repeat the search using the comprehensive mode.
Detected partitions are added to the list of logical drives and can then be selected for document recovery.
Before You Start Recovery
Deleted files often remain physically present on the storage device until their disk space is reused by new data. The same applies in many cases after a quick format or file system failure: the original document contents may still be recoverable if they have not been overwritten.
Stop using the affected storage device as soon as possible. Do not copy new files to it, install software on it, or save recovered documents back to the same device. Any write operation can overwrite data belonging to the files you want to recover.
If the lost documents were stored on the Windows, Linux, or macOS system disk or volume, install Hetman Office Recovery on another drive whenever possible. You can also prepare the program on another computer and use a separate storage device for the recovered files.
Create a Disk Image
For an unstable, damaged, or heavily worn storage device, it is safer to create a disk image first and perform subsequent analysis on that image instead of repeatedly accessing the original device.
To create an image, exit the Recovery Wizard and select Options – Create Virtual Disk. You can image the entire device or specify a particular range of sectors.

Use an Existing Disk Image
To analyze an existing disk image, select Options – Mount Disk and open the image file. Hetman Office Recovery will add it to the storage tree, where it can be selected and analyzed like a regular device.
A disk image can also be created on one computer and analyzed on another, allowing you to continue recovery without further access to the original storage device.
Choose How to Search for Deleted Documents
Choose the analysis method according to how your documents were lost. Start with Fast Scan for recently deleted files. Use Full Analysis if the documents were lost after formatting, partition damage, or if Fast Scan does not find the files you need.

Fast Scan
Fast Scan is the best place to start when documents were recently deleted from an accessible disk, volume, or partition. Use it after accidental deletion, permanent deletion, or emptying the Recycle Bin or Trash in Windows, Linux, or macOS.
This method analyzes the existing file system information and usually finds recently deleted documents within a short time while preserving their original file names, folders, dates, and other available metadata.
If the required Word, Excel, LibreOffice, OpenOffice, ONLYOFFICE, or other supported document is not found, run Full Analysis.
Full Analysis
Full Analysis performs a deeper examination of the selected storage device. Use it when documents were lost after formatting, partition deletion, file system corruption, or when the required files cannot be found with Fast Scan.
The program analyzes the file system and scans the storage device sector by sector to locate information about deleted files and folders that is no longer available through the current file system alone. The same recovery approach applies to supported storage and file systems used by Windows, Linux, and macOS.
Full Analysis takes longer than Fast Scan, but it provides the best chance of finding documents after more serious data-loss scenarios.
Find and Preview Deleted Documents
Browse the scan results, check additional recovery folders, and preview the documents you need before saving them.

Find Deleted Documents
After the analysis is complete, Hetman Office Recovery displays the files and folders it has found in an Explorer-like view. When file system information is still available, deleted documents can often be found in their original folders with their original names and other metadata.
Browse the folder tree or use the available file information to locate the Word, Excel, LibreOffice, OpenOffice, ONLYOFFICE, or other documents and spreadsheets you want to recover.
“$Lost and Found”
The “$Lost and Found” folder contains files and folders that the program detected but could not reliably place in their original location. Check this folder if the required document is not available in its expected directory.
“$Content-Aware Analysis”
The “$Content-Aware Analysis” folder contains files detected by their contents and file signatures during Full Analysis. This method can find documents even when the file system no longer contains enough information about them.
Because these files are reconstructed from their contents, their original file names, folder paths, dates, and other metadata may be unavailable. Check this folder when the required document cannot be found elsewhere in the scan results.
Preview Documents Before Recovery
Select a supported document or spreadsheet to open it in the built-in preview. Previewing the file lets you check its contents and condition before saving it.
The preview is available before purchasing a license, so you can scan the storage and verify that the documents you need have been found and can be opened correctly before deciding to recover them.
If the required file displays correctly in the preview, select it for recovery. You can select a single document, multiple files, or entire folders.

Select Files to Recover
Mark the documents and folders you want to restore, then click Next to proceed to the saving options.
Save Recovered Documents
Choose a destination for the recovered documents, configure the saving options, and complete the recovery process.

Choose Where to Save Recovered Files
Specify a folder on another physical disk, USB drive, external storage device, or network location. Do not save recovered documents to the same storage device you are recovering them from, as this may overwrite other deleted files that have not yet been recovered.
If you are recovering documents from the system disk, use another physical drive or external storage device as the destination.
Configure Saving Options
Before starting the recovery, review the available saving options:
- “Path” – selects the folder where recovered documents will be saved.
- “Overwrite files with the same name” – replaces existing files with matching names. Leave this option disabled if you want to preserve existing versions.
- “Save directory structure” – restores the original folder hierarchy when this information is available. If disabled, recovered files are saved into a single folder.
- “Open folder after saving” – opens the destination folder when the recovery process is complete.
Click “Next” to start saving the selected documents and wait for the recovery process to finish.
Check the Recovered Documents
When saving is complete, open the destination folder and verify the recovered documents and spreadsheets. Keep the recovered copies on a separate storage device until you are sure that all required files have been restored successfully.
Quick Start
Watch this short video for a complete demonstration of document recovery with Hetman Office Recovery. See the entire workflow in action before downloading or installing the program.

-
Can I recover a document deleted with Shift + Delete or after emptying the Recycle Bin?
Yes. If the document data has not been overwritten, it may still be recoverable. Start with Fast Scan on the logical drive where the file was stored. If the document is not found, run Full Analysis.
-
Can I recover Word, Excel, LibreOffice or other documents after formatting a drive?
Yes, documents may still be recoverable after a quick format if their data has not been overwritten. Select the physical storage device and use Full Analysis to search the file system and scan the device for recoverable document contents.
-
How can I recover an unsaved Word or Excel document?
First, check the application's built-in AutoRecover, Document Recovery, Recent files, or unsaved-file locations. If an autosaved or temporary copy was written to the storage device but was later deleted or became inaccessible, data recovery software may also be able to find it.
-
Can I recover LibreOffice Writer and Calc, OpenOffice, and ONLYOFFICE files?
Yes. Hetman Office Recovery can search for supported document and spreadsheet formats created or edited with Microsoft Office, LibreOffice, OpenOffice, ONLYOFFICE, and other compatible applications. This includes common Office and OpenDocument files such as DOC, DOCX, XLS, XLSX, ODT, and ODS.
-
Why do some recovered documents have no original file name or folder?
Files found by Content-Aware Analysis are detected from their contents and file signatures. If the original file-system metadata has been lost, the document itself may be recoverable while its original name, folder path, dates, or other metadata are no longer available.