Top Tools to Recover Data from ZFS Drives: Ultimate Guide!
Are you facing data loss issues with your ZFS drives and wondering how to recover your valuable data? In this video, we’ll provide you with essential tips, top tools, and step-by-step methods for recovering data from ZFS file systems. Read now to learn everything you need to know about ZFS data recovery!
- ZFS file system structure
- How to recover data from a ZFS drive
- Erasing the main Vdev label
- Conclusion
- Questions and answers
- Comments
ZFS is a revolutionary file system that follows an absolutely different approach to administration of file systems while offering new features and advantages that no other file system can provide at the moment. ZFS is reliable, scalable and easy to manage.
It moves away from conventional file system principles by dropping the concept of volumes. Instead, ZFS offers more complicated storage pools that consist of one or more data media. Such media can be added to the pool or removed from it if and when necessary. File systems are then dynamically expanded or reduced without having to format specific media. ZFS ensures a format of disks that is constantly harmonized and coordinated. Such pattern guarantees that disk data is not overwritten for quite a long time, and all updates to the file system are made at the lowest level. However, just as any other file system, ZFS is not perfect, and it sometimes suffers from crashes and data loss.
| Feature | Description |
|---|---|
| Support for Large Data Volumes | ZFS supports extremely large data volumes, allowing storage of up to exabytes of information. |
| Integration of File System and Volume Management | Combines file system and volume manager, providing simplified disk space management. |
| Instant Snapshots | Allows creating snapshots of the file system for quick data recovery without significant resource overhead. |
| Data Corruption Protection | Built-in data integrity verification mechanisms using checksumming to prevent corruption. |
| Data Redundancy (RAID-Z) | Provides various levels of data protection through built-in RAID-Z functions to safeguard against loss. |
| Data Compression | Offers effective data compression, helping to save disk space. |
| File System Cloning | Allows creating cloned copies directly from snapshots for testing or development. |
| Encryption | Supports data encryption to protect sensitive information. |

ZFS File System on Linux Ubuntu and Its Key Advantages
ZFS file system structure
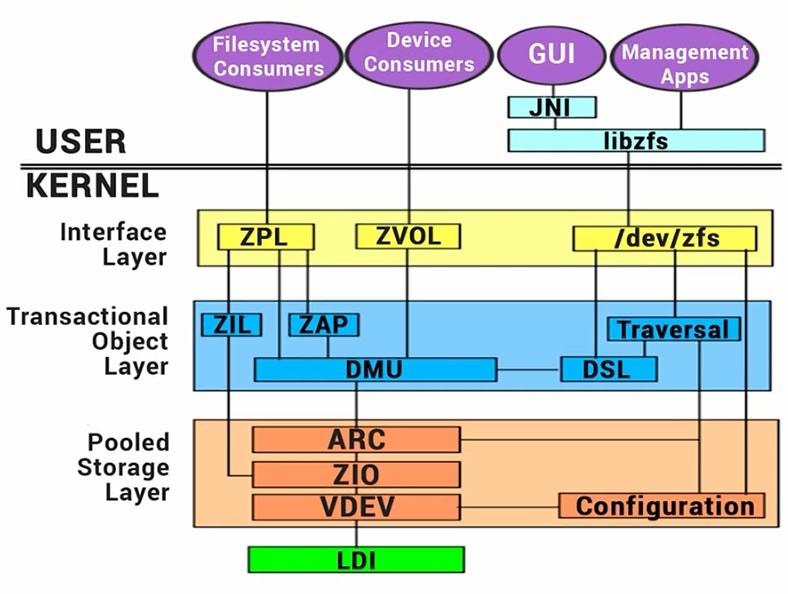
For starters, let’s explore the ZFS structure. It is divided into 7 main elements:
- SPA (storage pool allocator)
- DSL (data and snapshot layer)
- DMU (data management unit)
- ZAP (ZFS attribute processor)
- ZPL (ZFS POSIX layer)
- ZIL (ZFS intent log)
- ZVOL (ZFS volume).
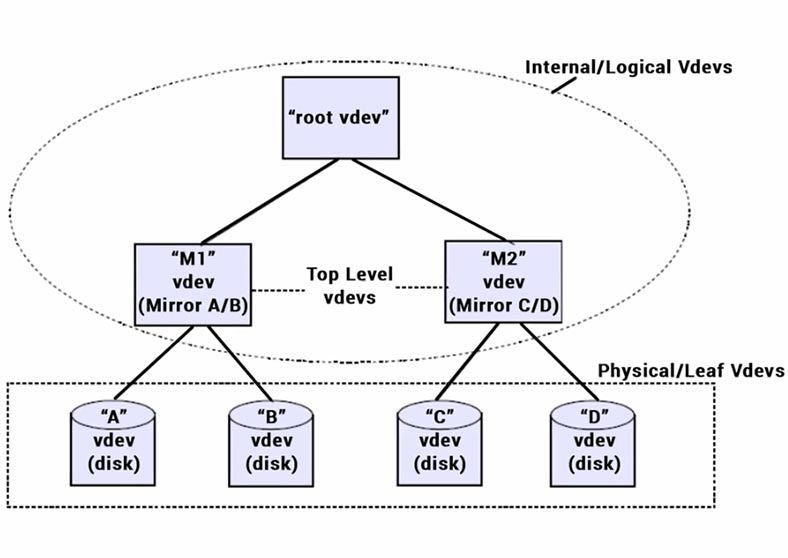
ZFS pools are built as combinations of virtual devices of two types: physical and logical virtual devices (vdevs). Physical vdevs are writable block devices (for example, hard disks), while logical vdevs are combined groups of physical disks. All vdevs create a tree, the leaves of which are represented by physical devices. All pools have a special logical vdev, which is the root of such tree. All branches of the root vdev are known as top-level virtual devices.
Every physical virtual device contains a structure of 256 KB known as vdev label. It contains information about this device and all virtual devices with which it shares a top-level vdev.

The label comprises four parts: 8 KB of blank space, 8 KB of boot header, 112 KB of name/value pairs and 128 KB of space occupied by 1 KB uberblock structures.
Unlike other file systems, ZFS does not have such a thing as Superblock, but it has a Vdev Label instead.
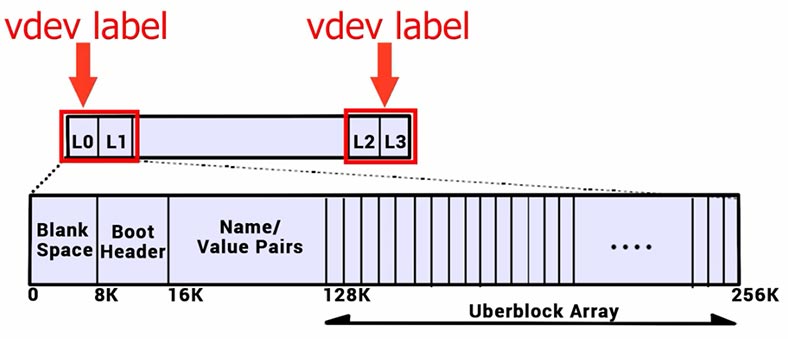
In the structure, there are four of them, each occupying 256 KB of space. This is where they are located: label zero and label one – at the beginning of the disk. 0-256 – zero label, and 257-512 – the first label. The second and the third are positioned similarly, but at the end of the disk.
Inside vdev labels, there are uberblocks that contain links to data. If one of vdev labels is erased, a data recovery tool may have some difficulty in searching for information on the disk.
How to recover data from a ZFS drive
In a Linux operating system, I created a ZFS pool, wrote some data to the disk – a few folders containing photos, videos, and documents, and then removed some of them.
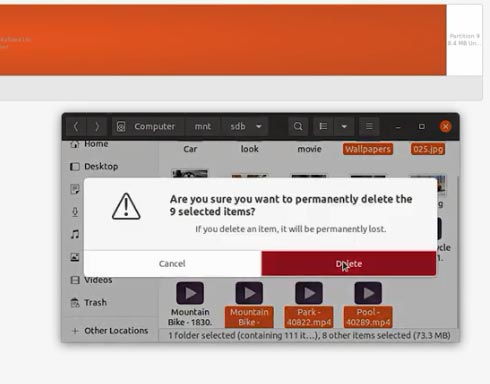
For our tests, we have selected several popular data recovery tools – Hetman RAID Recovery, ReclaiMe, UFS Explorer, Disk Drill, Wondershare Recoverit and R-Saver.
All right, let’s get down to testing.
Test 1. Hetman RAID Recovery
Let’s connect the ZFS disk. Windows can’t recognize this file system, and when the drive is connected, the operating system suggests formatting it so that the disk can be used.
However, in fact there is no need to format anything – start Hetman RAID Recovery and scan the disk. You can see that the program can recognize the disk, detect its file system and display its name and size properly.
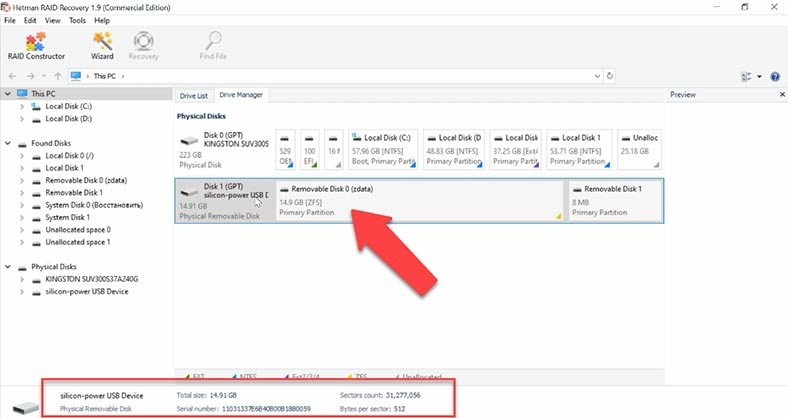
To view the contents and find the deleted files, right-click on the disk and choose “Open”. In this case, a “Fast scan” should be enough. This type of analysis will scan the disk quickly and display the results.
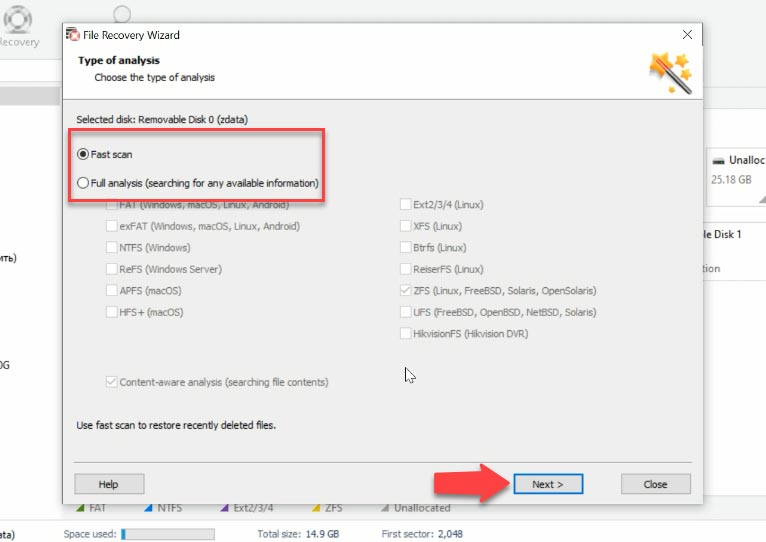
In this scenario, the tool has no difficulty in finding the files deleted in such a way, and it displays them marked with a red cross. Full analysis and signature search are not required for this case. Considering they take much longer to complete, it saved us quite a lot of time.
The contents of all files can be checked with the preview feature, and you can search files by name, which helps you find the necessary data even quicker.
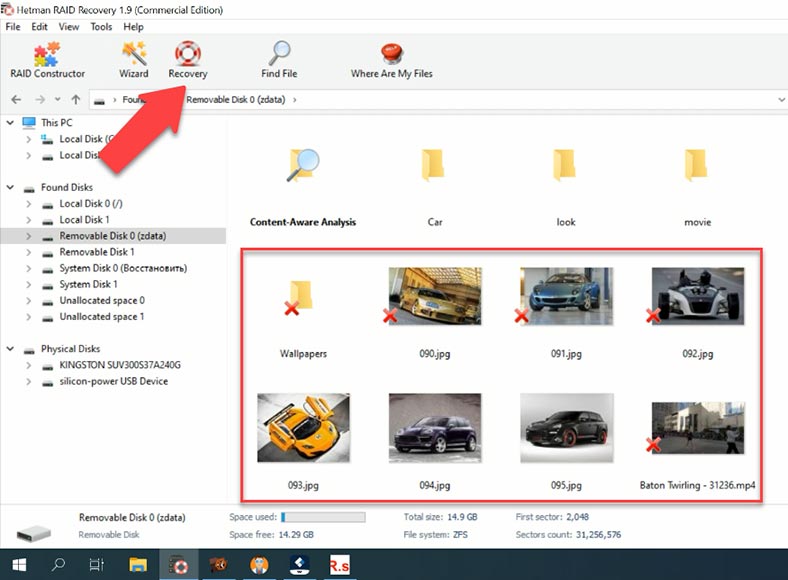
Now, all the files have been recovered. What is more, the disk structure is retained, so all files and folders can be found where they used to be, and it makes searching for lost data extremely easy. In a very short time and with little effort, the program was able to find and recover the data previously removed from a ZFS disk.
Test 1. UFS Explorer
Let’s try another candidate, UFS Explorer. It shows the disk name, capacity and an ZFS partition below. When you view the contents of this directory, only the files which are still on the disk are displayed, but you can’t see the ones that have been deleted. Let’s run a Quick scan. The result is similar.
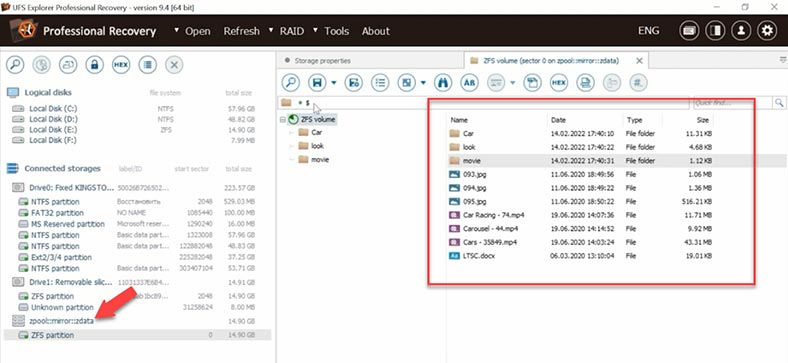
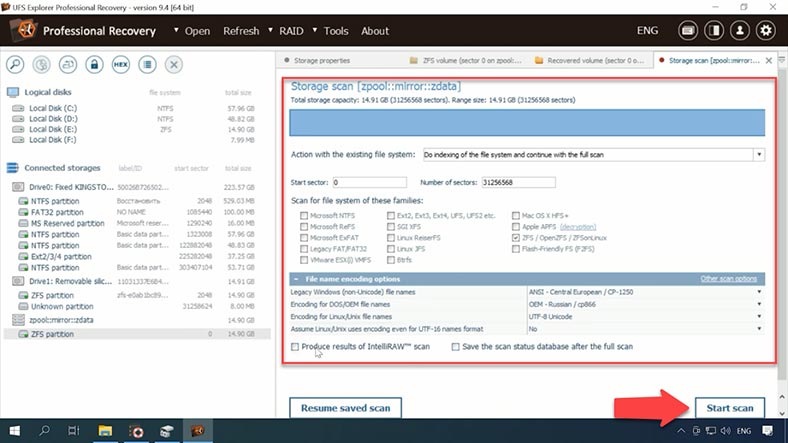
Now let’s start searching for lost files. Uncheck unnecessary options – if you don’t do that, the search will take longer. This is a disadvantage for novice users, who are unlikely to notice and disable all those options. Searching for lost files on a relatively small 15 GB drive took over 15 minutes. Scanning a disk of larger capacity will certainly require much more time.
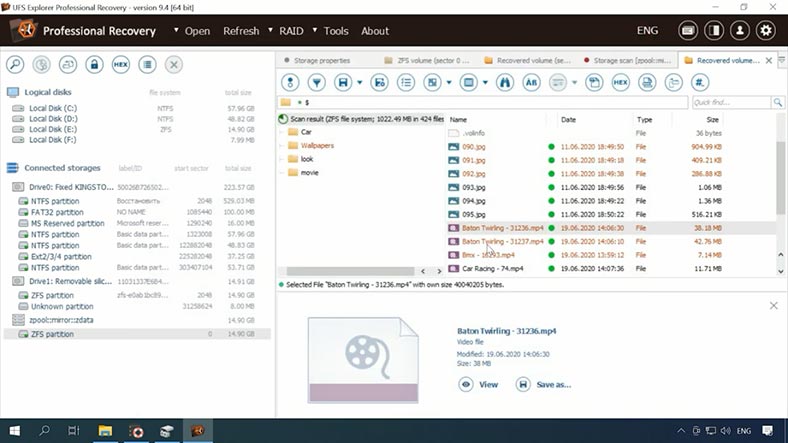
As a result, the program has found the deleted data – it is marked with a different color, but only photos can be previewed. This is another drawback, because we cannot understand if they could be recovered in the end, and if they are going to be damaged. Also, it’s very inconvenient to know so little about your chances of recovery before you actually buy the tool.
Test 1. ReclaiMe Pro
Let’s try another candidate, ReclaiMe. The initial screen doesn’t show the disks; at first, you need to set up a proxy server, then skip the registration window, and then configure disk scan options. After that, the program will start analyzing connected hard disks and then display their list on the screen, which also takes some time. The program reads service information, identifies the file system, file names and so on. When the process is over, we can see the list of recognized devices.
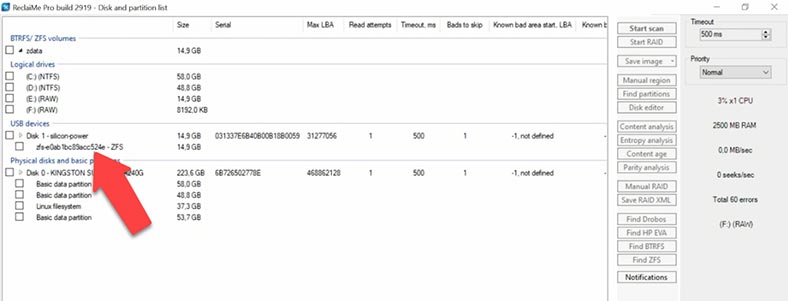
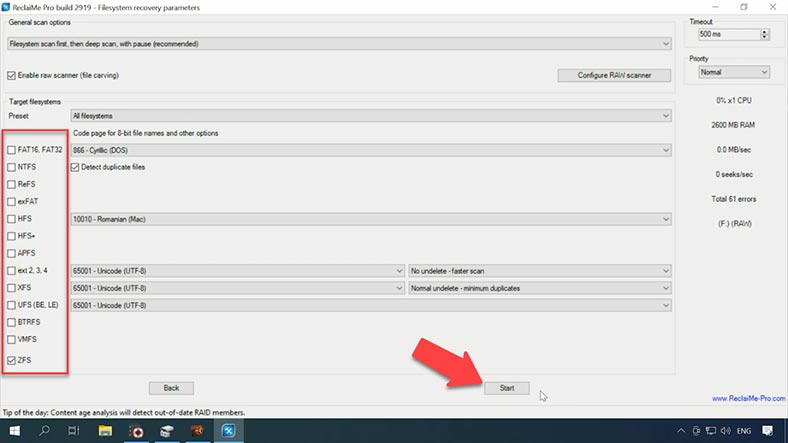
The test disk with ZFS file system. Select it and start the scan. In the next window, you can choose the scan type: we leave the recommended option as it is, uncheck unnecessary file system options. The program has identified the file system, but nevertheless, all file system variants are activated. If all variants are selected, the scan will take much longer, so that why we choose to uncheck the unnecessary ones, and then click “Start”.
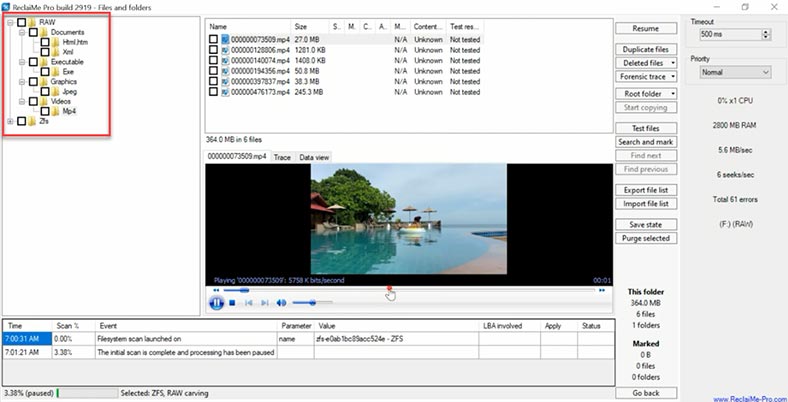
As a result, the program has found some files; only the contents of RAW folder can be previewed, and other files are not displayed. The deleted files are not showing either, file names are not preserved, the disk structure is damaged, and the program couldn’t find any documents. Most likely, a deeper scan is required to find the deleted files, so let’s click “Resume” to start.
The deep scan of a 15 GB drive took over 30 minutes; when scanning, this program uses a signature search – you can tell it by how the files are sorted. When dealing with a drive of big capacity, the process can be really long. As a result, documents are not available for preview, and some of the photos we have found are damaged.
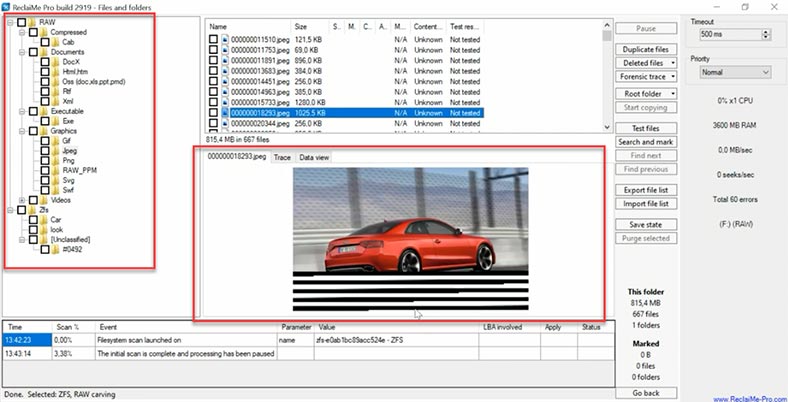
The same happened to video files: some of them are damaged and can’t be played properly. The structure and file names are lost, many files are damaged, and they will not be recovered completely.
Test 1. Disk Drill
The next one on the list is Disk Drill. The program can identify the storage device, its name and capacity, but the file system is not recognized. Quick Scan is not available for this disk as the program was unable to identify its file system, so all you can use is a deeper scan. Click “Search for lost data”.
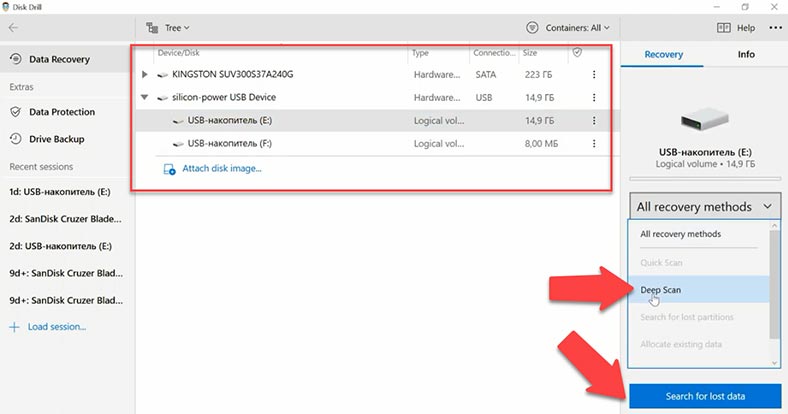
With such scan, the program also looks for files by their signatures; in this case, file names and disk structure are not preserved, and the scan takes a pretty long time to complete – it turned out to be longer than with other tools. As file names are not preserved, it’s difficult to understand which of them were removed, and it’s also hard to tell how effective the final result should be. In the preview, we can see that some photos and videos are damaged. The documents it has found can’t be viewed.
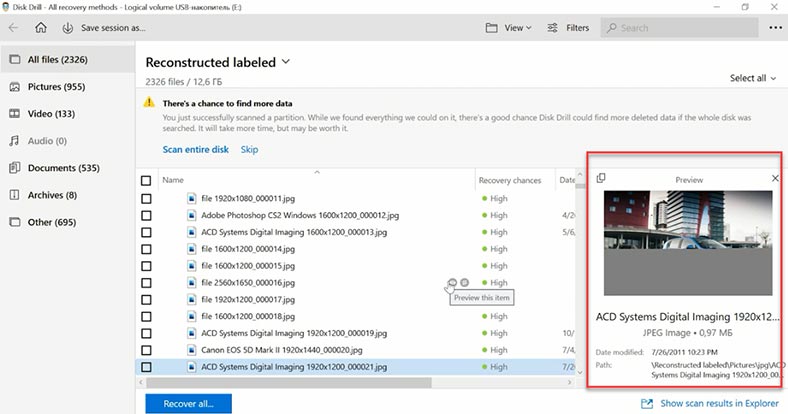
The program did manage to find some of the deleted data, but it lacks the quick scan feature, deleted files are not marked in any way, all files are sorted into folders by type, and it is difficult to find the ones you need. Also, file search takes quite a long time. Taking into account the results demonstrated by its rivals, it’s better to choose a different tool.
Test 1. Wondershare Recoverit
One more program to test is Wondershare Recoverit. The program can recognize the test disk, but it can’t identify its name and the partition containing the file system. Also, you can’t choose a scan type for this file system.
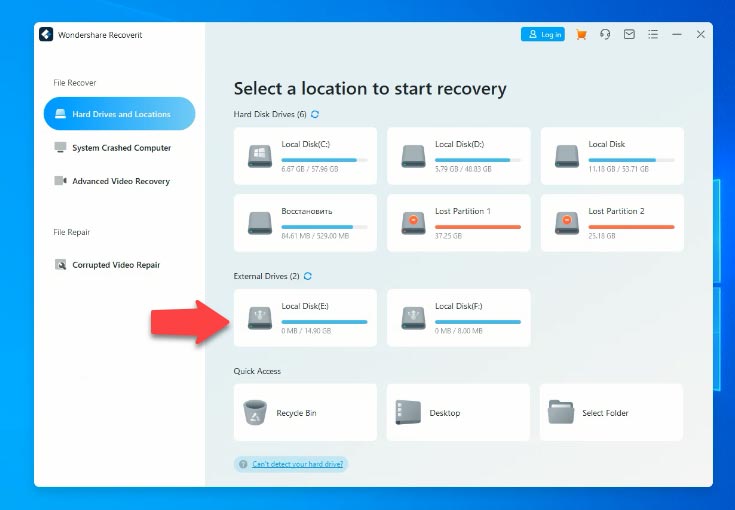
When you try to open the disk, the full scan starts immediately. While scanning, this program uses signature search. Just as with the previous recovery tools, files are sorted by type. When the scan is over, we can see that the program managed to find the files and even partially rebuild the disk structure. The folders with preserved names don’t contain any deleted files.
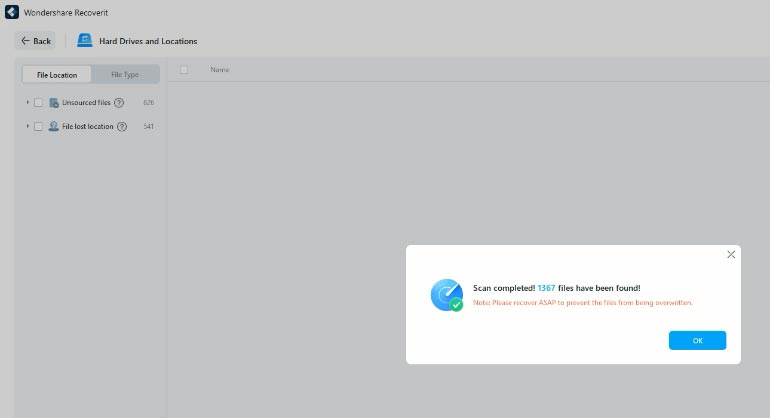
Other files are sorted by type but their names are missing, so it is difficult to evaluate the scan result. Some photos are damaged, video previews are limited to 10 seconds, so it is hard to tell if the program can recover such files in full. In documents, you can only view their first page, and the rest should be available only after you purchase the full version of this tool.
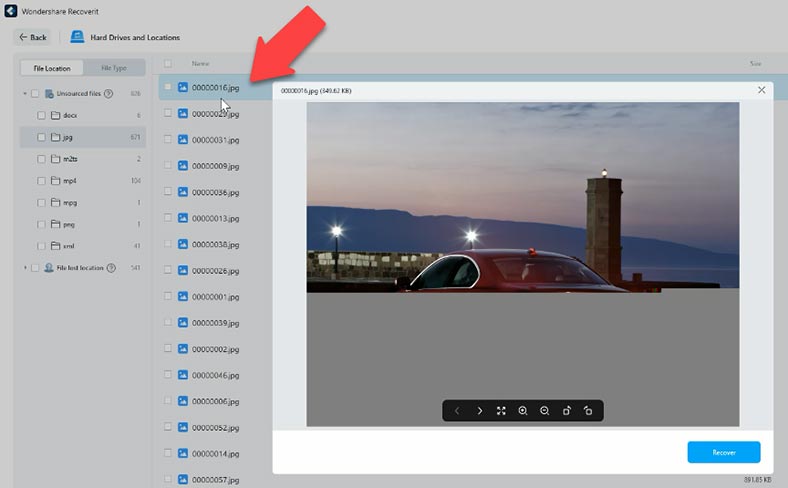
In the end, we can say that this program does support ZFS, but some files get damaged, and it is difficult to evaluate the result properly as we can’t see which of the files are the ones that have been deleted before the scan.
Test 1. R-Saver
The next one on the list is R-Saver. It can recognize the disk, but the format is unknown for this tool, as it can’t identify the file system. We couldn’t open the disk without scanning, so the deep scan begins.
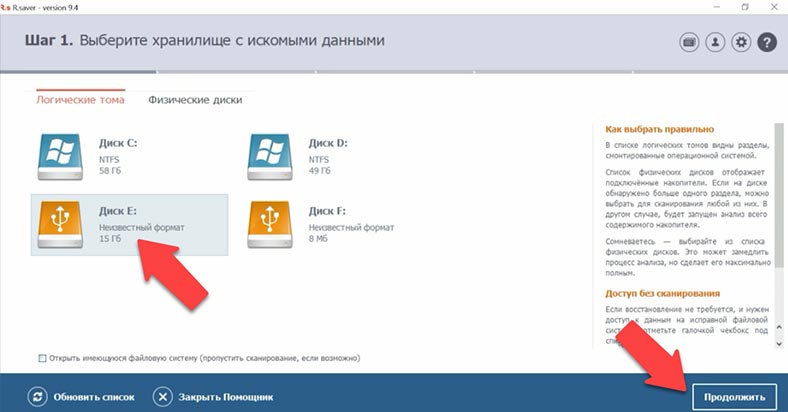
In the end, the program has found some files; it shows deleted photos in the root folder, and their contents can be previewed. Documents are not displayed; the videos that remained on the disk and the videos that we have removed could not be found; and there is not a single folder with photos.
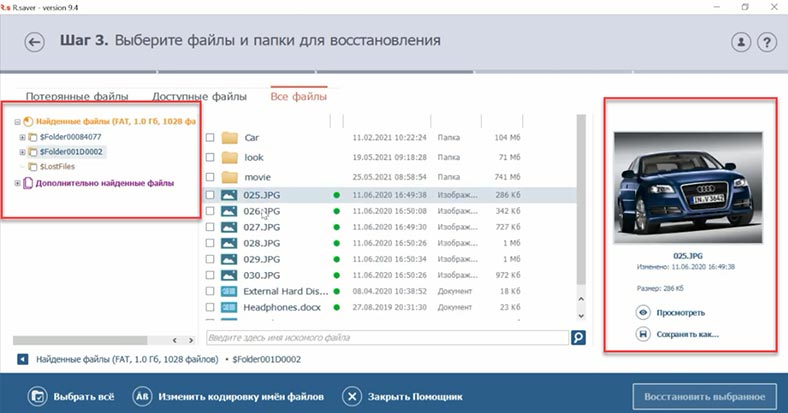
Videos are not displayed in preview. However, the disk structure is preserved, but one folder is still missing. That’s a good result for a free tool, but you shouldn’t rely on it too much, as most of the information was not recovered.
Erasing the main Vdev label
For the second test, I’m going to erase the main Vdev Label. Then I’ll save the result to a disk image. It will be used in all recovery operations.
All further tests will only involve the programs that managed to recover all data and preserve the disk structure – and they are Hetman RAID Recovery and UFS Explorer. As to the others, we already know, with more or less certainty, what results should be expected.
Test 2. Hetman RAID Recovery
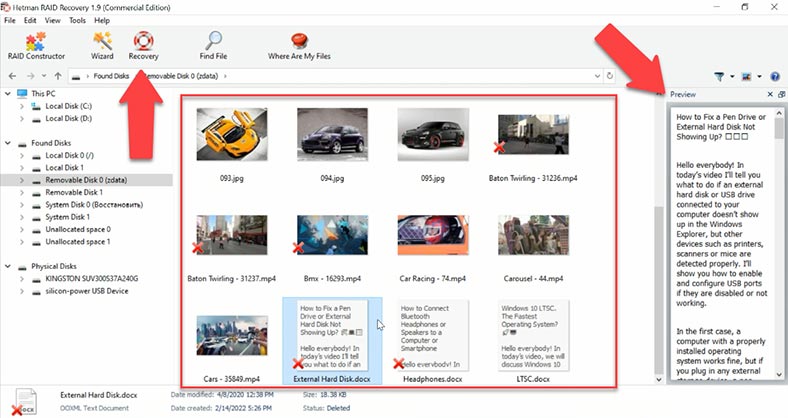
All right, let’s start Hetman RAID Recovery. As you can see, even in this case the program can identify the disk, its name and file system. Even the “Fast scan” option is available.
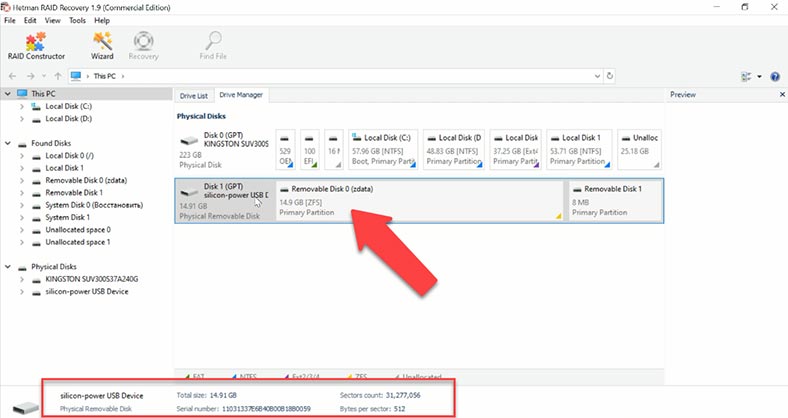
Finally, it shows the same result as in the previous test, without erasing elements. All photos, documents and videos are displayed, and the deleted ones are marked accordingly, with their names and disk structure preserved, and not a single file is damaged. Their contents can be viewed without any limitations, and it means you can be 100% sure that these files will be recovered in full.
Test 2. UFS Explorer
Let’s try the other candidate, UFS Explorer. There is no quick scan option either, so let’s look for deleted data.
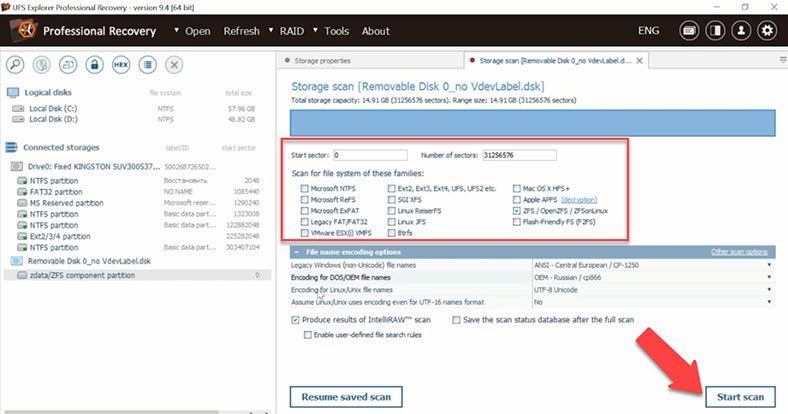
The result is also similar to the previous test. The program has found the deleted files and marked them with a different color. However, previews are only available for photos. This is a serious disadvantage, as we don’t know if the program can recover them in full, and to check it, all you can do is to buy the full version. That’s why we can’t be sure if the recovery works as expected.
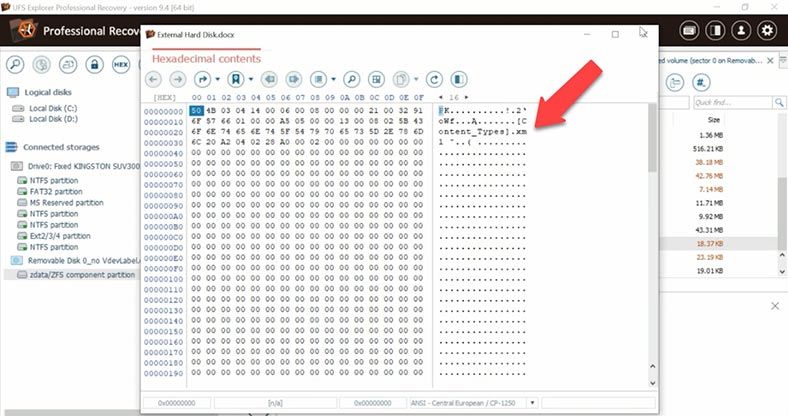
This is another drawback, because we cannot understand if they could be recovered in the end, and if they are going to be damaged. Also, it’s very inconvenient to know so little about your chances of recovery before you actually buy the tool. If we have a closer look at the photos, we can see that some photos are not displayed.
Conclusion
Now let’s draw the bottom line. From the entire list of tested recovery tools, only two programs managed to find data with file names and disk structure preserved – Hetman RAID Recovery and UFS Explorer. However, UFS Explorer fails to display previews for documents and videos. Without saving the files, it is difficult to estimate if all of them can be recovered in full. This is very inconvenient, because you have to buy the full version of the program to be able to save files, and in the end, the files could be damaged, and some documents or videos may never open.
On the other hand, Hetman RAID Recovery displays all files in the preview window, and you can evaluate the program’s effectiveness before actually paying for the full version license. The recovery process is very simple because of the convenient and intuitive interface that is easy to navigate even for beginners. This program lets you retain the folder structure and file names which makes it easier to search for certain data and saves your time. The algorithm used in our product lets you recover data even if the entire structure of the file system is erased, and if the disk has at least some data left, Hetman Partition Recovery can restore it and display it to you due to using signature analysis.
In addition, this tool supports recovery from RAIDs of various levels including RAID-Z, and works with most file systems. It can also help you rebuild a damaged disk array and extract the lost information.
| Characteristic | Hetman RAID Recovery | UFS Explorer | Reclaime | DiskDrill | Wondershare Recoverit | R-Saver |
|---|---|---|---|---|---|---|
| ZFS Support | Supports, detects file system and disk structure | Supports, shows remaining files, but not deleted ones | Supports, but does not preserve disk structure, requires deep analysis | Does not support quick scan, only deep analysis is possible | Supports, but scanning can be lengthy | Supports, but scanning speed is average |
| Scanning Speed | High, quick scan | Medium, quick scan does not find deleted files | Low, deep analysis required | Low, deep analysis takes a long time | Medium, prolonged scanning may occur | Medium, requires prolonged deep analysis |
| Data Structure Recovery | Preserves structure and file names | Structure is preserved, but no deleted files | Structure is damaged, file names are not preserved | Structure is not preserved, file names are absent | Structure may be partially damaged | Structure is preserved, but analysis may be lengthy |
| File Preview | Supports preview of all file types | Supports only photos | Supports only RAW files | Supports, but part of photos and videos may be damaged | Supports, but file damages may occur | Supports preview, but full assessment requires deep analysis |
| Recovery Speed | High, quick recovery of deleted files | Medium, but only recovers remaining files | Low, deep analysis required | Low, deep analysis is time-consuming | Medium, recovery may take longer | Medium, possible slow recovery |
| File Integrity | High, recovers all files without damage | Not determined until full version is purchased | Some files, especially photos and videos, may be damaged | Some files, especially photos and videos, may be damaged | Possible damages to some files | High, most files are recovered intact |

🔝 Top Tools to Recover Data from ZFS Drives. How to Recover Data from ZFS File System


