Troubleshooting Guide: How to Fix the Disk Input / Output Error in Windows
Encountering the Disk Input / Output Error in Windows and not sure how to fix it? Don’t worry, we’ve got you covered! In this article, we’ll provide you with a detailed troubleshooting guide on how to resolve the Disk Input / Output Error in Windows. From identifying common causes to implementing effective solutions, we’ll walk you through the process step by step. Whether you’re a novice or an experienced user, our tutorial will equip you with the knowledge to tackle this error with confidence. Watch now and regain control of your system!
- The core of the problem
- What is an input / output error?
- The input / output error is gone!
- Questions and answers
- Comments
The core of the problem
This is something that does happen once in a while: when you connect an external storage device to a desktop computer or laptop, it appears to be inaccessible. As a result, the operating system shows a message about an input / output error in your device.
In this case, the situation seems critical, especially when such external disk contains important personal data or a system backup copy. But don’t give way to panic – everything can be fixed. We will show you five ways to repair the input / output error without losing any files.

How to Check Your Hard Disk for Errors and Fix Them in Windows 10 🔎🛠️🗄️
What is an input / output error?
Input / output errors, also known as I/O errors, are something that users encounter quite often. Most of the time, they originate from hardware issues such as wrong cables, storage device failures, or incorrectly configured drivers. Considering the abovesaid, there are a few methods to fix the input / output error. They don’t take up much of your time, and are quite easy to use.
| Parameter | Description |
|---|---|
| What is it? | An Input/Output (I/O) error occurs when the operating system cannot read or write data to a storage device. |
| Causes |
|
| Devices | Hard drives (HDD), SSDs, USB drives, memory cards, CD/DVD drives. |
| Symptoms |
|
| Solutions |
|
| Prevention |
|
Before you start fixing the I/O error, restart the operating system, and then try to access the problem-plagued device again. Funny as it seems, but this elementary step may get things right immediately. However, if the error is still there, try the methods described below, one by one. After every attempt, check if the error persists. If you still encounter it, go on to try another method.

🆘 Windows 11 Error: You Need to Format the Disk in Drive Before You Can Use It. How to Fix It?
Step 1. Cables
You need to run a complete inspection to detect and check all vulnerabilities that may trigger an input / output error.
The first step is to adjust all cables connecting parts of the computer. Check the cables and their clamps / holders for any damage, fractures, cleaves or pollution. Unplug the cable connecting the external storage device to the computer, and then insert it again. Check both ends of the cable this way, and then try to access the disk again.
If the error is still there despite the check, use another USB cable and try again. If you are not sure that the cable is in good working order, use it to connect another external device (which you know for sure is healthy) to your computer. If the computer recognizes the device as it should, the conclusion is the cable is not damaged, and it is something else that causes the problem.
Step 2. USB ports
If the first stage of your inspection proves the cable is not to blame, try using a different port to connect the storage device. Modern computers tend to have several USB ports, because many external devices are designed to use the USB interface by default. Additionally, make sure that the USB ports on your computer are clean. If they are dirty or full of dust, clean them properly but carefully, to avoid damaging the contacts inside, and then try connecting the storage device again.
Step 3. Drivers
Another essential step in fixing an input / output error (although it is often omitted, somehow) is updating drivers for your operating system. The Windows 10 operating system is supposed to keep all of its drivers updated automatically. The question of permanent updates was a painful issue for many users when Microsoft rolled out their new product, Windows 10. Theoretically, an operating system capable of updating its drivers very often is almost flawless, and you should never encounter any driver issues if you use Windows 10.
However, in real life things are a bit different. Windows doesn’t always keep its drivers up to date, and sometimes the permanent update feature just doesn’t work. In this case, one of the possible solution is using third-party software that can monitor the operating system for obsolete drivers. Visit the website of any developer, download and install the program (sometimes such programs need a permission from the antivirus, so agree to create an exception), and then scan the computer for outdated drivers.
Don’t be surprised if the scan results show you a number of old driver versions. In spite of that, corresponding applications and services will still operate normally. What such result says is that the driver developer issued a newer version of a specific driver, and it is available for download and installation. Find the driver for your device and update it, then try accessing the storage device again.
Step 4. The CHKDSK app

How to Recover Files Removed by CHKDSK Command – No Software Needed! (100% Working)
Though input / output errors are mostly related to damaged hardware, we can try using the integrated system application to eliminate the problem. The Chkdsk examines the file system for errors and repairs them.
To start the process of checking and repairing, open the app with the Command Prompt (Administrator).
Open the Search app by clicking on the corresponding icon which can be found next to the Start button in the bottom left corner of the screen. Type command or cmd in the search field. Find the app you are looking for in the Best match section and right-click on it. Right-click on it and select Run as administrator

In Administrator: Command Prompt, type the following command: chkdsk /f /r /x [your drive letter], and press Enter on the keyboard. Give the drive letter which is assigned to your storage device (in our example, this is drive letter D:).
chkdsk /f /r /x your drive letter
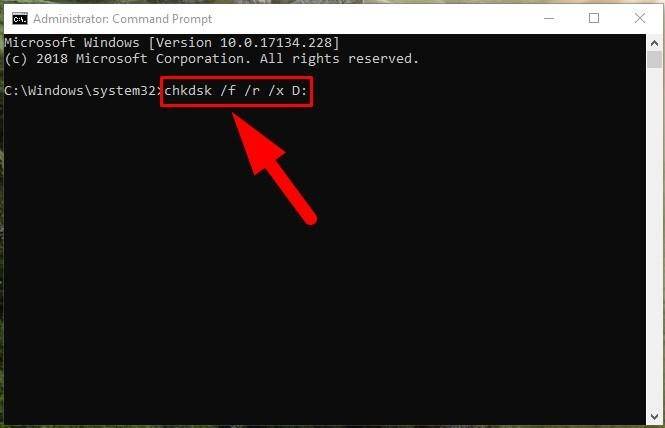
The scanning may take quite a long time if the app detects some errors that need to be repaired.
When the process is over, the app will display a report on the actions it has taken and list all repair activities applied to fix the issues it was able to detect.
Step 5. Use the Speccy tool to check the disk for operability
If the previous methods didn’t help, you can check the general condition of the hard disk using a free third-party tool, Speccy. Download and install Speccy, after looking for its developer’s website on the Internet. In the left panel, select Storage. In the right panel, you will see an extended list of available storage devices; scroll down to find the disk you are interested in. For every disk, full name, model index and serial number are displayed.
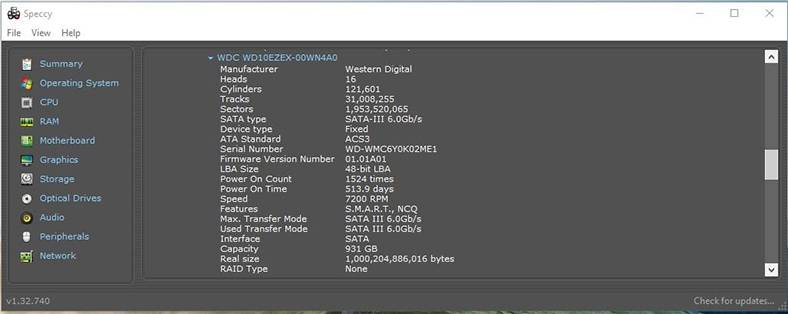
Find the S.M.A.R.T.. attributes under the disk specifications. This is something you should read very attentively.
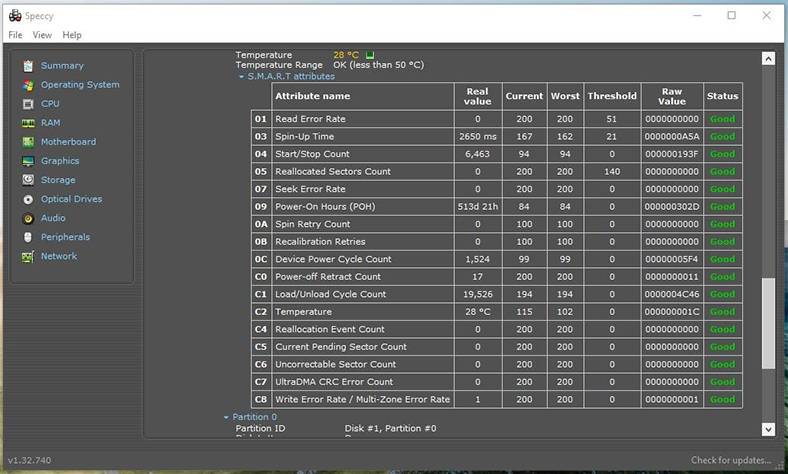
S.M.A.R.T. stands for Self-Monitoring, Analysis and Reporting Technology - a sort of built-in monitoring system that helps you to evaluate the hard disk health. In the image shown above, you can see that Speccy assigns a certain status to every monitored value. First of all, you should be most interested in the following:
- 05: Reallocated Sectors Count;
- 0A: Spin Retry Count;
- C4: Reallocation Event Count;
- C5: Current Pending Sector Count;
- C6: Uncorrectable Sector Count.
An overwhelming fact: A research work by Google indicated that within the first sixty days after the first uncorrectable error is detected, the chances of a hard disk to break down are thirty-nine times higher when compared with a similar hard disk that has no such errors.
For fairness' sake, though, it should be noted that this Google research also concluded that disk health status based on S.M.A.R.T. ratings is of limited use when trying to predict the future errors in the work of a disk, but such status is good at presenting the overall description of its condition. So keep that in mind, and if any of the attributes we have mentioned above shows errors (or if there are several errors for a few attributes), it is a symptom serious enough to make you think about transferring your data elsewhere and replacing this hard disk.
Using Speccy doesn’t mean you can get rid of the input / output error, but it can give you the overall picture of how healthy your disk is.
If you still have doubts as to the information this particular app displays, you can check your disk for the same data with other third-party tools, which can be found on the Internet.

👨💻 How to Use Victoria to Test and Fix Your Hard Disk in 2021 🛠️
The input / output error is gone!
We hope that after all the actions, your input / output error has been eliminated and now you can access the disk. Even if it appears, it doesn’t necessarily mean that your disk is at the end of its lifespan. However, it may indicate that something wrong is going on with the disk. That is why it is hardly recommended to start investigating if this error can grow into more serious issues.
On the contrary, it means you should consider backing up your files to another disk, and buying a new hard disk to replace the one you are having trouble with.
Have you ever encountered input / output errors? What did you do to fix them? Did the errors herald the breakdown of a hard disk? Did you manage to avoid loss of data from such disk? Feel free to share your experience in dealing with an input / output error by leaving a comment below this article.


