Mastering TP-Link AC750 Archer C20: Configure Internet, Wi-Fi, DHCP, Password
Ready to optimize your network setup? Follow our step-by-step guide to configure your TP-Link AC750 Archer C20 Wi-Fi router for internet access, Wi-Fi settings, DHCP configuration, and password setup. Whether you’re a beginner or an experienced user, we’ll walk you through the process to ensure a seamless setup experience.
This is a dual-band Wi-Fi router, but its settings are more or less conventional, so this guide can help you set up almost any kind of router.
| Feature | Description |
|---|---|
| Model | TP-Link AC750 Archer C20 |
| Wi-Fi Standard | IEEE 802.11ac/n/a (5 GHz), IEEE 802.11b/g/n (2.4 GHz) |
| Frequency Band | 2.4 GHz and 5 GHz (dual-band) |
| Data Transfer Speed | Up to 300 Mbps at 2.4 GHz and up to 433 Mbps at 5 GHz |
| Number of Antennas | 3 external antennas |
| Interfaces | 4 LAN ports (10/100 Mbps), 1 WAN port (10/100 Mbps) |
| Security Features | WPA / WPA2, MAC address filtering, access control |
| Operating Mode | Router, Access Point, Repeater |
| Additional Features | Parental Control, Guest Network, IPTV support |
| Dimensions | 230 x 144 x 35 mm |
- Step 1. How to Connect a Router?
- Step 2. How to Access the Router Settings?
- Step 3. How to Configure an Internet Connection for the Router?
- Step 4. Configuring a Wi-Fi Network
- Step 5. Modifying Default Login and Password in the Router Settings
- Quick Setup Menu
- DHCP Function
- Questions and answers
- Comments

WiFi Router Basic Setup with TP Link AC750 Archer C20: Internet, WiFi, DHCP, Password
Step 1. How to Connect a Router?
So, you have just had a new Internet connection installed to your place, or you have decided to replace the old router and bought a new one.
Connect it before you go on to configuring it. Everything should be done according to the usual procedure:
-
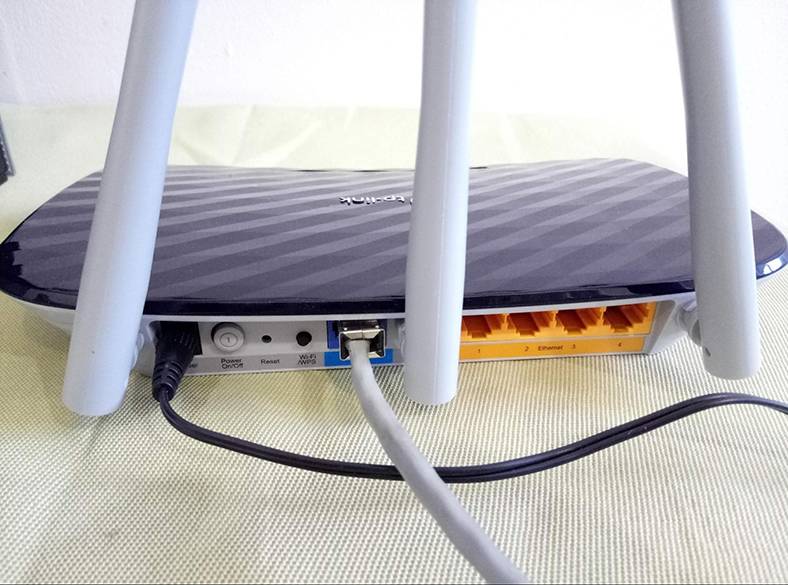
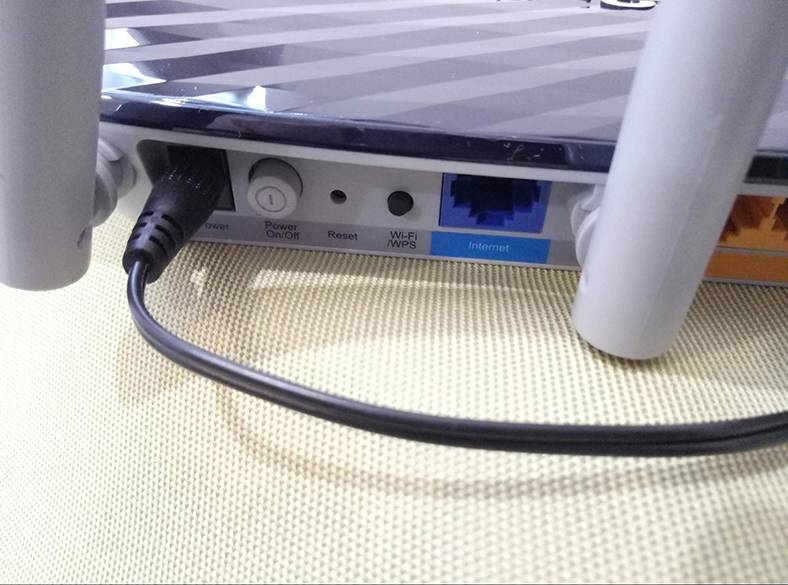
Plug the Wi-Fi router into the socket and switch it on. Wait for its front panel indicators to light up.
-
After that, plug the provider’s cable (or the cable from an ADSL modem) into the Internet port – it’s blue (The choice depends on how you receive the Internet service from your provider).
-
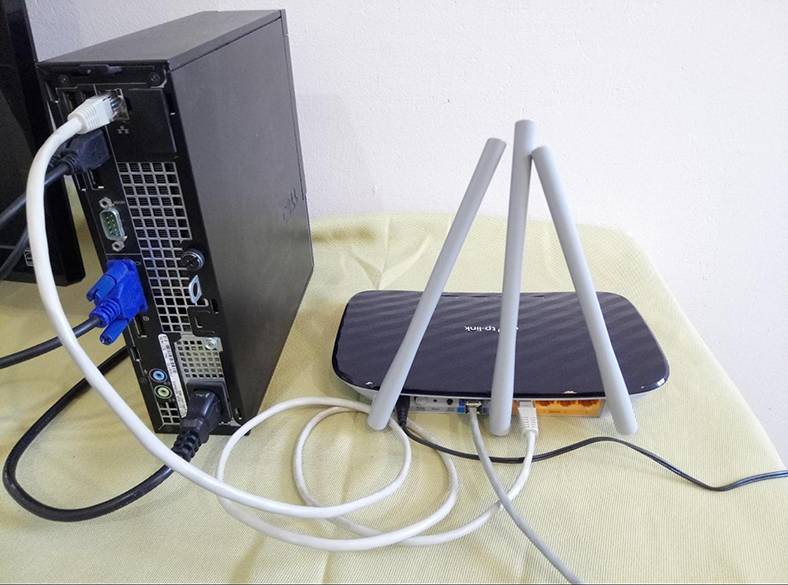
If you are planning to configure a router from your PC or laptop using a network cable, take such a cable (which comes supplied with the router) and connect your computer with the Wi-Fi router. Plug one end of the cable into one of the yellow Ethernet ports on your router, and plug the other end of the cable into the Ethernet port of your computer. I recommend configuring a router with a cable connection – if possible. This method is more reliable.
-
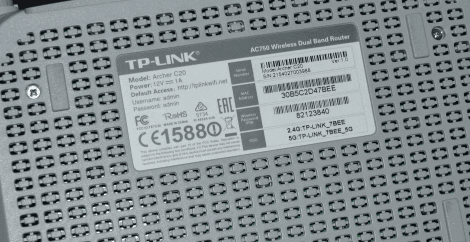
You can also use Wi-Fi to connect to the router. When the router is switched on, your devices should detect a Wi-Fi network with a default name. To connect to this network, use the password (PIN code) printed on a sticker which you can find on the bottom of the router. On this sticker, you will also find default names for Wi-Fi networks as given by the manufacturer. If there is no sticker for some reason, all this information will be printed in the user manual.

Step 2. How to Access the Router Settings?
To enter the settings of a TP-LINK router, connect to the router with a network cable or by Wi-Fi, open a browser on a device connected to the router and go to the address http://tplinkwifi.net (sometimes it can be tplinklogin.net).
You can find the address to enter the settings mode as well as other default values by looking at the sticker on the bottom side of the router. Typically, all routers also use IP addresses to open settings: 192.168.1.1 or 192.168.0.1
If you try to enter the settings page address but it doesn’t open, try resetting the router. Press the Reset button on the router and hold it 5 to 10 seconds. The router will start rebooting – you can tell it by the blinking indicator lights. After rebooting, try to access the router again, using the same method.
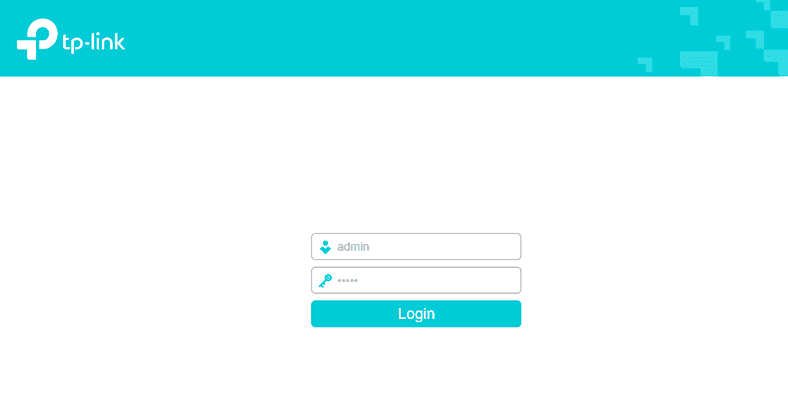
As a result, you will see an authorization page, asking you for a username and password. By default, these are admin and admin.
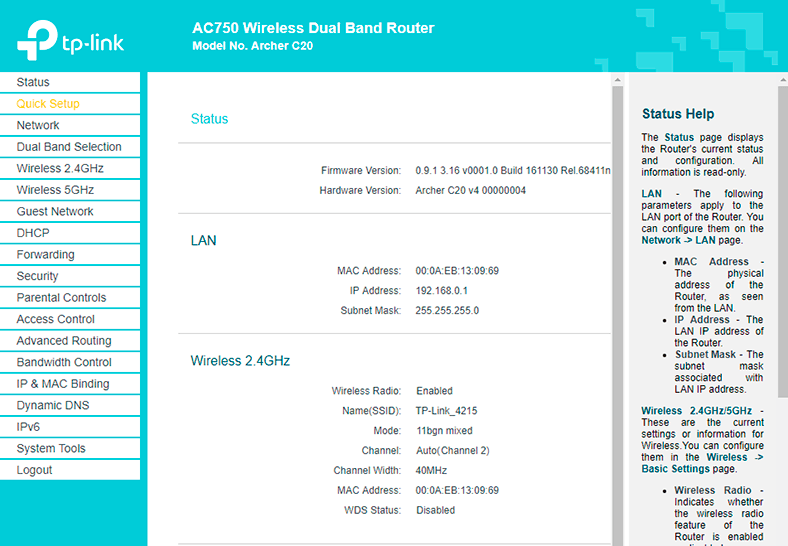
After that, a page containing router settings should appear. This is where you can set all necessary values.
Take a note – there is an option named Quick Setup. Don’t confuse it with automatic setup – we are going to discuss it a bit later.
Step 3. How to Configure an Internet Connection for the Router?
In the settings, go to the tab Network – WAN.
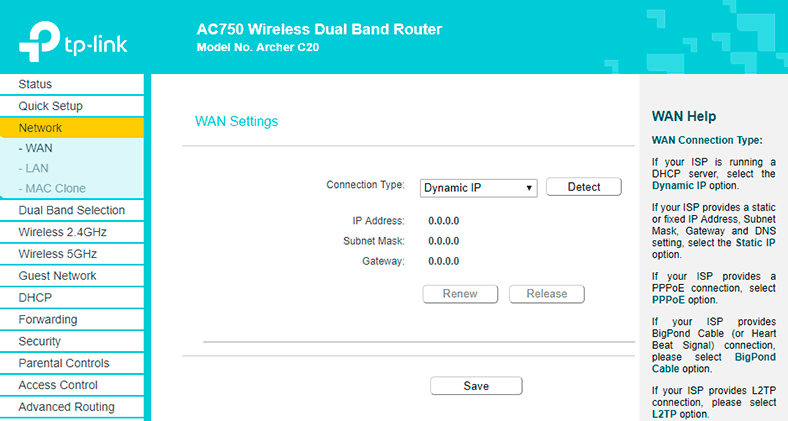
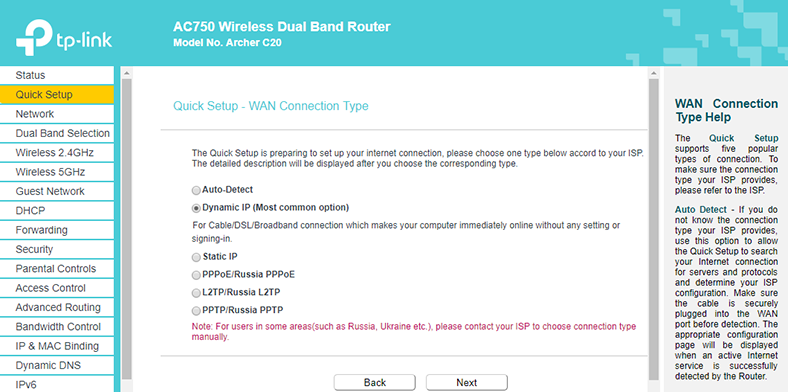
Choose connection type: in our case, that is Dynamic IP. If you have this connection type, there is no need to choose anything: it will be set by default. In fact, you should have an Internet connection via the router by now.
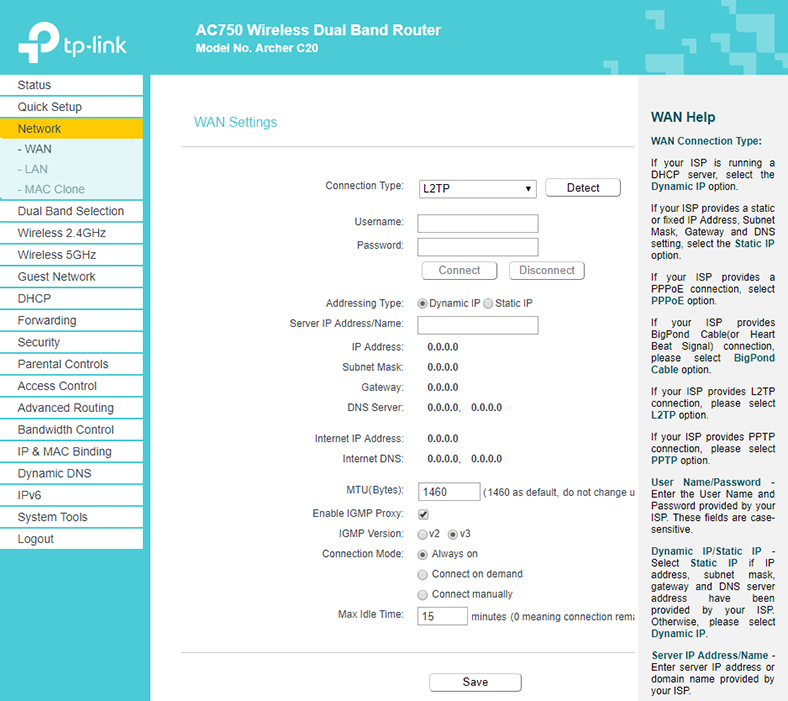
But if you have a PPPoE or L2TP connection, select the corresponding connection type from the menu and set the appropriate values which you should receive from your provider. Contact your provider and double-check the following information:
- Username;
- Password;
- IP address or server name, and so on.
Some routers also have a Detect button next to the connection type: when you click on it, the router will try to determine what connection type you are using. Click on it if you don’t know the connection type.
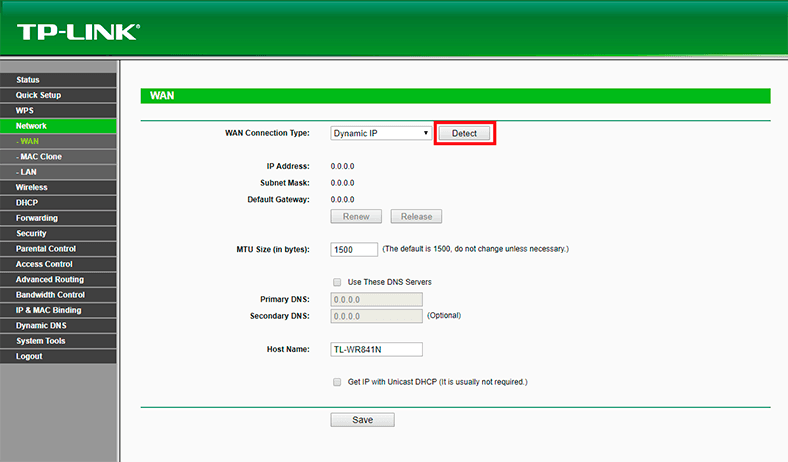
Don’t forget to click Save after modifying the settings.
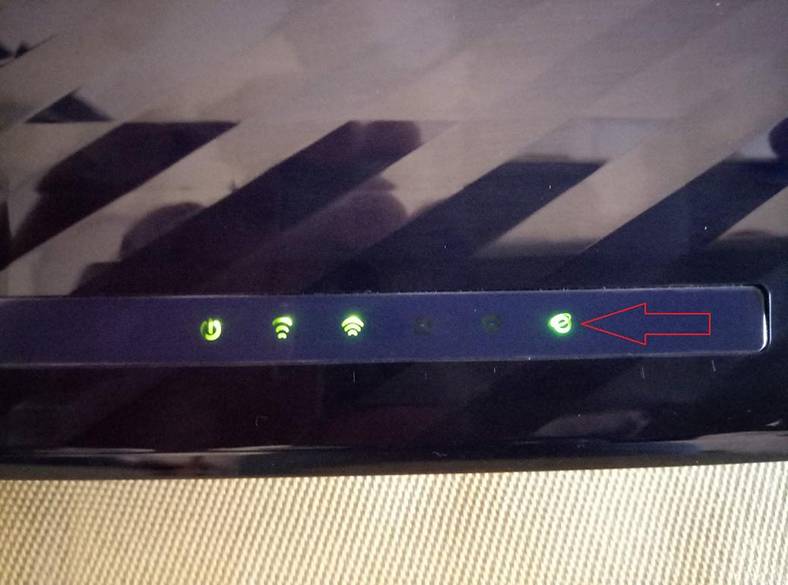
To have an Internet connection working through this TP-LINK Archer C20 router, the round indicator should be green. This indicator may look different in other routers, but it is always there to notify the connection is active.
Binding the Internet Connection to the MAC Address of the Device
Bear in mind: if you have Dynamic IP, your provider may use binding of the Internet connection to the MAC address of the router or another device. If the router can’t establish an Internet connection, contact your provider: you may have to submit your MAC address.
Sometimes it happens because certain Internet providers practice MAC address binding. This is when your Internet connection is bound to a particular device: a computer, laptop or router. The matter is that if your Internet connection is bound to the MAC address of a computer’s network card, you are not going to have a working Internet connection after you plug the cable into your laptop or router instead. That is because MAC addresses of the router or laptop differ the corresponding address you have previously registered with your ISP.
So if your provider makes use of MAC address binding, there are two options:
- In the router settings, use the MAC address to which your Internet connection is bound.
- Alternatively, give your ISP the MAC address of your router so that the Internet connection should be bound to this new address.
The MAC address of the router (assigned by the manufacturer) is always given on the sticker that you can find on the bottom side of the device.

To change the router’s MAC address, go to its settings – Network tab / MAC Clone.
There are two options as well:
- you can enter the new MAC address manually in the field WAN MAC address,
- or clone it from the computer connected to the router with the cable (I mean the computer you are configuring the connection from).

If you want to clone the MAC address from the computer, use the network cable to link the router and the computer that your Internet connection was bound to. Then use the computer to configure the router. This is an important aspect.
Don’t forget to save the settings and reboot the router after you have modified MAC address settings.
As a result, the Internet connection for your computer should already be established. To find out if the Internet connection is active, look at the indicator lights on the router – they should be green or blue, but never yellow or red.
Otherwise, check the network connection symbol in the system tray of your computer – there should not be any symbols like a yellow exclamatory mark or red cross.

Step 4. Configuring a Wi-Fi Network
If you’ve done everything right and you have an active Internet connection, you can go on to set up your Wi-Fi network.
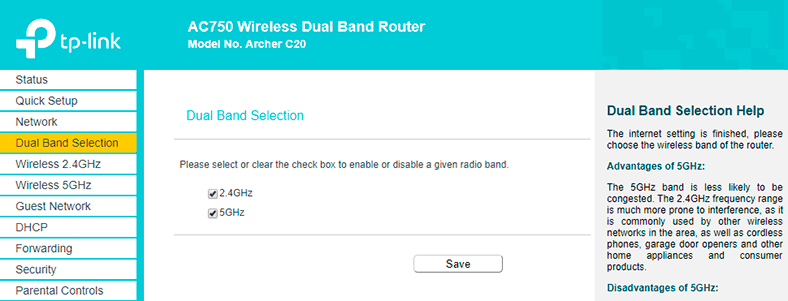
As the TP-Link Archer C20 device we are dealing with is a dual-band router, it broadcasts two Wi-Fi networks: One at the frequency of 2.4 GHz, and the other at 5 GHz. If you don’t need one of them, I recommend going to the tab Dual Band Selection and disabling the network for the frequency you don’t want to use. Just uncheck the box next to the network and save the settings. Otherwise, you can leave both networks as they are. For example, use 2.4 GHz for older devices, and let newer gadgets use 5 GHz – which they support, by the way.
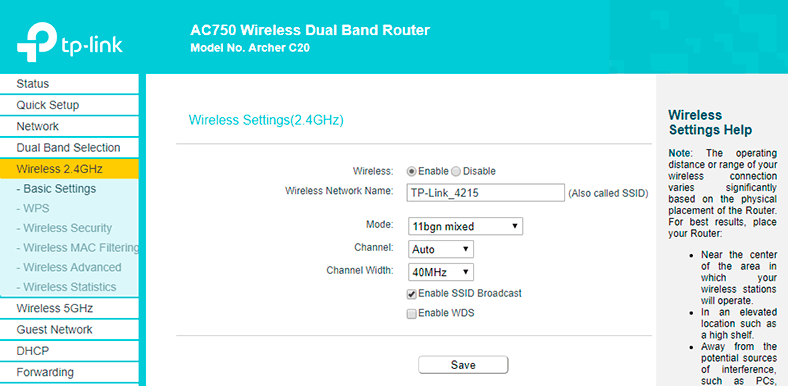
Go to tab of the wireless mode which you need to configure and set the wireless network name in the Basic Settings menu. Don’t forget to save the settings.
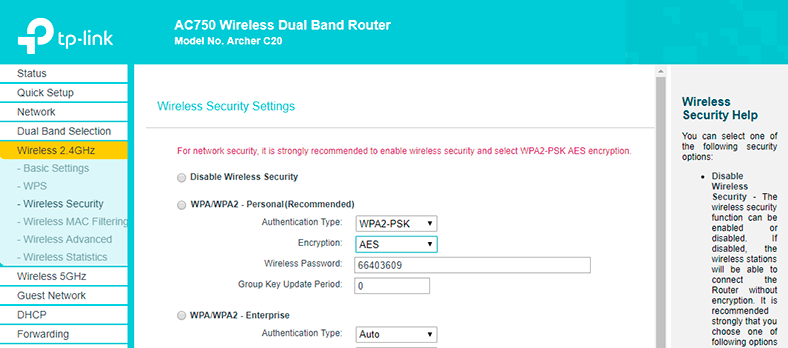
Always remember to set a password for your Wi-Fi network. To do it, go to the tab Wireless Security.
You can choose one of the following security options:
- Disable Security. If it’s disabled, wireless devices can connect to the router without encryption and password. It is strongly recommended to select one of the variants below to protect your wireless network.
- WPA/WPA2 – Personal. WPA-based protection with a pre-shared passphrase.
- WPA/WPA2 – Enterprise. WPA protection with Radius server.
- WEP Protection based on 802.11 WEP standard.
Choose the recommended security option, WPA/WPA2 – Personal and in the field Wireless Password give the password you want to use for connecting to your Wi-Fi network. Save the settings and reboot the router.
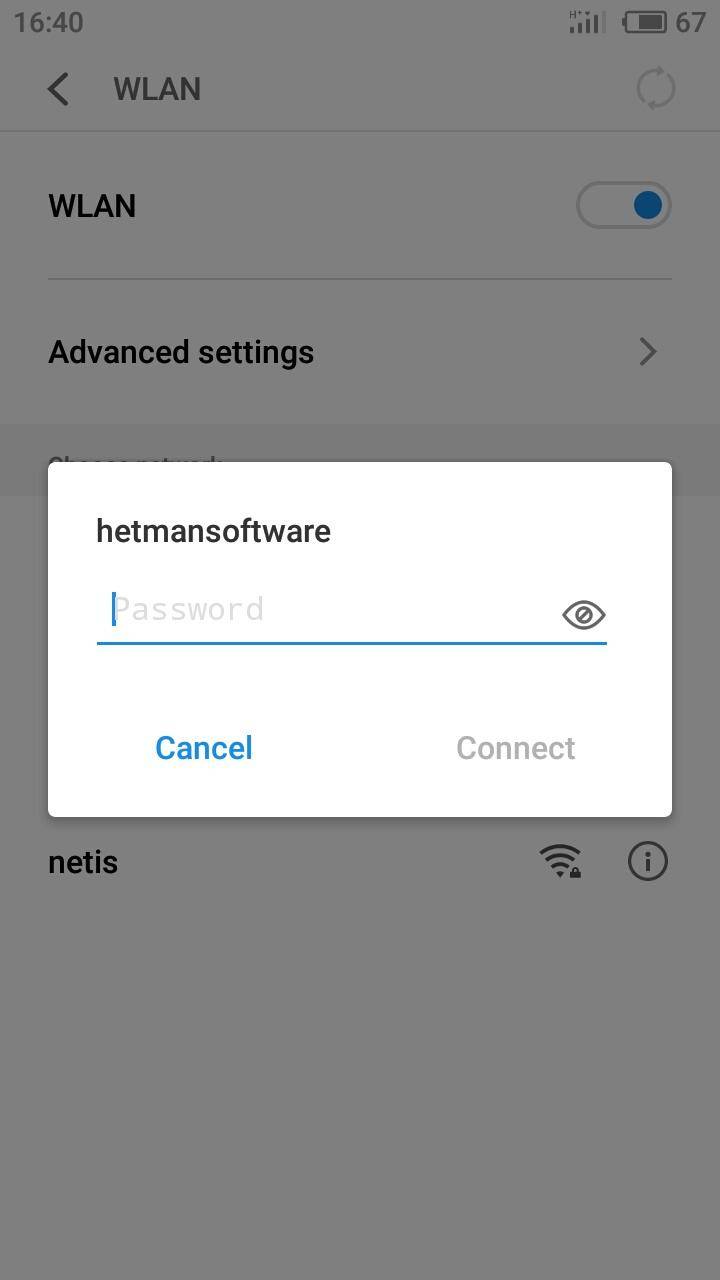
Here’s an important note! If you let your router broadcast at both frequencies (2.4 and 5 GHz), configure settings for both networks and set a password for connecting to them. Their settings are the same.
If you connected any devices to the wireless network before you have changed the Wi-Fi name and password, you will have to reconnect them after changing the password and restarting the router, and log in again after entering the new password. After you make changes to any Wi-Fi settings, all devices connected previously to this network will get disconnected.
Step 5. Modifying Default Login and Password in the Router Settings
By now, we are almost finished with basic router settings. I also strongly recommend changing the default login and password (admin) used to access the router’s settings.
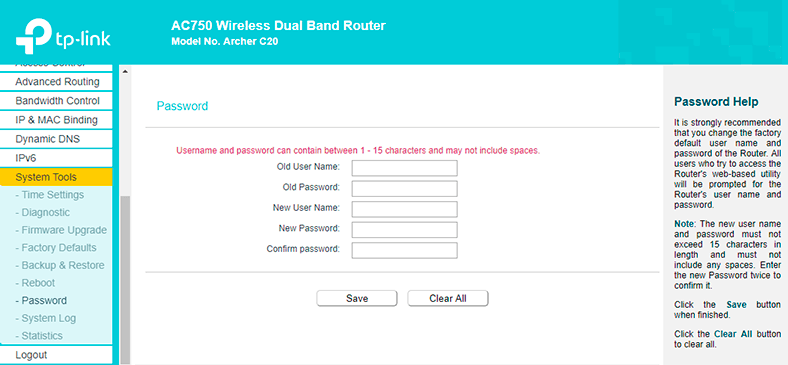
You can do it in the tab System tools – Password. Just give the old password and username, and then enter the new data. Save the settings.
Remember the new login and password. If you forget them, it will be impossible to access your router’s settings, so you will have to reset them to defaults, and then reconfigure them again.
Quick Setup Menu
Now that we’re done with all essential settings needed to work with the router, I would like to return to the Quick Setup menu again. This menu features all basic settings of the router we have already configured by opening corresponding menu tabs. But this is where you find all of them in one place.
To perform quick setup:
-
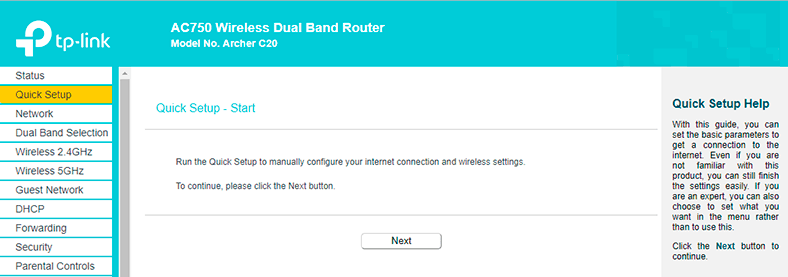
Go to the corresponding tab and click Next.
-
Specify your country, city and Internet service provider’s name.
The manufacturer tried to list all main Internet service providers and the connection types they are using.
-
If you are lucky and your provider’s name is on the list – choose it.
-
Otherwise, if you haven’t found the proper setting, check the box next to the corresponding line.
-
What you see is actually the group of settings we have just configured. Select the connection type that your ISP provider is using.
-
Decide if you need to clone MAC address (I have already explained why it can be done and how).
-
Select the frequencies for your Wi-Fi.

-
Set the name and password for the Wi-Fi network.
-
Confirm the settings. Click Back to change them or Save to save the settings and use them from now on.
Now it looks very easy because we have analyzed every point one by one. But if you did all those things for the first time, you wouldn’t think so, I can tell you.
You can learn more about Wi-Fi options, guest network settings and WPS functions by watching one of the videos on our channel: https://www.youtube.com/channel/UCu-D9QnPsAPn7AtxL4HXLUg
DHCP Function
In this article, I also would like to describe one of the router functions which is not an essential one – it’s DHCP. By default, it is enabled, and now I’ll try to explain the principle it’s based on and the settings you can modify.
The router acts as a DHCP server (DHCP stands for dynamic host configuration protocol) which configures TCP/IP for all computers within the router’s local network.
As a rule, this option is usually enabled for network devices, though some users may have it disabled, for a variety of reasons. In order to enable or configure it, browse the router settings to enter the menu DHCP / DHCP Settings.
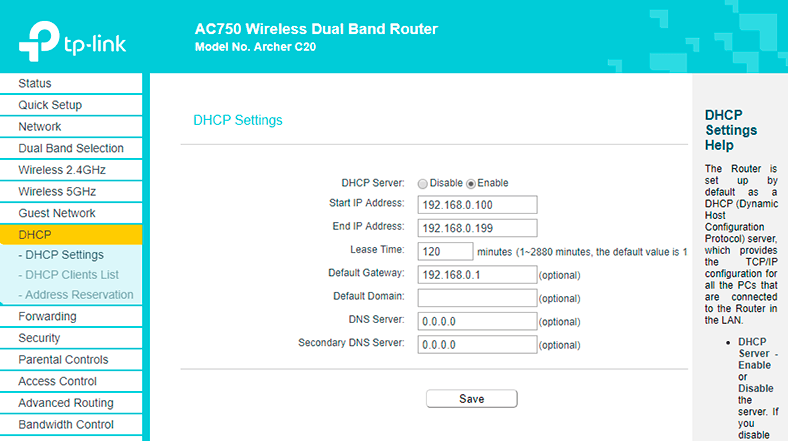
In this page, you can enable DHCP server and set start and end IP addresses for the local network by filling in the corresponding fields.
Start IP should be given with consideration of the router’s net point, so give the IP address following it. For example, f the main gateway is set as 192.168.0.1, the start IP address can be 192.168.0.2; 192.168.0.3 or like we have it here – 192.168.0.100.
By setting a certain end IP address, you set the number of addresses the router can assign to connected devices. For example, by setting it like 192.168.0.199 I allow the router to assign addresses to 99 devices. And these addresses will all fall within the range from 192.168.0.100 to 192.168.0.199.
All other settings are not obligatory, but if it is necessary, you can reduce the address lease time – the amount of time a network user will be allowed connection to the router with their current dynamic DHCP address.
When the lease time expires, the device that has been assigned the IP address will ask to prolong it. This dialogue takes place in the background so you don’t see it, and if there are many clients in this network, such option is very useful because it prevents the table from being overflown. You can see the address lease time, MAC and IP addresses on the DHCP Clients List.
With DHCP, the router assigns IP addresses to devices which are connected to its network. Every time, it will assign the addresses one by one. In our case, the first connected device will be assigned 192.168.0.100, and the following devices will get 101, 102 and so on.
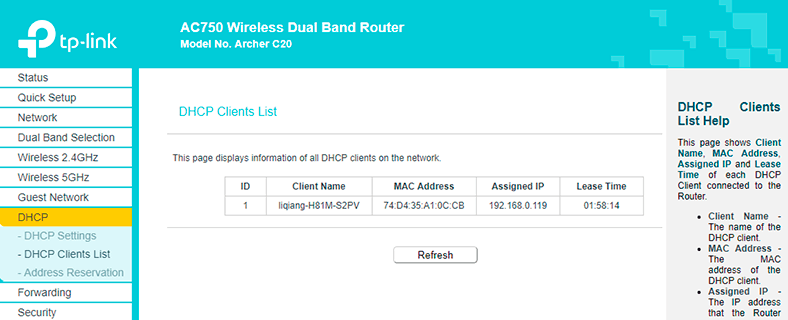
However, there is a way to reserve a static IP address for a client. If you do it, the router will give the connected device the same IP address every time such device connects to the network. To do it:
-
Go to Address Reservation tab and click on Add New
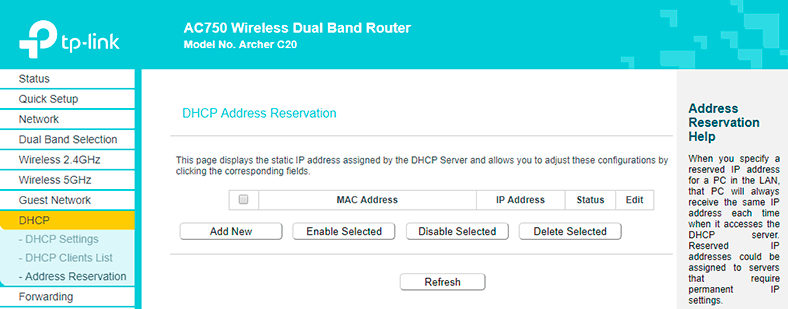
-
Enter the MAC address for the device and give an IP address which is not used for other devices from the available range.
- You can see them on the DHCP Clients List if the device you are configuring now is connected to the router at the moment.
- Or in the device settings – if the device is not connected.
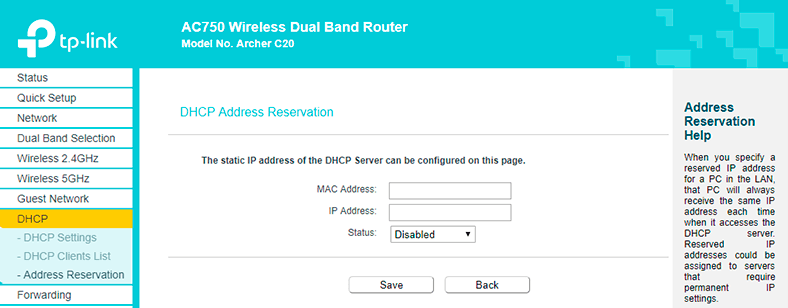
-
In the Status drop-down list, select Enabled and then click Save.
-
Now this device will always connect to the network with this IP address only.
The settings we have just configured are enough to use the router at some basic level.
If you have any questions while you are configuring your router, feel free to ask them in comments.


