Boost Your Router Security: Steps to Safeguard Wi-Fi and Access
Protect your network from unauthorized access with our comprehensive guide to router security settings. Learn how to configure Wi-Fi passwords, access passwords, WPS, MAC filtering, and more to safeguard your connection. Follow along step-by-step and fortify your network against potential threats!
Many users neglect to configure their network security settings believing that their network is of no interest to anyone. Why would an intruder try to access it?
Unfortunately, this is a false assumption: proper security settings can protect you from identity theft as well as from unintended damage caused by other users of your network. Just out of curiosity, hackers may change something in your settings – which can leave you stranded offline. That is why we recommend checking your security settings right now.
I will show you how to configure router security settings with the example of a popular model, TP-LINK WR841N. However, almost all routers have similar functionality, so this guide will be useful for other devices as well. With the exception of some differences in the menu interface, of course.
| Feature | Description |
|---|---|
| Model | TP-LINK TL-WR841N |
| Wi-Fi Standard | IEEE 802.11b/g/n |
| Frequency | 2.4 GHz |
| Data Transfer Speed | Up to 300 Mbps |
| Number of Antennas | 2 external antennas |
| Interfaces | 4 LAN ports (10/100 Mbps), 1 WAN port (10/100 Mbps) |
| Security Features | WPA / WPA2, WEP, MAC address filtering |
| Operating Mode | Router, Access Point, Repeater |
| Additional Features | Parental Control, Guest Network, Bandwidth Control |
| Dimensions | 192 x 130 x 33 mm |
- Step 1. Modifying the Login and Password to Access Your Router
- Step 2. Setting a Password for Wi-Fi
- Step 3. Disabling the WPS Function
- Step 4. Hiding the Wireless Network Name
- Step 5. Filtering Devices by MAC Address
- Step 6. Upgrading the Router’s Firmware
- Step 7. Disabling Remote Access
- Step 8. Choosing Operation Time
- Step 9. Filtering Devices by IP Address
- Step 10. Checking for Strange Devices in the List of Clients Connected to the Router
- Questions and answers
- Comments

How to Configure Router Security Settings (Wi Fi Password, WPS, IP and MAC Filtering, Remote Access)
Step 1. Modifying the Login and Password to Access Your Router
The first thing to do is to change the default password protecting access to the router settings. Such password will prevent strangers from gaining unauthorized access to your router. So when you change the default password, no one else will be able to connect to the Internet or modify network settings.
To make changes to the router’s name and password, connect to this device by Wi-Fi or cable, and open a browser to enter its network address.
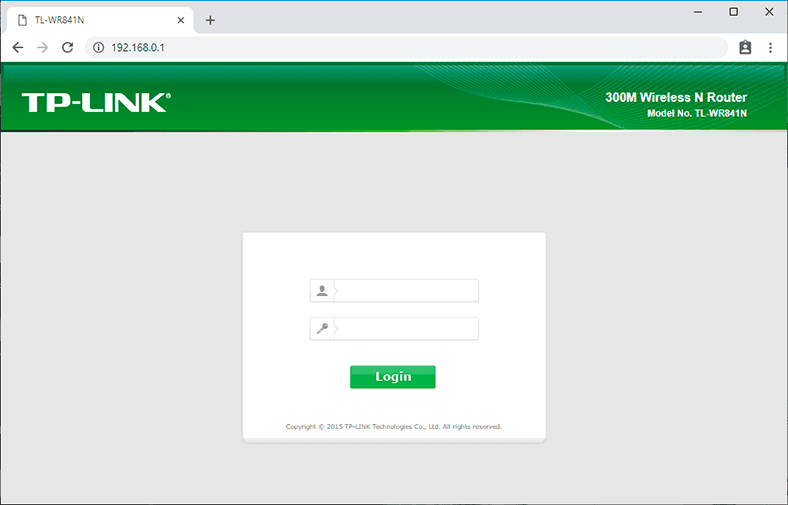
The router’s network address is given on a sticker which you can find on the bottom of the device. Usually, it looks like 192.168.1.1 or 192.168.0.1, tplinkwifi.net or tplinklogin.net, etc.
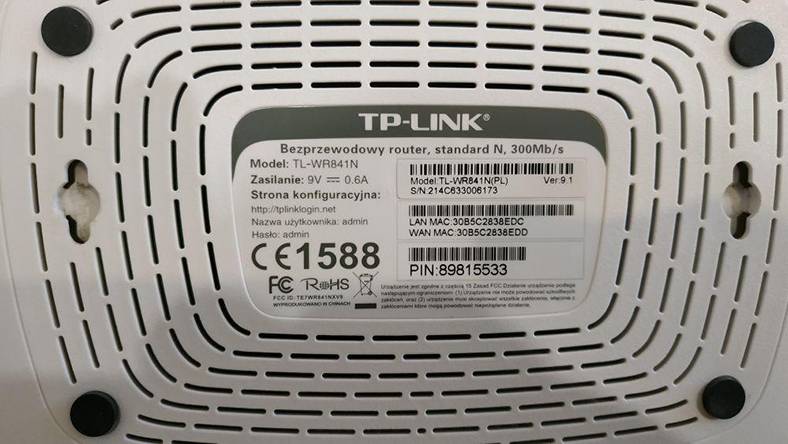
In this window, type the username and password – by default, they are admin and admin. The default login and password can be found on the same sticker as before.
If you do everything right, the screen will show you the settings menu.
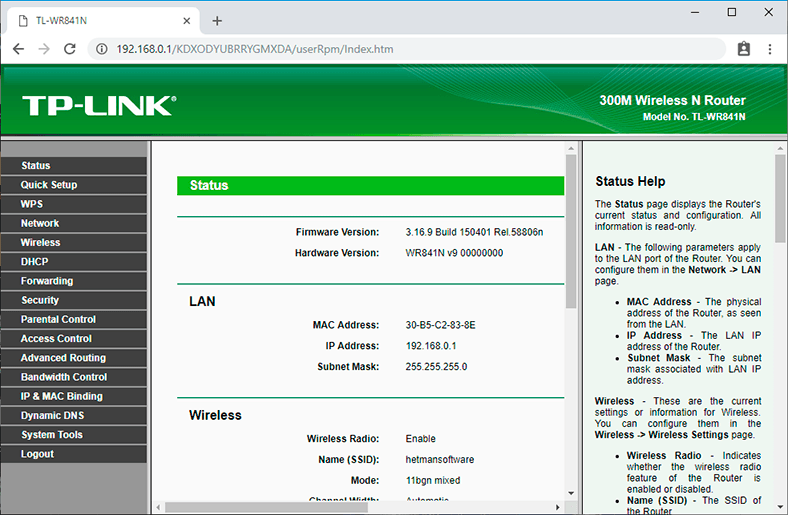
Go to the tab System Tools and find the Password line.
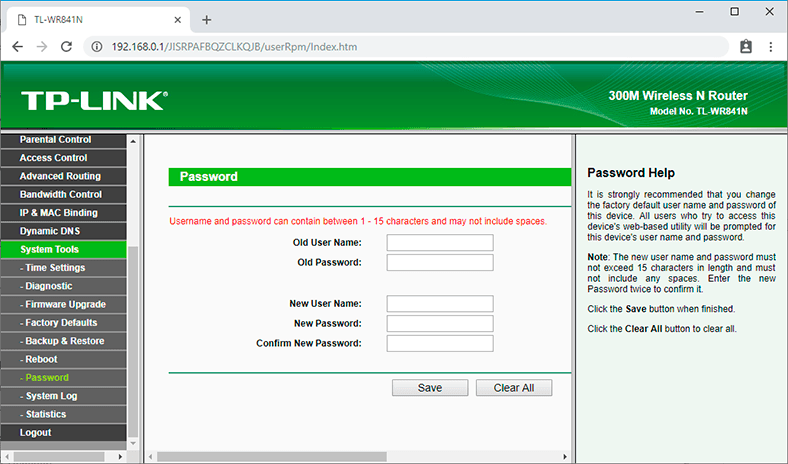
You will have to give the previous username and password, and then enter the new data and click Save. That is all – the password for accessing the router has been modified. You have just completed the first goal on the way to configuring security settings. Let’s move on.
Step 2. Setting a Password for Wi-Fi
The second important step is to set a password for accessing your Wi-Fi network. It will prevent strangers from connecting to this network.
Many people believe this option is unnecessary and so they leave their networks open to anyone. However, by connecting to your network, other users can use torrent clients to download content, or play online games – which eats up the traffic and puts pressure on your router. Talking of the router, it can have various issues, the connection speed will drop, and the overall quality of Internet access will deteriorate.
To change the password, go to the tab Wireless. Look for the line Wireless Security.
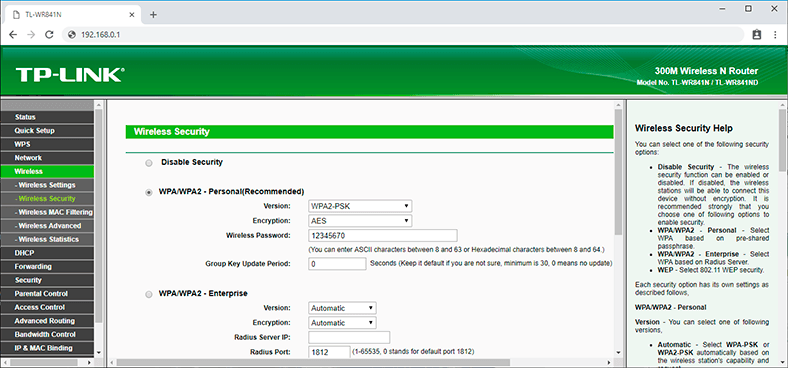
If wireless security is disabled, turn it on. To do it, choose one of the suggested options. For standard situations, the recommended option WPA/WPA2 would be enough.
Type the desired password into the field Wireless Password.
Don’t use simple passwords consisting of eight digits 1 or 0, or digits from 1 to 8. Think about a reliable password having both capital and lowercase letters, digits and special symbols. Write down the new password just in case you may forget it.
Read another article for a very detailed description of other Wi-Fi settings.
Step 3. Disabling the WPS Function
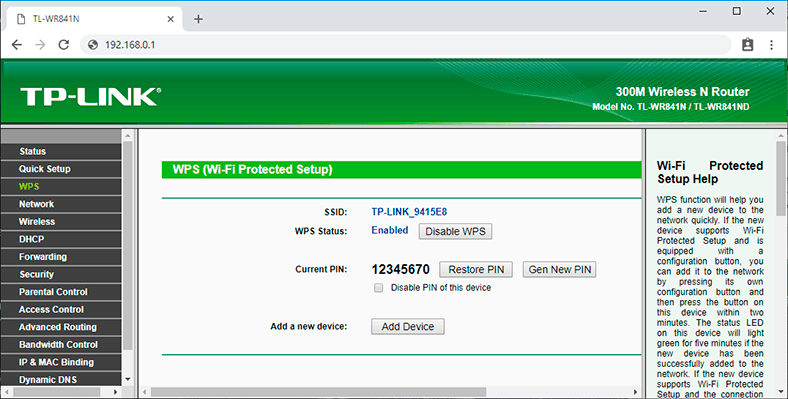
The third step is to disable the WPS function. This function allows connecting to a wireless network quickly and without a password. In real life, it is rarely used, and as it is too vulnerable to hackers, I recommend disabling it.
To do it, go to the WPS tab (sometimes, you can find it in the Wireless menu) and select Disable WPS.
Step 4. Hiding the Wireless Network Name
Hide your network from the eyes of strangers. There is a special option in the router settings that allows you to hide your network. When you turn it on, other devices will no longer see your Wi-Fi. In order to connect, they will have to give not only the password but also the network name (SSID).
You can enable this function in the wireless network settings by unchecking the box next to Enable SSID Broadcast.
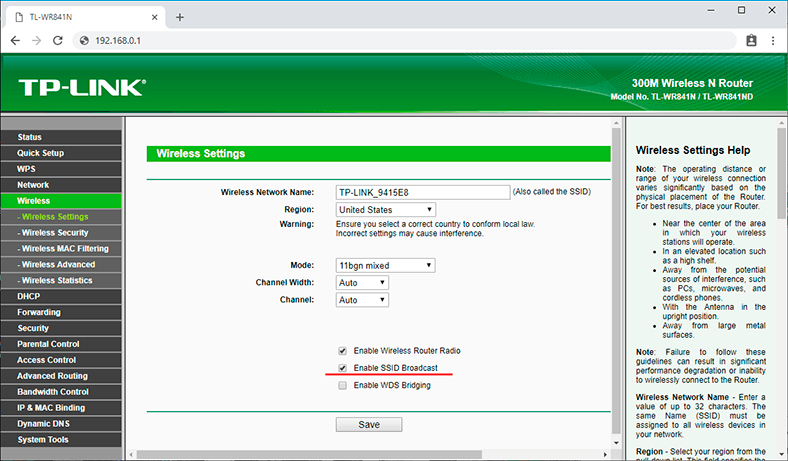
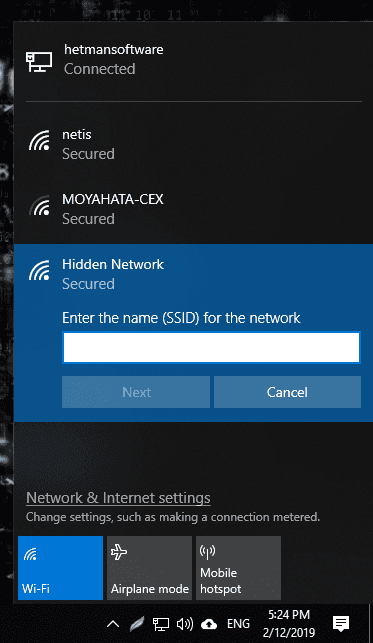
As you do it, other devices won’t be able to see it, and from a Windows 10 computer, you will see a hidden network among other networks. If you try connecting, you will have to enter the network name (SSID) and then the password; only if everything is right, you will be able to connect.

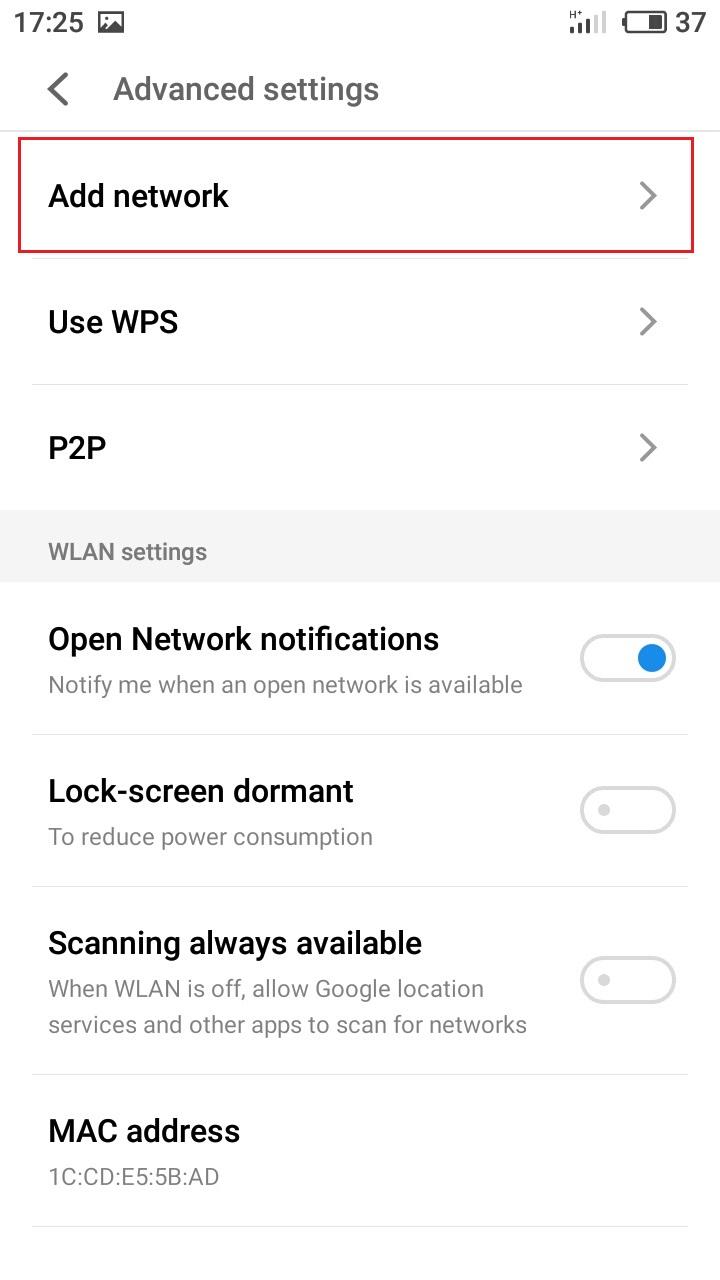
From a smartphone, this network is just invisible: in order to connect, you should go to W-Fi settings and create a new network. Give the network name (SSID) and password.


Step 5. Filtering Devices by MAC Address
The next stage is filtering the devices trying to connect by their MAC addresses.
MAC address is a unique identifier of a device, as every gadget has its own MAC address. In the router settings, you can add MAC addresses of the devices which are allowed to connect to your network. When this function is enabled, only devices which are on this list can connect. Alternatively, you can list the devices for which access should be blocked.
This is a most efficient way to protect your router but it is only suitable for organizations with a specific number of users; for a home network, though, you will have to connect new users by entering the router settings and adding their MAC addresses, which is not too convenient.
To enable this option, open Wireless MAC Filtering which you can find in the Wireless settings tab.
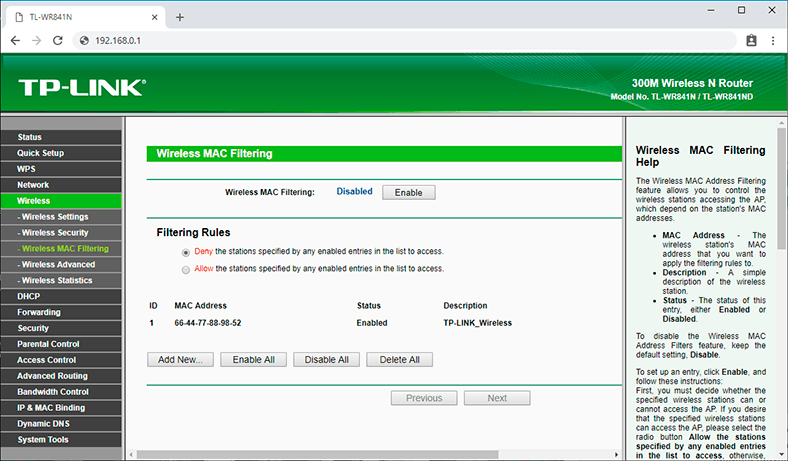
When you are there, click Enable and check the box next to Deny the stations specified by any enabled entries in the list to access or Allow…, then add MAC addresses of such devices.
To add them, click on Add New.
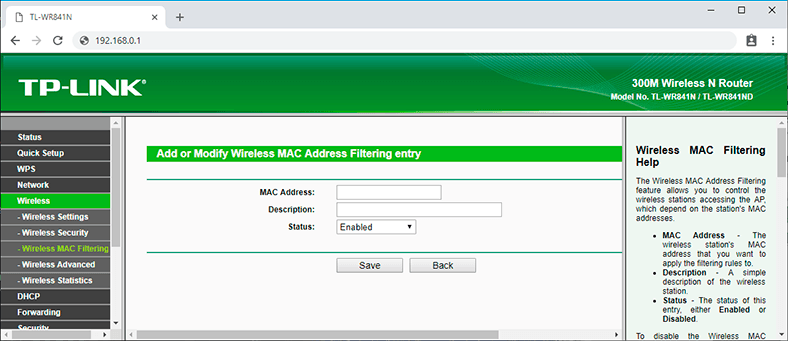
Step 6. Upgrading the Router’s Firmware
Another important aspect you have to take into account when configuring security settings is making sure your router has the latest firmware. It will fix errors and patch possible vulnerabilities that may give strangers a foot in the door to hack your network.
The function for upgrading the router’s firmware is usually in the menu System Tools / Firmware Upgrade.
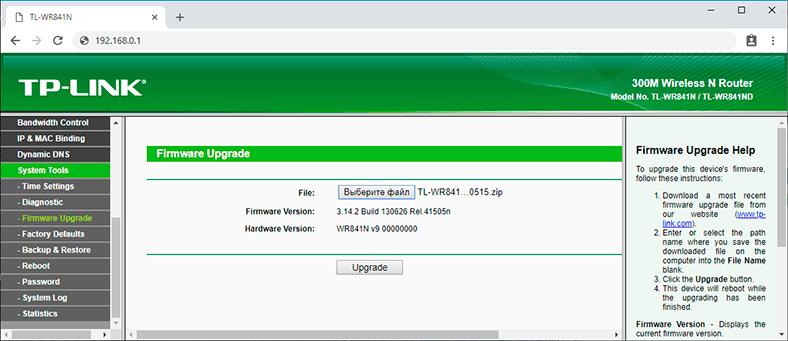
You can download the latest package from the official website of the router’s manufacturer. In my case, it’s TP-Link. The company’s official website: tp-link.com.
In the website, go to Support / Download. And find your model on the list.
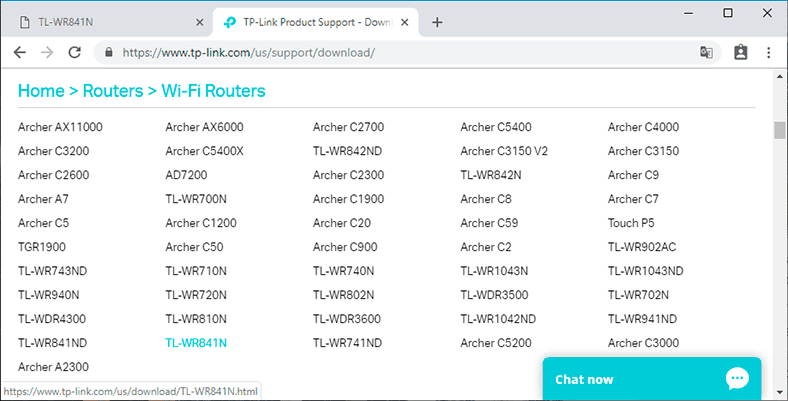
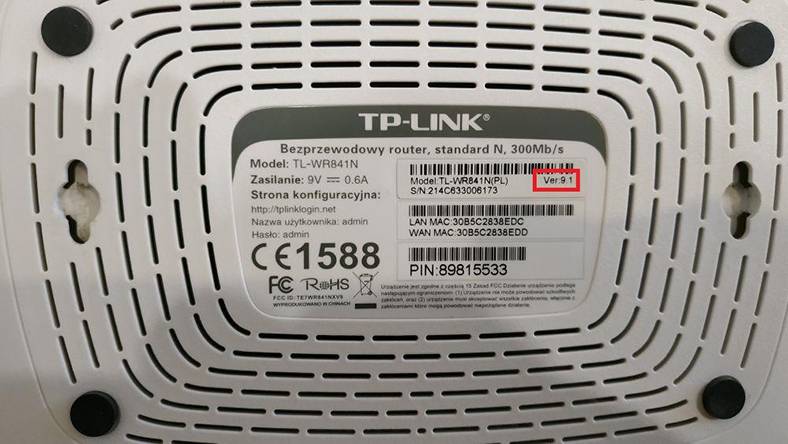
Before downloading the firmware, you should verify the hardware version of your device. If you install firmware for a different version, it can damage the device or even make it inoperable. The hardware version is specified on a sticker you can find on the bottom plate of the router.
However, you can choose to install standard, newer or alternative firmware. The only thing that matters is that it should be compatible with your device.
Choose a file and give the path to the firmware you have downloaded, and then click Upgrade.

After the process is over, the router will reboot automatically.
Webpages for Downloading Firmware for Routers by Other Manufacturers:
Almost all manufacturers let users download firmware for their routers. Usually, the firmware download page can be found in the support section of the company’s website.

How to Flash a TP Link or D Link Router, Update Router Firmware
Step 7. Disabling Remote Access
The next thing to configure is remote access. If you have remote access function enabled but you don’t use it – turn it off, because such function lets anyone access your router via the Internet from any other device. In other words, any user knowing your router’s IP address (WAN address) can access its settings.
In order to disable this function, go to the tab Security / Remote Management. Type zeroes in the IP address line. By default, this function is disabled.
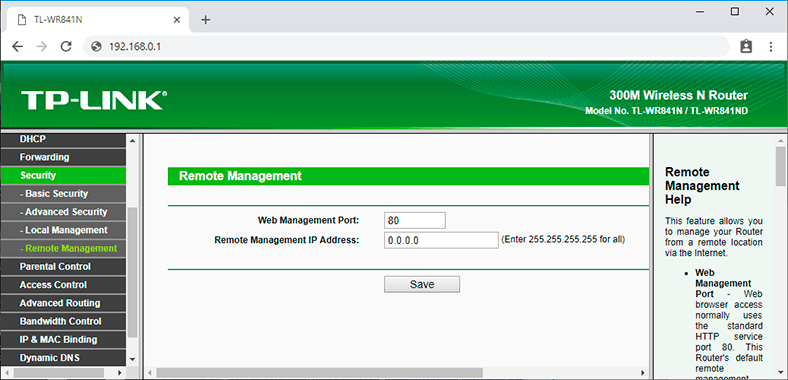
To enable remote access available to anyone the IP address should look like this: 255.255.255.255.
Step 8. Choosing Operation Time
In some models, you can set up an operation schedule. For example, you don’t use the network at night so you don’t want someone else to connect either. This can be done in one of the two ways: by turning the router off (pressing the corresponding button) or setting up the schedule for its work.
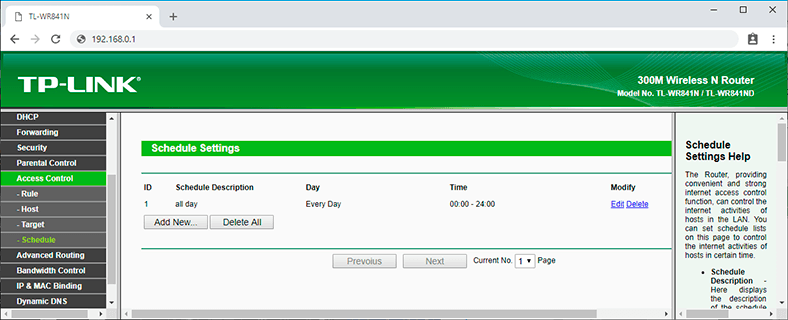
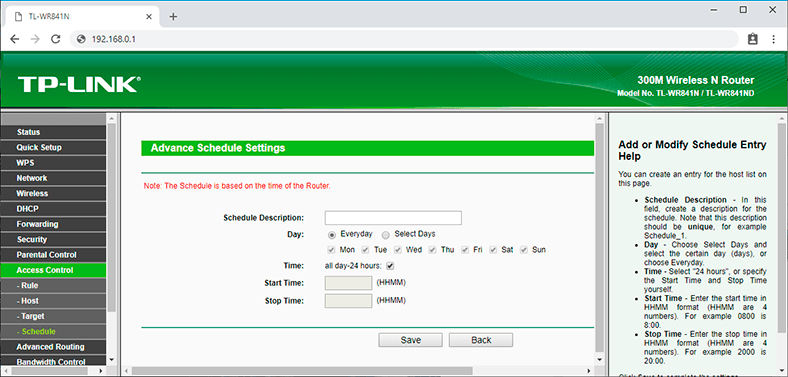
To do it, open the tab Access Control, go to Schedule, and click Add New.
In this window, you can specify days and time when you want the router to operate, and confirm your choice by clicking Save.
Step 9. Filtering Devices by IP Address
If you need to restrict Internet access for certain computers within the network, use the ARP function. Binding by ARP protocol is a convenient option to control access for computers within a local network.
To set up this filter, you should assign a static IP to every computer connected to the network.
For a Windows 10 computer, open Settings / Network & Internet / Change adapter options.
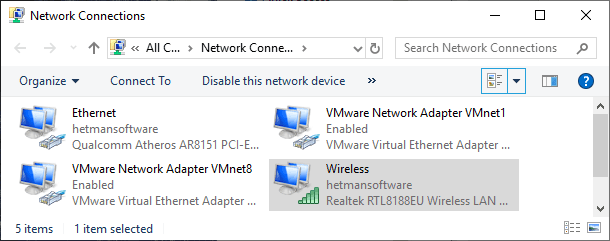
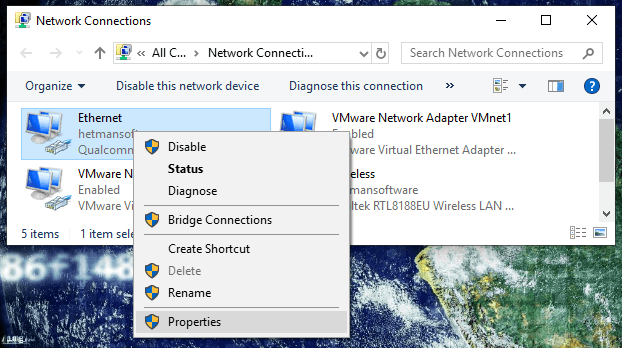
Right-click on your network and choose Properties. Then select IPv4 and click on Properties.
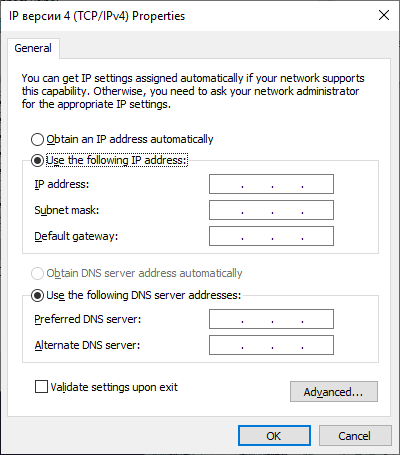
Check the box next to Use the following IP address and specify it, as well as the subnet mask and default gateway.
To connect the IP address of a computer to a certain MAC address and make sure that other computers don’t use this address, enable ARP Binding function in the router’s settings by visiting the tab IP & MAC Binding.
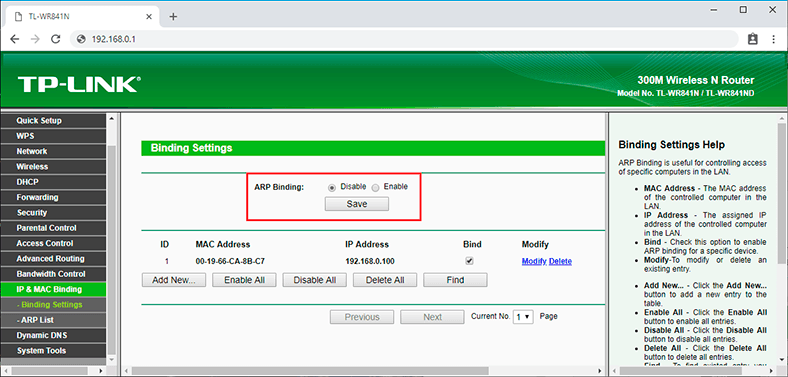
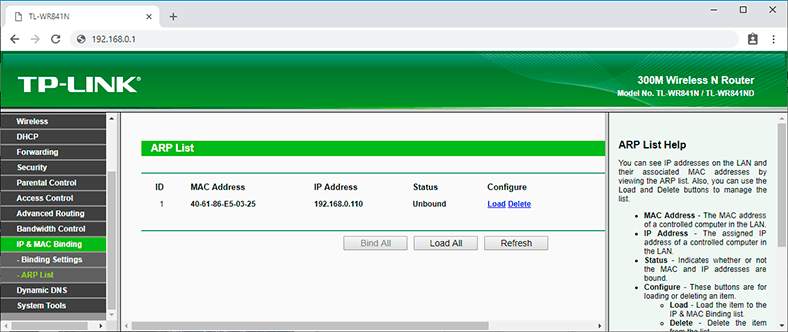
After that, create a new entry by clicking on the button Add New, type the МАС and IP addresses, check the box next to Bind and click Save. In the ARP table, you will see all bound devices.
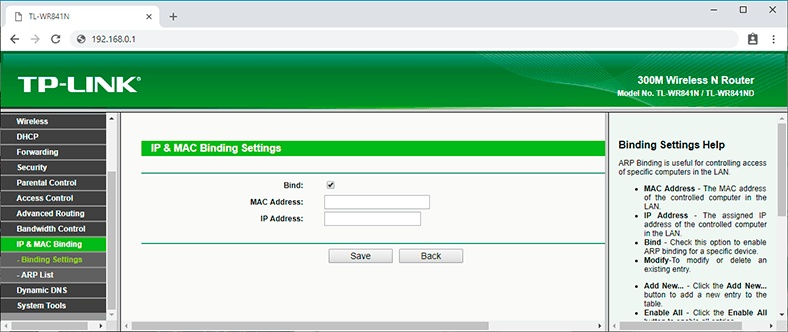
Now if someone else’s computer (which is not on this list) sends a request to establish connection, access will be denied.
Step 10. Checking for Strange Devices in the List of Clients Connected to the Router
If you notice that the amount of your traffic has reduced considerably, or you doubt that the router works properly, check it for any odd devices that might be connected.
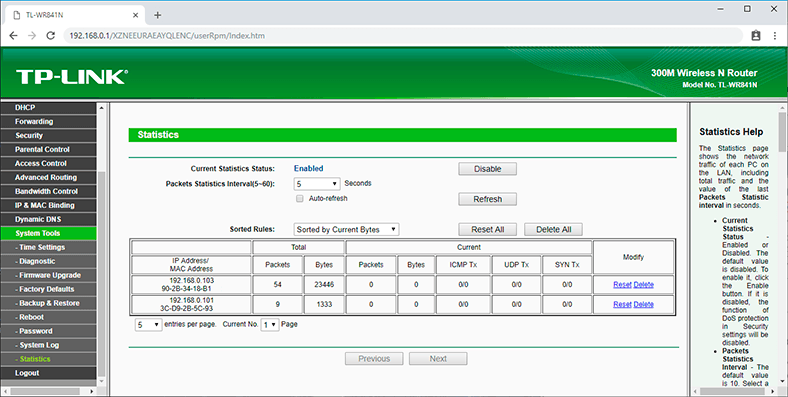
To do it, open the tab System Tools and go to Statistics. Enable Internet traffic statistics by clicking on the corresponding button.
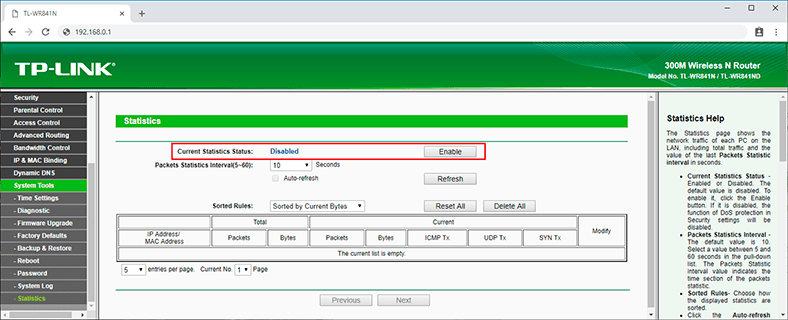
In the table, you can see all connected devices and notice strange connections by their IP addresses.
All the security settings I have shown you today are not obligatory, and everyone is free to use them or not. The paramount task is to ensure the router’s security so that no one can modify its settings and deprive you of your Internet connection. Quite often, the only sufficient measure required is changing the router’s login and password, along with setting a reliable password for the Wi-Fi network.
That is all for now. I hope this guide will be useful. Feel free to leave comments and ask questions.


