Internet Traffic Control: Tips for Router Management
Ready to take control of your network? Learn how to effectively control and monitor internet traffic on your router with our expert guide. Whether you’re looking to prioritize certain activities or monitor usage, we’ve got you covered with step-by-step instructions. Say goodbye to bandwidth issues and hello to a more optimized network experience!
Quite often, people face the need to limit the speed of Internet connection that the router is broadcasting. In this article, I will give a detailed explanation of how to limit Internet connection speed, with the example of a TP-LINK TL-WR841N router. We will have a look at two possible scenarios: limiting connection speed for all devices, and doing it for a particular device or a group of gadgets. For example, for several computers, a smartphone, tablet PC etc.
- Bandwidth Control
- Method 1. Limiting the Wi-Fi Data Transmission Speed
- Method 2. Limiting the Internet Connection Speed for Particular Devices
- Method 3. Guest Network
- Questions and answers
- Comments

How to Configure Parental Controls in a TP Link Router from a Smartphone or PC in 2019 🌐🛡️🧒
Bandwidth Control
Before you start configuring bandwidth for your router, it is necessary to enable the traffic control function, and set the speed of incoming and outgoing connection offered by your Internet service provider.
To do it:
-
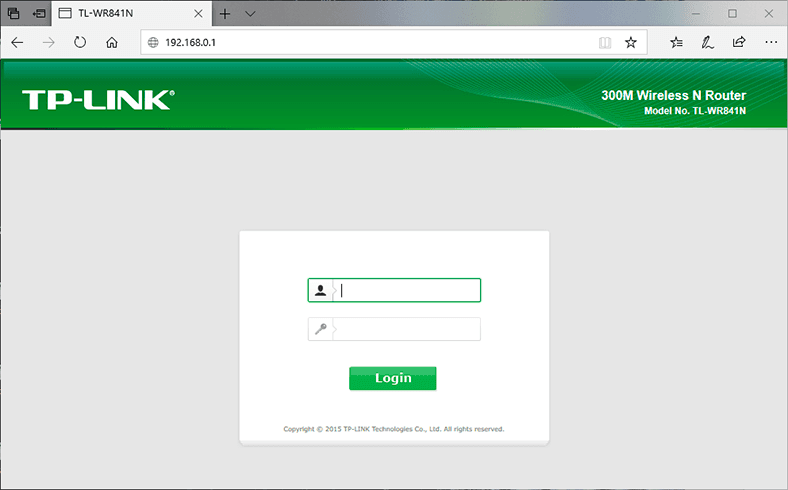
Go to the router settings. In one of the previous articles on basic router configuration, I have already described this step in detail.
-
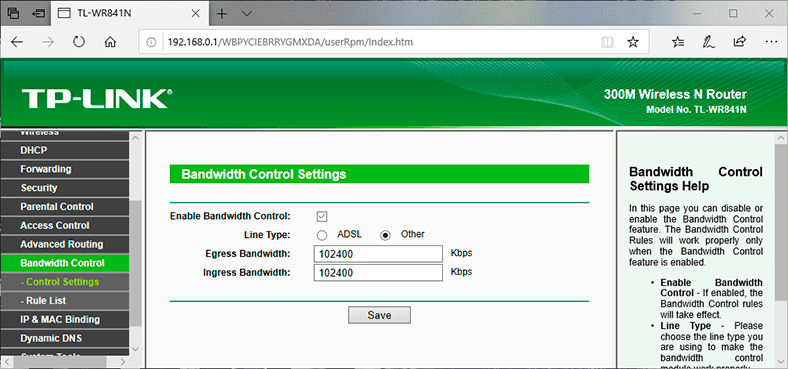
In the router settings, go to the tab Bandwidth Control and check the box next to Enable Bandwidth Control.
-
Set the Egress Bandwidth and Ingress Bandwidth. This is the speed your ISP gives you. For example, when you are provided with 100 Mbps for download and upload, you should convert this value from megabytes per second to kilobytes per second (Kbps) and type the result into the corresponding fields. It’s very easy: 100 Mbps multiplied by 1,024 Kbps = 102,400 Kbps. This is the data you should enter into the fields.
-
Click Save to confirm the settings.
Now you should configure the bandwidth limitations. As I said, we will find out how to configure limiting settings for all devices connected to the router, and how to limit connection for certain devices only.
Method 1. Limiting the Wi-Fi Data Transmission Speed
To limit Wi-Fi network speed for all devices:
-
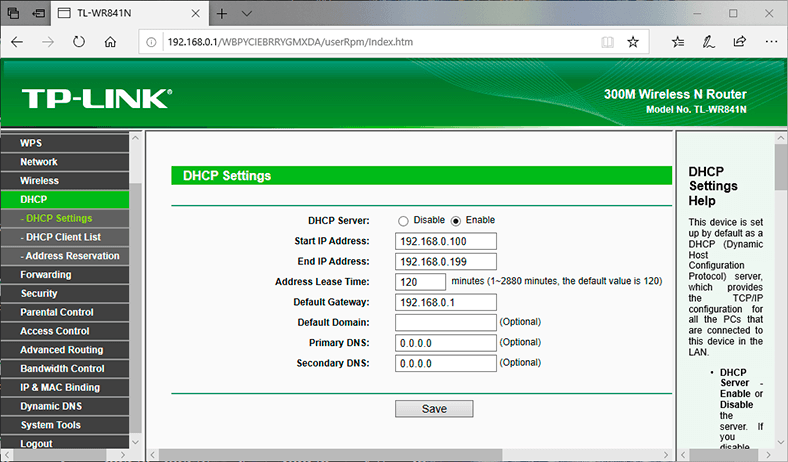
Go to the router settings. Go to the tab DHCP to see the range of IP addresses specified there. Look for Start IP Address and End IP address. Copy or remember them.
-
After that, switch to the tab Bandwidth Control. This is where you should create a new bandwidth control rule. Do it by clicking on the Add New button.
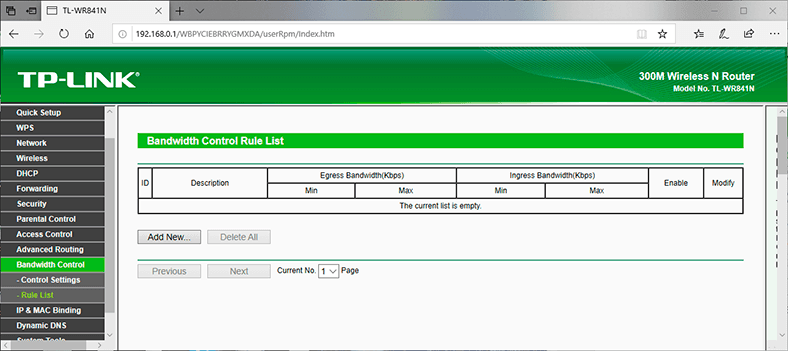
-
Check the Enable box. Specify the range of IP addresses (which you saw in the DHCP tab) in the corresponding field.
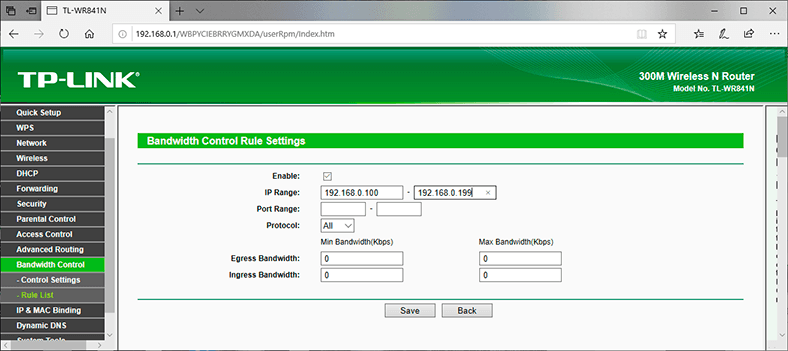
-
The Port Range field should be blank.
-
Protocol – choose ALL.
-
Set Priority if available. The default value is 5, so you may leave it as it is.
-
Set the maximal Egress Bandwidth and Ingress Bandwidth. The minimal value (usually, the minimal permissible value is used) is 1. The maximal – which I choose – is 10 Mbps. That is, 10 240 Kbps.
-
I will use the same values for the Ingress Bandwidth. This is the speed at which the device will receive data from the Internet. You may set a higher or lower value.
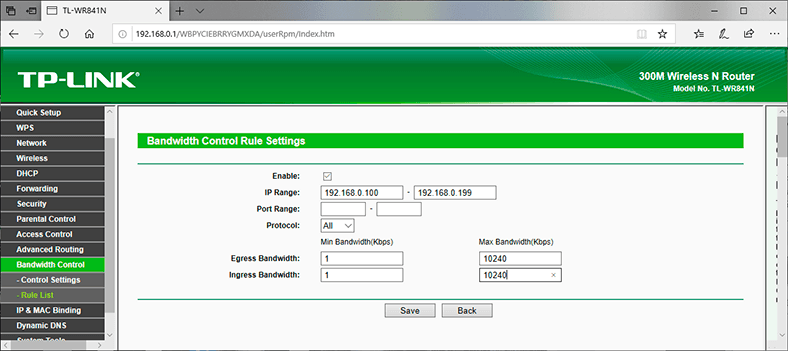
-
Save the rule.
Now the rule you have created in the bandwidth control settings will be applied to ALL devices that ever connect to your router. That is, the speed of incoming and outgoing connection will be limited to 10 megabytes per second.
Method 2. Limiting the Internet Connection Speed for Particular Devices
This method is more complicated. However, in the router settings you can configure maximal permitted speed for every device. These settings should be bound by IP address.
That is why start by binding the IP address (assigned by the router) to the MAC address of the device for which you would like to set a speed limit. It is required to ensure that a certain device always receives the same IP address – for which you will set certain bandwidth limitations.
How to bind an IP address to the MAC address of a device?
To bind an IP address to the MAC address of the device you should go to the router settings (the tab DHCP / DHCP Client List.
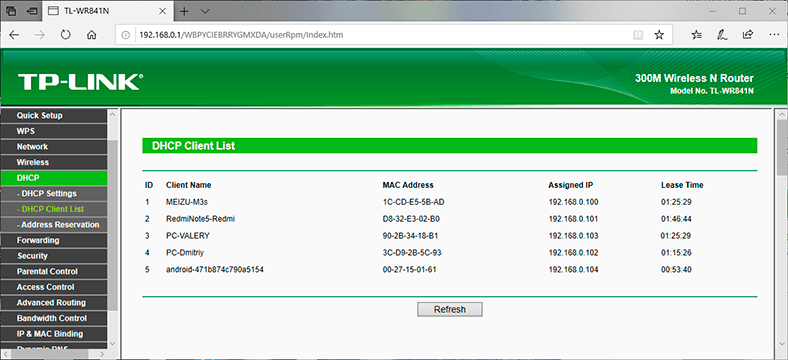
You will see the list of devices connected to the router at the moment. You should find and copy the MAC address of the required device. You may also note the IP address assigned to such device.
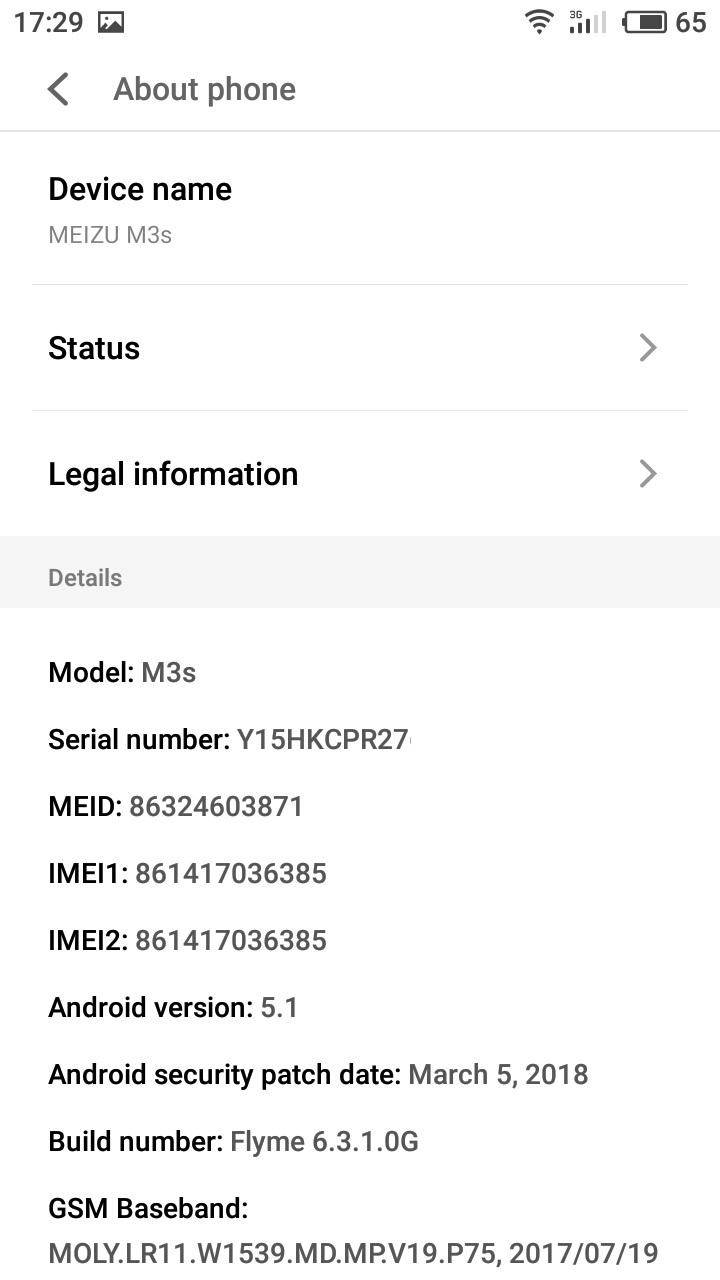
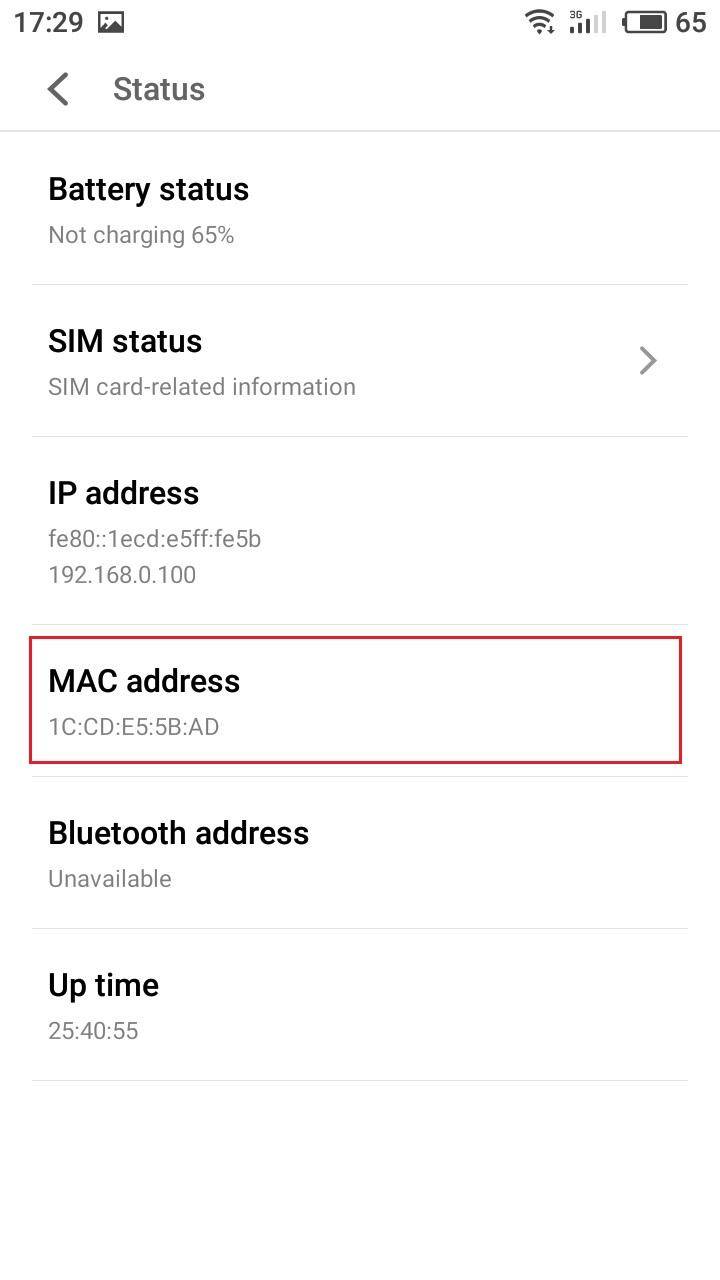
If the device for which bandwidth settings should be configured is not connected to the router at the moment, you can see the MAC address for such device in its settings, somewhere in the section About phone, for example.
How to find the MAC address of an Android device?
For example, for an Android smartphone you need to go to Settings / About phone / Status. The address you are looking for is given in the line MAC Address.

How to find the MAC address of a Windows computer?
In Windows, go to Network & Internet settings / Change adapter options.

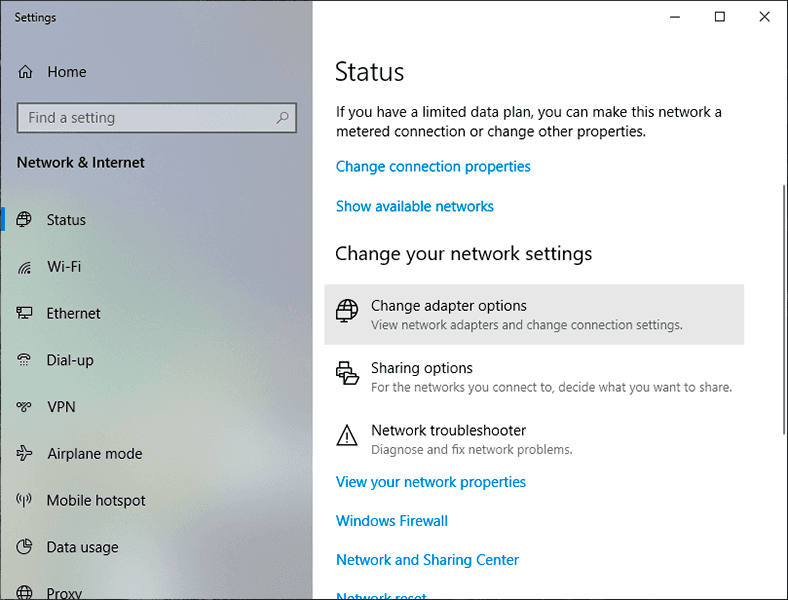
Right-click on the network adapter which is used for establishing the Internet connection and select Status / Details.

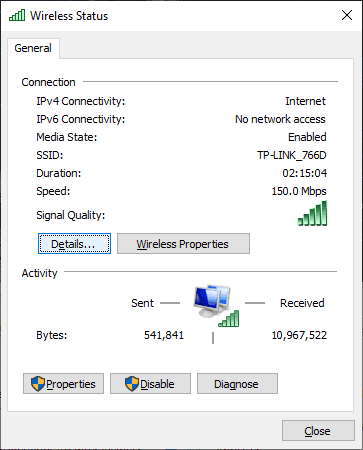
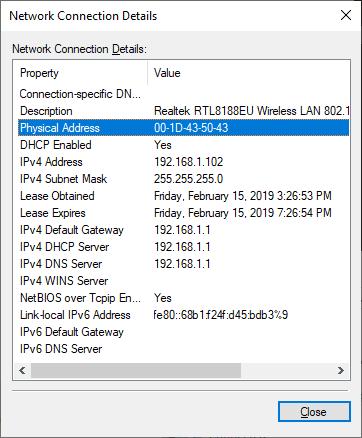
Physical address is the actual MAC address of the computer’s network adapter.
How to Reserve an IP Address for a Device, Based on its MAC address?
You already know the MAC address of the device. Now:
-
Go to the tab DHCP / Address Reservation. This page shows you the static IP address assigned by the DHCP server. Below, you can configure corresponding settings for reserving IP addresses.
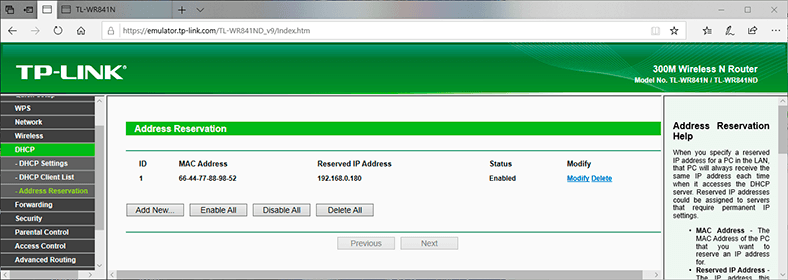
-
Click Add New and enter the MAC address of the device.
-
After that, specify the IP address to be reserved for this device (you can use the address from the page DHCP Client List), or, for example, specify it as 192.168.1.120 (if the IP address of your router is 192.168.0.1, the address should be 192.168.0.120).
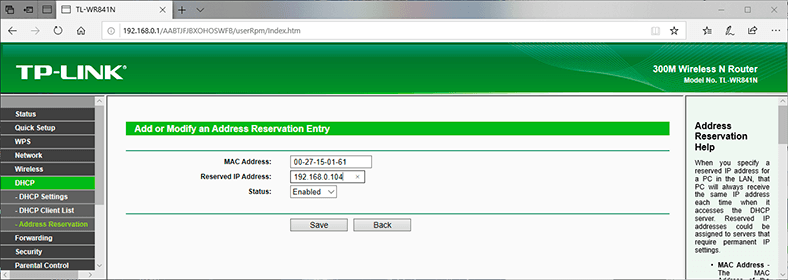
-
Change the status to Enabled and save the settings.
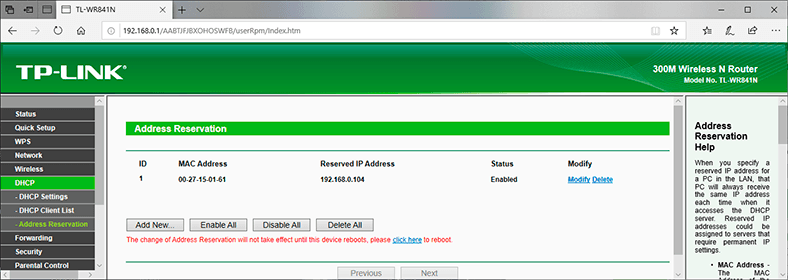
This way, you can bind the required number of devices, or edit/remove an address reservation entry. The most important thing is to remember the IP address you have set. You will need to use it when setting maximal speed for this device.
How to Limit the Internet Connection Speed for a Specific Device?
Now let’s configure bandwidth for a device using its IP address. To do it:
-
Go to the tab Bandwidth Control.

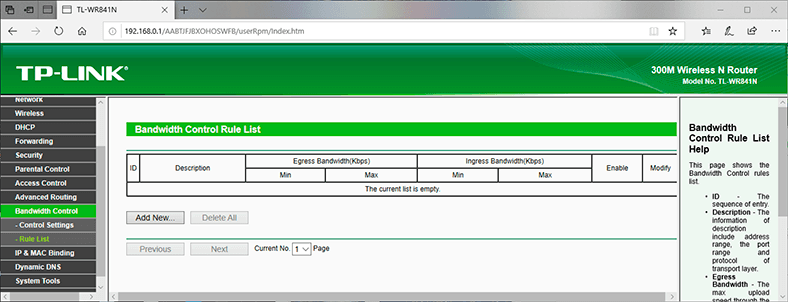
-
To create a new rule, click on the button Add New. A window will open, where you can set the values limiting the bandwidth.
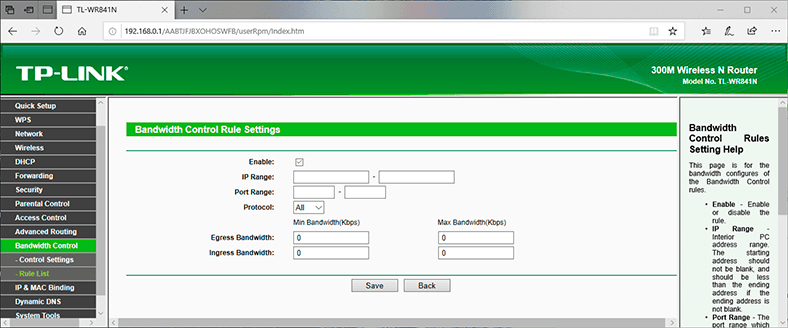
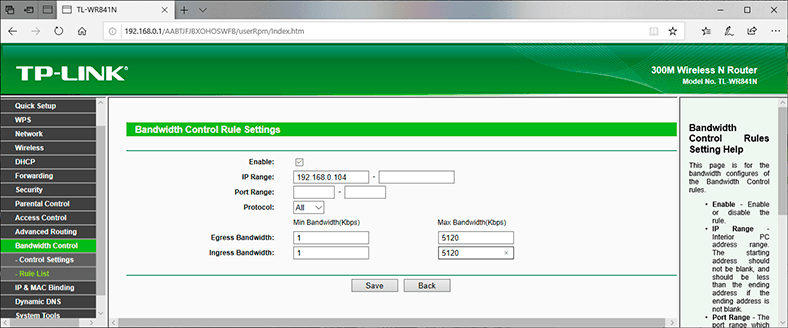
Follow these steps:
-
Check the box next to Enable,
-
In the field IP Range, type the IP address you have previously reserved for this device.
-
The Port Range field should be blank.
-
Protocol – choose ALL.
-
Priority. The default value is 5, so you may leave it as it is.
-
Set the maximal Egress Bandwidth and Ingress Bandwidth. The minimal value (usually, the minimal permissible value is used) is 1. The maximal – I will choose 5 Mbps. That is, 5,120 Kbps.
-
I will use the same values for the Ingress Bandwidth. This is the speed at which the device will receive data from the Internet. You may set a higher or lower value.
-
Save the rule.
You will see the rule you have created. It can be modified, selected and deleted, or you can create another rule. For example, to limit the speed for other devices.
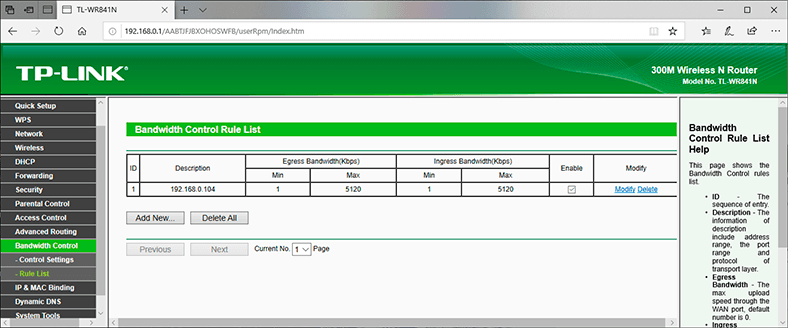
That is all – using this sequence, you can set maximal speed for virtually every device connected to your router. To check the result, test Internet connection speed on the device for which you created a rule.
Method 3. Guest Network
If you have a public Wi-Fi network, perhaps even without a password, for which you need to set a maximal speed limit, the best solution would be to use the Guest Network function.
The matter is that you can arrange a guest network in addition to the main network, and such guest network will be completely isolated. With the speed limitation of your own choice. This limitation will apply to all devices connected to the guest Wi-Fi network.
How can you do that? Go to the router settings and find Guest Network menu.
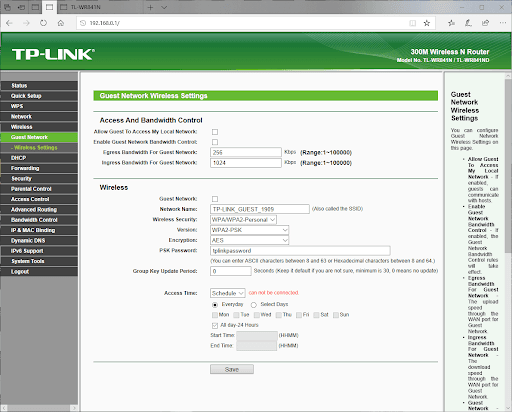
In this page, you can:
-
Allow Guests to Access My Local Network. If this function is enabled, users will be able to connect to other devices in the router’s local network.
-
Allow Guests to Access My USB Storage Sharing. If this function is enabled, users will be able to connect to a network USB storage. This function is available for routers with a USB port only.
-
Guest Network Isolation. If this function is enabled, users won’t be able to communicate with each other.
-
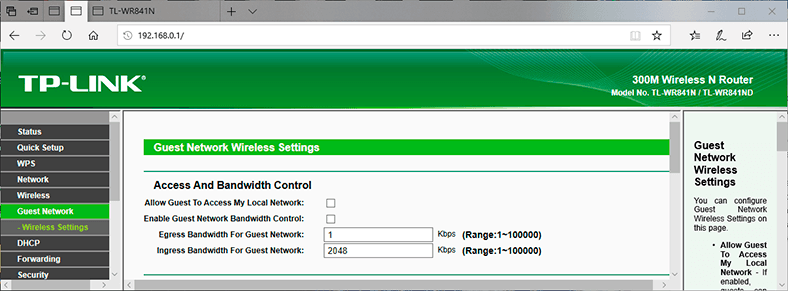
Guest Network Bandwidth Control. This is what you need. This function will apply rules for controlling the bandwidth of guest network. That is, you can use the method I have described before to set Egress Bandwidth and Ingress Bandwidth for devices connected to the guest network.
For example, the minimal value can be 1, And the maximal – 2,048 Kbps, that is, 2 Mbps.
Next:
-
You can specify the frequency to be used by the guest network: 2.4 or 5 GHz. But it only makes sense if your router is a dual-band one, like mine.
-
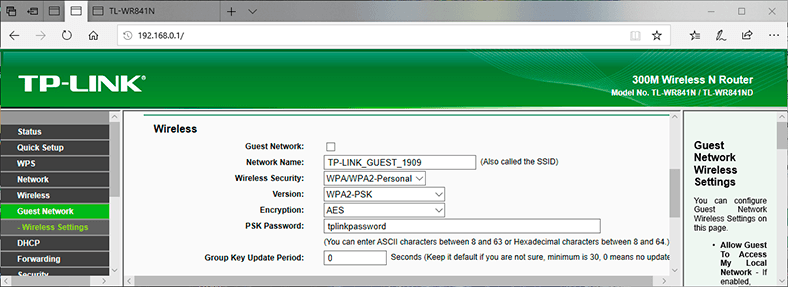
Guest Network. Enable or disable the guest network.
-
Network name is actually the name of the guest network. Type the name (up to 32 characters long). This is the name that your guests will see.
-
Max guests number: up to 32. Give the number of guests you prefer.
-
Security. Use it to disable or configure guest network protection. If you disable it, guests will be able to connect to your Wi-Fi network without a password.
Alternatively, you can enable it and configure WPA/WPA2 protection, just like you do it for wireless protection of the main network.
-
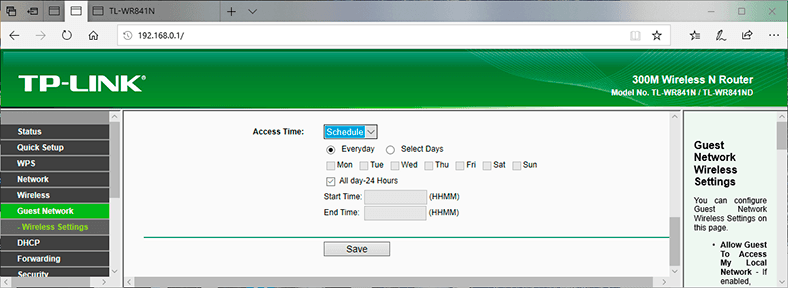
Access time. Set the time when access is possible. That is, when and for how long it is available. I am sure you will find your way through this particular setting – it’s quite easy.
-
Don’t forget to save the modified settings.
These were the methods to limit bandwidth for devices connected to the router, which can help you to control how much Internet traffic they are allowed to have.
If you have any questions while you are configuring your router, you can leave a comment to ask one.



Yes, there are several risks associated with restricting and controlling internet traffic on a router. These risks include: