Wi-Fi Router Mode Configuration: TP-Link AC750 Archer C20 Tutorial
Ready to enhance your network experience? Learn how to configure Wi-Fi Router Mode for your TP-Link AC750 Archer C20 with our expert setup guide. Follow along step-by-step as we walk you through the process, ensuring that you can optimize your network for seamless connectivity. Say goodbye to Wi-Fi woes and hello to a smoother online experience!
In another article, we have already considered basic settings of a Wi-Fi router required to connect to the Internet. But how can we use Internet without Wi-Fi? Let’s find out how to configure it properly.
We will be using a particular router, TP-LINK Archer C20. This is a dual-band Wi-Fi router, but its settings are more or less typical, so this guide can help you set up almost any kind of router.
- Frequency for Wireless Data Transmission
- Wireless settings
- Configuring Guest Network
- Questions and answers
- Comments

How to Set Up WiFi Network in Router TP-Link AC750 Archer C20 🌐💻📱
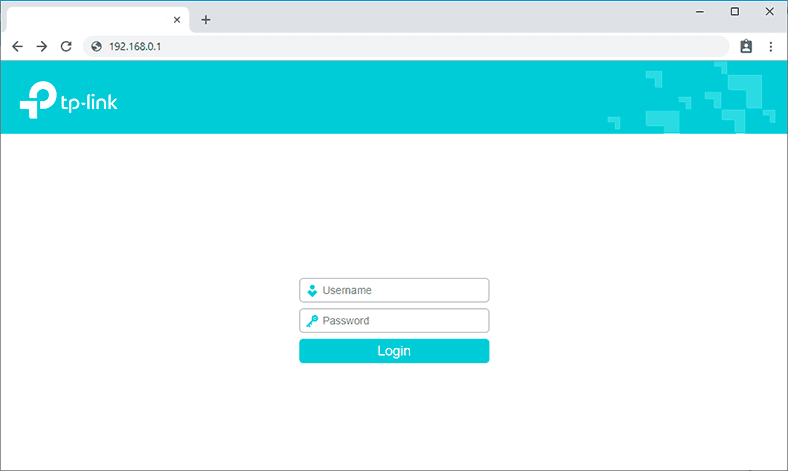
In order to configure wireless (Wi-Fi) mode for a router, go to the settings panel.
In one of the previous articles, I have already described in detail all aspects of connecting a router to the computer and entering the settings panel, so I don’t think we have to focus on it again.
Frequency for Wireless Data Transmission
Let’s start with choosing the working frequency for wireless data transmission.
As this router is a dual-band one, it can broadcast two Wi-Fi networks:
- One at the frequency of 2.4 GHz;
- And the other at 5 GHz.
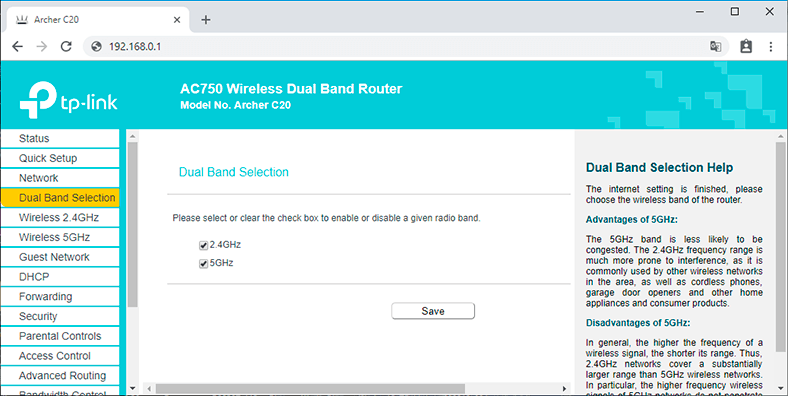
If you don’t need one of them, go to the tab Dual Band Selection and disable the network for the frequency you don’t want to use. Uncheck the box next to such network and save the settings.
Otherwise, you can leave both networks as they are. For example, use 2.4 GHz for older devices, and let newer gadgets use 5 GHz which they support.
What is the difference, you may ask?
The primary difference between the wireless connection frequencies (2.4 and 5 GHz) is the range of signal. When the frequency 2.4 GHZ is used, the signal is transmitted to longer distance compared to that of the 5 GHz frequency. It can be explained through the main wave characteristics – the higher is the frequency, the sooner waves will fade out. That is, if you worry about the coverage area, you should opt for 2.4 GHz.
The other difference is the number of devices working with such frequencies – at 2.4 GHz the wireless signal is more prone to interference than at 5 GHz. This is because there are many other devices that also use the frequency of 2.4 GHz. Mainly, these are microwave ovens and wireless handsets (also known as cordless phones), as well as other devices. They produce more interference into the frequency environment which reduces the speed of wireless connection.
In both cases, 5 GHZ is a better choice, because it gives you more channels to isolate your network from other networks, and there are less sources of interference for this frequency.
To cut the long story short, if there is a lot of interference in your area and your devices support 5 GHz data transmission, it is recommended to use 5 GHz wireless networks. In all other cases, you should go for 2.4 GHz.
| Parameter | 2.4 GHz | 5 GHz |
|---|---|---|
| Frequency Range | 2.4 – 2.5 GHz | 5.1 – 5.8 GHz |
| Data Transfer Speed | Up to 600 Mbps | Up to 3.5 Gbps |
| Range | Wide (better penetration through walls and obstacles) | Shorter (effective within a single room) |
| Channel Congestion | High (commonly used, more interference) | Low (fewer devices, less interference) |
| Best Use | Low-speed internet devices, IoT, web browsing | Online gaming, high-definition streaming, video calls |
| Compatibility | Compatible with older devices | Requires modern devices |
Wireless settings
Step 1. Basic Settings
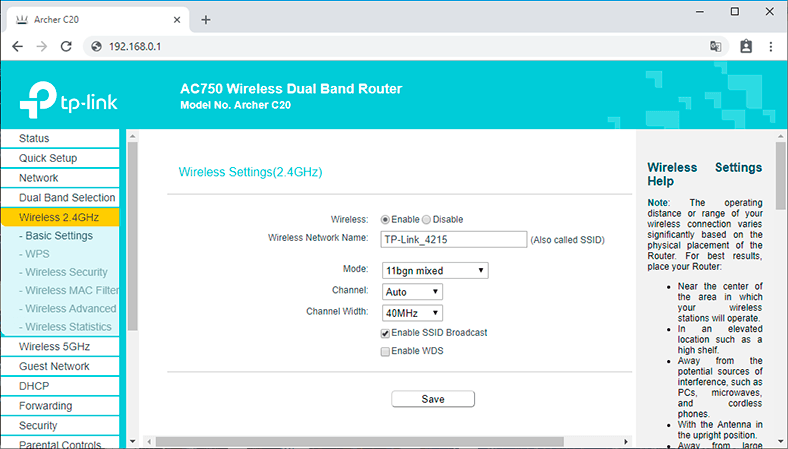
Now move on to the tab of the Wi-Fi network you need to configure. For example, like in my case: Wireless 2.4 GHz.
Enable wireless mode (if it was disabled), and set the Wireless Network Name in the Basic Settings menu. You can choose to have any network name you like.
The next step is to set the Wi-Fi network mode.
Nowadays, the current standard is 1, with four main modes: b/g/n/ac. They differ mostly by the maximum connection speed (bandwidth):
- 11b works at 2.4 GHz with the speed up to 11 Mbps.
- 11g works at 2.4 GHz with the speed up to 54 Mbps.
- 11n supports the speed up to 150 Mbps at 2.4 GHz and up to 600 Mbps at 5 GHz.
- 11ac is the new standard that supports 5 GHz only. It can transmit data at the rate of 6.77 Gbps.
Newer modes are compatible with the older ones, but the older modes do not work with newer standards.
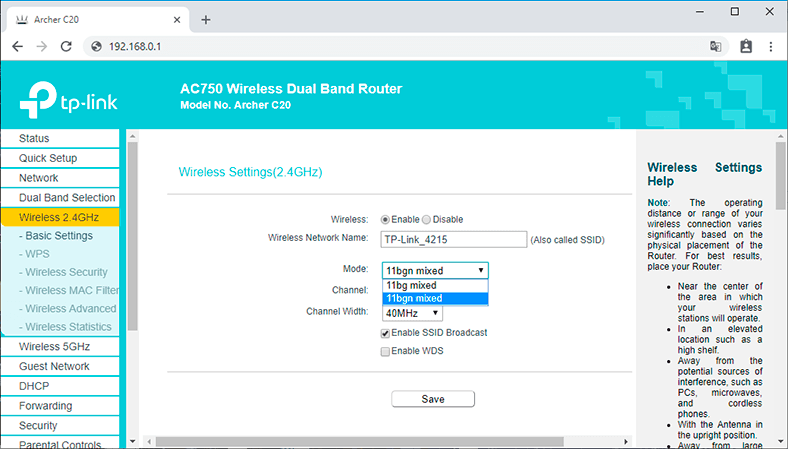
Usually, the default option is 11b/g/n mixed for 2.4 GHz networks, or 11а/n/ac mixed for 5 GHz networks. This approach is meant to ensure maximal compatibility, so that you can connect any gadget to your router, be it a newer or older device.
I recommend checking your situation and enabling the mode which is the most appropriate and compatible.
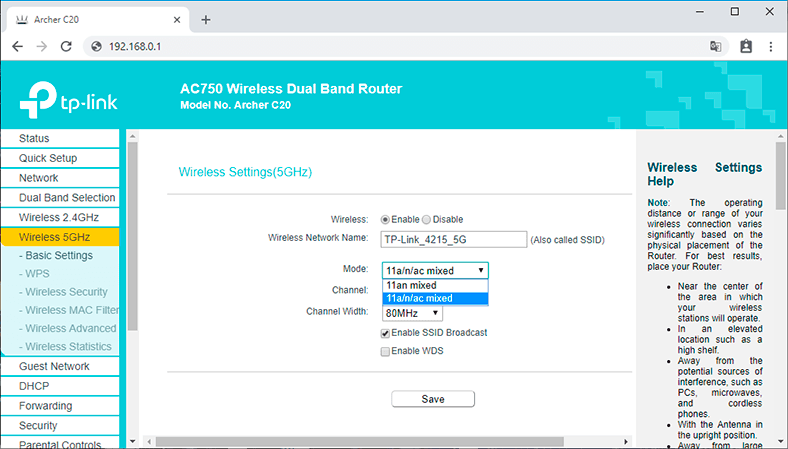
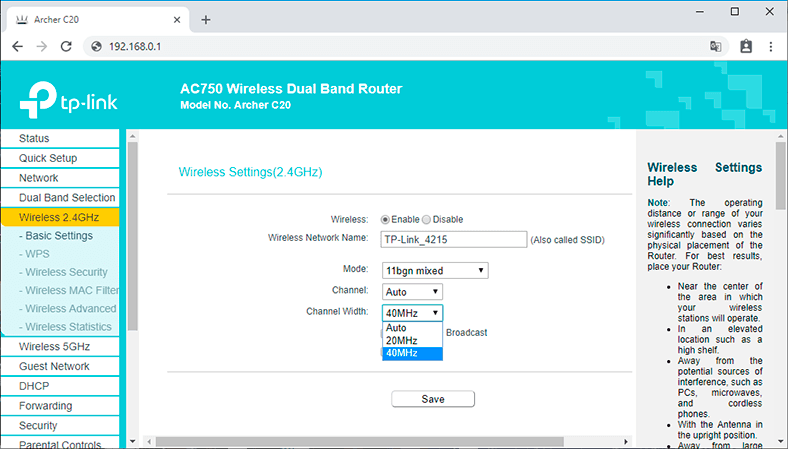
In the fields Channel and Channel Width you can set the frequency the router will be using when working in the wireless mode. You should change the channel only if there are problems because of the interference generated by another hotspot located near your devices or equipment. If you choose automatic mode (Auto), the router will select the most suitable channel automatically. That’s why don’t change anything here, or just choose Auto.
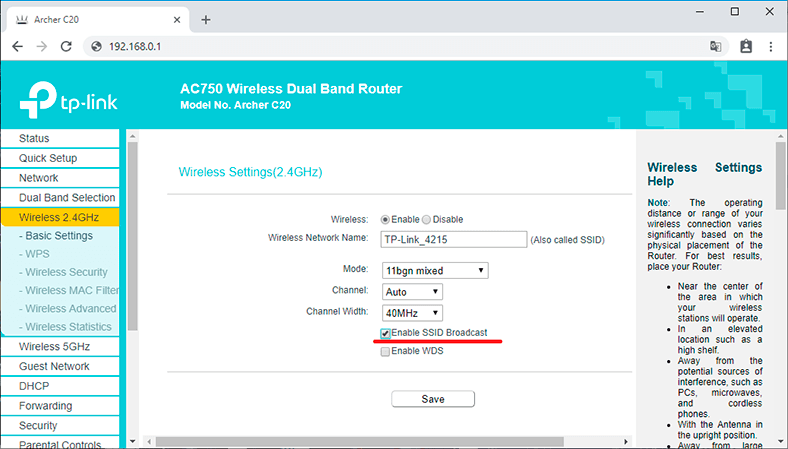
Enable SSID Broadcast – by checking this box you allow the wireless router to transmit its name (SSID) openly in the broadband mode. What does it mean?
Every wireless hotspot transmits the name of its Wi-Fi network (in a broadband format) within the working range of its frequencies. Any client currently scanning the range in search of hotspots available for connection will see it and may try to hack it. If you hide SSID by unchecking the corresponding box, this identifier will not be broadcast in the broadband format and therefore, it will not be visible on the list of available Wi-Fi networks. If you do it, only the client who knows the SSID and enters it manually or with the help of WPS function (which we will cover a bit later) will be able to connect to such network.
So uncheck this box if you want to hide your network, but I will keep it as it is.
Enable WDS. This function lets the router bridge two or more local wireless networks. You can use it to extend the coverage area of a wireless network by combining several Wi-Fi hotspots into a single network, without having to establish a wired connection between the hotspots.
However, you are unlikely to need it for standard Wi-Fi network settings. I am going to describe this function in more detail in one of the next articles – Connecting Two Routers Within One Network.
Don’t forget to save the settings.
Step 2. WPS
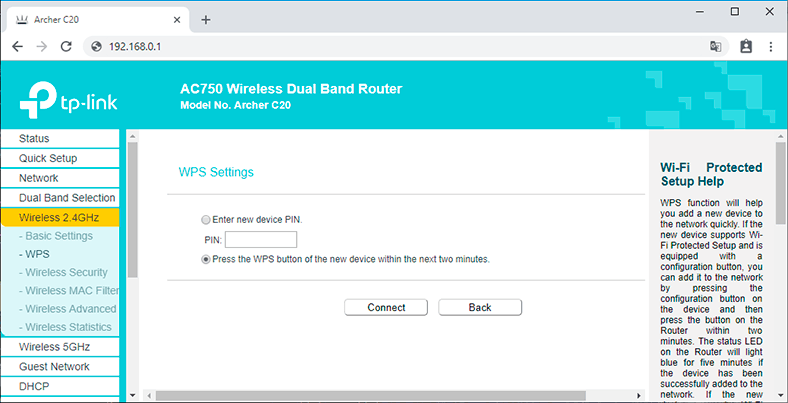
The next menu is WPS. This function allows you to add new devices to the network quickly.
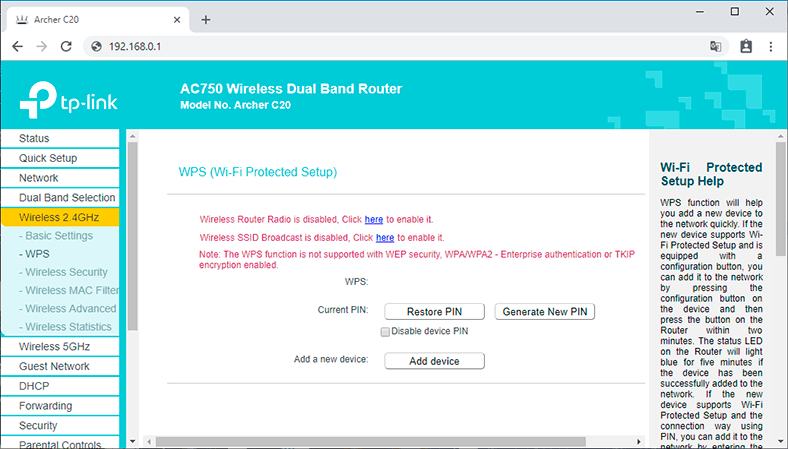
If such new device supports the function for configuring protected Wi-Fi connections (Wi-Fi Protected Setup) and has a corresponding quick setup button, you can add it to the network by simply pressing the button on the device or enabling the corresponding function.
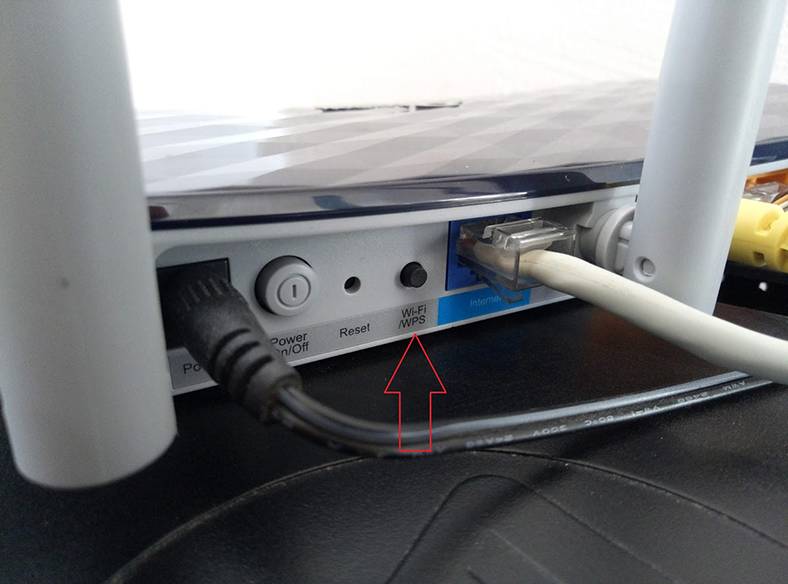
Here is how it looks like when you use WPS to connect a smartphone to the network:
-
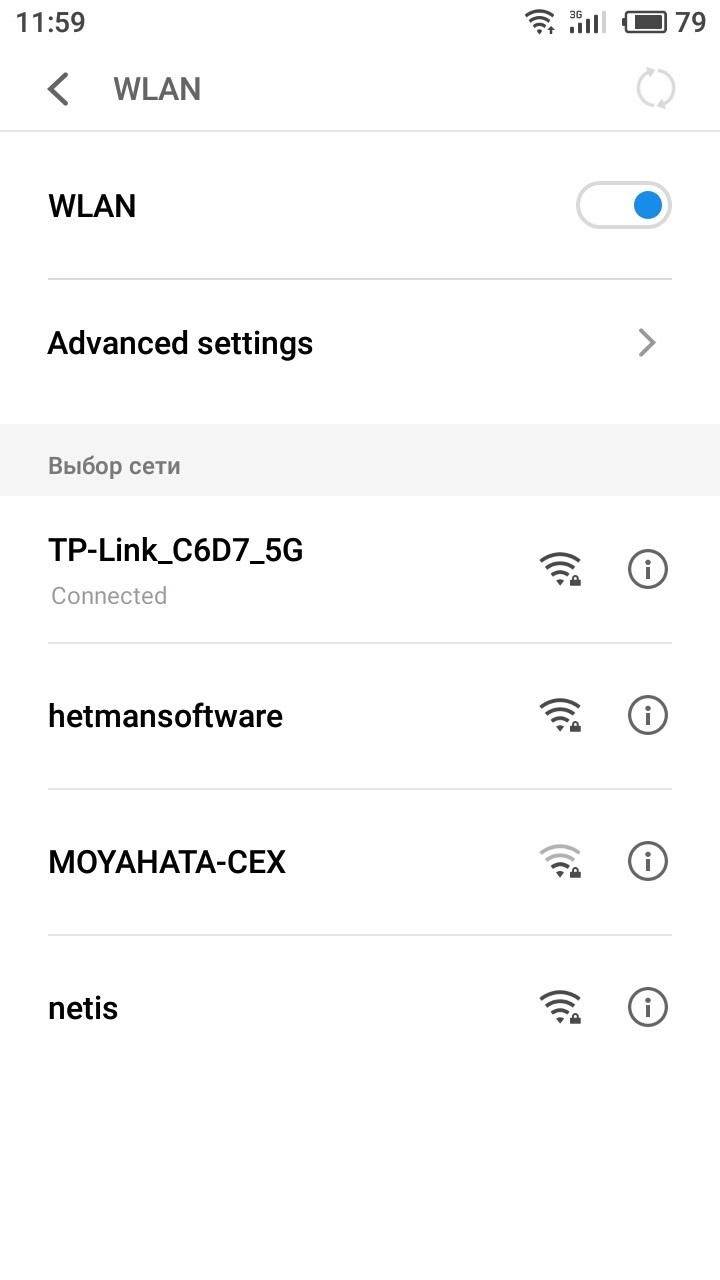
My smartphone is now connected to the wireless network. Let it be hetmansoftware.

-
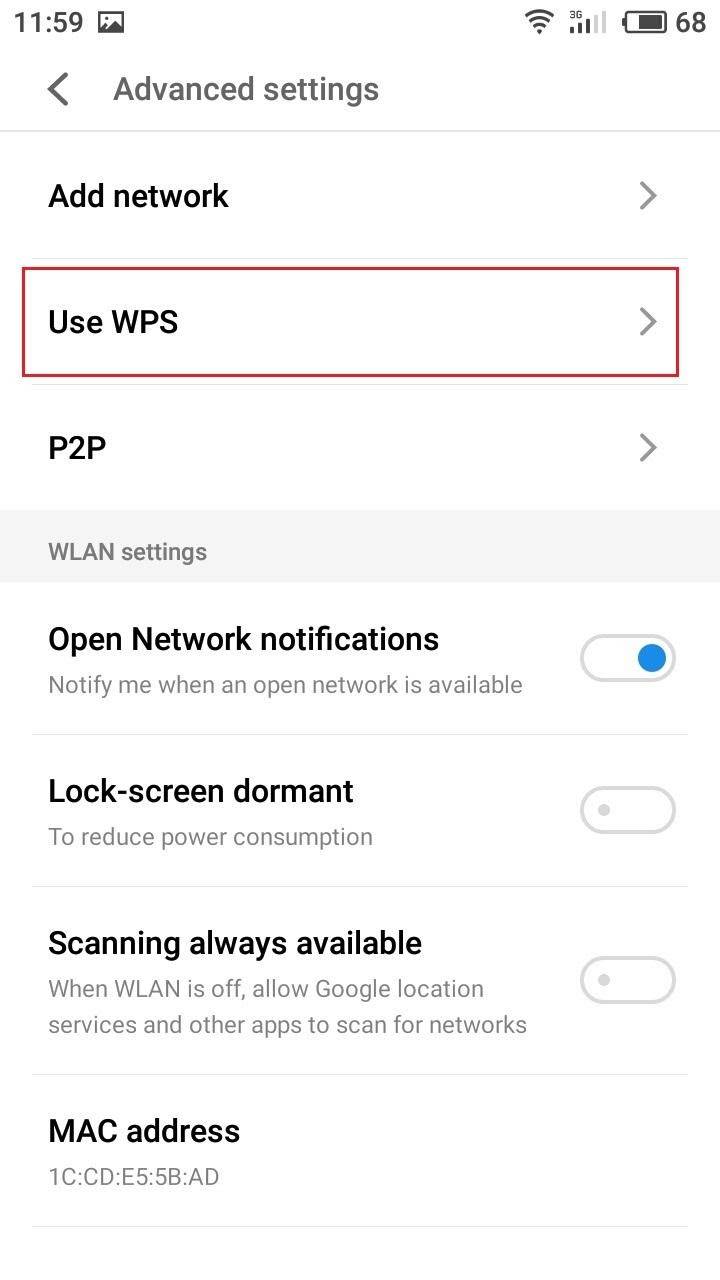
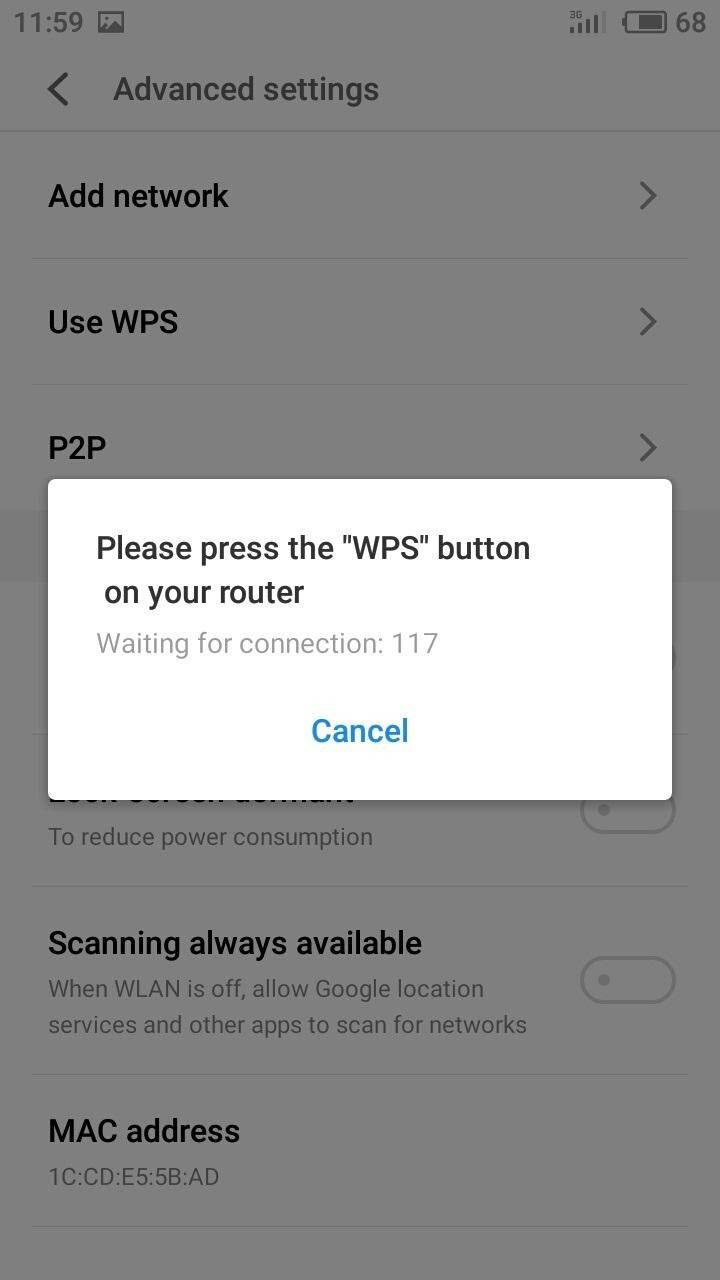
Go to Advanced settings of the phone’s wireless network and enable WPS. It starts the countdown.
-
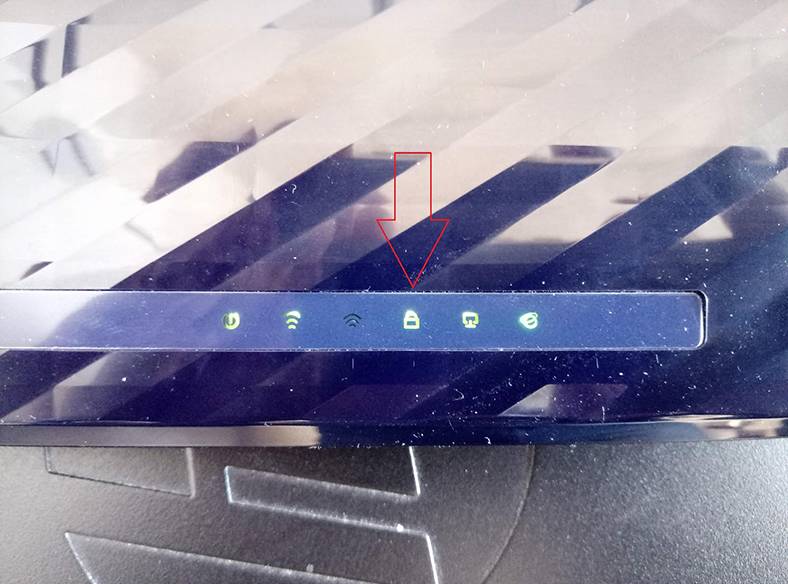
Now press the WPS button on the router. An indicator lights up to show the function is now active.
-
Wait for several seconds and you can see that the countdown on the smartphone has stopped. Check the network – the smartphone is now connected to the router by WPS.
This function does not require any special settings.
- It can enabled or disabled.
- Current PIN – The current value of the router’s PIN is displayed here. The default PIN code can be found on a sticker placed on the router’s side, or in the user manual.
- Restore PIN – Restore the PIN of the router to its default.
- Generate New PIN – Click this button to get a new random value for the router’s PIN.
- Add Device – You can add a new device to the existing network manually by clicking this button. Press the WPS button on the router or enable this function in the menu.
Step 3. Wireless Security
The next step is to set configure Wireless Security and set a password for your Wi-Fi network. To do it, go to the tab Wireless / Wireless Security.
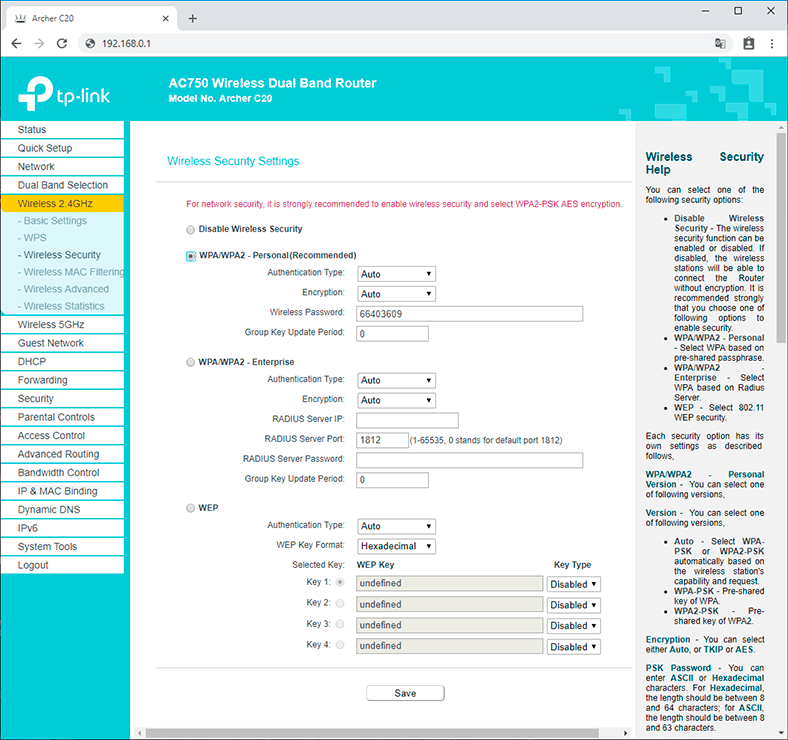
You can choose one of the following security options:
- Disable Security. If it’s disabled, wireless devices can connect to the router without encryption and password. It is strongly recommended to select one of the variants below to protect your wireless network.
- WPA/WPA2 – Personal – WPA-based protection with a pre-shared passphrase.
- WPA/WPA2 – Enterprise – WPA protection with Radius server.
- WEP – An option based on 802.11 WEP standard.
Select the recommended option – WPA/WPA2 – Personal.
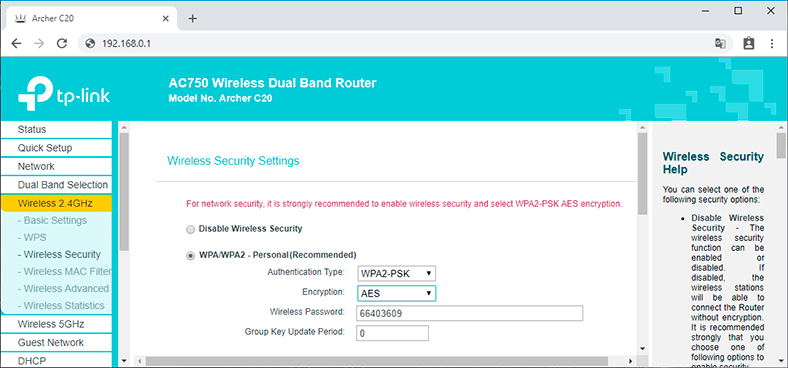
You can choose the authentication type, WPA-PSK or WPA2-PSK. Both protocols, WPA and WPA2, offer high standards for data security and improved access control for users trying to access wireless networks. However, WPA2 provides better safety than its predecessor, the WPA protocol, because WPA2 protocol supports the AES standard which enhances its protection greatly.
It suggests naturally that AES encryption should be used with WPA2-PSK, while the best option for WPA-PSK is using TKIP. If you configure this part in a different way, users won’t be able to connect to such a hotspot.
In the field Wireless Password set the password you want to use for connecting to your Wi-Fi network.
If you connected any devices to the wireless network before you have changed the Wi-Fi name and password, you will have to reconnect them after changing the password and restarting the router, and log in again after entering the new password. After you make changes to any Wi-Fi settings, all devices connected previously to this network will get disconnected.
Group Key Update Period: enter the key update period which tells the router how often encryption keys should be changed. If you don’t have a super-secret laboratory at home and you don’t expect evil hackers launching attacks at your humble data, you can set the update period at 0 – that is, cancel key updates.
Save the settings after all necessary things have been configured.
Step 4. Wireless MAC Filtering
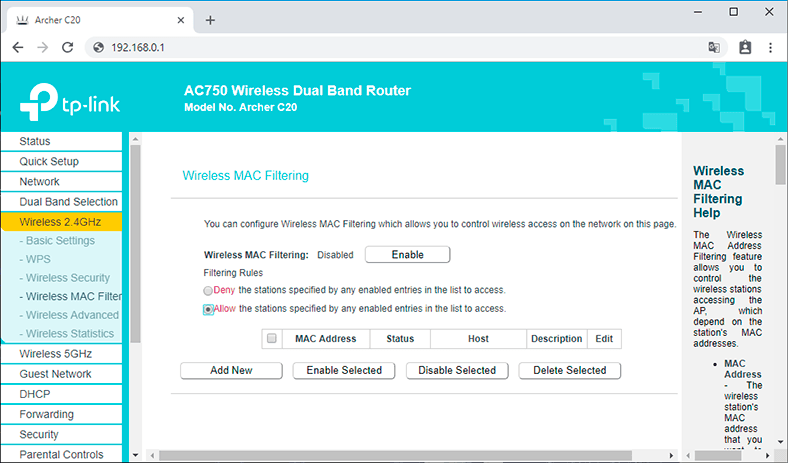
Together with encryption, authentication and encryption key (Wi-Fi network password), MAC filtering is an additional factor for protecting your wireless network. For example, you can use it if you want to restrict access to your network for strangers, or allow access for your own devices only. Sometimes, it can be used as a Parental Controls function to restrict access to the local network for children’s devices.
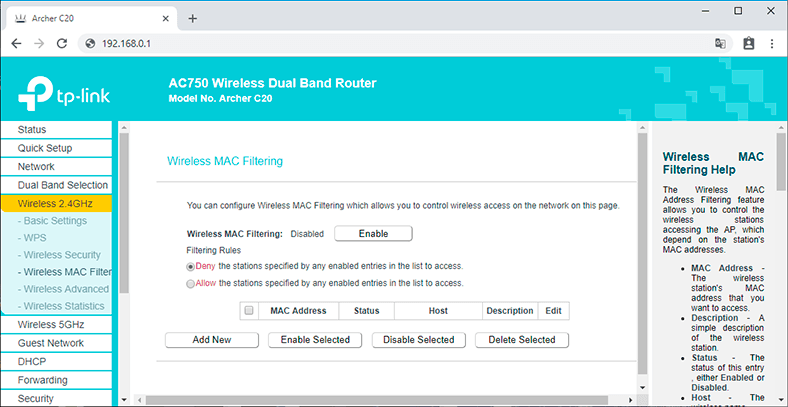
If you want to disable network access for a device within your area, just add it to the exclusion list. To do it:
-
Check the option Deny the stations… and click on the Add New button.
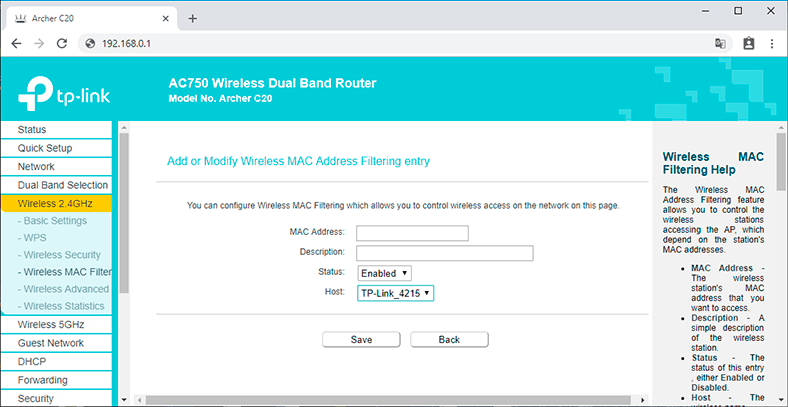
-
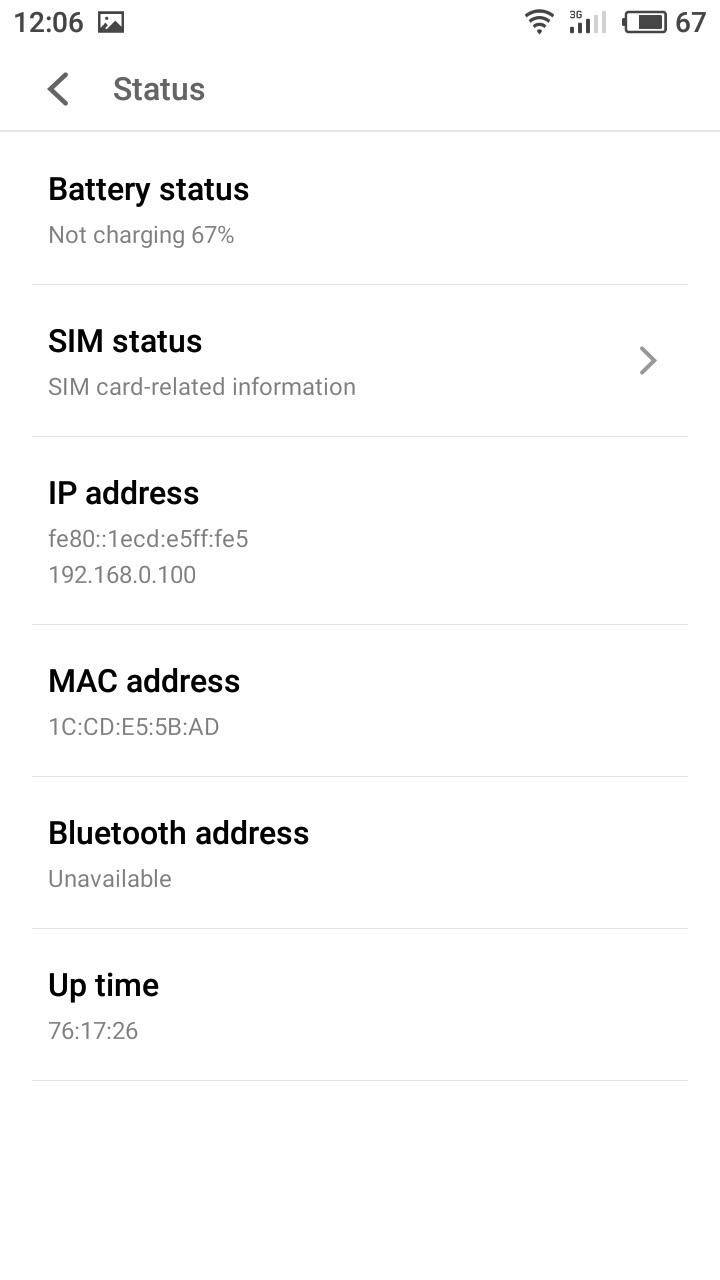
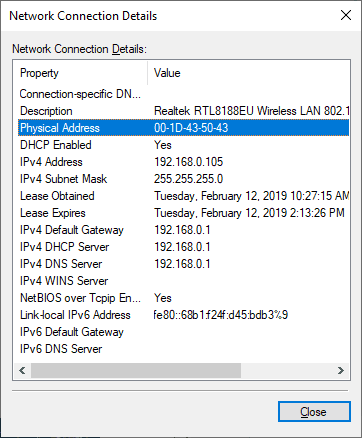
Type the MAC address of the blocked device. You can see this address on the device itself, or in its settings.
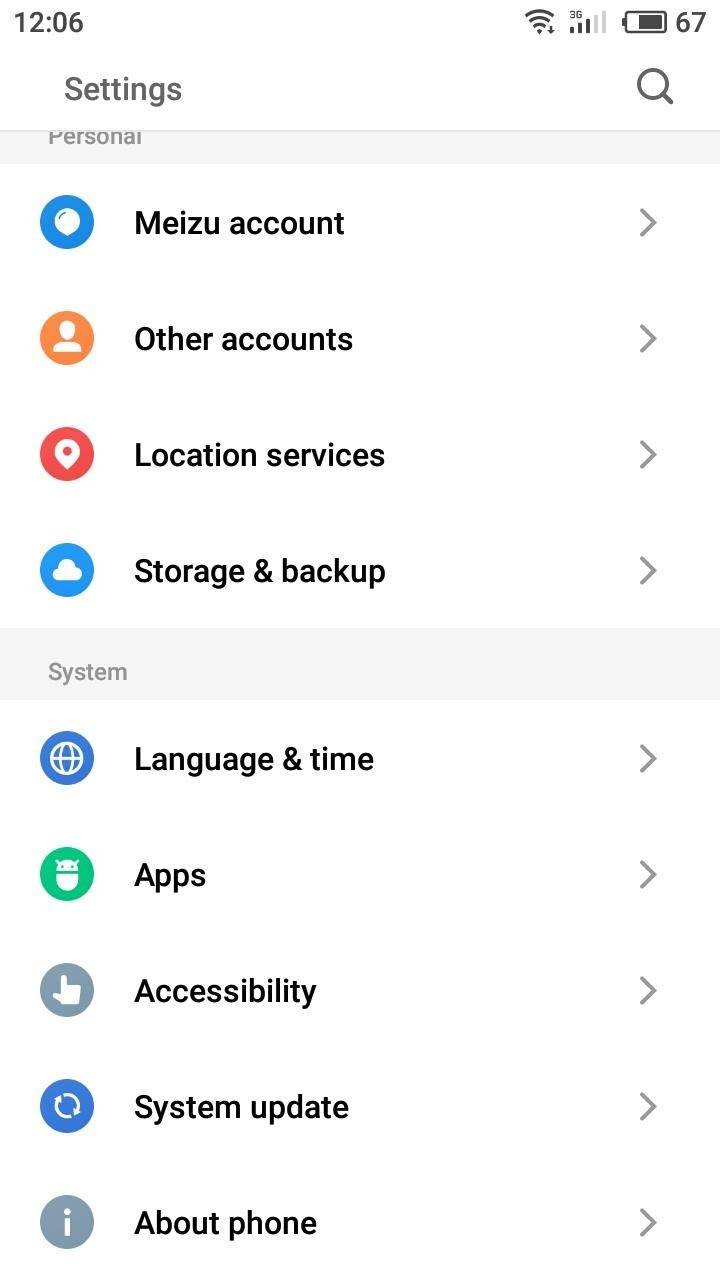
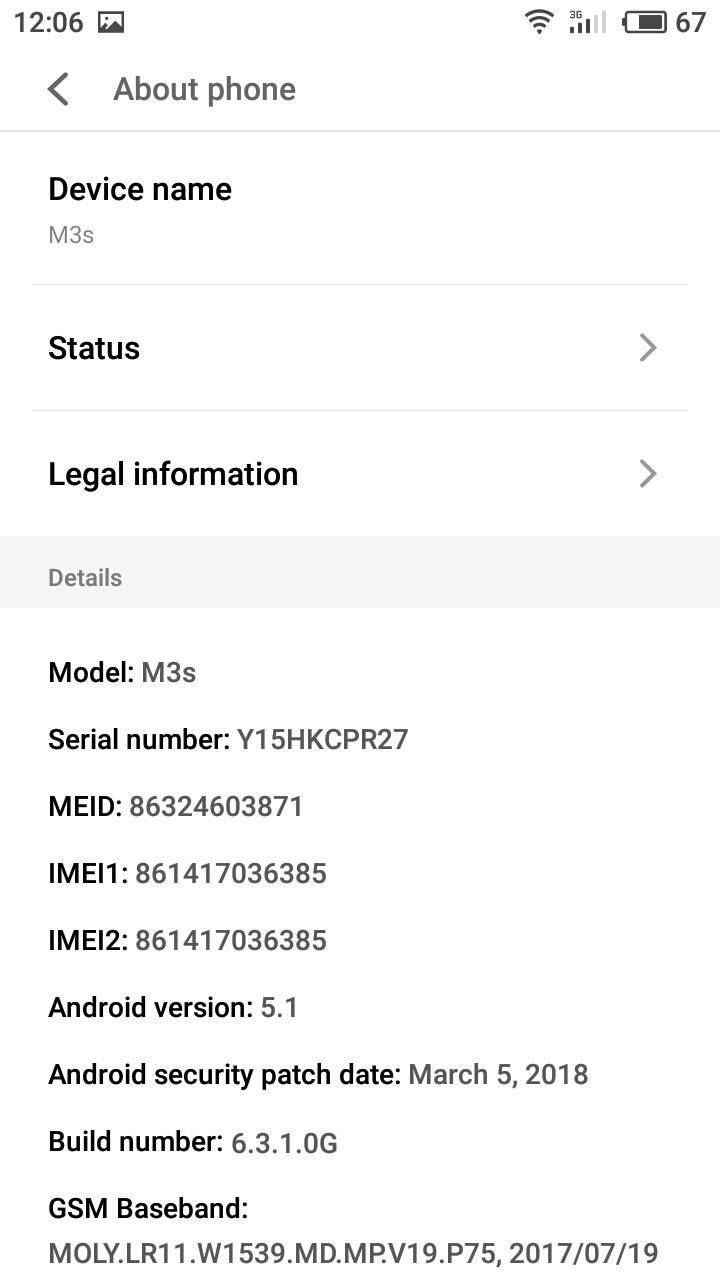
For example, with an Android smartphone you need to go to Settings / About phone / Status. The address you are looking for is given in the line MAC address.
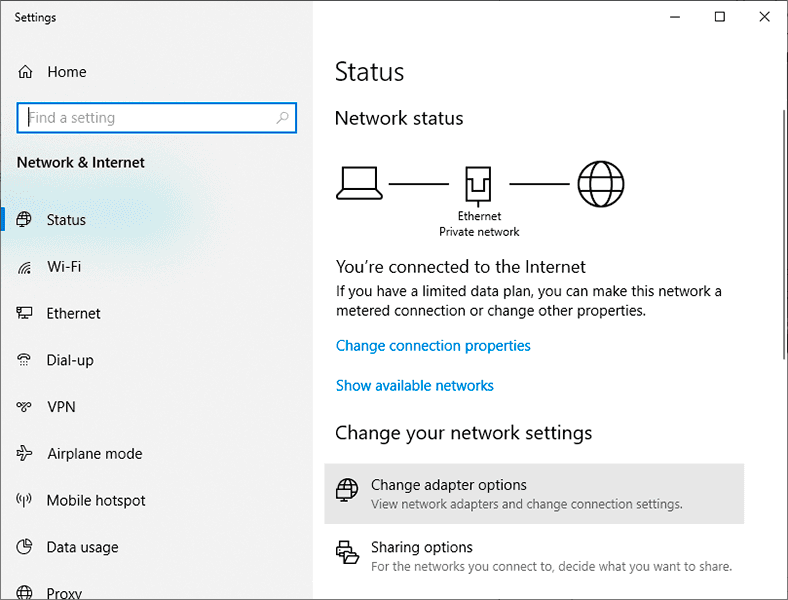
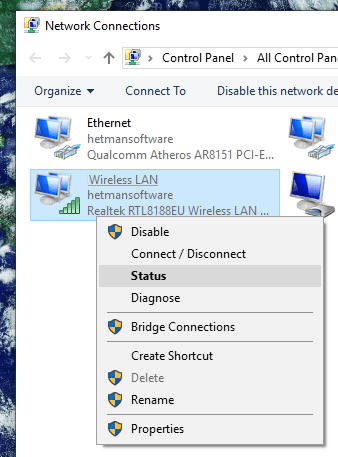
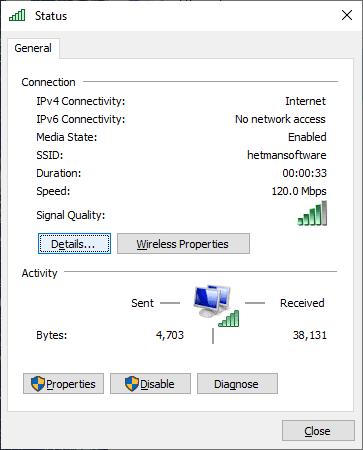
In Windows, go to Network & Internet settings / Change adapter options. Right-click on the wireless adapter which is used for the Internet connection and select Status / Details. Physical address is the actual MAC address of the computer’s Wi-Fi adapter.

-
After that, enter simple description of the wireless station into the Description field.
-
In the Status drop-down list, select Enabled.
-
Choose the wireless network for which the rule should apply in the Host field.
-
Click Save to save the changes you have made.
As soon as the function Wireless MAC Filtering is enabled, the added device won’t be able to connect to this Wi-Fi network even by giving the proper password.
If you enable the option Allow the stations specified by any enabled entries in the list to access, only the devices added to the filtering list will be able to connect to this wireless network.
Step 5. Wireless Advanced
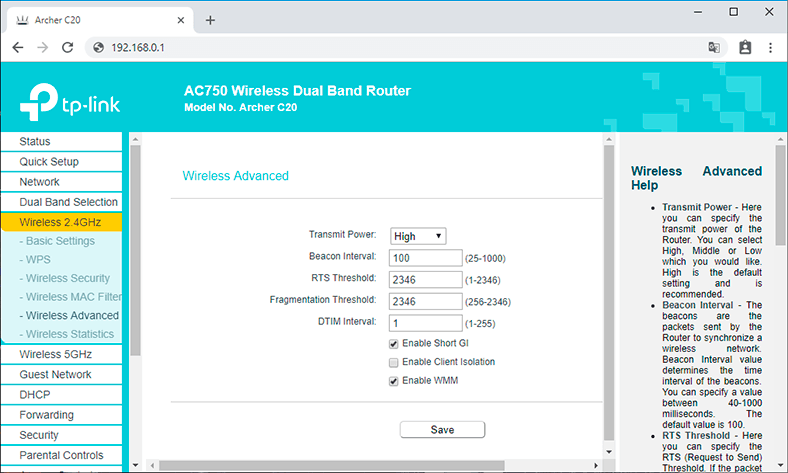
- Transmit Power. You can specify how powerful a signal the router should transmit. You can select one of the options: High, Middle or Low.
- Beacon Interval. The beacons are the packets sent by the router to synchronize a wireless network. Beacon interval value determines the time of the beacons being sent. You can set this value in the range of 40 to 1000 milliseconds.
- RTS Threshold. This is where you can specify the RTS (request to send) threshold. If a packet is larger than the size established in the RTS threshold, the router will send RTS blocks to a certain receiving station and coordinate sending data blocks.
- Fragmentation Threshold. This value determines the maximal size of packet after exceeding which it should be fragmented. Setting an extremely low fragmentation threshold may reduce network performance due to an exceedingly high number of packets.
- DTIM Interval. This value determines the interval of sending Delivery Traffic Indication Messages (DTIM). You can set a value within the range of 1 to 15 signal packet intervals
- Enable Short GI. This function is also recommended as it allows improving throughput at the expense of reducing the space between symbols (characters) being transmitted in order to eliminate intersymbol interference.
- Enable Client Isolation. It isolates all connected wireless stations so that these stations can only communicate by WLAN. This function becomes disabled only when the WDS/Bridge mode is on.
- Enable WMM. The WMM function deals with prioritizing data packets according to the categories they belong to, so highest-priority information is sent in the first place.
If you are new to the settings shown in this page, I strongly recommend that you do not change anything and stick to default values. Wrong settings can affect performance of your wireless network.
Step 6. Wireless Statistics
This page shows you the MAC address, current status, the number of received and sent packets, as well as SSID for every connected wireless station.
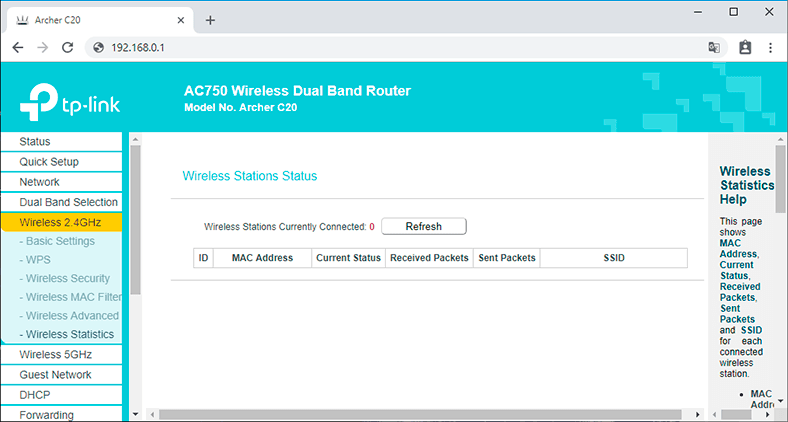
You cannot change any values in this page. To refresh data and display the currently connected wireless stations, click Refresh. However, the page updates itself automatically every 5 seconds.
An important note! If you let your router broadcast at both frequencies (2.4 and 5 GHz), configure settings for both networks and set a password. Their setting menus are similar.
Configuring Guest Network
One more setting for a wireless network is the guest mode.
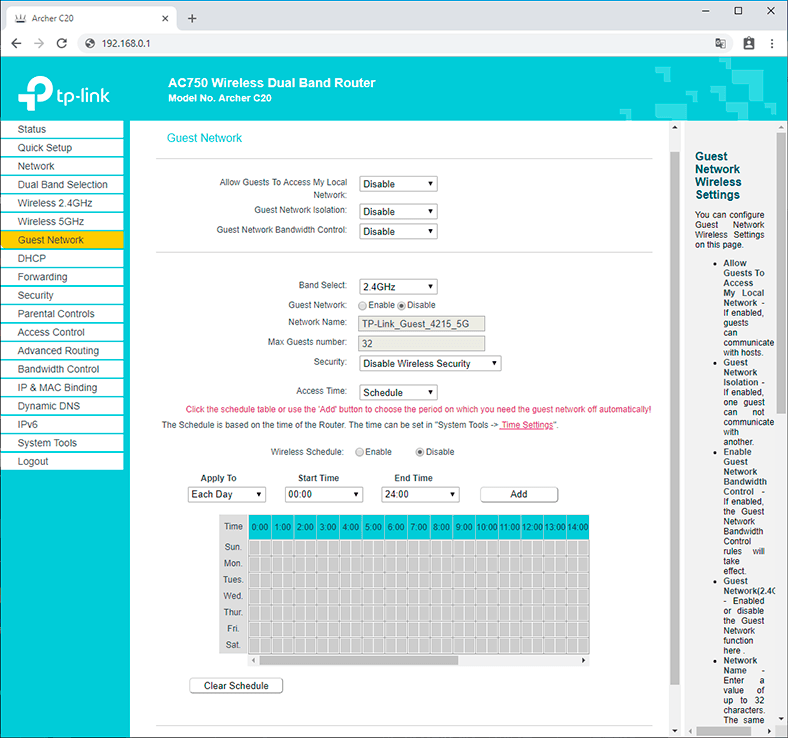
Guest Network is an additional wireless network that your router will broadcast. It will have a different name and password. It is called guest because it is meant to be used by your guests, visitors or customers in your office, cafe etc. Its main difference is complete isolation. It means that any devices connected to the guest network will not be able to access the local network or shared printer / drive (unless you change the settings to allow it). Having such a network makes sense if you provide access to your Wi-Fi for your neighbor, for example.
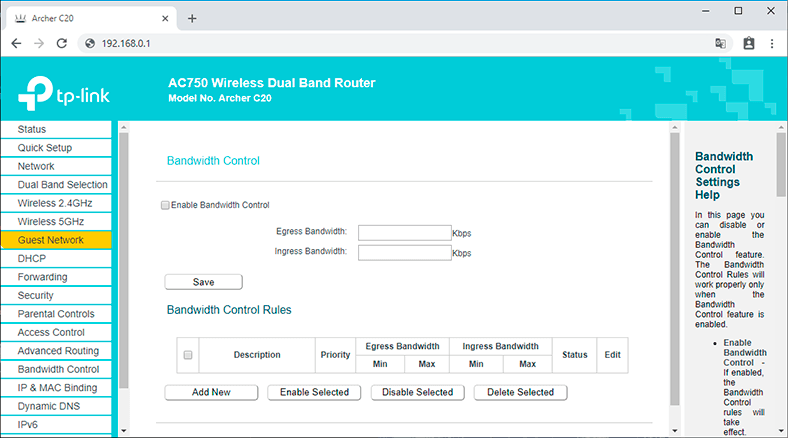
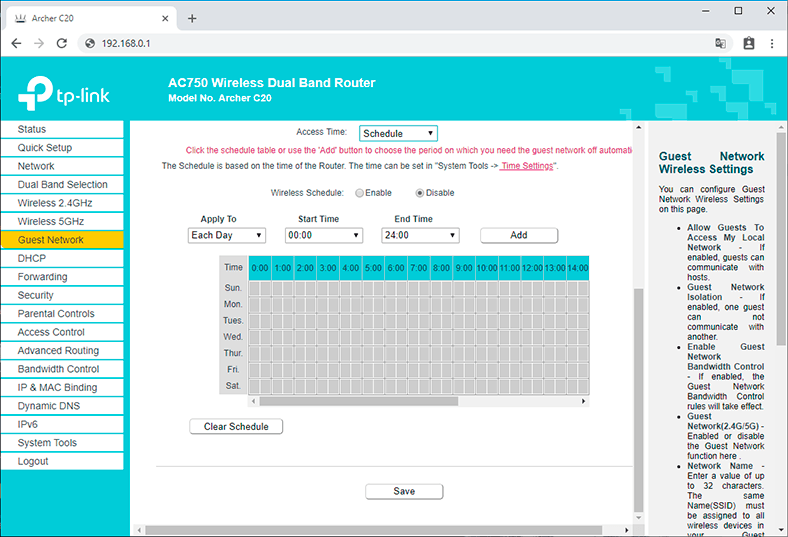
The operation of such network can be scheduled, too. For example, make guest network operate during working hours only, or have this network running for a few hours or minutes, and then it will be disabled automatically. Here is one more thing you can configure – its bandwidth, that is, you can limit the Internet connection speed for the guest network.
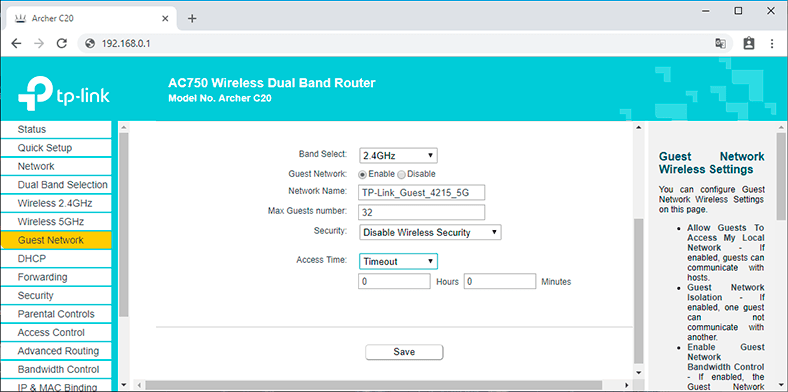
In this page, here is what you can do:
-
Allow Guests To Access My Local Network – If this function is enabled, users will be able to connect to other devices in the router’s local network.
-
Guest Network Isolation – If this function is enabled, users won’t be able to communicate with each other.
-
Guest Network Bandwidth Control – Turning this on will apply rules for controlling the bandwidth of guest network.
-
You can specify the frequency to be used by the guest network: 2.4 or 5 GHz, but it only makes sense if your router is a dual-band one, like mine.
-
Guest Network. This enables or disables the network.
-
Network name is actually the name of the guest network. Type the name (up to 32 characters long). This is the name that your guests will see.
-
Max guests number: up to 32. Give the number of guests you prefer.
-
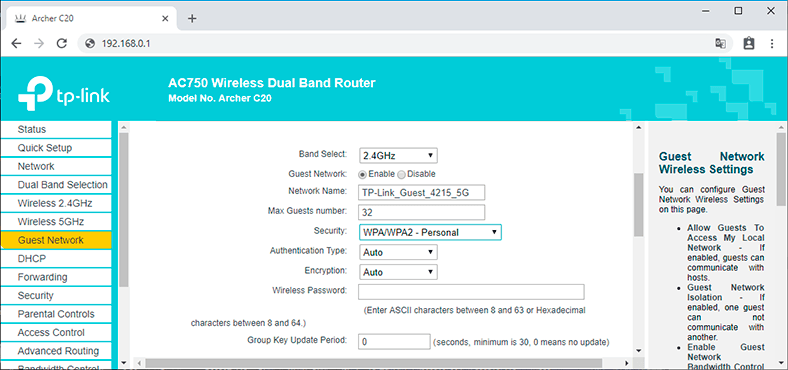
Security – Use it to disable or configure guest network protection. If you disable it, guests will be able to connect to your Wi-Fi network without a password.
Alternatively, you can enable and configure WPA/WPA2 protection, just like you do it for wireless protection of the main network.
-
Access time. Set the time when access is possible, that is, when and for how long it is available. I am sure you will find your way through this particular setting – it’s quite easy.
All these settings deal with how the router transmits data in a wireless mode. You can use them to regulate all aspects of your Wi-Fi network.
If you have any questions while you are configuring the Wi-Fi network for your router, you are welcome to comment and ask your questions here.



Your WAN settings should now be configured on the TP-Link AC 750 Archer C20 router.