Why Black Screen Appears in Windows 10 and How to Solve It
Learn why black screen appears on Windows 10 and how to solve it with this comprehensive guide. Whether you’re facing a blank screen after startup, during login, or while using your PC, this tutorial covers everything you need to know. Dive deep into step-by-step instructions and essential tips for troubleshooting and fixing the black screen issue on Windows 10.
- Many Reasons Why It Happens
- Solution 1. System Rollback to The Previous Version
- Solution 2. Black Screen During The Update: Solution to The Problem
- Solution 3. Booting The System in Safe Mode
- Solution 4. System Rollback in Safe Mode
- Solution 5. Installing Drivers and Deleting Updates
- Solution 6. Restarting Explorer Service Manually
- Solution 7. Repeated Activation of Windows: How Can It Be Disabled?
- Solution 8. Data Recovery In Case When You Cannot Restore Operability Of Your Windows
- Questions and answers
- Comments
Many Reasons Why It Happens
Regardless of what version of Windows is installed on your computer, 7 or 8, very often people see black screen after they update it to Windows 10. This is quite a non-standard situation because so many things can cause it. This is why most users have no idea what to do in such a situation.
The most widespread causes include:
- incompatibility of graphic system drivers with the actual hardware;
- system errors in the work of Explorer;
- enabled Quick Launch;
- the need for repeated activation.
The abovesaid things are the most frequent, but there are some aspects to be taken into account. First of all, the black screen that appeared after updating the system to Windows 10 can disappear by itself after some time, and your Windows will work normally; secondly, the black screen can be on all the time, but your keyboard and mouse can work as they are supposed to. It should be said at once, that in this article we will not deal with hardware-related issues; all methods of eliminating problems connected with black screen in Windows 10 will exclusively involve software tools, integrated into the operating system.
| Cause | Description |
|---|---|
| Graphics card driver issues | Incorrectly installed or outdated graphics card drivers can cause a black screen when starting Windows. |
| Incorrect display settings | Choosing the wrong display source or setting a low resolution can lead to a black screen. |
| File system error | Corrupted or missing system files may prevent the system from loading. |
| Viruses or malware | Some viruses block Windows from loading or alter system settings, leading to a black screen. |
| Hard drive issues | Physical damage or connection problems with the hard drive can cause a black screen during boot. |
| Failed Windows update | Errors during Windows update installation can lead to a black screen. |
| Conflicts between programs | Conflicts between installed programs can cause system crashes on startup. |
| Hardware malfunction | Failure of hardware components, such as memory or power supply, can cause a black screen. |

Why Computer Runs into Blue Screen Errors and How to Fix BSOD 💻🛠️🤔
Solution 1. System Rollback to The Previous Version
Arguably, the method which is the easiest and most widely known among the majority of users to solve all problems in relation to Windows operating systems, including the black screen, is the restoration of the previous version of the OS, which you have been using before installing Windows 10.
If you have a boot CD or a flash drive, then you should have no problems>, and the recovery process itself won’t take up much time. However, what can be done if neither is at hand? If you were using Windows 7, there is no rollback to speak of, but if your OS was Windows 8, you can do without any additional tools and roll back the system to its previous version with Windows-integrated tolls exclusively. The matter is that when upgrading Windows 8 to Windows 10, the former is not deleted from the PC but only disabled.
So, to restore Windows 8 the first thing to do is to start Task Manager and activate performance of a new task cmd under administrator rights.
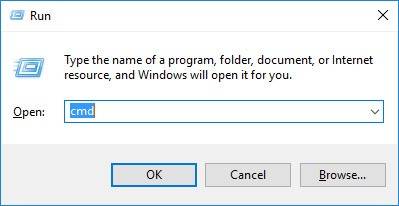
Then in the command prompt line that opens start the process shutdown /r /o /f /t 00, after which the system will restart automatically.
shutdown /r /o /f /t 00

When Windows is started again, launch system diagnostics in the screen where you are offered to select the action, and go to additional settings to activate system restore service. Now, the only thing left to do is to wait for the process to complete; when it happens, the computer will restart and Windows 8 will be booted.
Solution 2. Black Screen During The Update: Solution to The Problem
The situation we have reviewed above occurs when the operating system has been updated to Windows 10, but what should you do if the updating process was not completed and interrupted by the black screen? In this case, check compatibility of the software and the discrete graphic system. This is when you can do without rolling Windows back, but you will have to make your computer a warm restart. To do it, press and hold for some time the power button which makes your computer/laptop turn off. When you turn it on next time the system will check the load partition for errors and then load the version of Windows you have on your PC.

Three Ways to Disable Automatic Driver Update in Windows 10, 8, 7 🔄🚫💻
When the operating system is loaded, check your graphics card drivers to make sure they are up-to-date. You can do it on your own in Task Manager or with specialized utilities.
If you choose to check the drivers for compatibility on your own, you will have to go to your graphics card manufacturer’s official website and download the latest drivers. If you choose to use third-party utilities, they will do everything automatically. When the drivers have been updated, you can start updating your OS to Windows 10.
Solution 3. Booting The System in Safe Mode
Another widespread situation faced by so many users is the notorious black screen which appears in the process of using Windows 10. Updating seems to have gone all right, there are no driver issues, the first start of the system was without failures, but the system won’t work properly. What can be done in this situation?

How to Boot Windows 10 in Safe Mode (All Methods) 👨💻⚙️🛠️
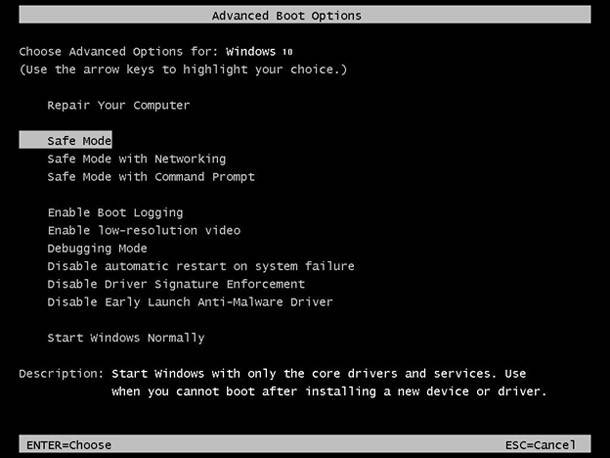
In this case, the problem can be solved by booting the system in safe mode. However, practice suggests most users have difficulties here as well. The matter is that the standard way of choosing the boot method does not work in Windows 10, unlike it was in Windows 8. It is unknown why Microsoft programmers made Safe Mode activated in Windows 10 through a combination of Shift + F8, which has to be pressed several times when the system starts.
After the diagnostics window appears, launch the command prompt from additional settings menu and perform the command advancedoptions true, which will open a window where you can select the desired boot option.
Solution 4. System Rollback in Safe Mode
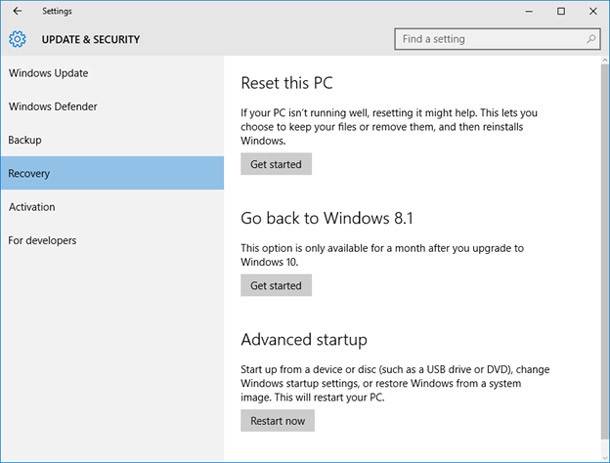
If you have updated your OS to Windows 10 but you kept system files of the previous version in the hard disk, solving the black screen problem is possible by rolling the system back to its previous version. For this purpose, there is a special service, “Recovery,” which can be found in the section UPDATE AND SECURITY in Windows.
If you want to roll back Windows 10 itself after an unlucky update, you will need to open command prompt and launch the command sfc /scannow.
sfc /scannow

As the recovery process is complete, you can use the command shutdown -t 0 -r –f to test the system operability. We have to warn you, that the process is quite long and can take from 30 minutes to several hours depending on performance of your hardware.
shutdown -t 0 -r –f
Besides, you can launch system rollback immediately when starting Safe Mode, where in the restore window you will have to specify the restore point created during the last archiving of Windows.

How to Create or Delete Restore Point on Windows 10. Restoring Computer To an Earlier Date 📝🔄💻
Solution 5. Installing Drivers and Deleting Updates
If you installed Windows 10 and a black screen appeared when working with the computer, but you don’t want to roll back the system to the initial OS version, there is one more method to solve the problem. To use it, you will need to boot the system in safe mode and then update the drivers which conflict with your hardware.
To find out the drivers of which devices caused blackscreening, you need to go to Windows Update and view the report on all drivers installed recently.

It is recommended to delete all packages that have been installed over the last week. The next step will be to search for the most suitable driver versions and install them. It should be noted at once that it is strongly forbidden to use automatic driver update tools integrated in Windows or third-party utilities.
Besides that, very often a black screen in Windows 10 appears because you have installed broken or raw updates, that is why it is recommended to uninstall them completely. Most often the root of the problem is in updating the security system and office utilities, so these updates are the first to be deleted. If that yields no result and the black screen doesn’t go away, you can proceed to delete other updates as well.
Solution 6. Restarting Explorer Service Manually
Another unpleasant situation when using Windows 10 is a system error at the stage of starting the OS, as a result of which there is a black screen with the system cursor moving around. It is caused by a failure to start Explorer service, so the system cannot launch desktop. To solve the problem, a user will have to start the service manually.
To do it, you should start Task Manager and go to “Processes” tab where you need to find the line explorer.exe and end this service.
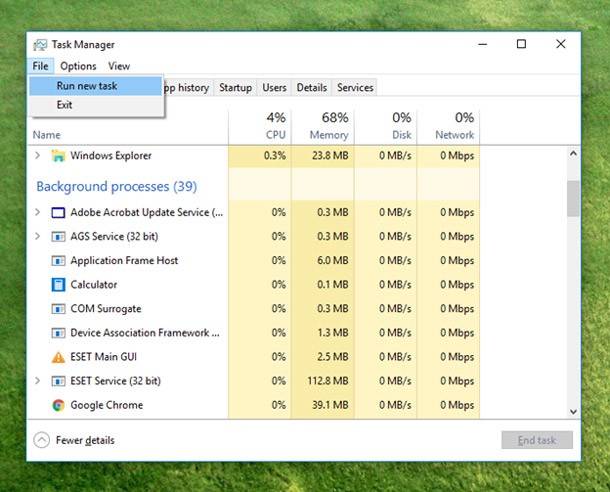
Then press the button “New process” and start Explorer again by just typing the process name in the format which was used when you ended the task. In most cases operability of the system is restored after these actions, but if the black screen keeps coming back, there is only system recovery to help you.
Solution 7. Repeated Activation of Windows: How Can It Be Disabled?
Finally we have reached the last problem which in most cases causes black screens when working with Windows 10. The issue comes from the license activation file which confirms authenticity of the operating system. If the problem roots in this file, the black screen may never go away, even after some time.
In this situation, the problem will also be solved in safe mode; when it is loaded, activate showing of hidden files and folders in the operating system. Then find and delete a same-name catalogue located in the root folder with OS system files. After that, restart the system and perform repeated activation; now you can enjoy stable work in Windows 10.

How to Boot Windows 10 in Safe Mode (All Methods) 👨💻⚙️🛠️
Solution 8. Data Recovery In Case When You Cannot Restore Operability Of Your Windows
If for some reason you cannot restore operability of Windows 10 or roll it back to the previous version (which may also happen) the only way out will be complete reinstallation of the operating system.
But what should you do with your data which is still on your computer? It is a very relevant question because when reinstalling the system, all data on the disk (at least, on the system disk С:) will be deleted.
Again, there are two variants for this situation:
- Do not hurry to install Windows. Connect your computer’s hard disk to another computer and make a copy of your data there.
- If there is no such possibility, recover the data by using the method described in one of the articles in our blog “I Reinstalled Windows! Can I Recover My Data?”.
Sometimes data can be lost after failures in the computer’s operation and emergence of black screen (blackscreening). Data can be ether lost or damaged. Yet do not give way to panic and try restoring it with one of data recovery programs.
| Characteristic | Description |
|---|---|
| File System Support | FAT / exFAT, NTFS / ReFS, APFS / HFS+, Ext2 / 3 / 4, ReiserFS, XFS, UFS, ZFS, Btrfs, VMFS |
| OS Compatibility | Supports data recovery from Windows, MacOS, Linux |
| Recovery after Windows Reinstallation | Can recover data even after a complete OS reinstallation |
| Virtual Machine Support | Recovery from popular virtual machine disk formats like VMDK, VHD |
| Interface | User-friendly interface for easy access to recovery features |
| File Preview | Allows previewing files before recovery for selecting required data |
| Deep Scan | Performs deep analysis to find lost files even after formatting |

👨🔧 How to Recover Data from an Unallocated Area in a Hard Disk, Pen Drive or Memory Card (2021) 🛠️


