How to Recover a File Deleted by Bitdefender Antivirus Mistake
Bitdefender Antivirus Removed Your Files? Learn How to Recover Them in This Step-by-Step Guide! In this essential tutorial, we’ll walk you through the steps to recover files accidentally removed by Bitdefender Antivirus. From understanding why files may have been flagged as threats to using recovery tools to retrieve them, we’ll cover everything you need to know to get your files back safely. Whether you’re a novice or an experienced user, these easy-to-follow instructions will help you recover your valuable data in no time.
The algorithm inside every Bitdefender product is set up to ensure timely detection of security threats and elimination of issues by isolating infected files or removing infected elements under certain conditions (for example, a suspicious file cannot be cured, is large enough, its actions do not comply with security settings etc). If the removed file contained important data or was the only copy, and was then removed by an antivirus program, it becomes an urgent task to find a solution and restore it. Below, we will describe main products by Bitdefender and find out how to restore files deleted by the antivirus.

How to Delete Any Viruses: Trojan, Rootkit, Ransomware, Spyware For Sure ☣️🛡️💻
Recover Files Deleted by Bitdefender Antivirus

How to Find and Remove a Hidden Miner Virus on Your PC 🐛🛡️🖥️
Any antivirus software is meant to protect a computing device and its data from harmful effects of malware and hidden virus attacks. Antivirus developers work to improve their products, extend their functionality by implementing ways to detect threats and prevent malware infiltration, and to find infected elements for curing.
Bitdefender always strives to ensure complete security for its users. Sometimes, after real-time system scan, some files and documents which the antivirus believes can be suspicious will be removed from the computer without showing you an additional notification, just to exclude any threats. However, it can make a user’s if more difficult.
Especially because it is a widespread case. Bitdefender experts explain that the antivirus may remove an infected or potentially dangerous file automatically, if it can’t be cured. So now you know why some files get removed without asking you for permission. At the same time, some files may contain important data and be the only copy, so bringing them back becomes an urgent matter. Fortunately, files removed by Bitdefender are not erased forever and can be restored. In this article, we will tell you about locating and restoring documents deleted by an antivirus program.
Method 1. Recover Deleted Files from the Quarantine of the Bitdefender Antivirus

Did a Ransomware Virus Encrypt Your Files? Are You Looking For Ransomware Decryption Tools? ☣️🚫📁
Antivirus products by Bitdefender, a leading cybersecurity company, feature a protected storage for dangerous and suspicious files, the Quarantine. While scanning the computer and looking for suspicious files, the antivirus uses advanced threat identification algorithms to find unwanted files and put them to a protected storage where they are no longer harmful as they can’t be either run or read. Yet sometimes the antivirus fails to determine the threat level correctly for potentially dangerous files and removes harmless files by mistake – that is, it allows malfunction for the sake of preventing possible virus infestation. Mostly, suspicious files get deleted because of wrong programming practices included into some applications. The antivirus can malfunction if applications modify the master boot record, add startup registry entries, modify system files with the system administrator’s approval, run a user’s macros in office apps etc.
That is why, if you can’t find your files in their proper location after scanning the computer with the Bitdefender antivirus, the first place to look for them is the program’s Quarantine folder. To access the program’s protected storage, take a few steps.
Step 1. Open the Bitdefender window in any way you prefer, for example, by clicking on the Taskbar in the lower right corner of the desktop to show hidden icons, and click on the icon of the corresponding app.

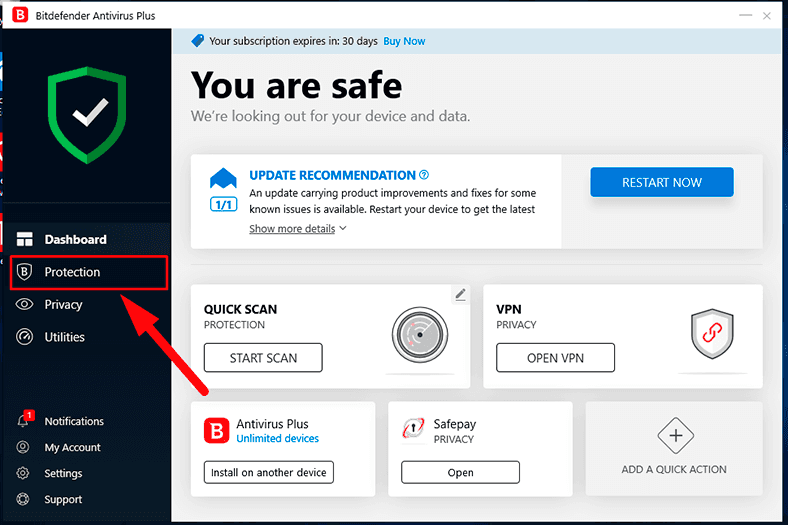
Step 2. In the left-side panel of the antivirus, find the main menu. Select Protection, by clicking on it.
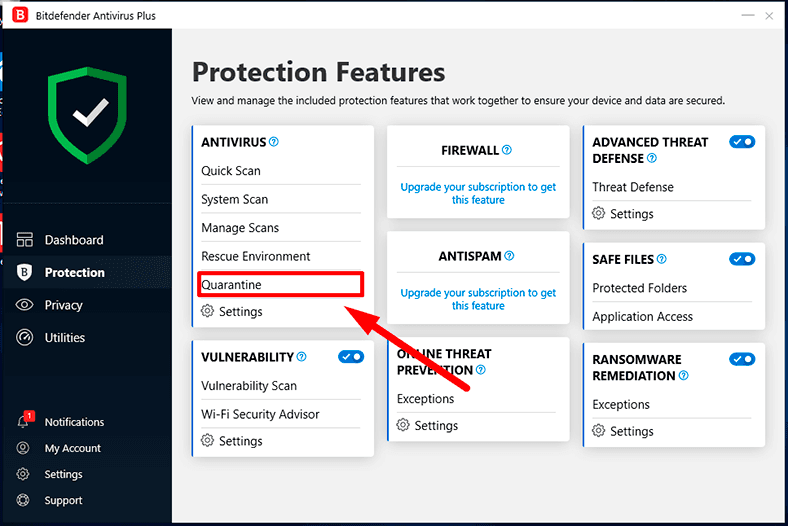
Step 3. On the right, you will see tabs for managing enabled protection features. Find the tab Antivirus and choose Quarantine from the list.
Step 4. The new Quarantine window will list all threats moved to the protected storage after scanning the computer. Select the necessary files and click Restore below.
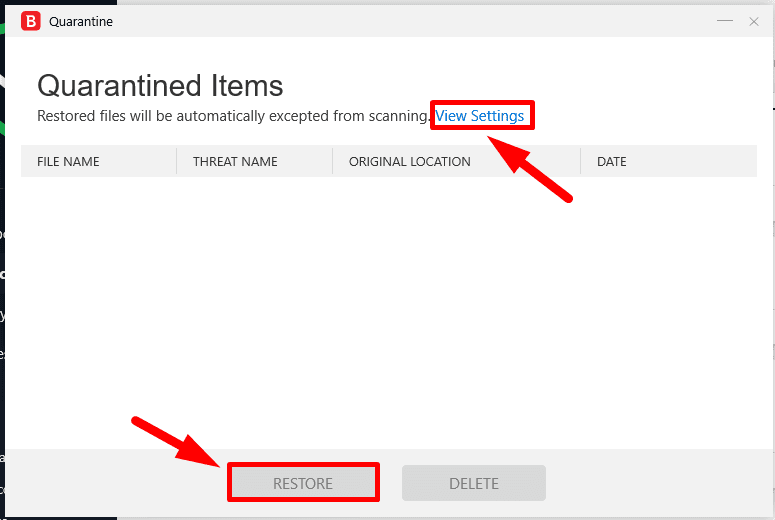
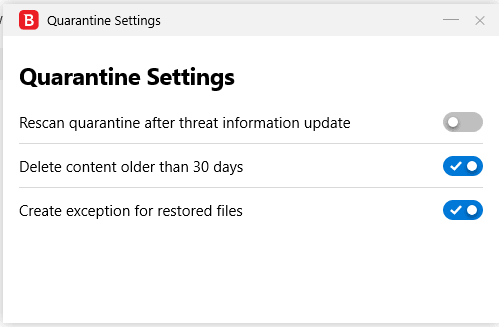
The files will be restored automatically to their original location, and excluded from further scanning. If you don’t see a notification about exclusion, change the settings for Quarantine by clicking on the link View Settings, and configure the Quarantine Settings as you need.
If there are any files or folders that you trust completely, you can exclude them from the obligatory scan list by following this sequence of steps.
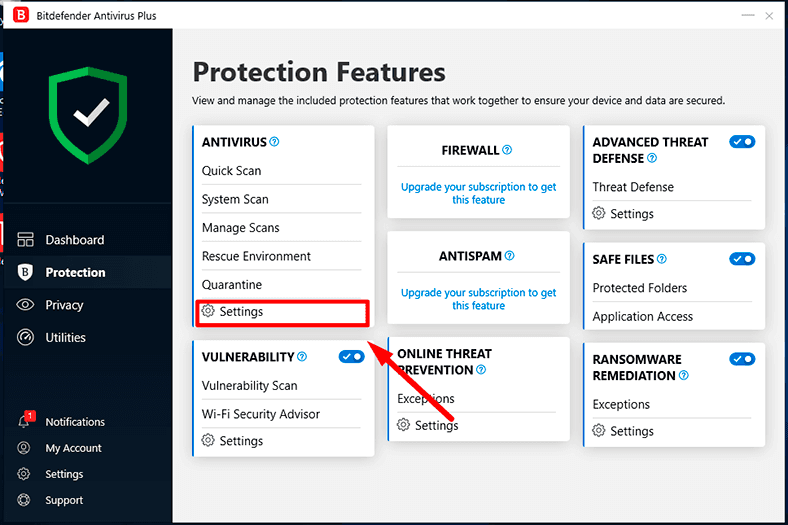
Step 1. In the antivirus window, switch to Protection, find the tab Antivirus and select Settings.
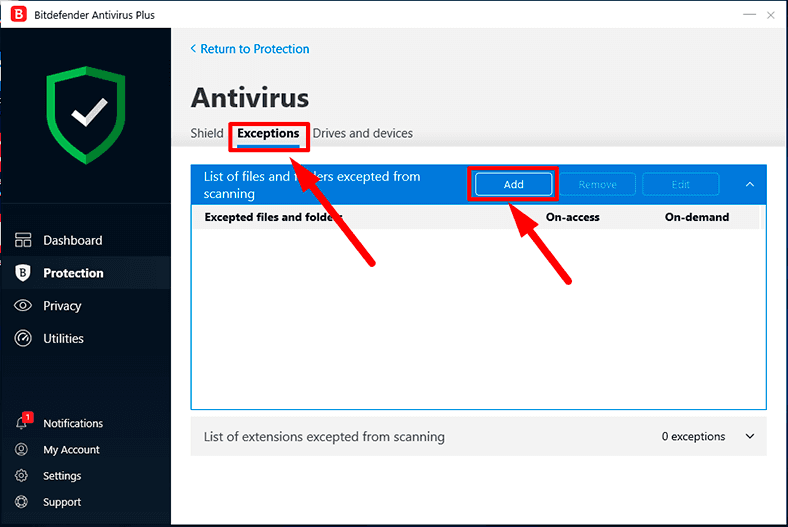
Step 2. In the right-side panel, switch to the tab Exceptions, and then click Add to create a list of files and folders to be excluded from the scan.
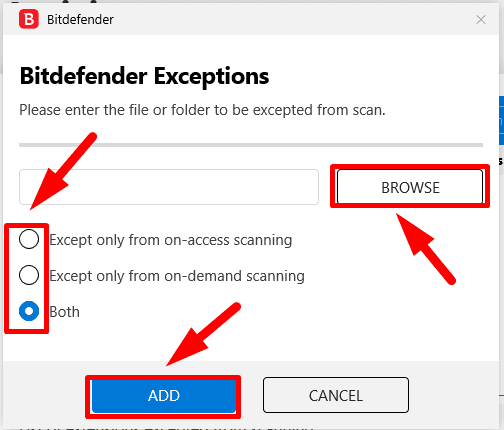
Step 3. In the new window, select trusted elements with the Browse button and select the required exclusion level by checking the preferred option, and then click Add to finish the procedure.
If you can’t find the files you are looking for in the Quarantine folder of this antivirus, it’s time to try a specialized data recovery solution.
Method 2. Restore Deleted Files with a Third-Party File Recovery Program
As we mentioned before, during an automatic system scan, as well as when downloading or moving files from removable devices or remotely over the network, Bitdefender may remove an infected or suspicious file immediately if there is no way to cure it. Also, the antivirus using progressive heuristic algorithms to identify possible threats may detect some elements as being potentially dangerous, or suspicious, and remove them by force.
If you open the quarantine and you can’t find the file removed by the antivirus and bring it back, your next step should be using specialized file recovery software.
At the moment, there are lots of programs capable of recovering files deleted or lost for a variety of reasons. Naturally, their functionality differs in many ways. By the percentage of successfully recovered deleted files and the number of supported formats, the leading position among rivals belongs to Hetman Partition Recovery, the flagship product by Hetman Software.
| Parameter | Description |
|---|---|
| Name | Hetman Partition Recovery |
| Purpose | Recovery of deleted, damaged, and inaccessible data from hard drives, SSDs, memory cards, and USB drives. |
| Supported File Systems | FAT/exFAT, NTFS/ReFS, APFS/HFS+, Ext2/3/4, ReiserFS, XFS/UFS/ZFS, Btrfs, VMFS, HikvisionFS. |
| Operating Systems | Windows, macOS, Linux |
| Device Types | Hard drives, SSDs, memory cards (SD, microSD), USB drives, virtual disks, and virtual machine disks. |
| Additional Features | – Recovery of deleted partitions – Disk image creation – Data recovery from disk images – File preview before saving |
| File Formats | Documents, photos, videos, archives, emails, and other file types |
| Ease of Use | Step-by-step recovery wizard with an intuitive interface |
| License | Trial version with file saving restrictions |
| Interface Languages | Multilingual support |
This program is primarily developed to recover hard disk data lost after deleting, disk damage, disk errors, or when a hard disk becomes inaccessible or unreadable.
Hetman Partition Recovery supports restoring data from any media (USB drives, memory cards in smartphones and cameras, internal and external hard disks etc) and various gadgets and computing devices (personal computers, all kinds of laptops, media centers, cameras, digital recorders and so on).
It can easily restore data after formatting or removing partitions, from a modified or damaged file system, and after file allocation tables are damaged or absent.
The program can handle data recovery after all kinds of methods applied to delete information, deliberately or accidentally, as well as permanent deleting, including by antivirus programs, after emptying the Windows Recycle Bin, or erasing data with specialized third-party apps – the Fast scan mode will quickly help you bring the files back.
This tool can also successfully recover data lost or inaccessible due to system errors and hardware issues after power failures, driver and disk firmware errors, and even an operating system crash when the computer cannot boot.
The obvious advantage of Hetman Partition Recovery is the ability to recover any data after all kinds of virus attacks or other malware activity resulting in complete destruction or blocked access to data.
The program can correct errors of the hard disk logical structure and works smoothly on all main file systems of any version of Windows, including the latest – Windows 10, and will not pose any difficulty even to users with minimal or no background in file recovery.
The algorithm for recovering deleted files is simple and includes several steps.
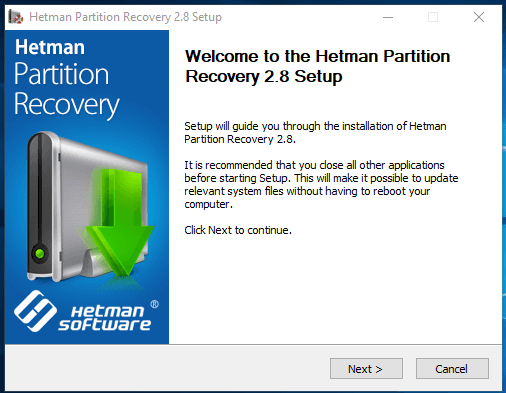
Step 1. Visit the official website of Hetman Software to download a setup file for Hetman Partition Recovery and launch it on your computer. The step-by-step installation wizard will take you through the settings and install the program to a specified directory.
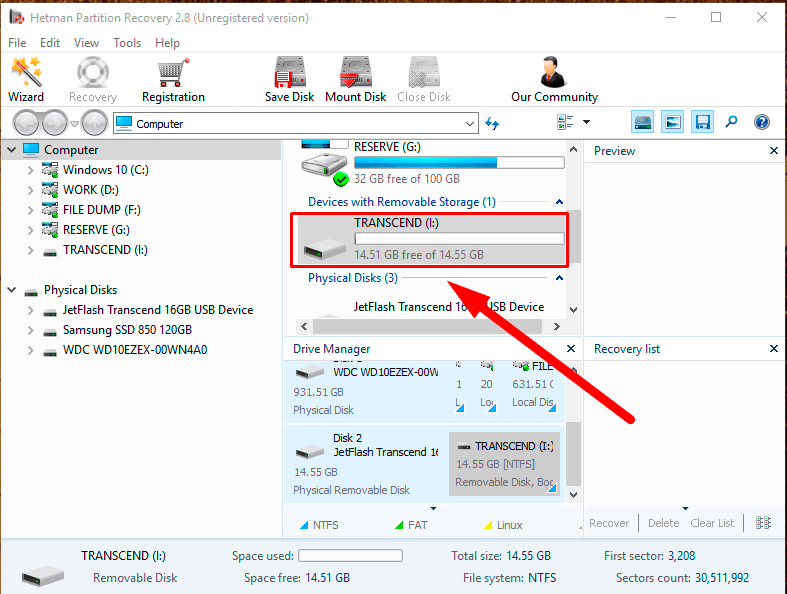
Step 2. Open Hetman Partition Recovery. The program will run a primary analysis automatically and show all storage devices it can find. In the main window, select the necessary logical disk or an entire drive and double-click on it.
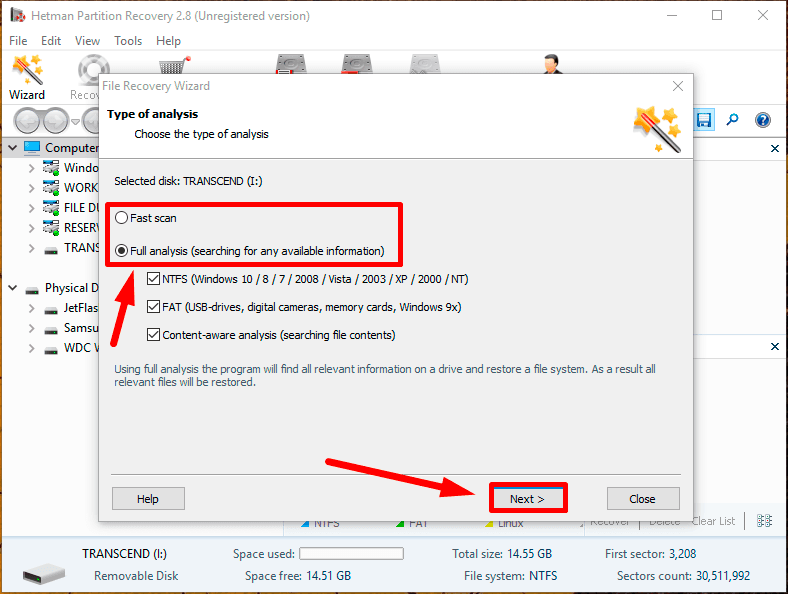
Step 3. In the file recovery wizard window that appears, select a suitable analysis type to be applied to search and restore the lost data. The simple option, Fast scan, is good for recovering recently deleted files. Using a more powerful option, Full analysis, will let the program use all available algorithms to find all the information ever lost for any reason, restore the file system of the selected partition and bring back as many lost files as possible. So choose one of the options and click Next to start the analysis.
Step 4. Disk analysis will start, and its duration depends directly on many factors such as the original disk size, the extent of damage to data and the storage device, performance of the computing device, file system type etc. You can monitor the scan progress by looking at the corresponding bar and see the estimated time left in the wizard window.
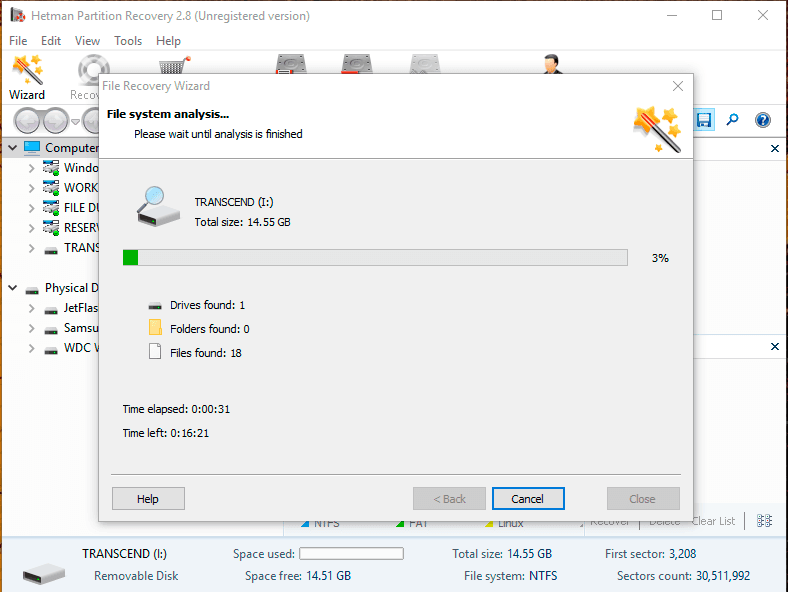
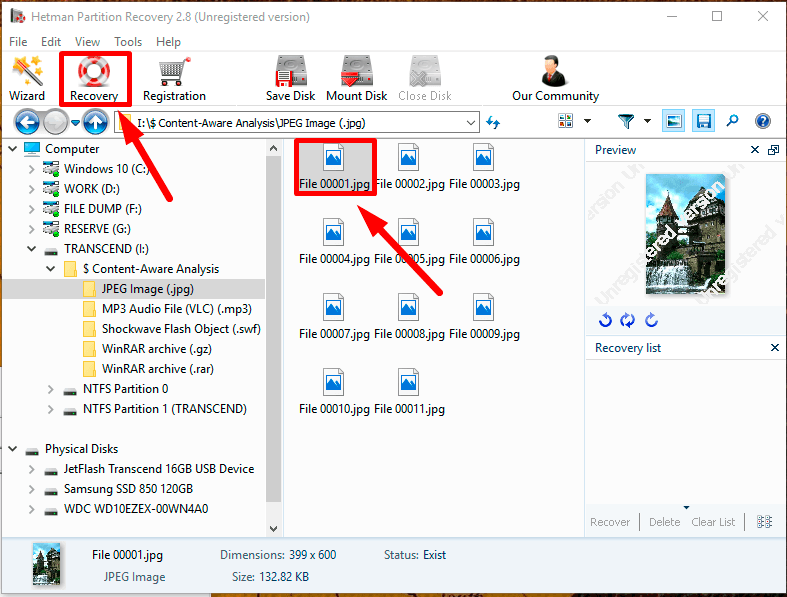
Step 5. When the process is over, all detected and recovered files will be shown in the main program window. By clicking on every file, you can view or even watch / listen to its contents in the Preview window. Having selected the necessary files and placed them onto the Recovery List by dragging and dropping, click on the Recovery button.
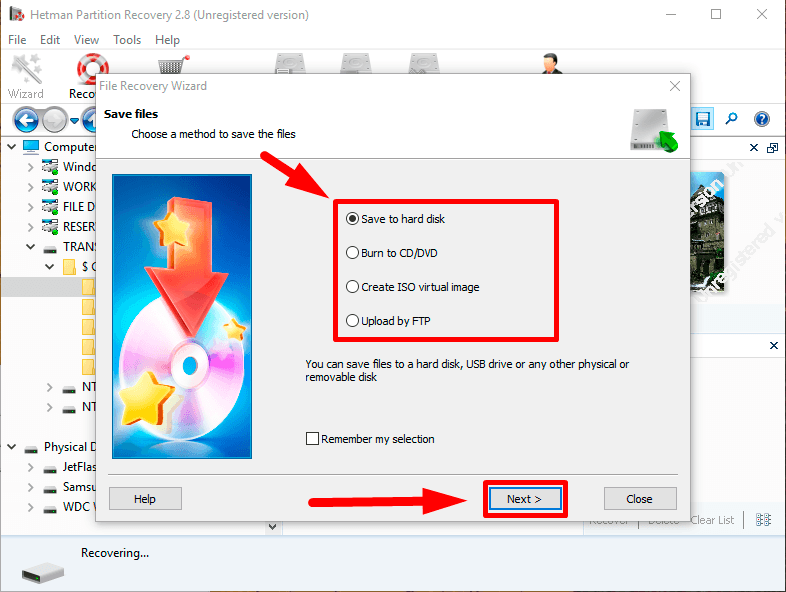
Step 6. The program initiates the file recovery wizard so that you can choose how to save the files. This extends the program’s functionality as you can decide which option is the best for this particular case.
Choose one of the options for saving the files and click Next to continue.
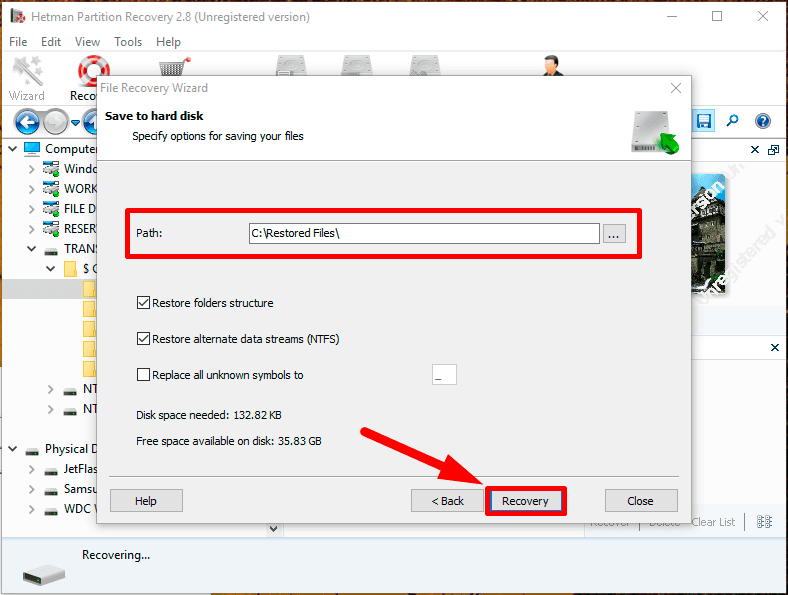
Step 7. In the next window, you will need to specify the path to save files and several extra settings depending on what saving method you chose. Now click Recovery to accomplish the process of restoring deleted files.
When the files are recovered, go to the directory containing restored files and make sure they work properly (you can open or play them etc).
Conclusion
Using modern digital technologies to generate and store information improves overall performance of any work you do and makes it easier to search, edit, exchange and transfer data, with almost instant access.
The widespread use of various computing devices does not only give you round-the-clock access to data and processing options, but also contributes to more and more data being converted to digital formats,
Which, unfortunately, attracts all kinds of swindlers looking for ways to steal important and confidential data with the help of various malware. Damaged computing devices, theft or destruction of important data – all these things can be rather painful to anyone and result in considerable financial losses.
That is why it is important to use specialized software to protect your data and secure your devices from viruses and other malware. One of the powerful security options is to use antivirus products by Bitdefender,
But sometimes even antiviruses may delete certain files by mistake. With the integrated safe storage tool for malicious and potentially dangerous files, the Quarantine, you can recover necessary elements back to their original location in just a few steps.
Alternatively, you can resort to third-party file recovery software like Hetman Partition Recovery and have the files brought back, if you can’t find the files you need in the Quarantine folder of the antivirus program.


