Optimize Windows for SSD: Guide
In this comprehensive tutorial, we’ll show you step-by-step how to fine-tune your operating system for maximum performance and longevity. From enabling TRIM and disabling disk defragmentation to optimizing power settings and minimizing unnecessary writes, we’ll cover everything you need to know to ensure your SSD operates at its peak efficiency.
By the way, if you installed a fresh copy of Windows (from the scratch) onto your SSD, many services and parameters will be configured automatically during the installation (this is why many specialists recommend a new Windows installation when adding an SSD to your rig).
Optimization of Windows for an SSD will not only allow to extend your drive’s lifetime but also to improve Windows performance. As to optimization procedures, the advice and recommendations in this article are relevant for Windows 7, 8 and 10.
- What Should Be Checked Before Optimization?
- Optimizing Windows for an SSD
- Utilities for Automatic Optimization of Windows for an SSD
- Questions and answers
- Comments

SSD Diagnostics: Programs to Find and Fix SSD Errors 🛠️🔎👨💻
What Should Be Checked Before Optimization?
Step 1. Make Sure That AHCI SATA Mode Is On
It is quite easy to see what mode is enabled for the controller, just by looking at BIOS settings. If the disk mode is set as ATA it has to be switched to AHCI.
| Feature | ATA (Advanced Technology Attachment) | AHCI (Advanced Host Controller Interface) |
|---|---|---|
| Full Name | Advanced Technology Attachment | Advanced Host Controller Interface |
| Purpose | Standard for connecting and controlling storage devices | Defines a newer standard for SATA storage devices |
| Interface | Parallel ATA (PATA) or Serial ATA (SATA) | Works only with SATA devices |
| Data Transfer Method | Legacy mode with limited features | Supports advanced features like Native Command Queuing (NCQ) |
| Performance | Lower speed and efficiency | Higher speed and better efficiency |
| Hot Swapping | Not supported | Supported |
| Compatibility | Compatible with older systems and drives | Requires modern hardware and BIOS/UEFI support |
| Power Management | Basic | Advanced power-saving features |
| Driver Support | Does not require additional drivers | Requires specific AHCI drivers |
| Usage | Legacy systems and older operating systems | Modern systems with SATA drives |
Yet there are two important things to keep in mind:
- Windows won’t boot as it doesn’t have the necessary drivers. You will have to either install them beforehand or just reinstall Windows (which is both easier and more preferable, in our opinion);
- Your BIOS might not have AHCI mode available (though, it applies mostly to pretty old PCs). In this case, you will probably have to update BIOS (or at least check at the manufacturer’s website to see if their new BIOS supports this function).

How to Enable AHCI Mode Without Reinstalling Windows, INACCESSABLE_BOOT_DEVICE Error 💻🛠️🤔
It would be useful to enter Device Manager (it can be found in the Windows Control Panel) and open the tab containing information on IDE ATA/ATAPI controllers. If you can see a controller with a name that includes SATA AHCI then everything is all right.
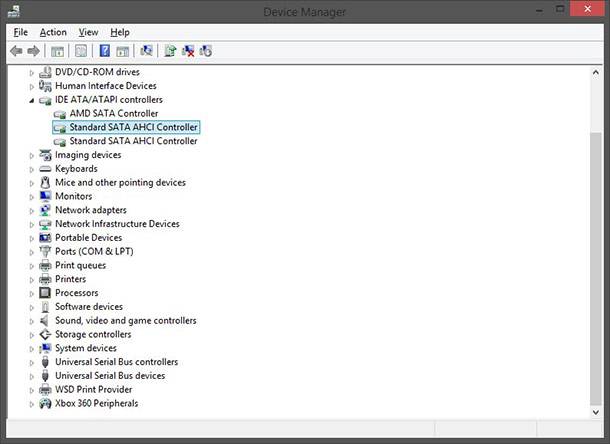
The AHCI mode is required for supporting normal operation of TRIM in the SSD.
TRIM is a command of the ATA interface required for Windows to transfer to the drive some data on which blocks are no longer needed and can be overwritten. The matter is that the principle of file deletion and space formatting in HDD and SSD differs. With the use of TRIM, SSD performance in increased, with a steady wear-out pattern of the drive memory cells. TRIM is supported by Windows 7, 8, 10 (if you are using Windows XP I recommend upgrading your OS or buying a drive with hardware-based TRIM).
Step 2. Make Sure That TRIM Support Is Enabled in Windows
In order to check if Windows support for TRIM is enabled, you can just launch command prompt as administrator. Then type in the command fsutil behavior query DisableDeleteNotify and press Enter.
fsutil behavior query DisableDeleteNotify
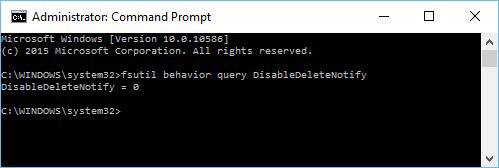
If DisableDeleteNotify = 0 (as shown in the picture) - then TRIM is enabled and you needn’t enter anything else.
If DisableDeleteNotify = 1 - then TRIM is disabled; you can enable it with the command: fsutil behavior set DisableDeleteNotify 0.
fsutil behavior query DisableDeleteNotify 0
Then check it once more with the command: fsutil behavior query DisableDeleteNotify.
Optimizing Windows for an SSD

How to Move Windows From One Computer to Another, or From HDD to SSD 💻 ➡️ 💻
Step 1. Disable File Indexing
This is the first thing I recommend because this function has been created for HDD in order to accelerate access to files. However, an SSD is fast enough by itself and this function is merely useless.
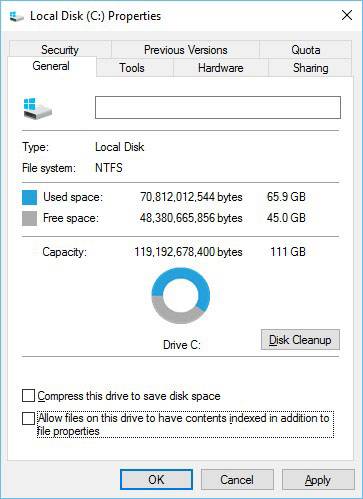
After all, disabling this function reduces the number of write sessions to your drive which means extending its lifecycle. To disable indexing go to SSD properties (you can start Explorer and go to This PC tab) and uncheck the box next to Allow files on this drive to have contents indexed in addition to file properties.
Step 2. Disable Windows Search
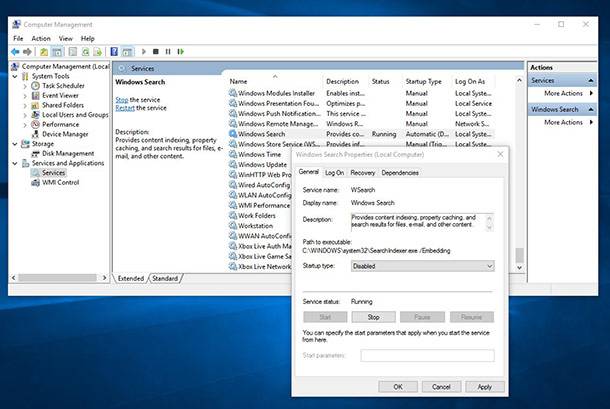
This service creates a separate index of files which helps the system to find certain files and folders quicker. An SSD is fast enough and many users just don’t apply this function so it would be better to disable it.
First of all, open Control Panel / System and Security / Administration Tools / Computer Management.
Then, search the Services tab for Windows Search and disable it.
Step 3. Disable Hibernation Mode
Hibernation mode allows saving the contents of RAM to the hard disk drive which helps the PC to quickly return to its previous state when switched on again (applications launched, documents open etc).
When using an SSD this function becomes not so important. First of all, Windows starts much faster with an SSD, so there’s little point in saving its previous state. Secondly, extra write and overwrite cycles may influence the life of your SSD.
Disabling hibernation is quite simple – just launch the command prompt as administrator and type in the command powercfg -h off.
powercfg -h off

Step 4. Disable Disk Auto Defragmentation
Defragmentation is a useful operation for HDDs that helps to improve their performance a little. However, it has no benefits for an SSD because it is designed in a different way.

How to Defragment Your PC's Hard Drive on Windows 10 🛠️🗄️⏲️
The speed of access to all SSD cells containing data is the same, and it means the speed of access will be the same, no matter where "pieces" of files are stored!
Moreover, relocating these "pieces" from one place to another increases the number of write/overwrite cycles which eats up the SSD lifetime.
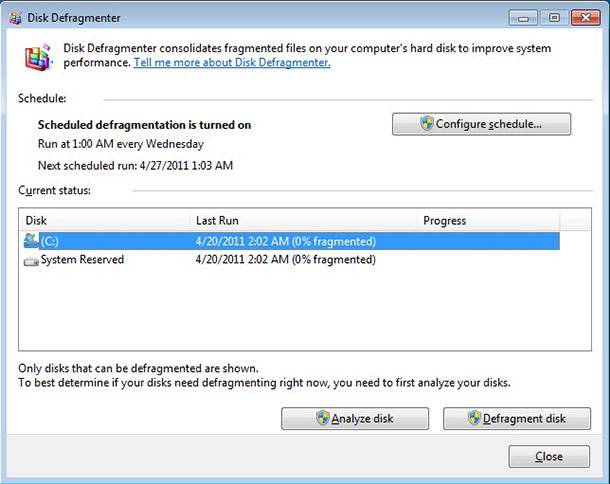
If you have Windows 8/10 there is no need to disable defragmentation. The built-in disk optimizing software (Storage Optimizer) will select the necessary option automatically.
If you have Windows 7 you should go to defragmentation utility (Disk Defragmenter) and disable it.
Step 5. Disable Prefetch and SuperFetch
Prefetch is a technology that helps the computer to accelerate launching of frequently used programs. It is done by loading them into RAM beforehand. A special file with such name is created in the hard disk.
As SSDs are pretty fast this function is better to be disabled as it won’t give you any more speed.
SuperFetch is a similar function, the only difference being that the computer is trying to guess what programs you are likely to start and loads them into RAM in advance (this is also recommended to be disabled).
To disable these functions you should use the register editor.
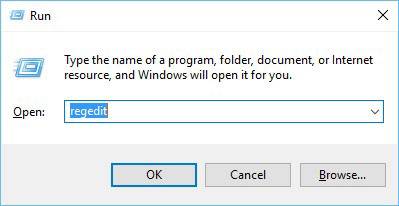
When you have it started, go to the following link:
HKEY_LOCAL_MACHINE\SYSTEM\CurrentControlSet\Control\Session Manager\Memory Management\PrefetchParameters
Then, in this part of the register you need to find two parameters: EnablePrefetcher and EnableSuperfetch. Their value should be set at 0. By default, they are set at 3.
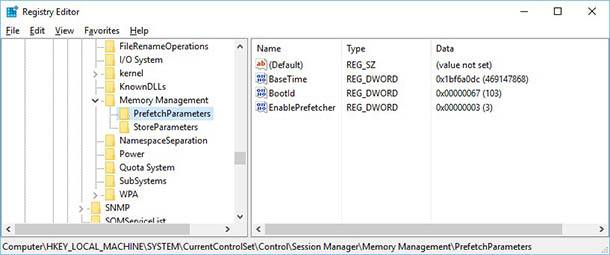
By the way, if you install a fresh copy of Windows on an SSD, these parameters will be configured automatically. Frankly speaking, it does not always happen flawlessly: sometimes there can be errors if your system contains both SSD and HDD drives.
Utilities for Automatic Optimization of Windows for an SSD
Some people would choose to do manually every step described in this article, and some others would love to use special utilities for fine tuning of Windows. Such utilities are known as tweakers.
Many users also recommend transferring browser cache, paging files, Windows temporary folders, system backup copies (and other data) from SSD to HDD (or even disabling these functions at all).
Then why have an SSD? To make sure your system boots up in 10 seconds? In our view, an SSD is necessary to accelerate the general system performance (the main goal), reduce noise, extend the working time of a laptop when on battery power etc.
But when applying all these settings we can reduce all advantages of an SSD to nothing.
This is why when we talk about optimization and disabling unnecessary functions we mean only what cannot accelerate your system in any way but can affect the lifecycle of your SSD and therefore safety of your data.
That is because if an SSD goes wrong when depleting its resources, no data recovery software can help you.

Recovering Data from SSD After File Deletion or Disk Formatting ⚕️📁💥


