Restore .PST and .OST Data Files in Outlook: Recovery Solutions
Lost important emails due to .pst or .ost file corruption? In this article, we uncover the methods and techniques to restore .pst and .ost data files in Outlook. Our experts share valuable insights, tips, and solutions to help you retrieve those crucial emails. Whether it’s accidental deletion, file corruption, or other issues, we’ve got you covered.

- Fix Issues with Microsoft Outlook Data Files
- Conclusion
- Questions and answers
- Comments
You can use Microsoft Outlook as a separate application, or as a tool to organize cooperation between a group of users within a company, while it keeps important data for shared email accounts, task folders, calendars, planners and documents.
In Windows 10, regardless of what version of the program you use – Microsoft Outlook 2019, 2016 or an older one – it saves copies of your emails, contacts and calendars with the help of two different data files for offline access, depending on the account type.

What Data Is Stored in Microsoft Windows, Edge, OneDrive and Outlook Accounts 💻👨💻📧
If you use standard Internet application layer protocols to receive emails from an IMAP or POP remote server as provided by your ISP, then the information on your account is stored in an Outlook data file with the extension PST. On the other hand, if you use an account with Microsoft Office 365, Microsoft Exchange or Outlook.com, information is saved to an Outlook offline data file with the extension OST.
| Characteristic | PST | OST |
|---|---|---|
| Full Name | Personal Storage Table | Offline Storage Table |
| Storage Type | Local storage for user’s personal data | Local storage for data synchronized with the server |
| Purpose | To store emails, contacts, calendars, and other personal data | For offline access to account data and synchronization with the server |
| Server Synchronization | Does not synchronize; data is stored locally | Synchronizes with the account on the server |
| Availability Without Internet Connection | All stored data in the file is available | All synchronized account data is available |
| Usage | Personal and corporate accounts | Corporate accounts with Exchange server support |
| Export Capability | Easily exported and transferred | Usually only used locally, not exported |
| Password Protection | Supported | Not supported |
| File Type | Typically smaller, suitable for archiving | Can be large, as it contains all synchronized data |
Usually, these files are very reliable, but in the end, they may stop working or get damaged, and this is why all versions of Microsoft Outlook for PC come with a repair tool that can fix issues with .pst data files, and correct automatically any errors in .ost files.
In this article, we will try to give a full coverage of methods for recovering damaged data files, restoring missing elements to the Inbox folder, eliminating problems with opening OST or PST files in Microsoft Outlook 2019, Microsoft Outlook 2016 and older versions, and show you a universal method for file recovery after it was deleted or formatted, both accidentally or deliberately.
The main methods to achieve the final goal will be given in the corresponding parts of the article:

How to Restore Access to Gmail, Yahoo, AOL, ICloud, Outlook Mailbox without a Login and Password 📧🔓🔑
Fix Issues with Microsoft Outlook Data Files
Any information users may keep in the storage device of a personal computer, be it a part of a database required for proper work of certain applications and programs, or some documents and files, still requires a safe and reliable storage method. Usually, applications within Windows 10 operating system are quite good at ensuring data integrity and protecting it from failures without additional tools to be involved.
Yet for a number of reasons, such as incompetent user actions, external threats like viruses and malware, software and hardware failures, accidental or deliberate deletion, formatting, failed storage devices or crashing operating systems and so on, we may from time to time encounter situations when a file has to be recovered in order to restore access to certain elements of a Microsoft Outlook account.
That is why we are going to consider the main ways of fixing and recovering data files.
Method 1. How to Restore an Outlook Offline Data File (.ost)?
Regardless of whether you are using an account with Microsoft Exchange, Microsoft Office 365 or Outlook.com, there is a certain preparation sequence before you start fixing problems with an OST file: first of all, close Microsoft Outlook, and then take the following steps:
Step 1. Use any method you find comfortable to open Control Panel, and change settings for all services of the Windows operating system on your computer. For example, click on the Start button which you can find in the lower left corner of the taskbar to open the main Windows pop-up menu. Use the scroll bar to reach the bottom of the list of all applications and programs and find the section Windows System. Left-click on the section to open the menu; select Control Panel.

Here’s a piece of advice. If you use only settings of an Outlook default profile without binding it to a specific e-mail address, you can type the following path into the Windows file explorer: %LOCALAPPDATA%\Microsoft\Outlook, to open the directory containing the OST file, and skip all the following steps, so that you can continue the recovery process from Step 10. Otherwise, follow the sequence of steps as described below.
%LOCALAPPDATA%/Microsoft/Outlook
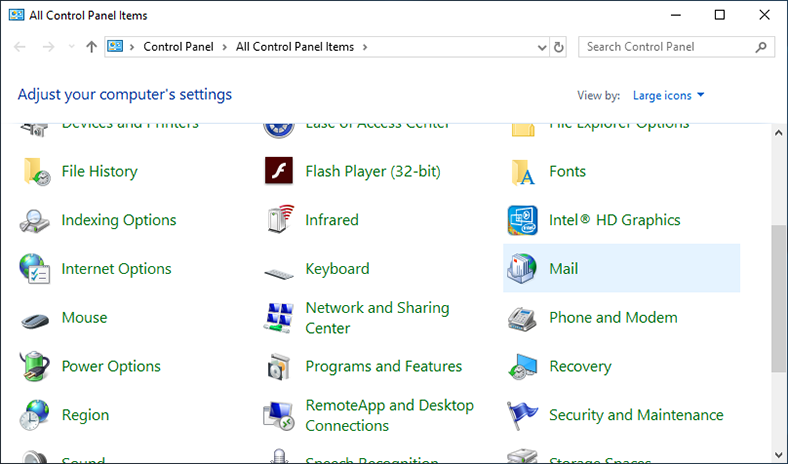
Step 2. In the main window of Control Panel, scroll down and click on Mail - this section contains information on Microsoft Outlook profiles.
Step 3. In the Outlook setup window that opens, find Profiles and click on Show Profiles to see the settings for e-mail accounts and data files.

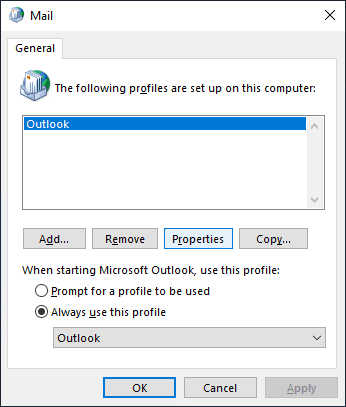
Step 4. In the new Mail window, select the account profile you are going to fix. (By default, the Microsoft Outlook profile is selected.)
Step 5. Click on the Properties button under the profile window.
Step 6. In the new Outlook setup window, find the section E-mail Accounts and click on the corresponding button to access e-mail accounts and directories.
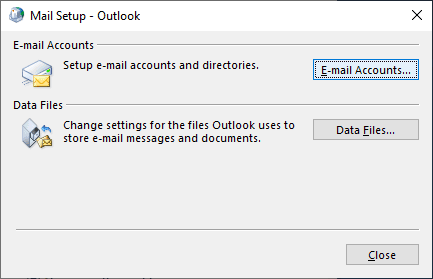
Step 7. In the email account settings window, choose the necessary profile, then click Data files to change settings for Microsoft Outlook files used to store documents and messages.
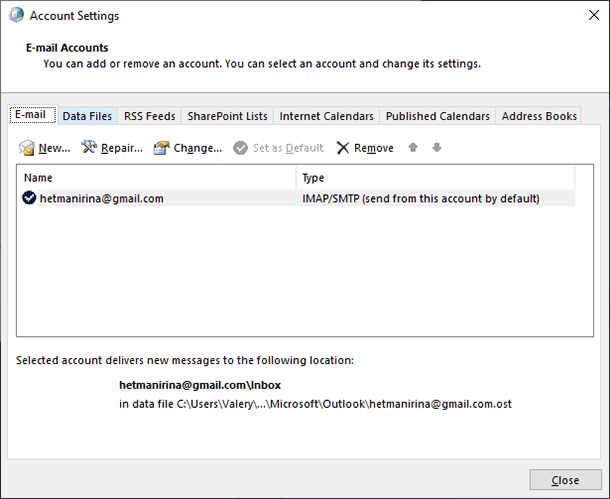
Step 8. In the data file tab, select the damaged entry, and then choose Open file location from the available commands. In a moment, the Windows file explorer window will display the folder containing the selected data file.
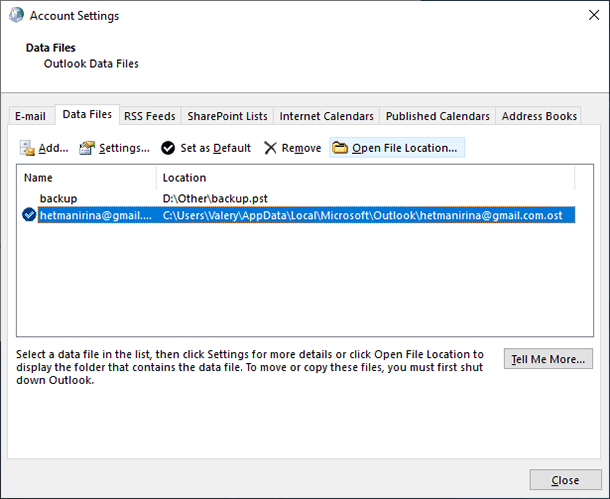
Step 9. Click on the buttons to close all previously opened windows: Account Settings, Mail Setup – Outlook, Mail and Control Panel.
Step 10. In the central tab of the Windows file explorer window, right-click on the automatically selected OST file used by Microsoft Outlook for the selected account, and open the context menu. From the list of possible actions, select Delete.
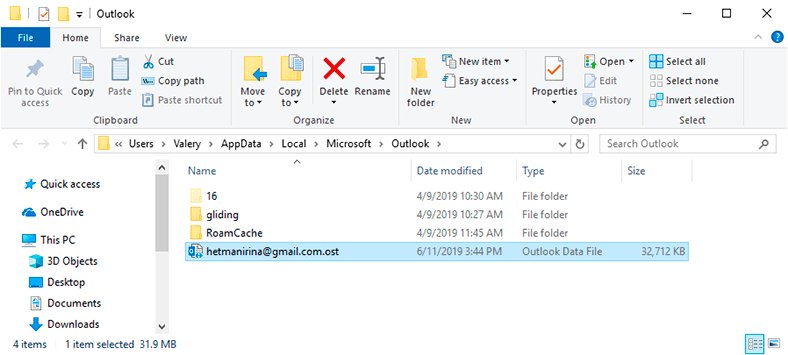
When you finish this sequence of steps, open Microsoft Outlook again to restore the offline OST file for the account which you were going to fix.
Method 2. How to Restore an Outlook Data File (.pst)?
If you use an account providing access to e-mail via application-layer protocols like IMAP or POP, there is another sequence of simple steps to follow if you need to fix problems with a PST file.
In this part of the article, you will find a method for detecting and correcting errors in an Outlook (.pst) data file with the help of the integrated repair tool, which can perform an initial examination of the data file on your computer and detect any signs of the coming trouble.
The suggested method is the best way to go in one of the following situations:
- You can see a message from Microsoft Outlook that it cannot open a data file.
- There is a system error message when you try to open Microsoft Outlook folders.
- You are sure (or you have facts that confirm it) that the Microsoft Outlook data file is damaged.
To perform diagnostics and error correction for the Microsoft Outlook (.pst) data file, just do the following:
Step 1. Close Microsoft Outlook if it is running.
Step 2. Open the Run window in any way you like. For example, right-click on the Start button or press the keyboard shortcut Windows + X to bring up a menu and select Run.

Here’s another piece of advice. The quickest and easiest way to open the Run window is with the keyboard shortcut Windows + R.
Step 3. In the line Open, type the following command:

It is designed to open the corresponding directory in the operating system Windows 10 32-bit. For a 64-bit version, Program Files (x86) should be replaced with Program Files.

When you have typed the command, click ОК or press the Enter key.
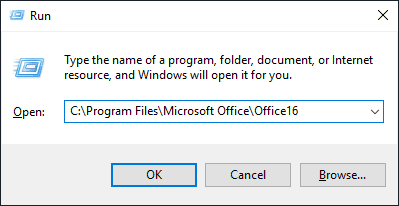
An important note. This path to the Microsoft Outlook (.pst) data file is used in office packages like Microsoft Office 2016, Microsoft Office 2019 and Microsoft Office 365. If you have Microsoft Outlook 2013, then type the following path in the line Open of the Run window: C:\Program Files (x86)\Microsoft Office\Office15. In case you have an earlier version of Microsoft Outlook, modify the path by changing Office15 into Office14 for Microsoft Outlook 2010 or into Office13 for Microsoft Outlook 2007, respectively.
C:/Program Files (x86)/Microsoft Office/Office15
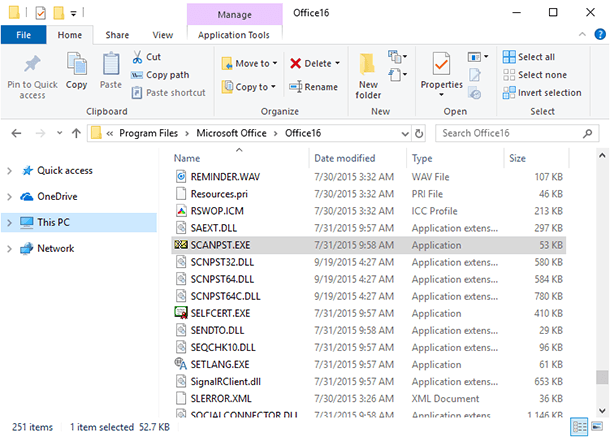
Step 4. When the Windows file explorer shows you this directory, use the scroll bar to find a file with the name SCANPST.EXE and double-click on it to open the interface of the Microsoft Outlook Inbox repair tool.
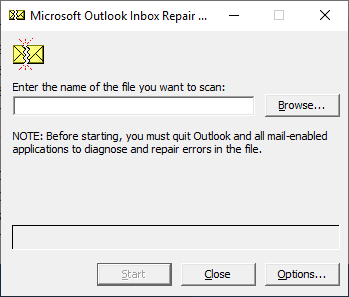
Step 5. In the recovery tool window that opens, click Browse to find the damaged file.
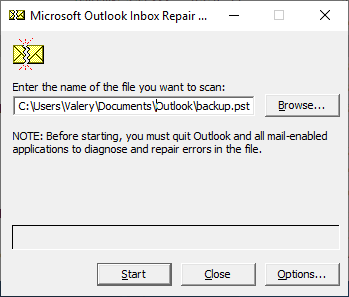
Step 6. The Select File To Scan window will open automatically the directory containing the backup file, backup.pst. Select the file you need and click Open.

Step 7. Now that the name of the file to scan is filled into the proper line, click Start and the process for detecting and fixing file error will begin.
Step 8. When initialization and step-by-step integrity check are complete, the repair tool will examine the file for inconsistencies and tell you if this specific file is worth recovering. If you decide to recover the file, check the box for Make backup of scanned file before repairing, and then click Repair.
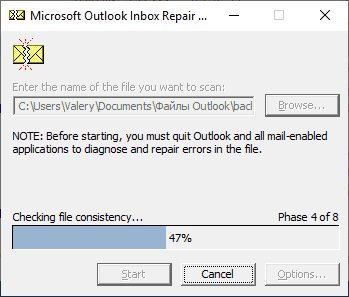
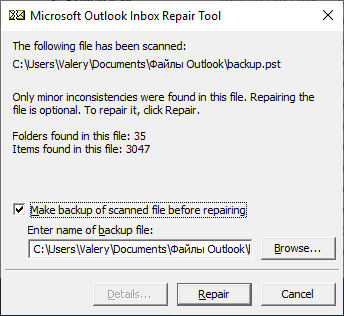
When this step-by-step algorithm is accomplished, Microsoft Outlook Inbox Repair Tool will scan and recover the PST file for the damaged e-mail account. As the recovery process is over, you can start Microsoft Outlook and make sure that now there are no problems with your account at all.
Method 3. Further Steps to Restore Specific Elements
Despite the fact that the Microsoft Outlook integrated repair tool can detect and fix most issues involving PST data files, there is always a chance that some messages are recovered only partially, and it takes a few additional steps to restore all elements of an email account.
In this situation, after the repair process is over, in the left panel of the app you can see additional folders containing some recovered personal elements or lost and found elements. For some reason, the Microsoft Outlook repair tool failed to restore these elements to the source location where they used to be, and assigned them to a separate directory.
To accomplish recovery of the missing elements, open such a folder, select the elements to be recovered and drag them to the corresponding source location. When you are finished, the temporary folder created by the repair tool can be deleted in a standard way, by selecting the corresponding line from the menu or pressing the Delete keyboard button.
Method 4. How to Restore a Data File from a Backup Copy?
Creating and storing a backup copy of important data is a good security method that can protect your saved information against being removed or deleted, and can help recover the data if necessary. In this part of the article, we will have a look at several ways of recovering email account elements from a backup copy, with the help of integrated functions inside the Microsoft Outlook app or with standard system tools provided in the latest operating system by Microsoft, Windows 10.
Restoring Missing Elements from a BAK file of a Backup Copy
If some elements of the email account are still missing, they can be recovered from the Outlook source data file using the BAK file of the backup created by the Microsoft Outlook integrated recovery tool.
When you use this Inbox Repair Tool, it creates a backup file with the same name as the source file but with a different extension - .bak, and the tool saves it to the same folder where the PST file is located. That is why for elements that the Microsoft Outlook integrated tool failed to recover, you can still try and restore them from the backup file.
Step 1. Use Windows 10 File Explorer to open location of the BAK file in the backup copy file (.bak). It can be found in the same directory as the PST file, and this path can be discovered at Step 6 in the previous part of this article How to restore an Outlook data file (.pst)?.
Step 2. Right-click on the .bak file and open the context menu; select Copy.
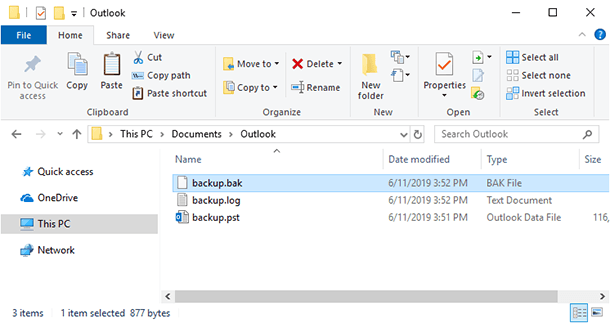
Step 3. Right-click on an empty area in the File Explorer window, and in the menu that opens select Paste, to create a copy of the file in this directory.
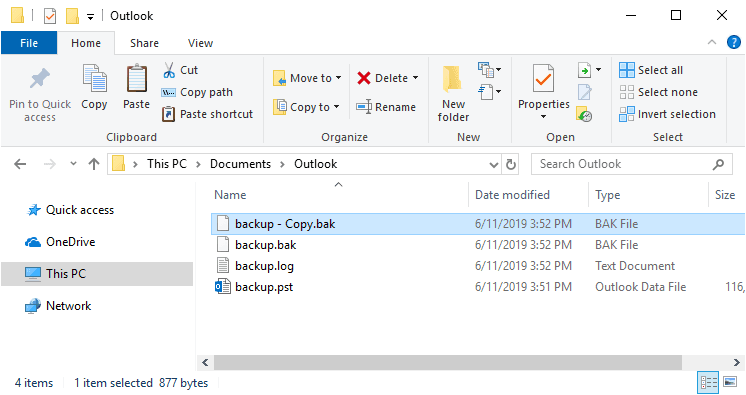
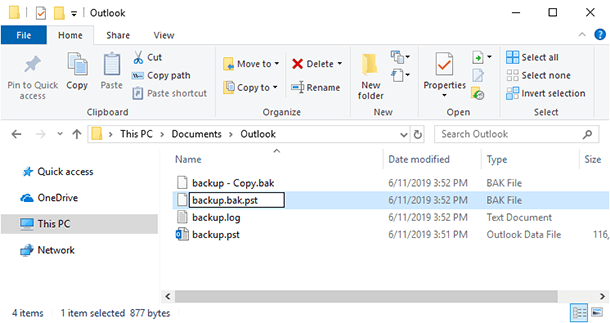
Step 4. Highlight the .bak source file, then rename it by changing its original extension .bak to .bak.pst. To do it, right-click on the file and select Rename from the context menu, or just press F2 to change the file name immediately.
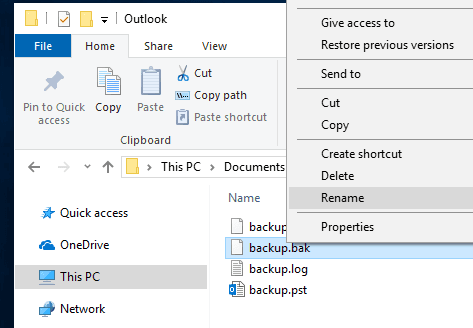
When finished, press Enter on the keyboard and the file will be assigned a new name.
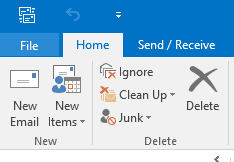
Step 5. Open Microsoft Outlook. Choose the File tab in the main menu.
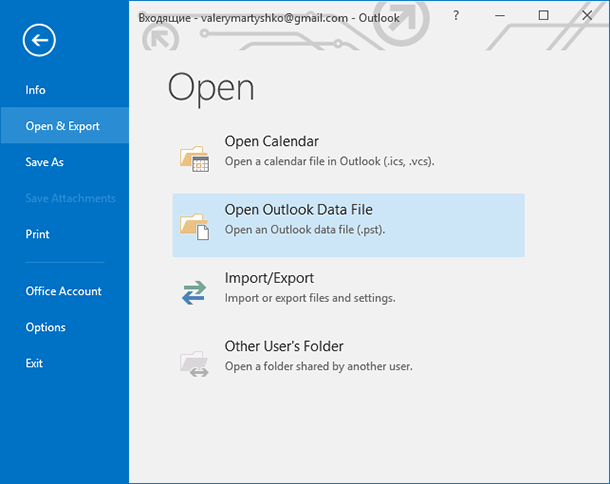
Step 6. When the page containing information on the email account opens, look on the left to find Open & Export.
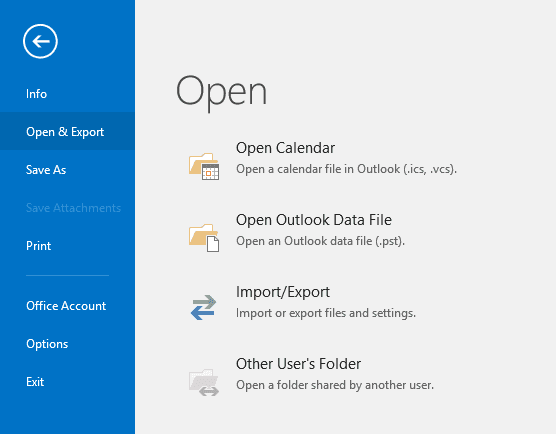
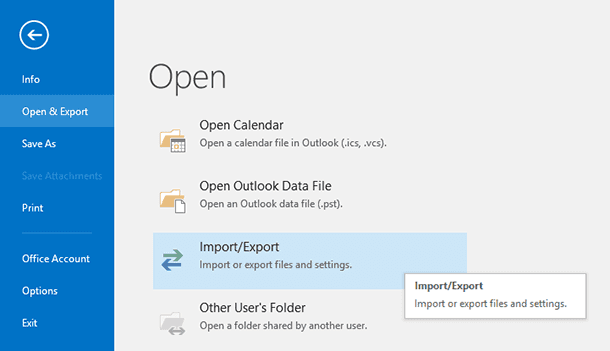
Step 7. Select it, and then click on Import/Export.
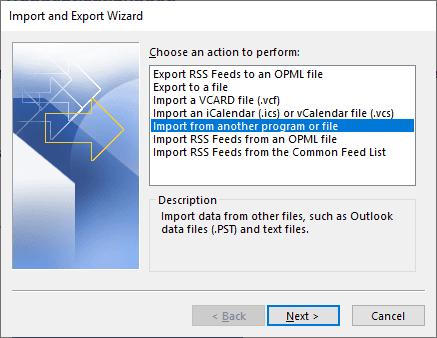
Step 8. Microsoft Outlook will launch Import and Export Wizard to help you perform various actions with the files according to the predefined settings. In the window Choose an action to perform select the line Import from another program or file that enables you to extract data from third-party data files and text files, and click Next to continue.
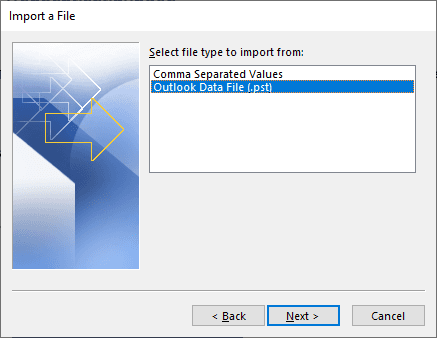
Step 9. In the next window Import a file, find Select file type to import from, choose the line Outlook Data File (.pst) and confirm your choice by clicking Next.
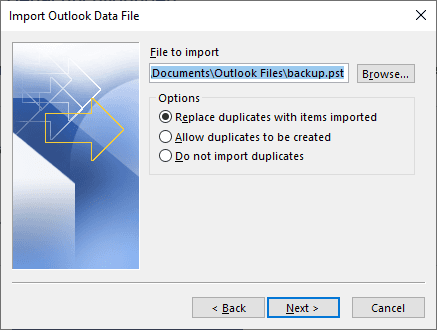
Step 10. In the window Import Outlook Data File you will be shown the section File to import and suggested to give a path to the location of the .pst file by typing it or choosing it with the Browse button. Additionally, select one element in the Options section: you can leave the default value or choose between the other two if you like. After that, click Next.
Step 11. Use the File to import option to choose the elements you are looking for and then click Finish to let the wizard deal with importing files.
When all the steps described here are complete, Microsoft Outlook should display all elements of the account.
This method of recovery suggests using Microsoft Outlook 2019 in Windows 10 operating system. Yet even if you use an earlier version of Microsoft Outlook (2016, 2013, 2010 or 2007), this tutorial is equally useful for other operating systems such as Windows 8.1 and Windows 7.
Restoring Elements with the Integrated Tools of Windows 10 Operating System
Microsoft engineers are permanently working to enhance their products by adding new system elements and improving the existing ones. Windows 10 introduced several new tools to help users recover lost or damaged files.
The main tools for recovering files from a backup copy are Restore previous versions, Backup & Restore (Windows 7) and File History. Each of these tools can help you recover a copy of the file and use it instead of the deleted or damaged original file.
The essential condition for successful backup and recovery operations is to set up the corresponding tool properly. These tools are disabled by default in Windows 10, and when you want to enable them, you have to choose the storage media for your archive and set the list of important files and directories which should be backed up regularly.
Another sad fact is that the amount of user data is growing constantly, which means you need a large storage device to ensure safekeeping of files and backup archives. That is why users have to think about saving disk space and do not always include all important files when the time for backup comes. In case of some unexpected damage, they may lack a backup copy of some specific files. Using a remote cloud storage service like OneDrive can offer more space for backup files and improve your chances for guaranteed recovery of necessary files in case of trouble, but it is not always convenient as third parties may access your data as well.
In spite of certain drawbacks, data backup is a powerful tool to secure your information – backups are something you should never miss but instead, do it on a regular basis.
How to Restore a Data File After Formatting or Deleting?
The methods for repairing problematic Microsoft Outlook data files that we described above suggest that the files are available. However, quite often the necessary files are missing and it is difficult to recover them. They may be removed by mistake, either by the user or after running a disk space cleaner, or they may be a system failure while reading or writing files, or malware can destroy certain files deliberately. Other options include formatting the storage media, file system issues or many other things, all resulting into one nasty consequence, the loss of files.
In this case you should use third-party software designed for recovering deleted files. On the Internet, there are lots of programs of all kinds, capable of restoring either a few specific file types or any type of file, and varying by the quality of results they can deliver.
Products by Hetman Software have enjoyed enormous yet well-deserved popularity among PC users. The company’s flagship product, Hetman Partition Recovery, outruns its rivals in all aspects and is the leading utility by the number of recovered files, the range of available file formats and overall performance.
Hetman Partition Recovery can easily restore any data from hard disks, external USB storage devices, memory cards of all types, and other media with FAT and NTFS file systems, while retaining compatibility with 32-bit and 64-bit versions of Windows 10 as well as with older Microsoft operating systems. Confidently and efficiently, the program recovers lost data from personal computers, laptops (netbooks, ultrabooks, transformer laptops etc), digital cameras, media players and other devices even in most difficult and seemingly hopeless cases.
Any methods applied to remove data, such as ordinary deletion (deliberate, accidental or by mistake), irreversible deletion with the key shortcut Shift + Delete, emptying the Recycle Bin, formatting partitions or entire drives, changing file systems for storage devices - all of them cannot prevent the powerful search algorithm from doing its job perfectly and recovering almost every bit of your data.
The multipurpose heuristic and signature analysis tool inside Hetman Partition Recovery facilitates data recovery even in the most difficult cases: after system failures and hardware errors, with missing or overwritten file allocation tables, after an operating system crash, system driver errors, malware effects, physical damage to storage devices, and it can even work with unavailable disks.
The program has a user-friendly interface and looks very similar to the Windows file explorer, which makes it very easy to understand even for novice PC owners.
Here is a step-by-step algorithm to recover a data file:
Step 1. Visit the official website of Hetman Software to download a setup file for Hetman Partition Recovery and launch it on your computer. The step-by-step installation wizard will take you through the settings, install the program to a specified directory and get it ready for use.
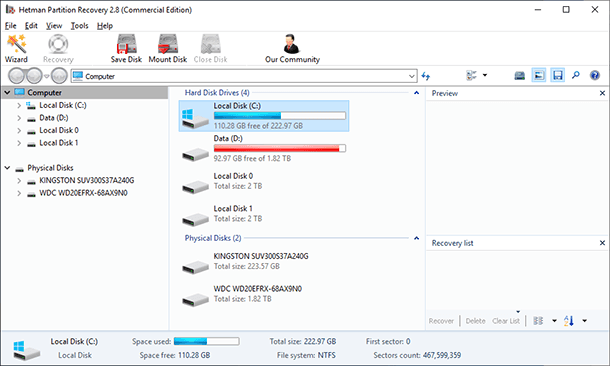
Step 2. When Hetman Partition Recovery starts for the first time, it runs an initial check to detect all connected storage devices which can be used to search and recover files. In the main window, choose a logical partition or an entire disk and double-click on it.
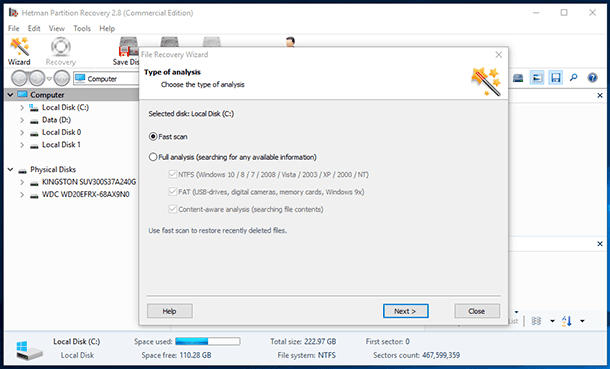
Step 3. It starts the file recovery wizard which asks you to choose the preferred type of analysis for searching and restoring data lost from the selected disk. Fast scan is good for recovering recently deleted files. With Full analysis the program will examine the disk surface, search all available information and fix file system errors which allows to recover as many files as possible. Select the analysis type and click Next to start the process.
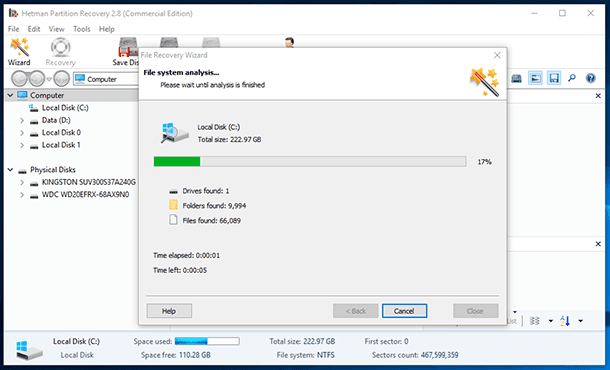
Step 4. Wait until the analysis is complete; the actual time required for this process largely depends on a number of things: the disk size, the existing file system, the amount of damaged files and extent of the damage, performance of the specific computer and so on. The green progress bar will display the course of the analysis in percent, and the time counter below will give you an estimated amount of time left before the operation is over.
Step 5. When the analysis is finished, all the files detected by the program will be shown in the main window. You can select any file and see (or listen to) its contents in the Preview window. Having analyzed condition of the files, drag the necessary files to the Recovery List and then click on the Recovery button fashioned like a life ring.
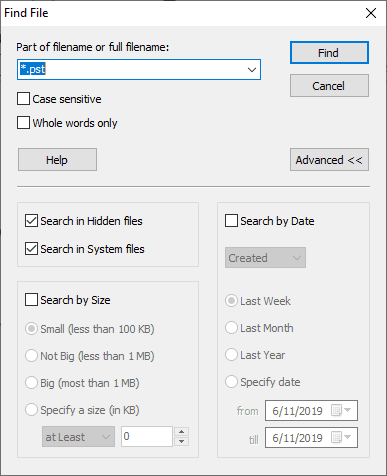
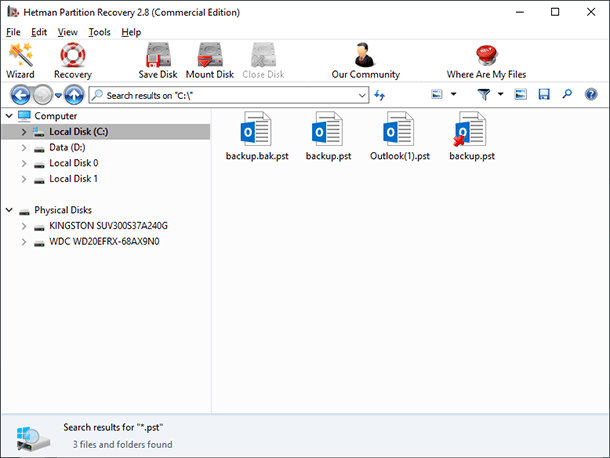
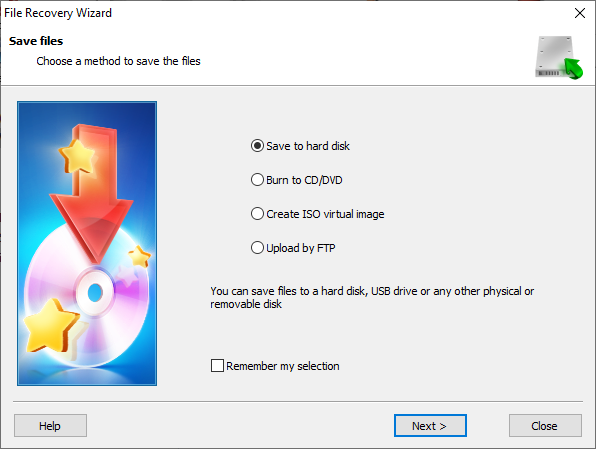
Step 6. At this stage, the file recovery wizard window appears again to help you decide on the methods for saving the recovered files. By default, you can choose from among four options:
Save to hard disk – save files to any available storage device, internal or external;
Upload by FTP – upload the recovered files to the Internet with the help of the integrated FTP client.
Select one of the methods to save the files, and click Next to continue.
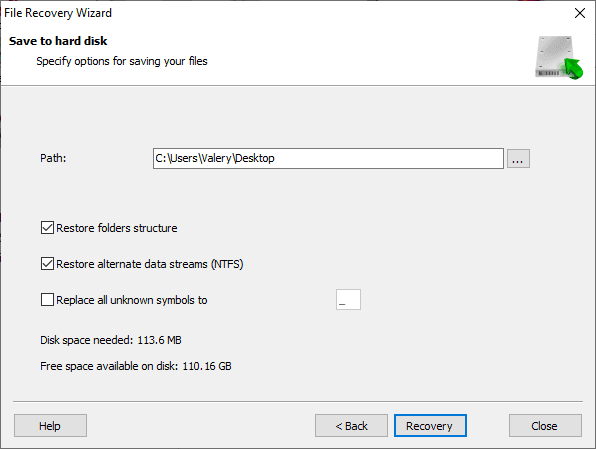
Step 7. Depending on the choice you have made, you may have to specify several settings (which differ for every saving method) to accomplish the process of saving the files; one of such settings is the final directory where data should be saved.
By default, .pst and .ost data files are stored in the system drive, inside the Documents folder, that is why you can specify this folder as the directory for saving the recoveredMicrosoft Outlook files and using them to replace the existing damaged files, or adding the recovered files to the directory if certain elements are missing. When you start the application at a later time, the files will be read successfully and you will be able to access all the elements inside the folder.
After you deal with all the necessary settings, click on the Recovery button and save the selected files.
Now you can launch Microsoft Outlook and make sure that the data file and all other elements are displayed correctly.
You can learn more about the opportunities provided by Hetman Partition Recovery, and discover various methods to recover lost files from all types of storage devices by watching our step-by-step video guide on YouTube: How to Recover Deleted Files in 2019 With Hetman Partition Recovery Software.

How to Recover Deleted Files in 2020 With Hetman Partition Recovery Software 📁🔥⚕️
Conclusion
Modern computer devices are now a part of our everyday lives. The fact to make computers of all kinds even more popular is that all information is now available in a digital format.
The ability of computers to process and store vast amounts of data makes them vitally important for dealing with all kinds of tasks including spreading and exchanging information between electronic devices.
One of the popular ways to exchange user files is e-mail - and this function is perfectly realized in Microsoft Outlook, which can also be used as a full-fledged organizer.
Despite its high reliability and failure tolerance, the mail client may encounter errors that damage data files and create difficulties in working with the e-mail account. As the user profile contains many important elements, the topic of fixing possible issues becomes very relevant.
Using the tools integrated into Microsoft Outlook by default, you can fix problems with Outlook .ost and .pst data files in a few simple steps.
Also, regular backups created with Windows 10 built-in tools can largely reduce the risk of loss or damage to Microsoft Outlook data files.
If the backup file does not contain the necessary elements or if the integrated tools cannot solve the problem, you can still resort to a universal utility, Hetman Partition Recovery, and recover the lost data files. By pasting the recovered files into the source directory and replacing the damaged or missing files, you can then start Microsoft Outlook and restore full access to all elements of a specific e-mail account.
If you have any questions about fixing issues involving .ost and .pst data files in Outlook, post a comment, and we will certainly provide you with the information you are interested in.


