Create Storage Space & Mirrored Volume in Windows
Learn step-by-step how to create a storage space or mirrored volume in Windows 7, 8, or 10 with this comprehensive guide. Whether you’re a beginner or experienced user, discover the essential techniques to set up storage spaces effectively. Dive deep into the process of creating mirrored volumes and optimizing storage for enhanced data redundancy and performance. Don’t miss out on these valuable tips to manage your storage effectively on Windows operating systems!

Software RAID in Windows 10, Storage Spaces and Data Recovery from RAID drives 💻⚕️🤔
- Storage Space
- How to Create a Storage Space
- How to Use Storage Spaces
- How to manage storage spaces
- How to Recover Data from a Drive Within a Storage Space or Mirrored Volume
- How to Create a Mirrored Volume, Striped Volume or Spanned Volume in Windows 7 or Older Versions of Windows
- Questions and answers
- Comments
Storage Space
This feature first appeared in Windows 8, and it was improved in Windows 10. Storage spaces are available in all versions of Windows 8 and 10, including Home versions.
In order to create a storage space, a computer should have at least two physical disks connected, including built-in or USB drives.
Using the Storage Spaces function, you can create a storage pool out of two or more physical disks uniting them into one group. After you have created a storage pool of two or more physical disks, you can create spaces in three types of resiliency:
- Simple It is meant to create a pool of maximal size. Such storage space type does not protect data in any way against possible failures or break-downs. In such storage space, Windows will keep all data in one copy. If one of the physical disks within a storage space fails, the data will be lost. Such type is convenient for temporary storage of large amounts of data.
- Mirror is meant to keep data safe in case of a physical disk failure, by saving several copies of files. If one of the physical disks within a storage space fails, the copy of data will still exist on another disk. This type is good for storing important data in case of possible hardware failures.
- Parity is a kind of cross between simple and mirror types. Data is written to several physical disks, with one or two parity data files created. However, because of the need to compute checksums, parity spaces are noticeably slower to write data, and that is why they are recommended for storing data archives. For example, photo or video.
| Type of Space | Characteristics | Advantages | Disadvantages |
|---|---|---|---|
| Simple Type | Basic structure, minimal number of elements, high predictability. | Ease of construction and analysis, stability. | Limited functionality, weak adaptability to external influences. |
| Mirror Space | Symmetrical structure, elements are duplicated in reverse form. | High resistance to distortions, self-correcting mechanisms. | High construction complexity, requires more resources. |
| Even Space | Balanced structure, even number of elements in all components. | Optimal stability, even load distribution. | Complex setup, dependence on parameter accuracy. |
How to Create a Storage Space
You can create a storage space with the special menu in the Control Panel.
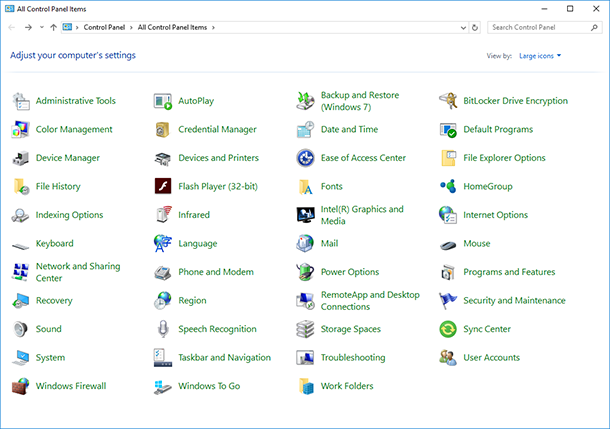
Before you start, connect to your computer all hard disks that you are going to use for creating a storage space. After that go to the Control Panel, select the menu Storage Spaces / Create a new pool and storage space.
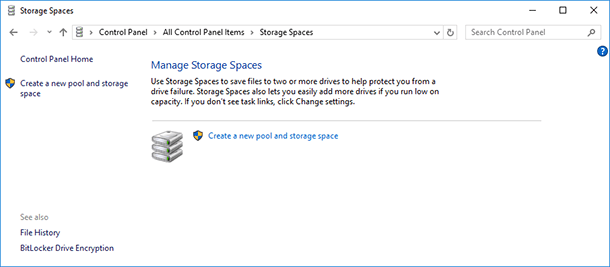
Select the disks you want to add to the pool and click on “Create pool”.
Please remember that all data from the drives selected for the storage pool will be deleted.
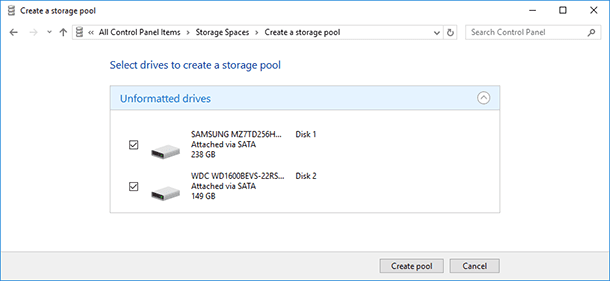
After the pool is created, you should adjust the new storage space – assign a name and select a drive letter. This letter and name will be represented in Windows.
You can also select the standard Windows file system – NTFS, or the new system type ReFS. If you are going to create a mirror or parity storage space meant to protect you against loss of data, it’s better to choose the ReFS type.
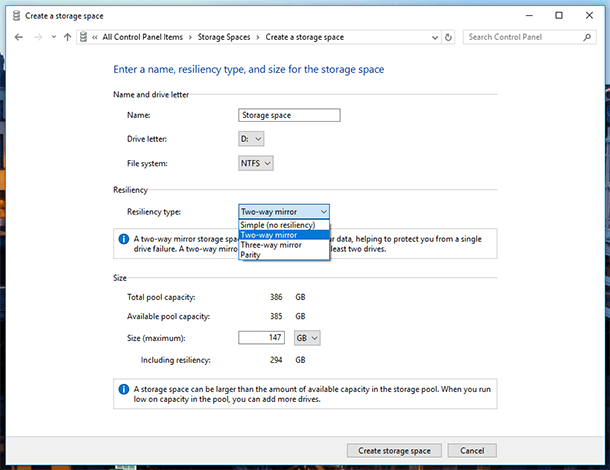
Specify the resiliency type: Simple (no resiliency), Two-way mirror, Three-way mirror, Parity.
To create a large storage pool without drive failure protection, select Simple (no resiliency). Two-way mirror suggests storing two copies of data on a drive, and Three-way mirror – three copies. A Parity storage space will protect data if one of the drives fails, and it will have a larger size than a two-way or three-way mirror, but it will work slower.
Depending on the resiliency type you have selected, the wizard will set the maximum size of the storage space. However, you can set up a larger size for a storage pool. This option is for cases when the available size of connected physical disks is full and the user can connect another drive without the need to make changes to the storage configuration.
After that, click on “Create storage space”.
How to Use Storage Spaces
The storage space you have created will be shown as another drive in the folder This PC. Such drive will have the name and letter which you have assigned to it, and it will look similar to other drives.
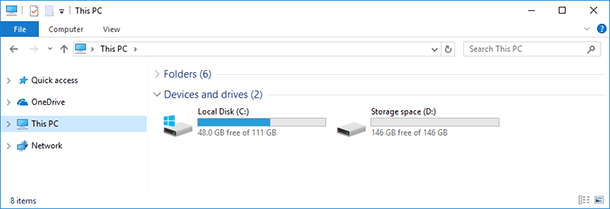
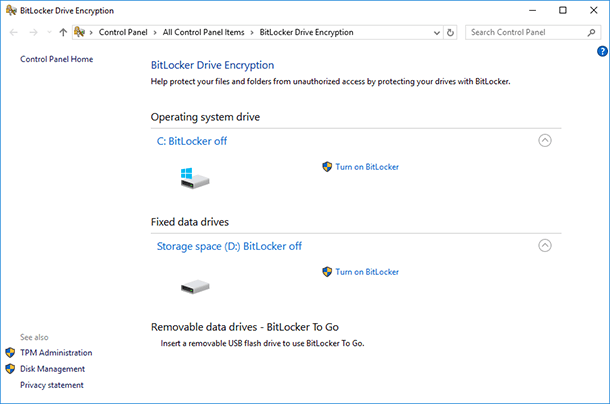
You can do anything to this drive that you do to an ordinary drive. You can even encrypt it with Bitlocker.
How to manage storage spaces
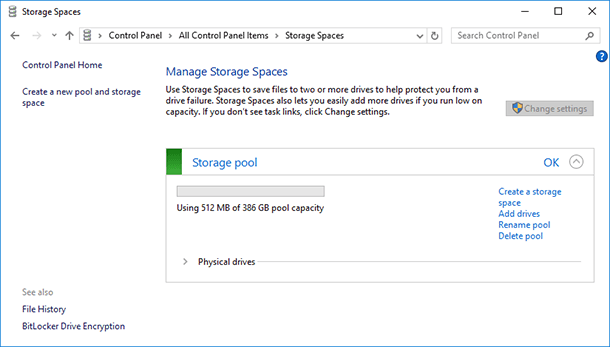
After creating a disk storage, you can go to the Control Panel to manage it or change settings.
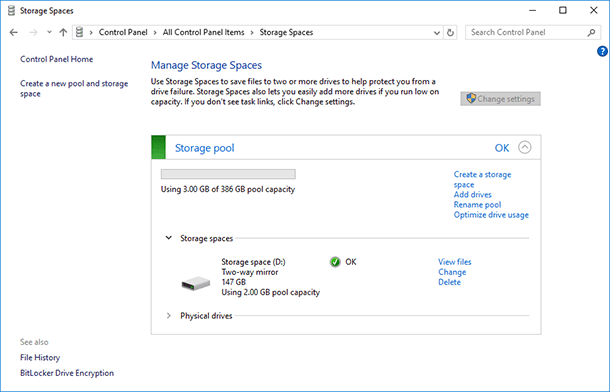
You can create another storage space. Their number is only limited by the number of physical disks connected to the computer. You can add drives or rename the storage pool.
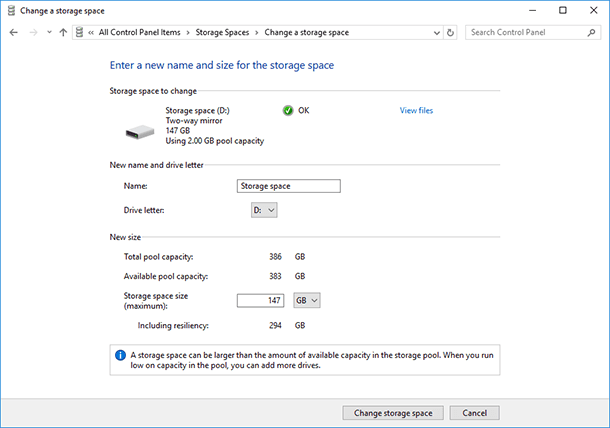
You can change the name or letter of a storage space by clicking “Change settings” in the Storage Spaces section.
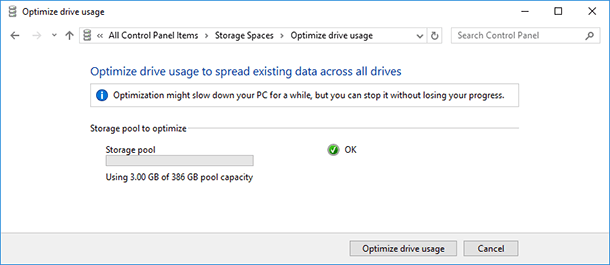
In order to add disks to the existing storage space, select “Add drives” and specify the disks you want to add. When you select the menu “Optimize drive usage”, Windows will spread the existing data evenly across the disks within the storage space.
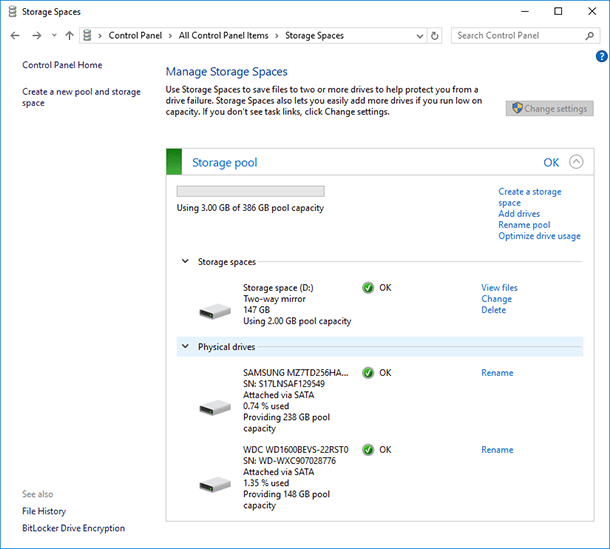
If the existing storage space consists of three or more physical disks, one of them can be removed. To do it, unfold the Physical Disks menu and click on “Prepare for removal” link next to the disk you want to remove. In our case, there is no such link as the storage space consists of two disks only.
After that, the system will take the data from the disk being deleted to the remaining two (or more) physical disks of the storage space. As a result, the link “Prepare for removal” will change into “Remove”.
The physical disk deleted from the storage space will become available in the Disk Management window. To enable further work with it, you may have to create a new partition there and format it.
Among other storage space management choices, there is an option to delete a storage space (it is on the right of the storage space name in Storage Spaces section). Please remember that all data from the deleted storage pool will be erased.
If you want to delete a storage space, the menu “Delete pool” will become active; by selecting it, you can delete the storage pool completely.
How to Recover Data from a Drive Within a Storage Space or Mirrored Volume
What to do if you face loss of data from a storage space? Can it be restored?

How to Recover Data After Formatting, Deleting or Creating Partitions in 2021 📁🔥⚕️
If one or several drives of a storage space fail, the process of data recovery from such storage space becomes very complicated and cannot be reduced to scanning every drive with data recovery software. In this case, data won’t be restored, or it will appear to be damaged.
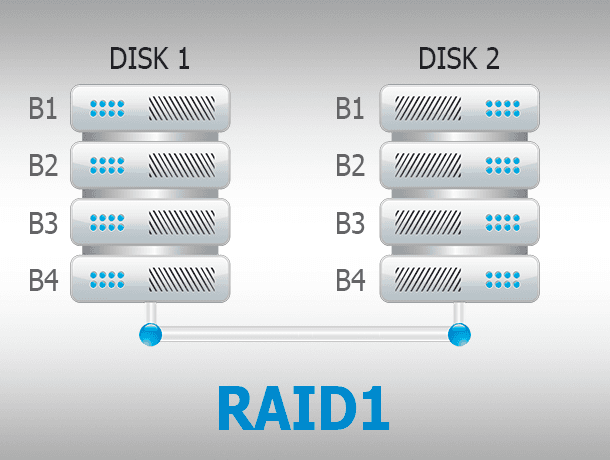
The only exception is a mirrored storage space which has been created as RAID-1, as such type of storage space creates a copy of all data on every drive.
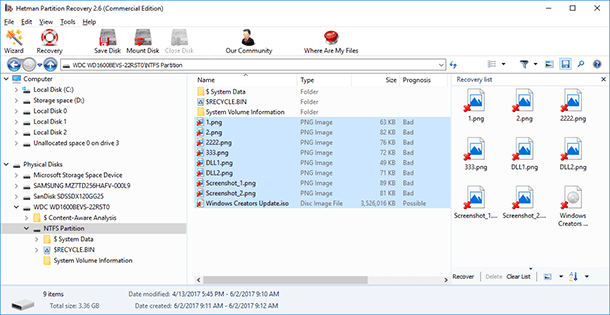
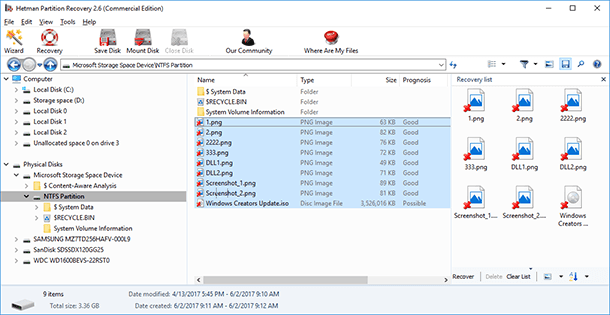
To do it, just scan the logical drive which represents the storage space with Hetman Partition Recovery.After that, find and restore lost files or folders in the same way as you do with any other drive.
How to Create a Mirrored Volume, Striped Volume or Spanned Volume in Windows 7 or Older Versions of Windows
As I said in the beginning of this video, the Storage Spaces function appeared in Windows beginning from Windows 8. However, this operating system had a function of creating storage spaces even in earlier versions. You can create a mirrored volume, striped volume or spanned volume in Windows 7 or older versions of Windows by using the menu Disk Management.
As Disk Management is also present in Windows 8 /10, you can create a storage space in the latest versions of Windows following this method.
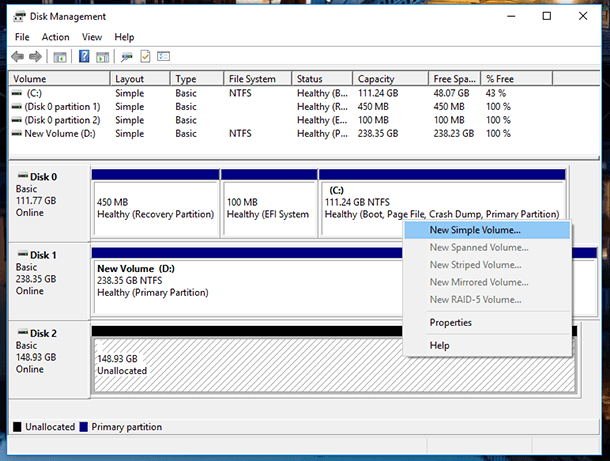
In order to create a storage space with the Disk Management menu, you need to have two or more drives connected to your computer, and these drives have to be unallocated. If the drive which you want to mirror is allocated, delete such volume. To do it, right-click on it and select “Delete Volume…” Please remember that it will delete all data from the drive.
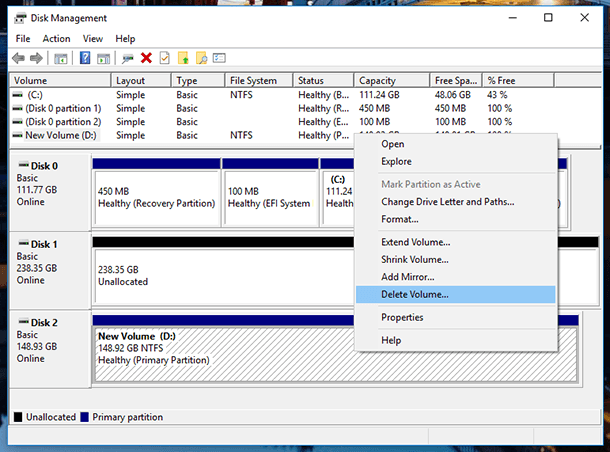
After that, right-click on the drive which you want to use for storage space, and select the type of new volume depending on your goals. These types are somewhat similar to resiliency types of disk storage that I have described in the first part of this video.
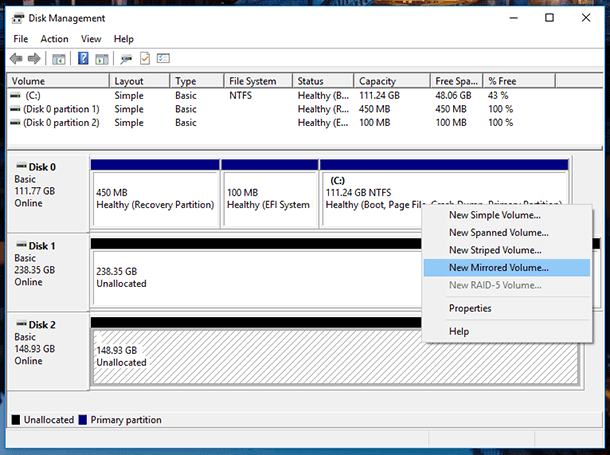
For example,
A Simple Volume is a part of the physical disk that operates as a separate physical block. It is nothing but an ordinary logical drive on a physical disk. It is not a storage space in the meaning that we use in this article.
A Spanned Volume unites the free space in two or more physical hard disks into one logical drive. It consists of at least two unallocated spaces in two hard disks that are combined into one unallocated space. If you create a spanned volume including 150 Gb from one hard disk and 250 Gb from another hard disk, in This PC folder you will see a local disk of 400 Gb. Spanned volumes have better performance than simple volumes, but their resiliency is the same. Creating a spanned volume can solve the problem with size of a local disk.
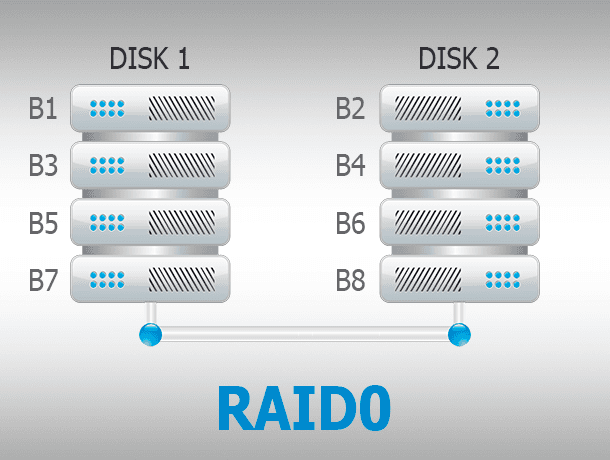
A Striped Volume is an array without redundancy. Data is broken into blocks and written to several disks at the same time. Failure of any disk results in the crash of such array. As this array is not redundant, there is no recovery procedure when one of the physical disks fails. Reliability of the set depends on reliability of every disk. Such array is meant for better performance rather than safe data storage.
A Mirrored Volume is the same as mirrored storage space. It is meant to keep data safe in case of a physical disk failure, by saving several copies of files. If one of the physical disks within a storage space fails, the copy of data will still exist on another disk where a copy was created. This type is good for storing important data in case of possible hardware failures.
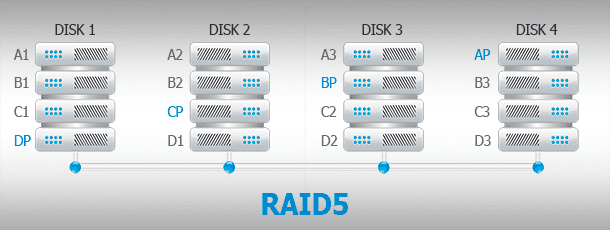
A RAID-5 Volume, as well as Parity storage space, is a cross between a simple and mirrored volume. Data is written to several physical disks, with one or two parity data files created. However, because of the need to compute checksums, parity spaces are noticeably slower to write data, and that is why they are recommended for storing data archives. For example, photo or video. Three or more disks are required to create it.
| Volume Type | Description | Advantages | Disadvantages |
|---|---|---|---|
| Simple Volume | Uses space from a single physical disk. | Easy to set up and manage. | No fault tolerance. |
| Spanned Volume | Combines space from multiple disks into one volume. | Increases disk space without disk replacement. | Data loss if any disk fails. |
| Striped Volume | Data is alternately written to multiple disks (RAID 0). | High performance. | No data protection, risk of data loss. |
| Mirrored Volume | Data is duplicated on two disks simultaneously (RAID 1). | High fault tolerance. | Reduced available disk space. |
| RAID-5 Volume | Data and parity are distributed across three or more disks. | Balance between fault tolerance and disk efficiency. | Slower write speeds, minimum of three disks required. |
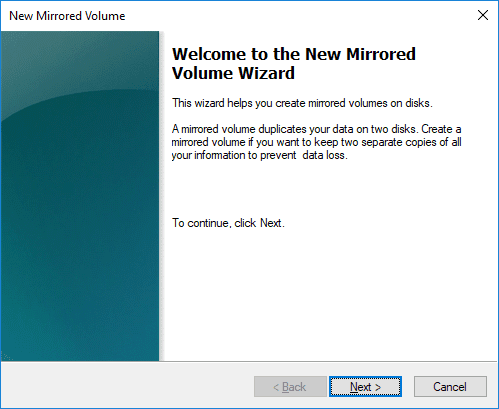
I select “New Mirrored Volume…” and click Next in the wizard window that appears.
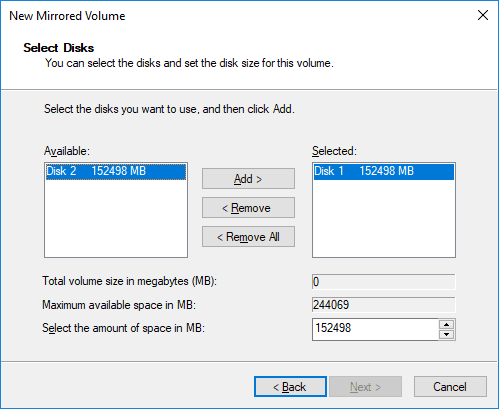
Choose the drive you want to add to the mirrored volume (that is, you select one more drive in addition to the one you have selected before) and click on Add / Next.
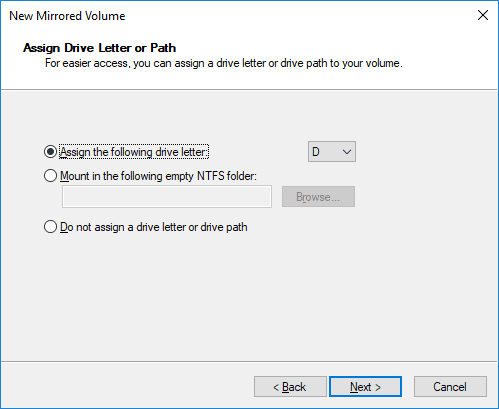
Choose the drive letter.
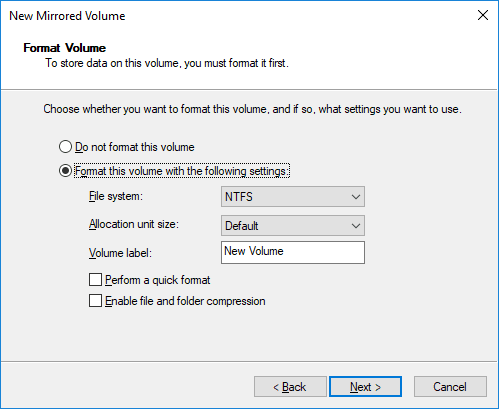
Assign a name to the volume and format it.
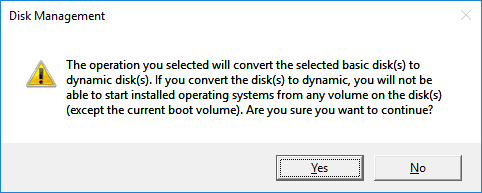
Before formatting starts, you will be warned that the basic drives will be converted to dynamic disks to create a mirrored volume.
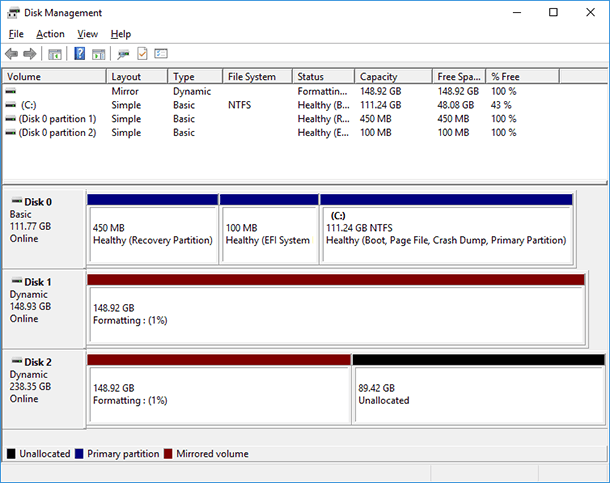
After that, formatting and converting the drives into a mirrored volume begins. In the Disk Management window, mirrored volume disks will be shown in brown color, and in This PC folder, as one of the local disks.

🏆 How to Recover a Crashed RAID 5EE After Controller Failure or Multiple Disk Failure 🏆


