Configure BitLocker Encryption: HDD or USB Drive in Windows
Learn how to configure BitLocker encryption for internal HDDs or external USB drives in Windows with our complete guide. BitLocker provides robust data protection by encrypting your drives, ensuring that your sensitive information remains secure from unauthorized access. In this comprehensive tutorial, we’ll walk you through step-by-step instructions and expert techniques to help you configure BitLocker encryption for both internal and external drives in Windows. From setting up encryption keys to managing recovery options, we’ll cover all the essential aspects to ensure your data stays safe. Don’t compromise on security—watch our guide and safeguard your data with BitLocker encryption today.
- Step 1. How to turn on BitLocker?
- Step 2. Use BitLocker without TPM
- Step 3. Select your unlock method
- Step 4. Save the recovery key to a safe place
- Step 5. Disk encryption and unlocking
- Questions and answers
- Comments

How to Encrypt System Disk C with BitLocker in Windows 10 Without TPM, Enable TPM 🤔🔐💻
Step 1. How to turn on BitLocker?
To work with BitLocker disk encryption software and BitLocker To Go, you will need a Professional or Enterprise edition of Windows 8, 8.1 or 10, or Windows 7 Ultimate edition. However, the kernel of Windows 8.1 includes the “Device Encryption” function for accessing encrypted devices.
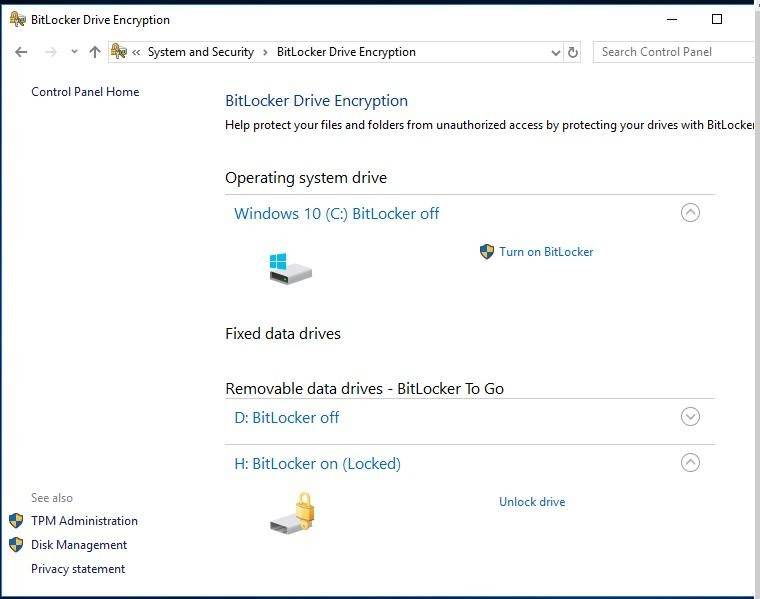
To enable BitLocker, open Control Panel and browse to System and Security / BitLocker Drive Encryption. Also, you can open Windows File Explorer, right-click on a disk and select “Turn on BitLocker.” If you don’t see this option, it means your version of Windows doesn’t support this feature.
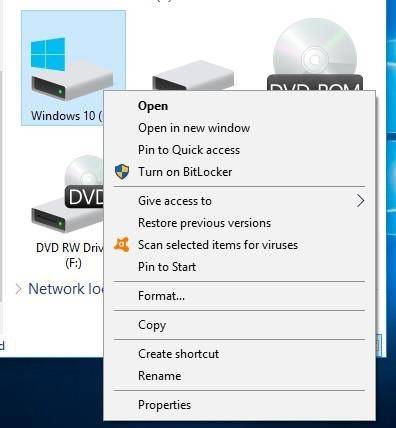
Click on the option “Turn on BitLocker” next to the system drive, any logical disk or removable disk to enable encryption. However, dynamic disks cannot be encrypted with BitLocker.
There are two encryption types available:
- For logical partitions. It allows encrypting any built-in non-removable disks, system or not. When the computer is turned on, the loader starts Windows from the System Reserved partition and suggests choosing a method to unlock – for example, using a password. After that, BitLocker decrypts the disk and starts Windows. The encryption / decryption process is on-the-go, and you can work with the computer in the same way as before encryption was enabled. You can also encrypt other disks in your computer as well – it is available not only the disk with the operating system. You will have to enter a password when you address such disk for the first time.
-
For removable devices: External media, such as USB drives and external hard disks, can be encrypted with BitLocker To Go. You’ll be suggested to enter a password to unlock the media when you connect it to the computer. Users who have no password won’t be able to access files stored in such media.
Step 2. Use BitLocker without TPM
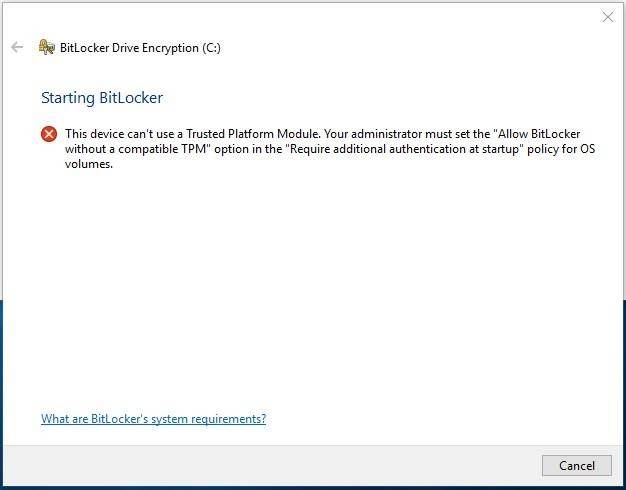
If your computer doesn’t have a Trusted Platform Module (TPM), then you will see this message when turning on BitLocker:
“This device cannot use a Trusted Platform Module. Your administrator must set the “Allow BitLocker without a compatible TPM” option in the “Require additional authentication at start-up” policy for OS volumes.
By default, encryption with BitLocker requires a TPM module to be available on your PC, to ensure security of the system drive. TPM is actually a microchip integrated into the computer’s motherboard. BitLocker can save the encryption key to the TPM, which is much safer than keeping it elsewhere on your hard disk. The TPM chip will only give you the encryption key only after checking the computer’s condition. This way, intruders can’t just steal the hard disk from your PC or create an image of the encrypted disk and then decrypt it on another computer.
| Parameter | Description |
|---|---|
| Name | Trusted Platform Module (TPM) |
| Main Purpose | Hardware-level protection for ensuring data security, authentication, and encryption. |
| Main Functions |
– Storage of cryptographic keys – Generation of random numbers – Security for biometric authentication – Disk encryption (BitLocker) – Support for Secure Boot |
| Versions |
– TPM 1.2: basic security functions – TPM 2.0: enhanced performance, support for modern algorithms |
| Compatibility |
– Operating Systems: Windows 10, Windows 11, Linux, MacOS – Compatible Devices: most modern motherboards and laptops |
| Advantages |
– Increased data security – Protection against hacking and data theft – Ensures trusted system boot |
| Disadvantages |
– Requires hardware-level support – Potential compatibility issues in older systems |
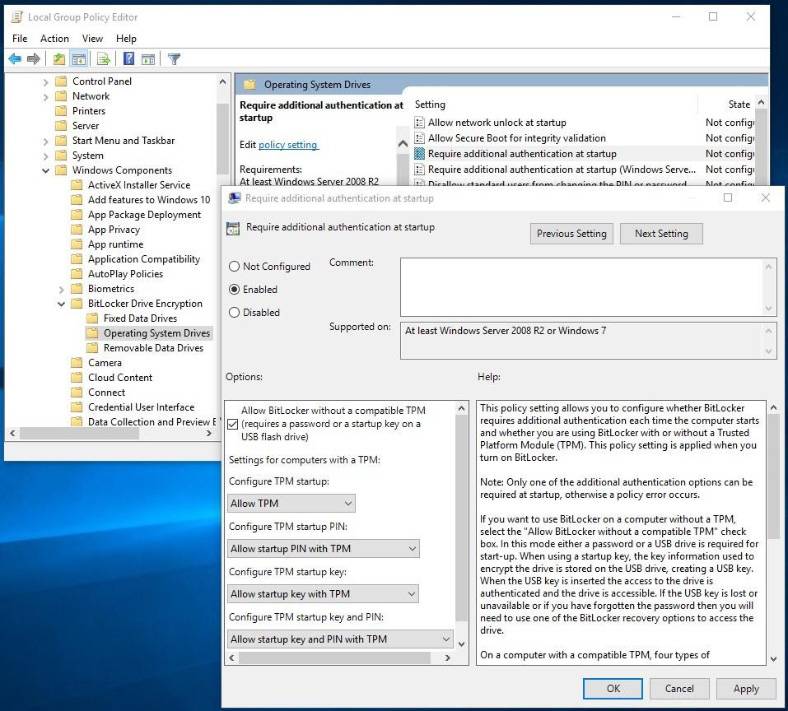
To enable drive encryption without a TPM chip, you need to have administrator’s rights. Open the Local Group Policy Editor and change some settings.
Open the Run window by pressing the Windows + R shortcut, type the command gpedit.msc and press Enter. In the Local Group Policy Editor, go to Computer Configuration / Administrative Templates / Windows Components / BitLocker Drive Encryption / Operating System Drives. Double-click on Require additional authentication at startup. Change the setting to Enabled and make sure the box is checked for Allow BitLocker without a compatible TPM, then click OK to save the changes.
gpedit.msc
Step 3. Select your unlock method
After that, it’s time to decide how to unlock the disk at startup. You can choose from several options. If your computer doesn’t have a TPM, the disk can be unlocked by entering a password or inserting a special USB drive that would act as a hardware key.
If your computer does have a TPM chip, there will be more options to explore. For example, automatic unlocking at startup. The computer will address the TPM for the password and then decrypt the disk automatically.
To improve security, you can enable PIN code at startup. The PIN will be used for reliable encryption of the key which is stored in the TPM.
Select your preferred unlocking method and follow directions for further setup.
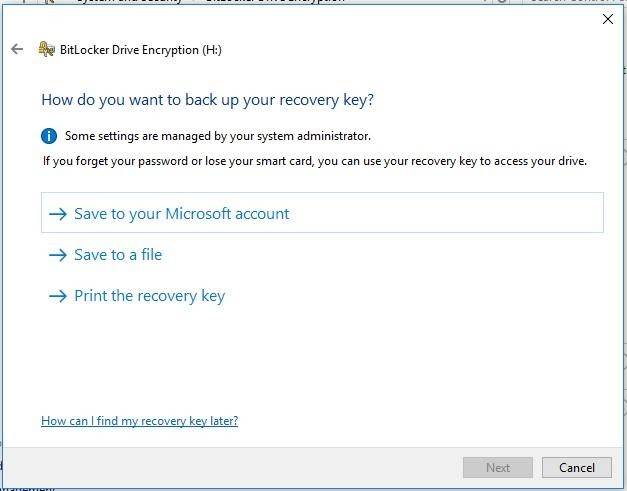
Step 4. Save the recovery key to a safe place
Before encrypting the disk, BitLocker will give you a recovery key. This key will decrypt an encrypted disk if the password is lost. For example, if you happen to lose the password or the USB drive used as the hardware key, or if the TPM stops working suddenly and so on.
You can save the key to a file, print it and keep with other important documents, save it to a USB drive, or upload it to your Microsoft account. If you save your recovery key to your Microsoft account, you’ll be able to access it later by following this link – https://account.microsoft.com/devices/recoverykey?refd=onedrive.live.com.
Make sure you are going to keep this key in a safe place - if anyone gets it, they will be able to decrypt the disk and get access to your files. It is reasonable to have several copies of the key and keep them in different places - if you have no key and something happens to your main unlock method, your encrypted files will be lost forever.
Step 5. Disk encryption and unlocking
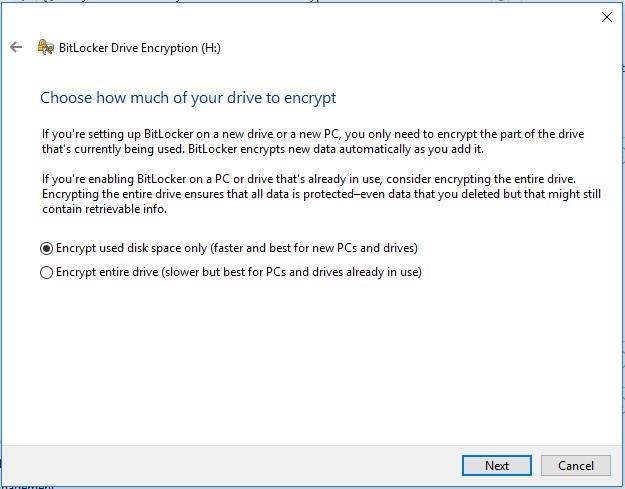
After BitLocker is turned on, it will automatically encrypt new files as they are created or modified, but you can choose what to do with the files that already exist on your hard disk. You can encrypt used space only or encrypt the entire drive. Encrypting the entire drive takes much longer but it will protect you against recovering deleted files. If you are setting up BitLocker on a new computer, then encrypt used space only - it will be faster. If you are configuring BitLocker on a computer you have been using before, you should encrypt the entire disk.
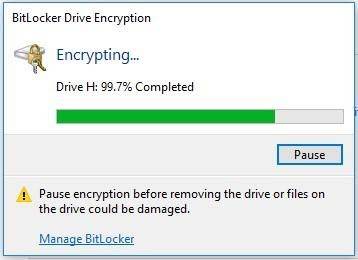
You will be suggested to run the BitLocker check and restart the PC. When it restarts, the disk will be encrypted for the first time. In the system tray, the BitLocker icon appears, so click on it to see the progress. You can use the computer while the process is running, but encryption will make it slower.
When the PC restarts, you will see the field to enter the BitLocker password, PIN or the suggestion to insert a USB key.
Press Escape if you can’t unlock the disk. You will be suggested to enter the recovery key.
If you selected removable drive encryption with BitLocker To Go, you will see a similar wizard, but the drive can be encrypted without the need to reboot your PC. Make sure not to disconnect the removable drive during the encryption.
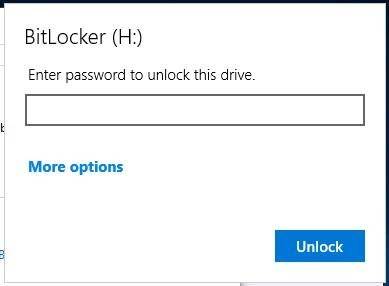
When you plug the encrypted USB flash drive or external storage into the computer, you will need to enter a password to unlock it. After the disk is encrypted, there will be a special icon shown on the disk in Windows Explorer.
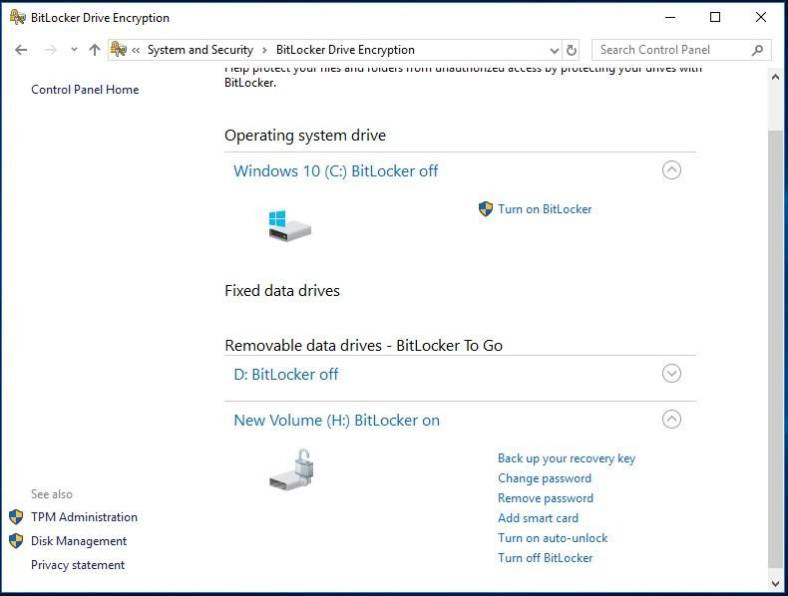
You can manage protected disks in the BitLocker control panel - change passwords, disable BitLocker, back up the recovery key and much more. Right-click on the encrypted disk and choose Manage BitLocker to go to Control Panel.
As any encryption process, BitLocker is quite resource-intensive. The official Microsoft data on BitLocker says that usually, the extra load is less than 10%. If you work with important documents and encryption is a must, this will still be an acceptable point of equilibrium between security and performance.

How to Encrypt a USB Disk with BitLocker, Unlocking with Password or Recovery Key 🔐💻⚕️


