Change Windows 10 Display Language: No Reinstallation Needed
Learn how to change the display language in Windows 10 without reinstalling the operating system with our step-by-step guide. Whether you’re looking to use your preferred language or accommodate multilingual users, changing the display language can enhance your Windows experience. In this comprehensive tutorial, we’ll walk you through the process of changing the display language in Windows 10 without the need for reinstalling the OS. From accessing language settings to installing language packs, we’ll cover all the essential steps to help you personalize your Windows experience effortlessly. Don’t let language barriers limit your productivity—watch our guide and unlock a world of possibilities with Windows 10.

In Windows 10, people usually choose the preferred language for the entire operating system when they install it. However, if the language settings were wrong, or people have to use computing devices with certain language preferences, there are some settings to be modified in order to bring them in line with your personal likings.
So if you ever need to change language preferences in Windows 10, this can be done in a quick and easy way with the help of the Settings app and without having to reinstall the operating system.
In today’s article, we will show you how to change the default display language into any other, including doing it for new and existing user accounts.

How to Add a Language, Change Shortcuts or Display Language in Windows 10, 8 or 7 🇺🇸 🇪🇸 🇺🇦
How to change the default display language in Windows 10?
If you have to move to a different region or you need to use a display language different from the default choice, or the initial language settings for the computing device have been wrong, there is absolutely no point in reinstalling Windows 10. All you need is to modify a couple of system settings to enjoy the experience of using your operating system in the right language.
Method 1. Disable language synchronization
If you are using a Microsoft account, the language settings will apply to all devices linked to such account. If you plan to change regional and language settings for one computer only, you need to disable synchronization of such settings before you proceed.
This is how you disable language sync in Windows 10.
-
Open the main system application, Settings. You can do it in any way you prefer. For example, click on the Start button in the lower left corner of your desktop, on the Taskbar, and open the main Windows menu. Use the scroll bar or the mouse wheel to search the list of all programs and applications installed on this computer and find the line Settings, or click on the Settings button in the left side of the user menu, and the application will open.

-
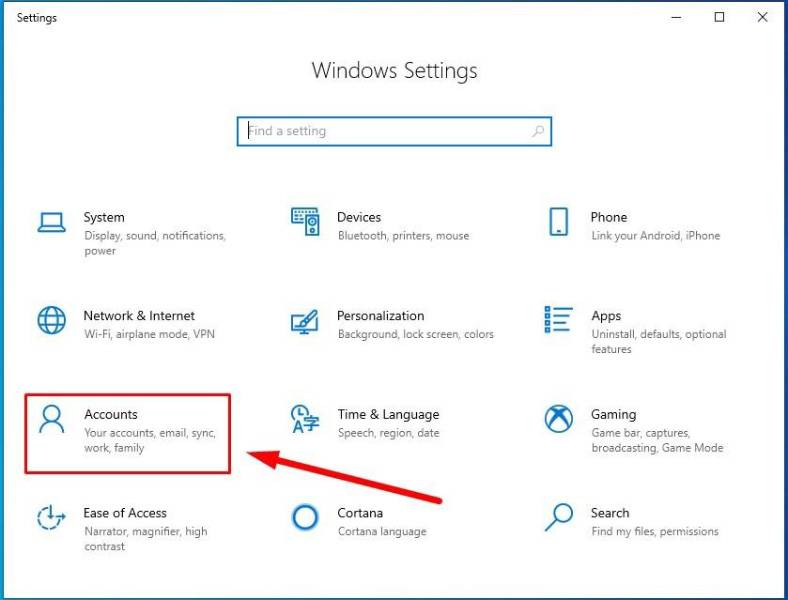
In the main Settings window, scroll down if necessary and choose the tab Accounts.
-
In the left panel, go to Sync your settings.
-
In the right panel, find the section Individual sync settings and the line Language preferences, then set the slider to the Off position (disabled).
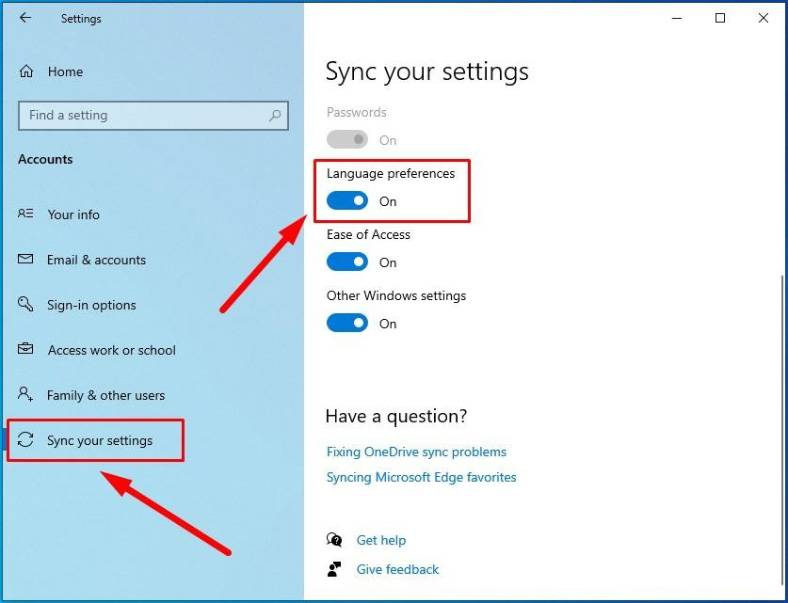
When these steps are taken, you can start changing language settings for the copy of Windows 10 installed on this computer, without worrying that this can affect similar settings in other linked devices.
Method 2. The steps to take if you want to change the display language
To change the display language of your Windows 10, you should close all running applications and do what is described below.
-
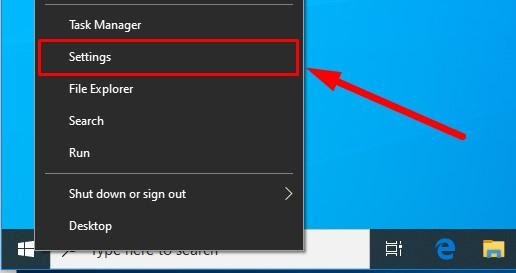
Use any method you prefer to open the Settings application. For example, right-click on the Start button that you can find on the Taskbar, in the left lower corner of the desktop, or press the key sequence Windows + X instead to open the context menu, and select the line Settings. The application will start immediately.
-
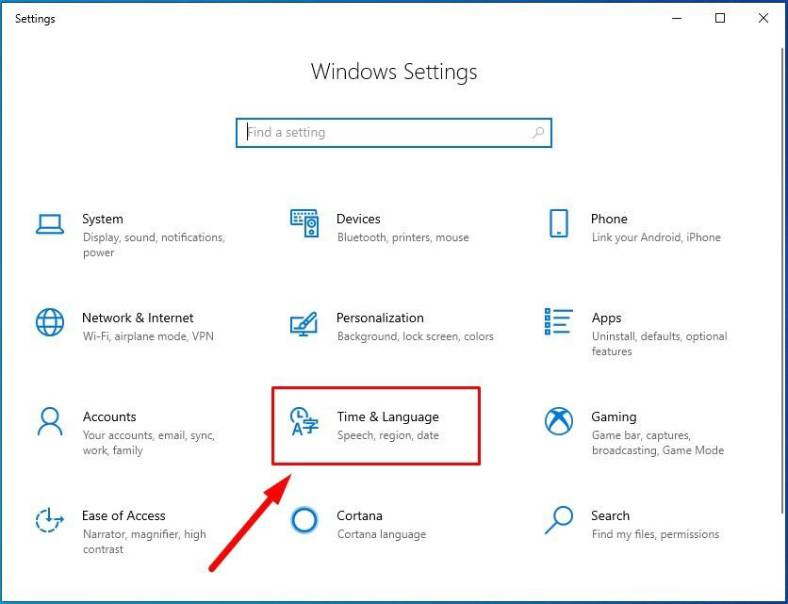
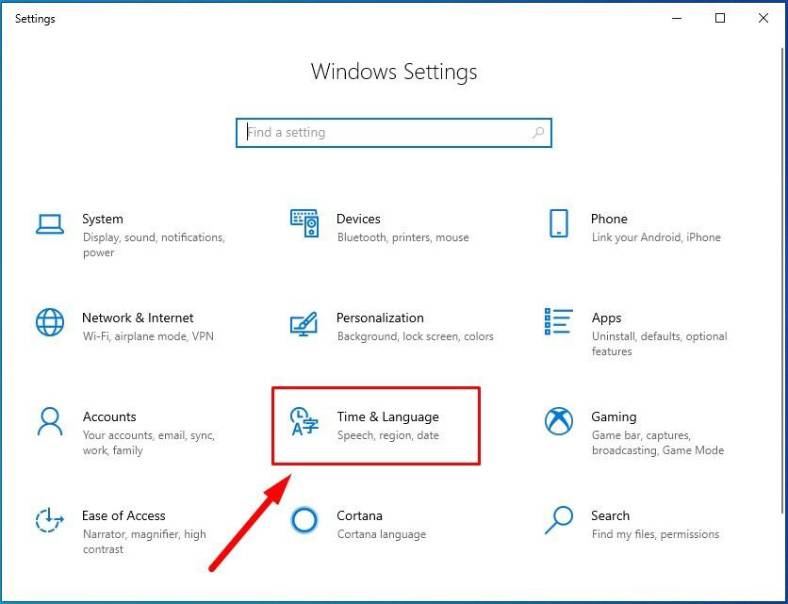
Use the scroll bar or the mouse wheel to navigate the Settings window, and find the tab Time and language.
-
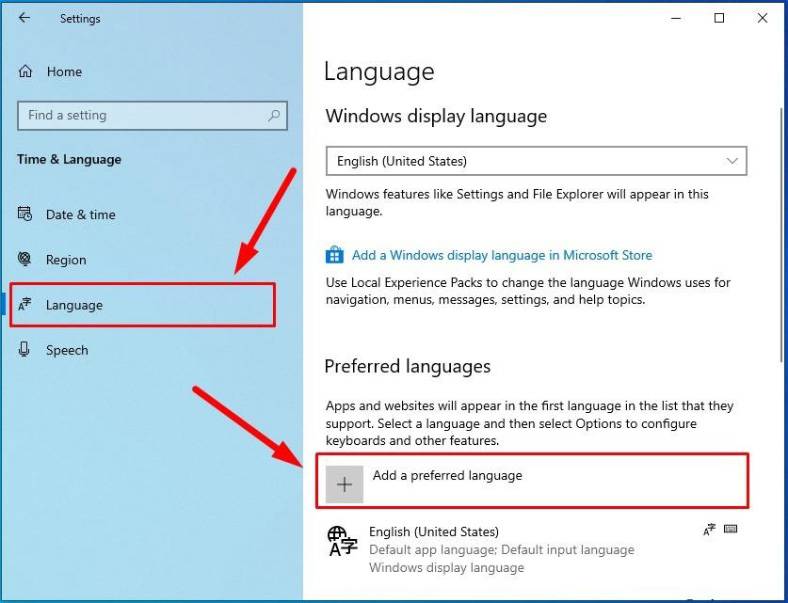
In the left panel, go to Language.
-
Now look to the right and find the section Preferred languages, where you can prioritize language settings, and click on the button Add a preferred language, with a + (plus) symbol on it.
-
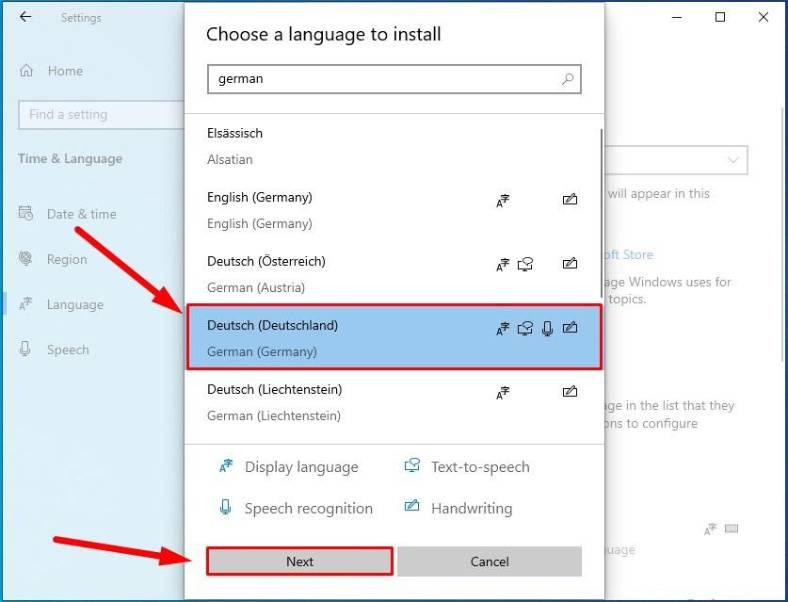
In the new window Choose a language to install use the scroll bar or the mouse wheel to find the language you need, or start typing its name in the search field above.
-
Choose the language pack you are planning to use in Windows 10 from the list.
-
When the language is chosen, hit Next.
-
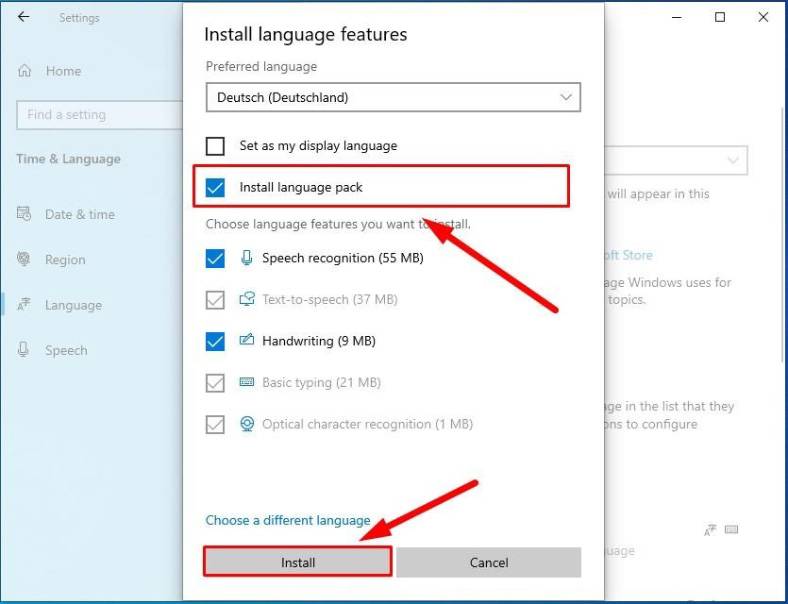
In the next page Install language features check the box for Install language pack to confirm your choice (the box with the tick will become blue, i.e. active).
-
Click Install below.
Changes will take effect after the language package is installed, which usually takes several minutes only. In some cases, restarting your Windows 10 may be required, and then the corresponding language settings will apply to all system elements. The changes will affect the sign-in screen, the Settings app, Windows Explorer, desktop, all applications, preferred browsers and websites you visit. From now on, they will use the new language by default. Besides, Windows 10 may suggest reviewing your current privacy settings.
Method 3. Changing region settings
If you change the display language for Windows 10 because you move to a different region, then regional settings should be modified too.
Changing them in Windows 10 is easy enough: just follow the steps below.
-
Open the main system application, Settings, using any way you prefer. For example, press the keyboard shortcut Windows + I to access the app directly.
-
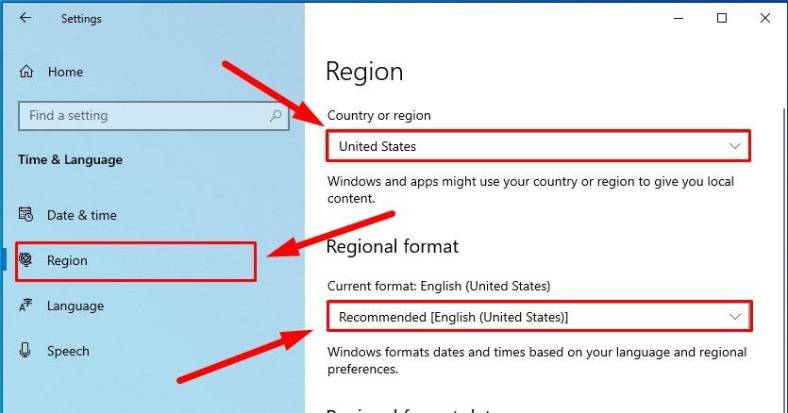
In the main window of the Settings app, find and select the tab Time and language.
-
In the left panel, select Region.
-
In the right panel, find the section Region and use the nested menu Country or region to specify your new location if it differs from the current settings.
-
In the section Regional format use another nested menu to select proper formats to display date and time in Windows, if these differ for your time and region.
-
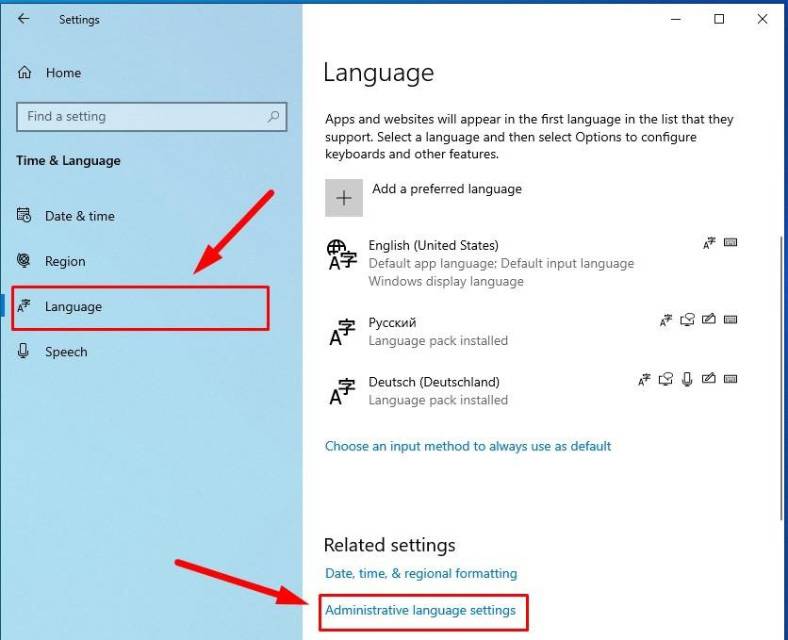
Now look at the left panel and jump to the tab Language again.
-
Use the scroll bar or the mouse wheel to find the section Related settings and click on the link Administrative language settings.
-
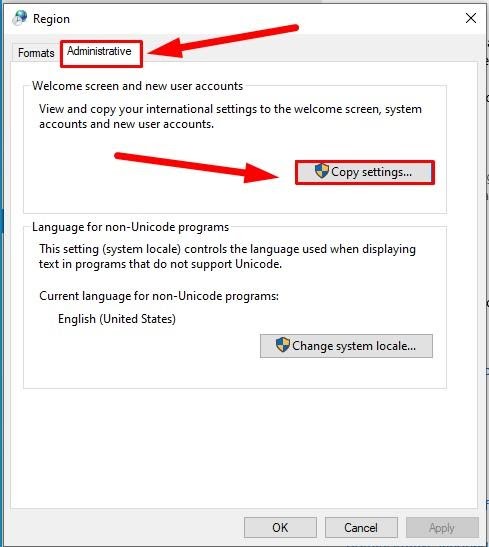
In the new pop-up Region window, jump to the tab Administrative and in the section Welcome screen and new user accounts hit the button Copy settings.
-
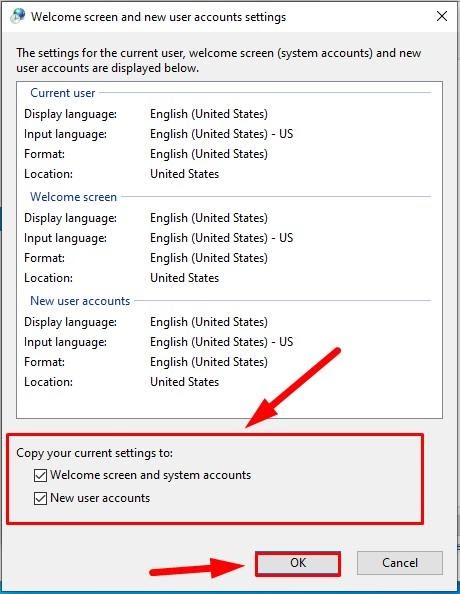
The new window will show you corresponding screen and account settings. In the section Copy your current settings to check the boxes for each option: Welcome screen and system accounts and New user accounts.
-
Click ОК.
-
Click ОК one more time, and then restart the computer.
After all these steps, your computer will display proper regional settings specified according to your physical location.
Most of the time, people don’t change or install additional languages regularly for their personal needs. This opportunity to change language packs quickly is more often required in small or large companies that need to deal with customers having various language preferences.
Besides, this option would be useful for people who have to move to a different region and would like their regional settings to comply. Another scenario is buying a computer from another country when the required configuration is not available locally.
Also, you should remember that modifying language settings may disable some functions like Cortana because this service is not supported in certain regions.
Conclusion
Preferred display language is one of the easily customizable things in the operating system. If you ever need to change the language settings, use one of the methods described here to replace the language pack currently used by Windows 10 without having to reinstall it.


