How to Add DNS Records – SPF, DKIM, DMARC – and Configure POP3 and IMAP4 Mail Protocols
In the previous article on this topic, we explored how to install Exchange Server and how to configure it for running a mail server. And in today’s article, we’ll describe how to make sure that your emails reach their recipients instead of ending up in the Spam folder, and how to set up POP3 and IMAP4 mail protocols.
- Step 1. How to create an SPF record
- Step 2. How to create a DKIM record
- Step 3. How to add a DMARC record
- Step 4. How to configure IMAP and POP3 mail services in Exchange Server
- Step 5. Checking POP3 and IMAP services
- Errors
- Conclusion
- Questions and answers
- Comments
You need to add SPF, DKIM and DMARC records to your DNS hosting so that your emails go all the way to their recipients, pass all filters and don’t get classified as spam.
SPF, DKIM and DMARC are essential settings that must be changed before starting a mail server. These records prevent fraudsters from sending harmful mail on your behalf, and if they are absent, messages may never reach their recipients.

How to Add DNS Records - SPF, DKIM, DMARC - and Configure POP3 and IMAP4 Mail Protocols
Step 1. How to create an SPF record
An SPF (Sender Policy Framework) record ensures a kind of mutual understanding between the sender’s and the recipient’s mail servers. It contains information about the mail servers that are allowed to send mail on your behalf.
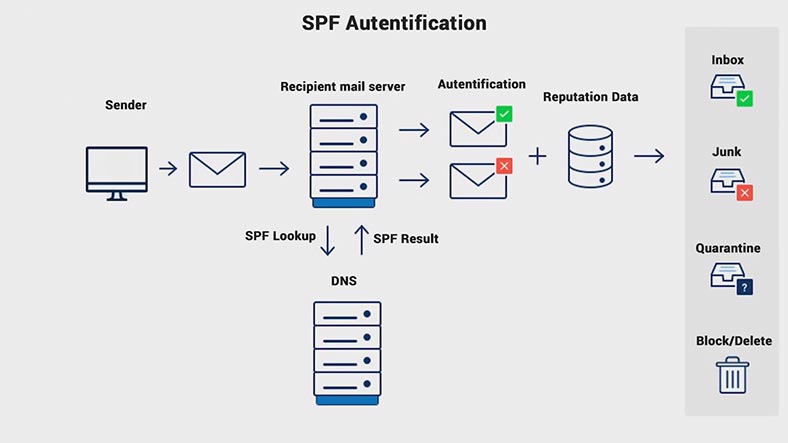
When an SPF record is missing, many mail services can just send all mail received from mailboxes within a certain domain into the spam folder, regardless of the mail contents. An SPF record is published on DNS servers that service a certain domain.
Go to control panel of your DNS hosting, and create the following .txt record by filling in all these fields. The record contains such keys as: the SPF version, the domain IP address (v=spf1 — SPF version).
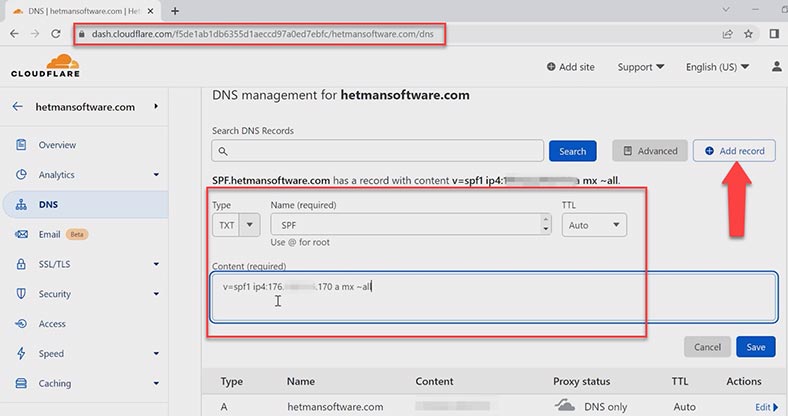
- The key – a — sets the rules for s specific domain by comparing the IP address of the sender with the IP address specified in the A-records of the domain.
- mx — contains all server addresses specified in MX records of the domain.
- The twiddle symbol ~ is a deviation. The mail will be accepted but marked a spam.
- all — means all addresses which are not specified in the record.
You will be able to add additional tags later, but for now, just click Save.
Parameters that define behavior for these keys:
| Parameter | Description |
|---|---|
| + | The parameter to accept mail (Pass). It is set by default if others are absent. |
| – | Reject (Fail). Mail won’t be accepted. |
| ~ | Soft rejection (SoftFail). The mail will be accepted but marked as spam. |
| ? | Neutral sender acceptance. |
Keys to determine nodes:
| Rule | Description |
|---|---|
| mx | Contains all server addresses specified in MX records of the domain. |
| ip4 | Gives specific IP addresses. |
| ptr | Checking PTR record for availability of the specified domain. |
| exists | Testing the domain’s operability. This test may deliver positive results even for addresses like 127.0.0.1, which makes it a doubtful method. |
| a | Sets the rules for a specific domain by comparing the sender’s IP address with the one in the A-records of the domain. |
| include | Uses permitted nodes specified in SPF records of another domain. |
| redirect | This rule indicates that the SPF policy for this domain is specified in another domain, similar to “include” but ignoring the current domain’s records. |
| all | Refers to all addresses that are not specified in the record. |
Step 2. How to create a DKIM record
The second level of protection when data is transmitted between mail servers is DKIM (DomainKeys Identified Mail). It helps to add a digital signature to all outgoing emails. The recipient uses this signature to verify incoming emails.
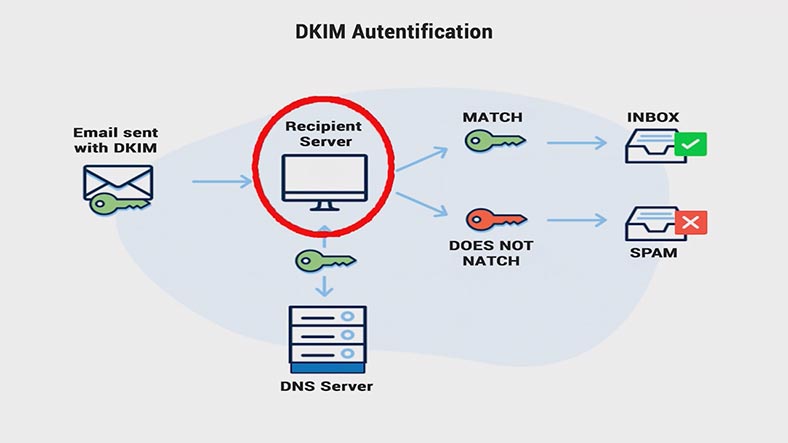
The recipient’s email server sends a DNS request and receives a public key which is placed into the DNS record. This key is then used to verify the email. If the keys match, the email is delivered to the recipient; otherwise, it is sent to the Spam folder.
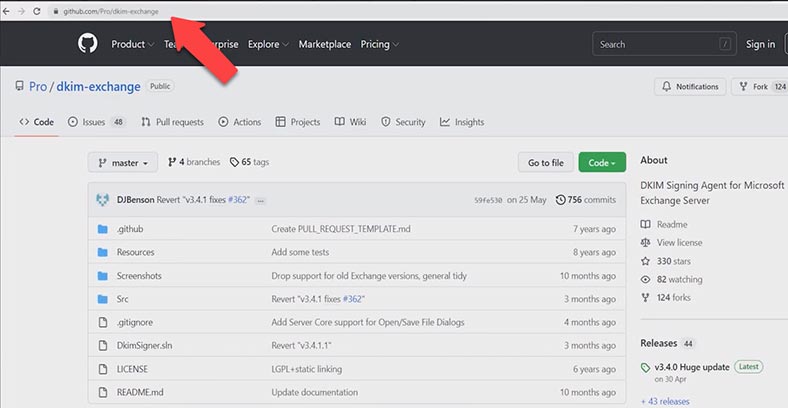
By default, MS Exchange Server doesn’t support DKIM. To configure it, you need to install a third-party transport agent onto Exchange – Exchange DKIM Signer.
https://github.com/Pro/dkim-exchange/releases/tag/v3.4.0
https://www.collaborationpro.com/exchange-2016-2019-implementing-dkim/
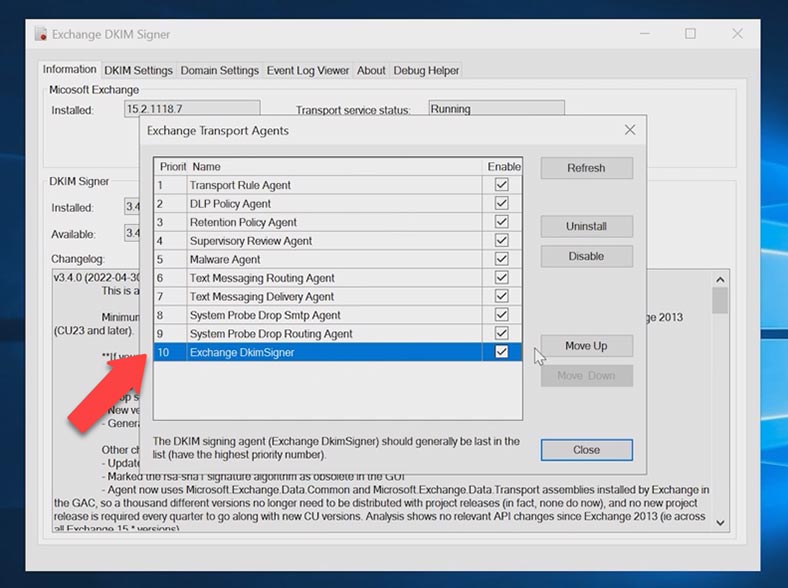
After the installation, it needs to be configured. Start the application, and in the window that opens, click Configure, then make sure that the agent – Exchange DKIM Signer – has the lowest priority (that is, placed at the bottom of the list). This requirement is important, so that emails are signed at the last stage, after all possible changes made by other transport agents.
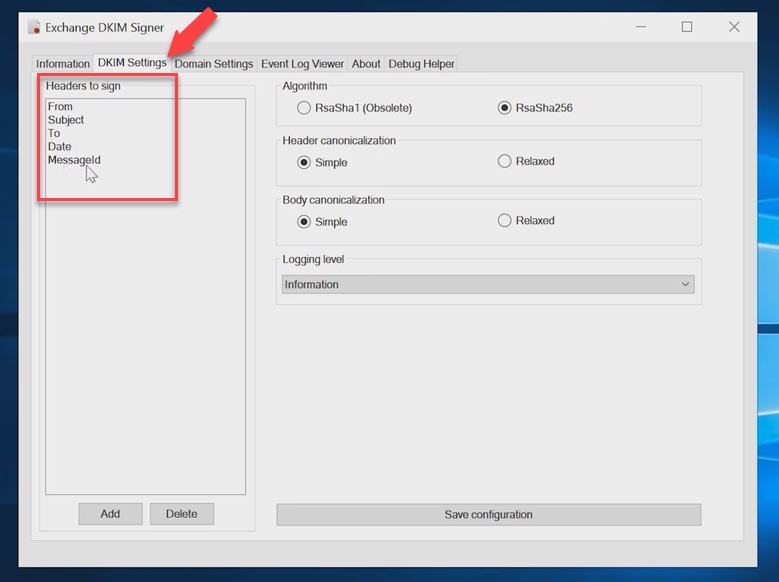
In the tab entitled DKIM Settings you can see which fields will be signed. By default, they include: From, Subject, To, Date, Message-ID.
Domain parameters are configured in the Domain Settings tab. To add a domain, click Add, give the domain name and selector (that is, the DNS record name). This is where you can either generate a new key or specify its location. To create a public key, click Generate new key and it will appear in this window.
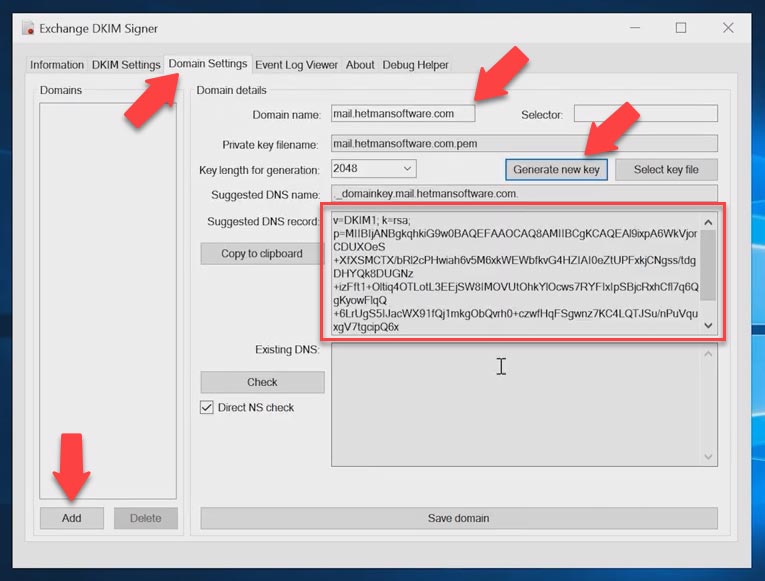
After that, go to the domain hosting control panel, create a .txt record with such name, and paste your public key into the Content field. After the settings are configured, click Save domain. The settings will apply automatically.
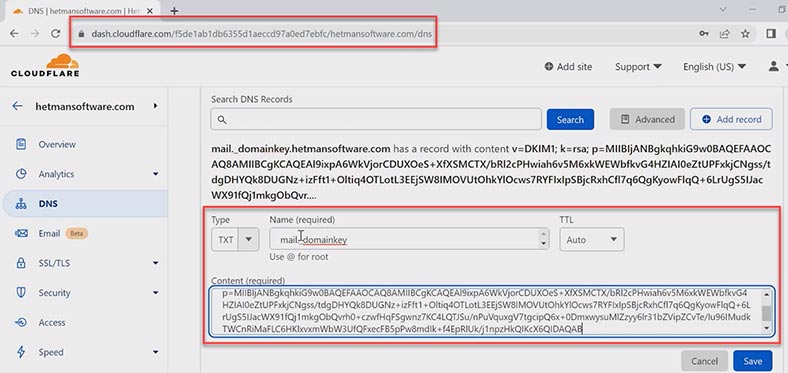
Step 3. How to add a DMARC record
Finally, let’s find out what is DMARC (Domain-based Message Authentication, Reporting and Conformance). It’s the level of protection that comes after SPF and DKIM. This record determines how to handle emails which have failed verification with SPF and DKIM. This is also the rule which is set for emails sent on your behalf.
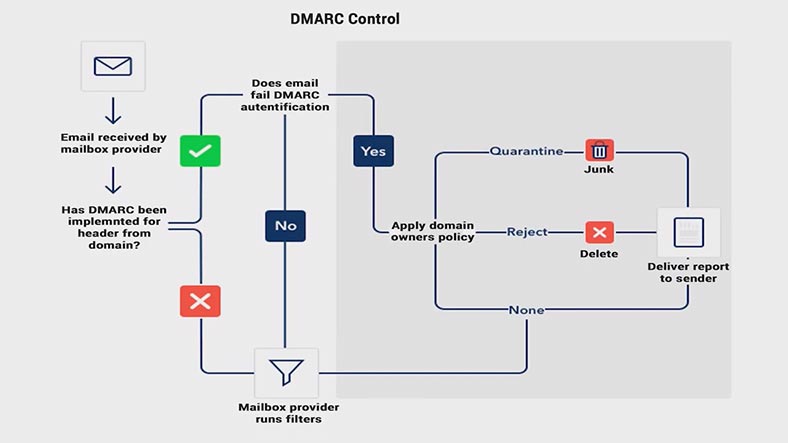
Before adding DMARC, it is important to make sure that SPF and DKIM are configured in a correct manner, otherwise it may result in filtering your own outgoing emails. To configure DMARC, go to the control panel of your DNS hosting and create a .txt record like this – _dmarc.
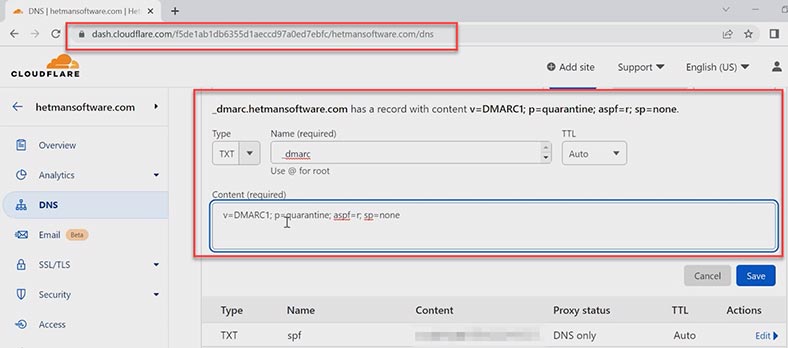
As the minimum requirement, it should include the mechanism version and the policy. During initial configuration, it is recommended to set the policy as none (it means “do nothing, just send a report”).
Later, you’ll be able to tighten your security by changing the record and adding more tags.
| Tag | Description |
|---|---|
| v | DMARC version. |
| p |
The rule for the domain. It can have one of the following values:
|
| sp | The rule for subdomains. It can take the same values as p. |
| aspf and adkim |
Allow checking compliance with SPF and DKIM. They can have one of the following values:
|
| pct | The number of emails to be filtered, in percentage. |
| ruf | It determines the mail address to which reports about mail failing DMARC test should be sent. |
| fo |
It determines the conditions of report generation. It can have one of the following values:
|
Now that we’re finished with the email setup, you can check how it works by sending a test email from your mailbox.
Step 4. How to configure IMAP and POP3 mail services in Exchange Server
Now let’s move on to configure POP3 and IMAP4 mail services. By default, POP3 and IMAP4 mail services are disabled for Exchange Server. To configure client connections by IMAP and POP3, you need to start them and enable automatic startup.
Open Services, find the service with the name Microsoft Exchange IMAP4, set its startup type to Automatic and start the service, then click Apply and OK.
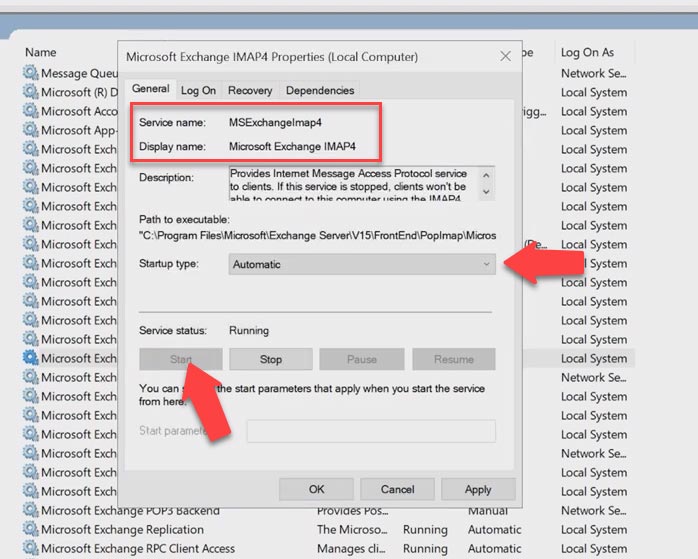
After that, perform the same actions for the following services: Microsoft Exchange IMAP4 Backend, Microsoft Exchange POP3 and Microsoft Exchange POP3 Backend. After the services are started, you need to configure the certificate. Open Exchange Admin Center and go to Servers – Certificates.
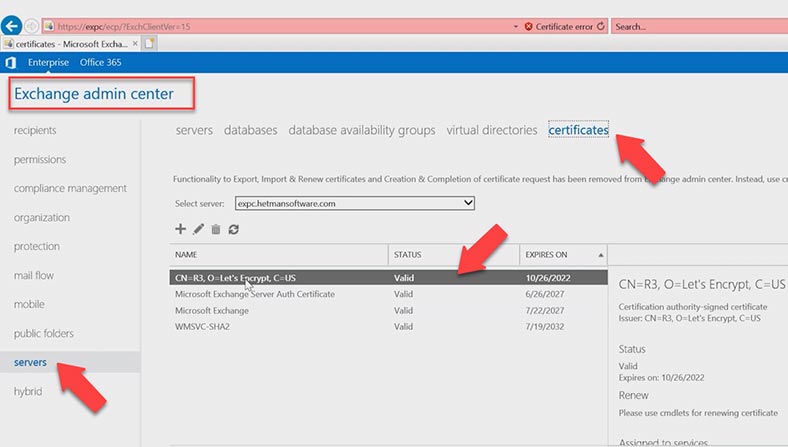
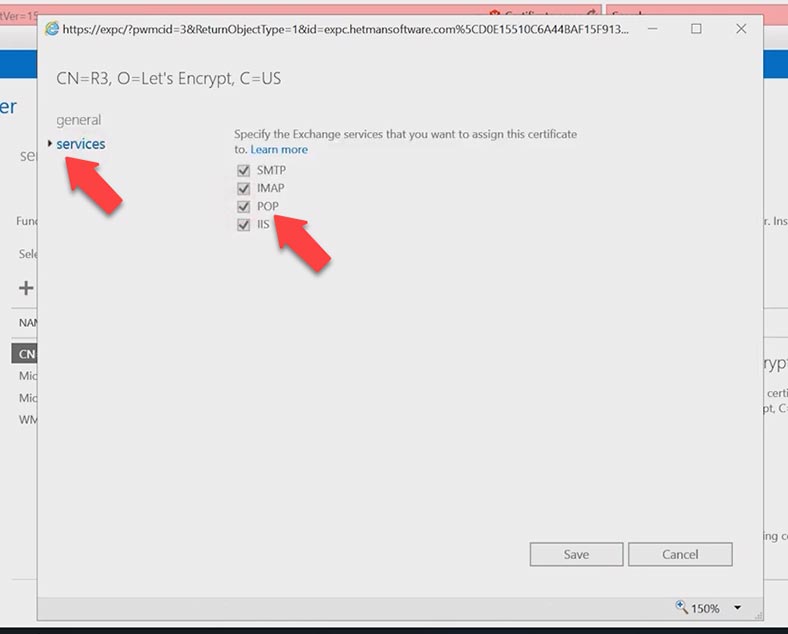
Open the SSL certificate by double-clicking on it, jump to the Services tab and check the boxes next to IMAP and POP, and click Save.
Now you need to connect the domain to POP3 and IMAP services.
Open Start – Microsoft Exchange IMAP4, Exchange Management Shell and run this command:
Type the first command for POP3 service, and remember to specify the external domain: port 995 and SSL, then the domain with port 110, and the certificate name at the end. Open the certificate in the Admin Center and copy its name.
Set-PopSettings -ExternalConnectionSettings “mail.hetmansoftware.com:995:SSL”,“mail.hetmansoftware.com:110:TLS” -x509CertificateName hetmansoftware.com
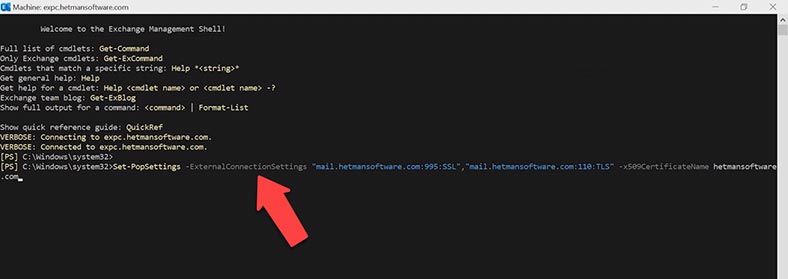
After you run the command, restart POP3 service: in the service window, right-click on the service and choose Restart. Then do the same to the other service, POP3 backend.
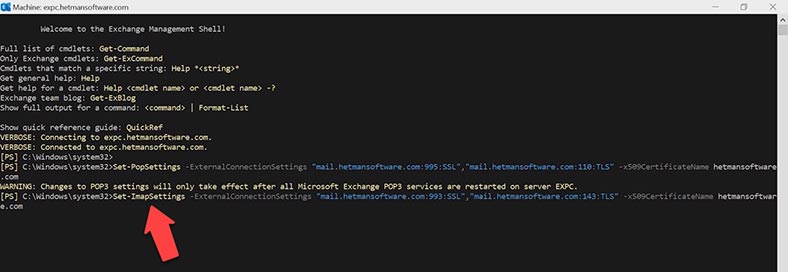
After that, run one more command to connect the IMAP service.
Set-ImapSettings -ExternalConnectionSettings “mail.hetmansoftware.com:993:SSL”,“mail.hetmansoftware.com:143:TLS” -x509CertificateName hetmansoftware.com
Then restart the services, IMAP and IMAP backend.
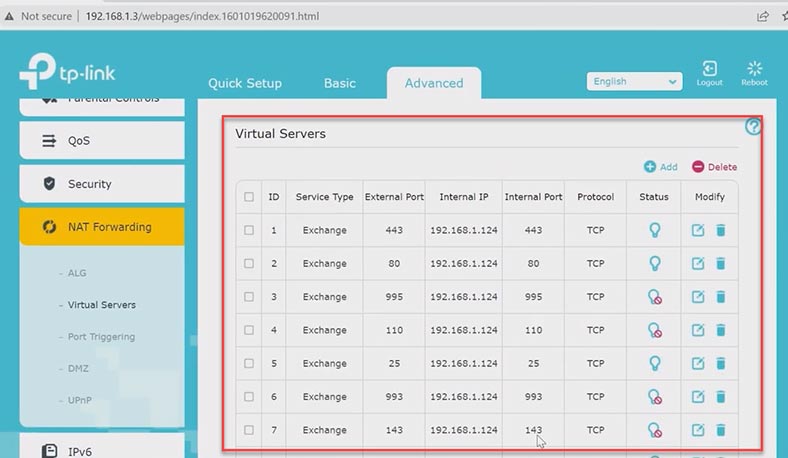
At the next stage, you should check if the following ports are open for these services in your network, and open them if necessary: 995, 993, 110 and 143. Access the network settings and open these ports for Exchange Server.
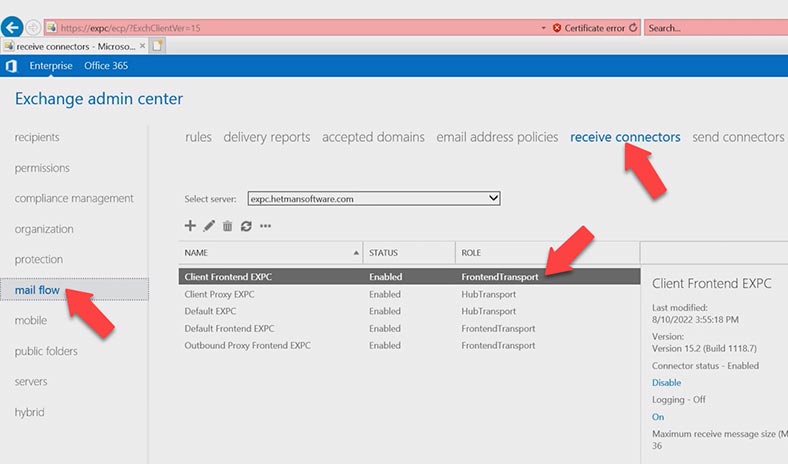
The next thing to do is to modify the receive connector options. In the admin panel, go to Mail flow – receive connectors – Client Frontend exchange.
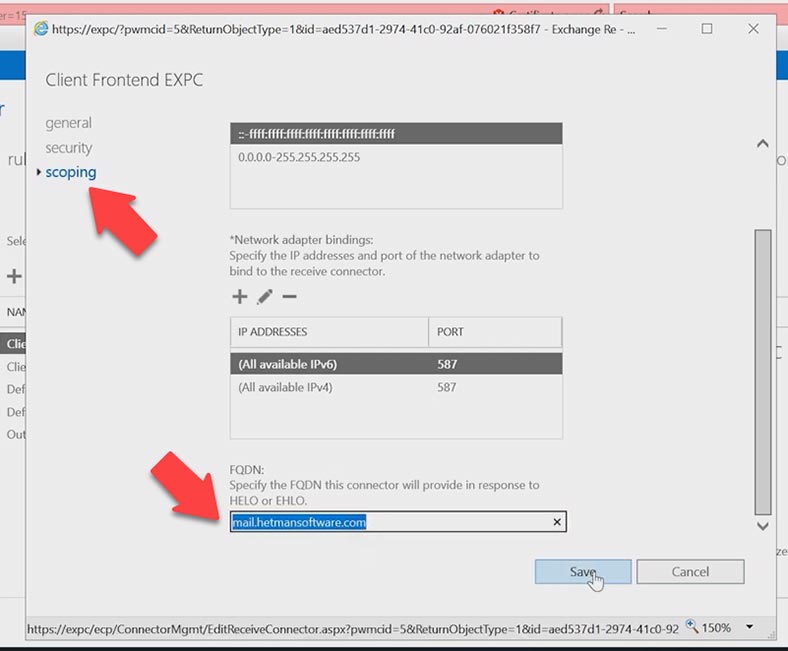
Open the scoping tab, FQDN – change the domain from internal to external – mail.hetmansoftware.com. and click Save.
After that, you should specify the certificate which will be used to encrypt SMTP connections. First of all, you need to know the ID of the certificate that you want to bind to the services.
Open Exchange Shell and run this command:
Get-exchangecertificate
Copy the certificate value – Thumbprint.
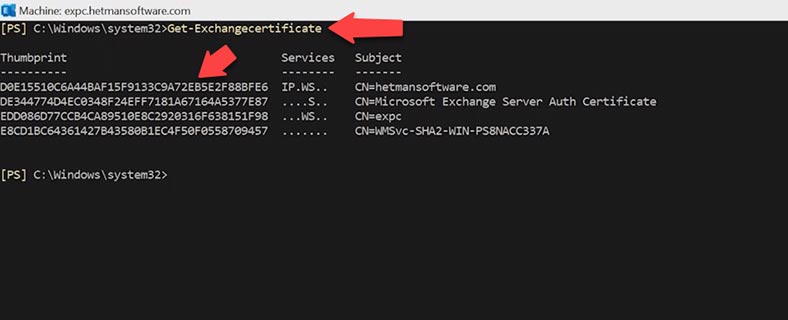
Then specify the certificate used to encrypt SMTP-authenticated client connections. This requires three commands to be used.
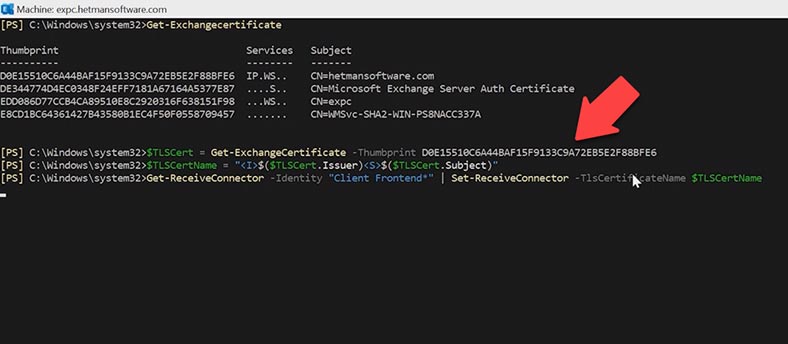
Run the first command:
$TLSCert = Get-ExchangeCertificate -Thumbprint <ThumbprintValue>
and add the certificate value at the end.
Then, the second command:
$TLSCertName = "<I>$($TLSCert.Issuer)<S>$($TLSCert.Subject)"
And the third command:
Get-ReceiveConnector -Identity "Client Frontend*" | Set-ReceiveConnector -TlsCertificateName $TLSCertName
To make sure that you have given the certificate that is used to encrypt SMTP-authenticated client connections, run another command:
Get-ReceiveConnector -Identity "Client Frontend*" | Format-List Name,Fqdn,TlsCertificateName
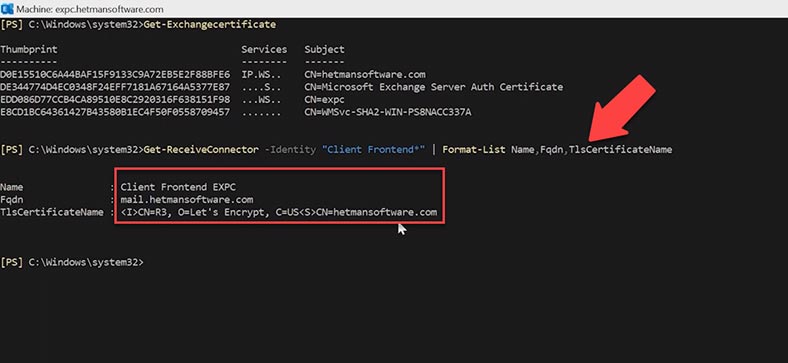
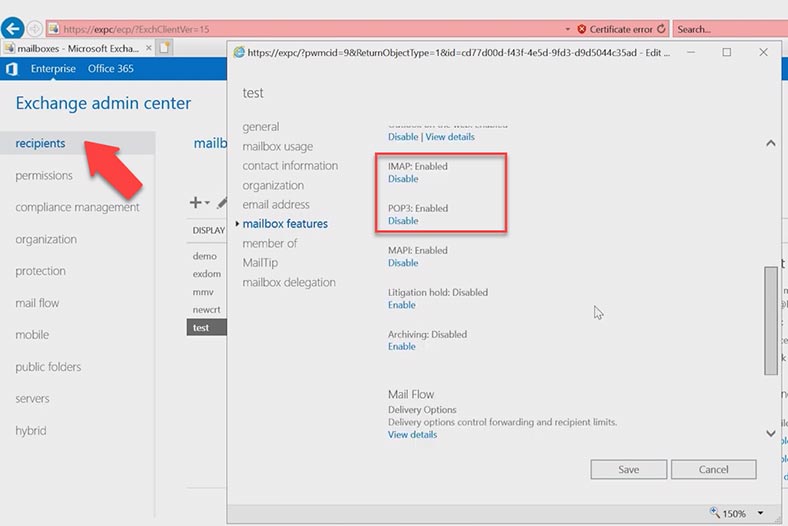
As a result, you’ll get the certificate name; there should be the name of the certificate you have given. At the next stage, you should check if these protocols are enabled at the mailbox level; if they are disabled, users can’t configure their profiles in Outlook to use POP3 and IMAP4. However, they should be enabled by default.
To check it, open Exchange Admin Center, go to Recipients – Mailboxes, open a specific account (that is, a mailbox) – and navigate to Mailbox features, and then check if the Enable value is set for these services.
To see how the services work, use the command:
-Test
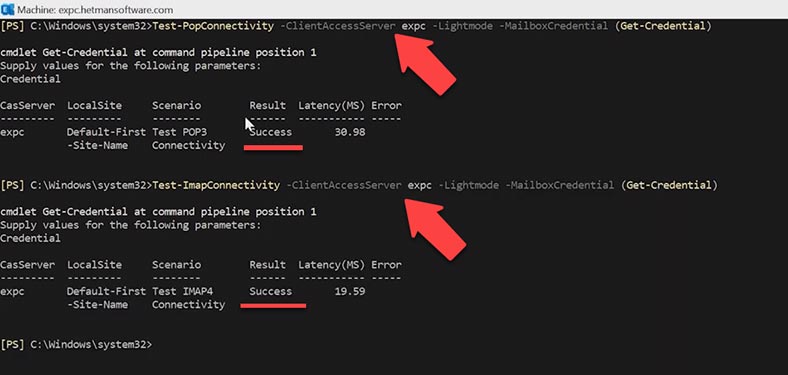
Test-PopConnectivity -ClientAccessServer expc -Lightmode -MailboxCredential (Get-Credential)
Enter the password. The result is successful.
After that, run a similar command for IMAP:
Test-ImapConnectivity -ClientAccessServer expc -Lightmode -MailboxCredential (Get-Credential)
Type the password to your account. This configuration works as well.
Step 5. Checking POP3 and IMAP services
To make sure that you enabled and configured IMAP4 on the Exchange Server, do the following:
Visit the Microsoft website to use a special service that checks POP3 and IMAP protocols. https://testconnectivity.microsoft.com/tests/Imap/input
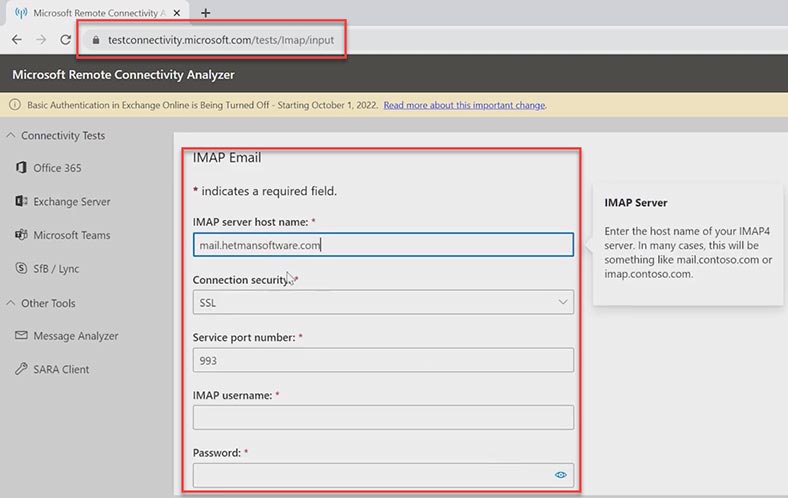
Fill in all required fields and click Perform Test. As you can see, the test is successful but with a warning. The matter is that Microsoft can’t check the certificate chain. This feature might be disabled or misconfigured for the server.
As to the SSL certificate, I’m 100% confident about it, so I’ll just disregard this warning. The service works properly.
Now let’s check the POP3 protocol. https://testconnectivity.microsoft.com/tests/pop/input
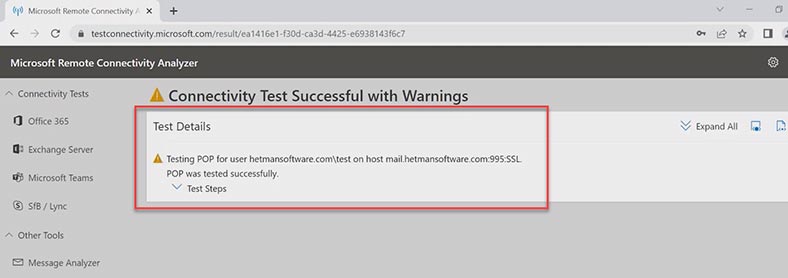
Follow the same steps, fill in the fields and click Perform Test. The test is successful, too.
Now let’s find out if mail circulates the way it should. In Outlook, I'll set up connection via IMAP or POP3 protocol, and send a test email.
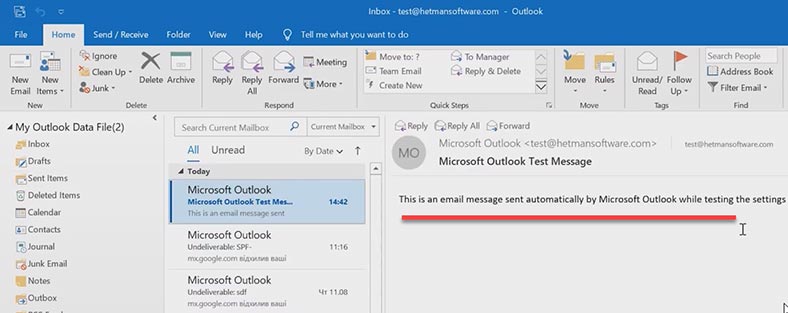
Now my emails don't end up in the Spam folder, but reach the recipient without any errors.
Errors
Now let’s analyze a few errors that you may encounter in case of incorrect configuration or when DNS records are missing - SPF, DKIM or DMARC.
| Error | Description |
|---|---|
| 550 5.7.1 | Message rejected due to SPF check failure. This may indicate that the sender's IP address is not included in the SPF record for the sender's domain. |
| Message Failed DMARC Compliance | Message did not pass DMARC check. This may be due to SPF and/or DKIM check failure, or a mismatch with the DMARC policy set for the domain. |
| DKIM-Result: fail (bad signature) | DKIM check failed due to a bad signature. This may indicate that the DKIM signature in the message is incorrect or was altered during transmission. |
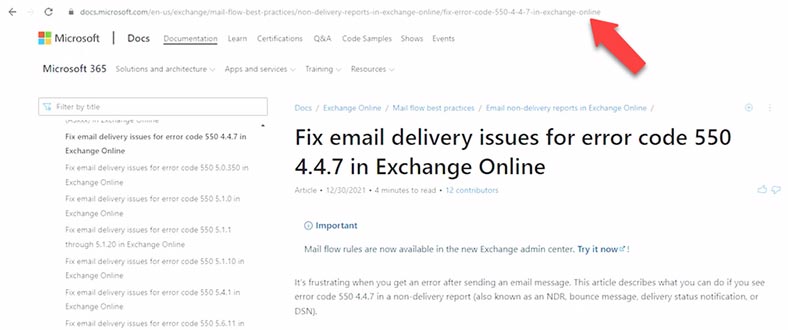
Error 550 - SPF Check Failed. The error may look this way if an antispam tool is installed on the Microsoft Exchange server:
SMTP; 550 5.7.1 550 Message rejected because SPF check failed.
This error means that the sender’s domain has an incorrect SPF record or that the sender is using a fake email address.
If the SPF DNS record is missing, misconfigured or disabled when sending an email to an external mail address, you can receive a message containing this error: mx.google.com rejected your messages to the following email addresses.
To eliminate the error, add an SPF record to your DNS hosting.
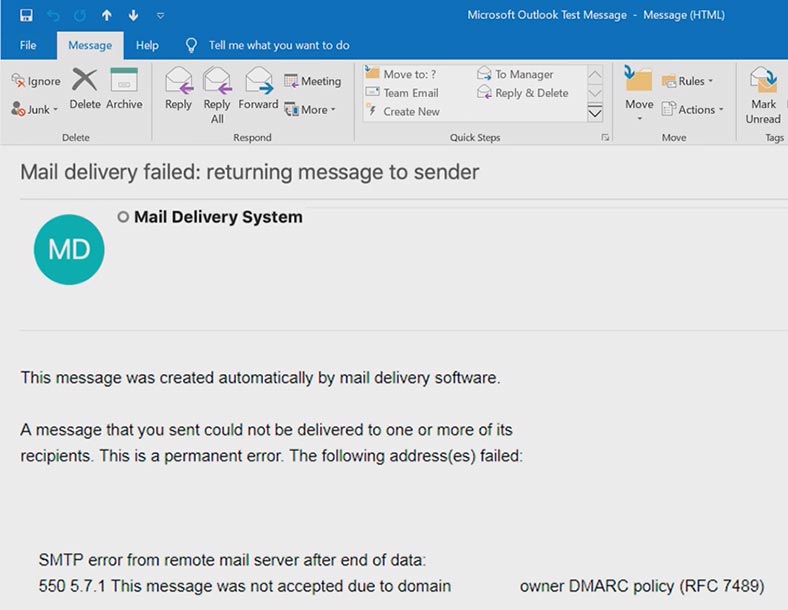
When checking a DMARC record, this error can be observed:
Message Failed DMARC Compliance
Message Failed Verification Tests & is not DMARC Compliant
This means that the email didn’t pass verification and doesn’t meet DMARC requirements. DMARC compliance error means that this email has failed SPF and DKIM verification tests. Such errors may have negative effects on delivering your emails as other mailboxes cannot verify your email address.
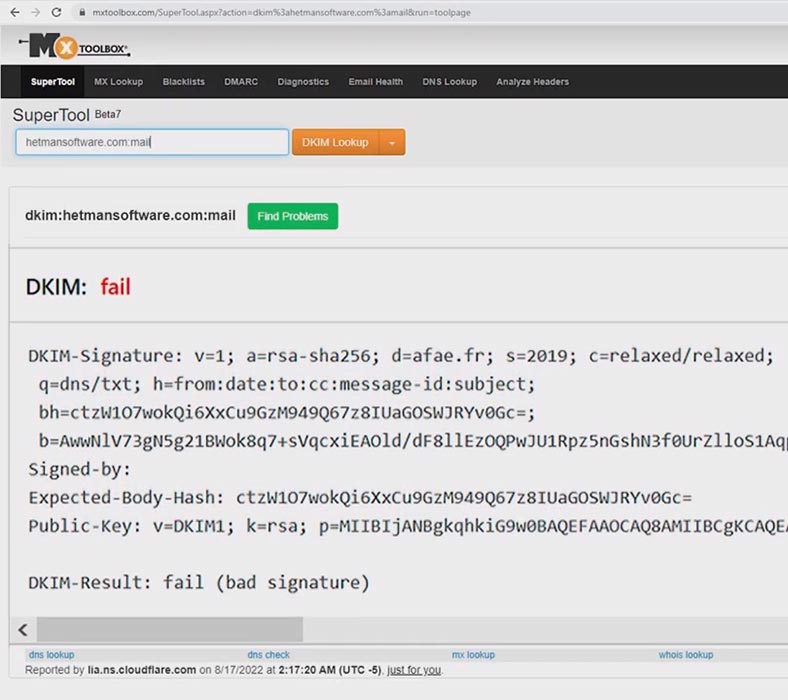
This is how a DKIM-related error looks like:
"DKIM-Result: fail (bad signature)"
Usually, it occurs during DKIM initial configuration, after the application is updated, or after the server migration.
It is often caused by errors in spelling the tags or in configuring the public key. If the DKIM record is missing or misconfigured, you will receive an email with a warning, and the applies to the DMARC record. If the email looks like this, change the settings for the corresponding record.
Conclusion
Summing up, in today’s article we have explored the simple and easy-to-use set of basic integrated tools available to any administrator that lets you improve the security of Microsoft mail servers. When properly configured, DKIM, SPF and DMARC records allow you to reduce the flow of spam, newsletters and malicious emails to a minimum. However, we’ve only described the basic configuration and working principles - to achieve full-fledged protection, some finer settings are required.


