ISO Image: Creation and Usage Guide
In this article, we’ll demystify ISO images, guiding you through the process of creating and utilizing them effectively. Whether you’re a software developer, IT professional, or simply curious about disk images, this comprehensive guide will provide you with all the information you need to master ISO images. From creating ISO images from optical discs to using them for software installation or data backup, we’ll cover everything you need to know to make the most of this versatile file format.
- What is an ISO image?
- Step 1. How to mount an ISO image?
- Step 2. How to burn an ISO image to a disk?
- Step 3. How to extract data from an ISO image?
- Step 4. How to make your own ISO file from an optical disk?
- Questions and answers
- Comments
Most computer software is supplied in a digital format – on an optical disk or in other forms. Quite often, there is a situation when a copy of a disk should be saved, and this is when an ISO image comes on stage.An ISO file (often referred to as an ISO image) is an archived file containing an accurate copy (or image) of data found on an optical disk, for example, a CD or a DVD. This file format is often used to back up optical disks or arrange large sets of files for further writing to an optical disk.

How to Download Original ISO Images of Windows 10, 8 or 7 x86, x64 📀💻 🛠️
What is an ISO image?
The abbreviation ISO comes from the name of the file system used for optical media – usually, it is ISO 9660. Think of an ISO image as a complete copy of all data stored on a physical optical disk such as a CD, DVD or Blu-ray disk, including its own file system. It is, in fact, a sector by sector copy of the physical disk, without any additional compression applied. The idea behind an ISO image is that you can archive an accurate digital copy of an optical disk and then use this image to burn a new disk which will be an exact copy of the original optical disk. Most operating systems (as well as many utilities – auxiliary computer programs designed to perform specialized tasks that ensure proper work of the computer’s hardware or operating system) also allow mounting an ISO image as a virtual disk. In this case, all your applications treat it as if it were a real optical disk inserted into the optical disk drive of your computer.
While many people look to the ISO format to back up optical disks, globally ISO images are mostly used for distribution of large programs and operating systems because it allows to store all files in one big file that can be downloaded easily. Once you have that big file, you can decide if you want to mount it for further use or burn that image to an optical disk.

💻 Creating a Bootable USB Drive to Install Windows 11 💻
Most operating systems available for download, including Windows and various Linux distributions are provided in the form of ISO images. It is very convenient when you are planning to download the latest version of Ubuntu to install on your computer or looking for a way to install a game from an old disk to your laptop, when the actual physical disk is missing.
| Characteristic | Description |
|---|---|
| File Format | .iso |
| Data Type | Optical disk image (CD, DVD, Blu-ray) |
| Main Function | Stores an exact copy of the data and file structure of a disk |
| Content | File system, directories, files, bootable sections (if bootable image) |
| File Size | Varies depending on the source disk (from several MB to dozens of GB) |
| Usage | Installing operating systems, creating disk backups, virtualization |
| Bootable | Can be created as a bootable image for installing OS or running specialized tools |
| Programs for Use | UltraISO, Rufus, Daemon Tools, Etcher, WinCDEmu, and others |
| Platforms | Compatible with Windows, macOS, Linux, and other operating systems |
| Advantages | – Convenient for storing and transferring data. – Easy creation of bootable disks. |
| Disadvantages | – Requires special software for mounting or burning to disk. – File size can be large. |
Step 1. How to mount an ISO image?
The idea of installing something from an ISO image suggests that you will mount the disk image you have onto the virtual optical drive. All your applications will treat the mounted image as if it were a physical optical disk inserted into the optical disk drive of your computer.
Latest versions of the most popular operating system – Windows 8, 8.1 and 10 – enable you to mount an ISO image without having to look for additional third-party software. Check this feature out by opening the folder where the ISO disk image file is stored, and right-clicking on it to display the context menu. From the list of available actions, select Mount.

Alternatively, open the folder with the Windows File Explorer, left-click on the required ISO image to select it, look up at the available options in the tab Manage / Disc Image Tools and click Mount.
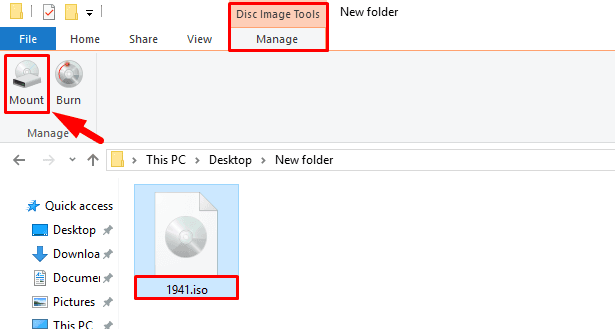
If your computer is running Windows 7 operating system (or an earlier version of Windows), you will have to install an additional third-party utility: for example, a free and easy-to-use tool WinCDEmu.
Step 2. How to burn an ISO image to a disk?
The option to burn an ISO image to a physical disk comes in handy if you want to create a bootable drive for installing software or operating system to another computer. It is especially useful when you are installing an operating system (or creating a special system disk) and this disk will be required for booting. Also, you can use this option to create a physical backup copy of a disk, or if you need to share a copy of the disk with someone else.
To make life easier for us ordinary users, modern operating systems like Windows 7, 8 and 10 feature an integrated function of burning ISO images to optical disks. All you need to burn an ISO image is to insert an empty optical disk into the optical disk drive of your computer, and then use either of the following options. Just like in the example with mounting an ISO image, you need to start by opening the folder containing the ISO image with the Windows File Explorer. Now right-click on it and open a pop-up menu, then select Burn disc image.

Alternatively, select the ISO image file, look up to find the tab Manage / Disc Image Tools and click Burn.
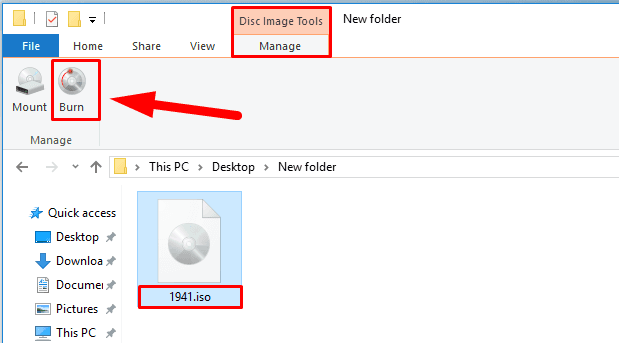
Note: If your computer doesn’t have a device able to burn data to optical disk, this button is not displayed. Besides, if an application for compressing files is installed on your computer (for example, 7-Zip) and it is associated with the ISO file extension, this button won’t be available either. You can learn more about it in the next part of the article.
In MacOS operating system, the function of burning an ISO image to an optical disk works by the same principle as in Windows, so there is no need to describe it in detail.
Step 3. How to extract data from an ISO image?
If you don’t want to mount an ISO image or burn it to an optical disk, but you still need to access the files inside it, you can extract the image contents to your computer. To do it, use a third-party app like WinRAR or 7-Zip. We will show you how to extract data from an ISO image through the example of WinRAR, but you can use any similar application you are comfortable with.
If you included .iso into the list of associated file extensions for WinRAR when installing the application, then just double-click on the corresponding ISO image to open it and view its contents. Depending on the size of the ISO file, opening it might take some time, so be patient.
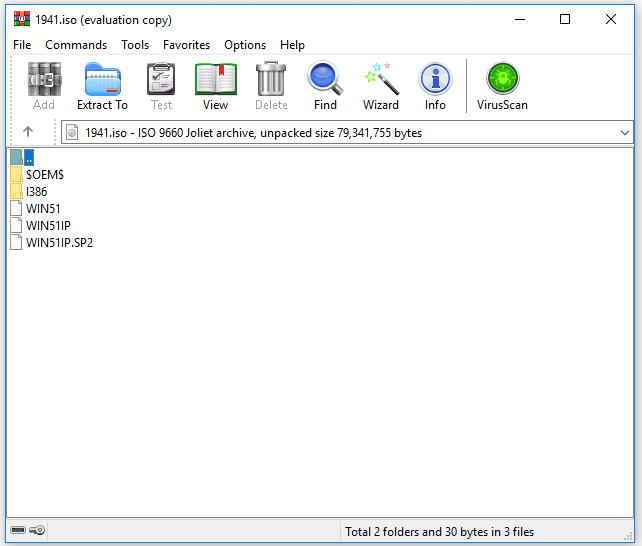
You can copy any files from the ISO image to another folder by just dragging them.
If necessary, you can also extract all the contents of the ISO image into a folder. In the File Explorer, right-click on the ISO image and open a pop-up menu. From the list of available actions, choose one of the three options, each of them having its own method of extracting files. The option Extract files… lets you choose where exactly you want to place the extracted files, the option Extract here puts the files into the same directory where the ISO image file is located, and the option Extract to folder name creates a new folder in the directory where the ISO image is located, and gives it the name of this ISO file.
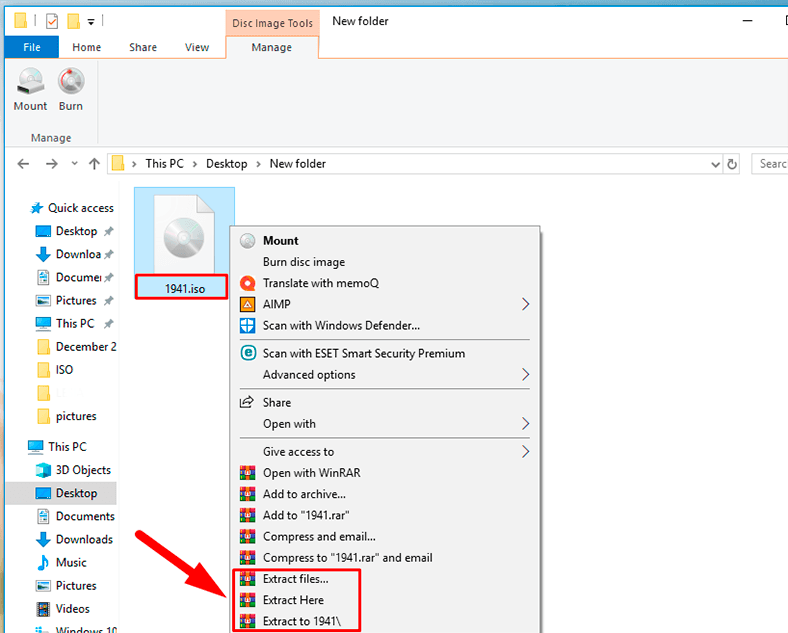
Other file compression tools such as 7-Zip are based on the same principle and offer similar options.
However, there’s an important peculiarity to be noted. If you install a file compression tool such as 7-Zip or WinRar, and let this tool become associated with ISO files, you will never see the integrated options to work with ISO images in the Windows File Explorer. That is why it is better to have the option to manage ISO images in the File Explorer; after all, you can always right-click on a file and access application options to extract data from an ISO image any time you need it.
If you have already installed one of such tools and it is associated with image files, you can easily change the settings to have the ISO file extension associated with the Windows File Explorer. Do it with the help of the integrated application, Settings. It provides you with access to all basic settings of your operating system, And Windows 10 developers intend to replace the Control Panel app with the Settings app to make using a computer more convenient for ordinary users. This is why we are going to show you a few possible ways of opening it, so you can choose the one you like to work with this tool.
-
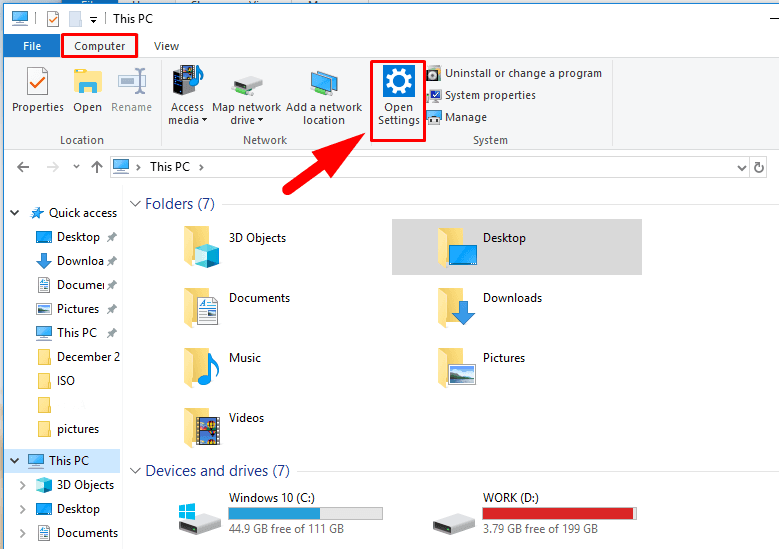
Open the Windows File Explorer and switch to This PC. Select the tab Computer above. Find the System section on the right and click on the blue button with a white gearwheel inside it (Open Settings).
-
Click on the Start button in the lower left corner of your desktop, on the Taskbar, and open the main Windows menu. Look to the left to find a button with a gearwheel on it and click on it to start the app. Alternatively, scroll down the list of all installed applications and find the section Settings.

-
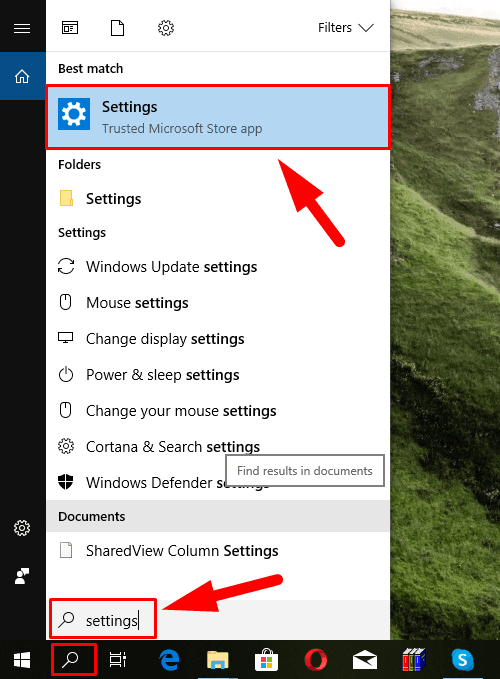
Click the Search button, shaped as a magnifying glass and located on the Taskbar next to the Start button, and open the search panel. Type Settings into the search field. The system will analyze your query and show the link in the Best match section for you to click on it.
-
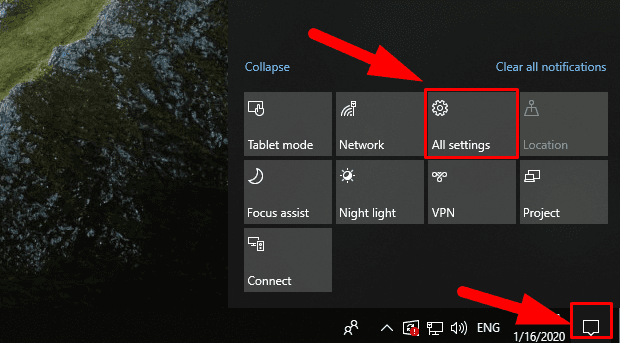
Click on the Windows Action Center icon, located in the lower right corner of the desktop on the Taskbar. Look at the bottom of the pop-up side panel to find the group of quick access buttons. Click on All settings to open the app you are looking for.
-
The easiest and the quickest way to start the Settings app is to press the key shortcut Windows + I and open the app directly.
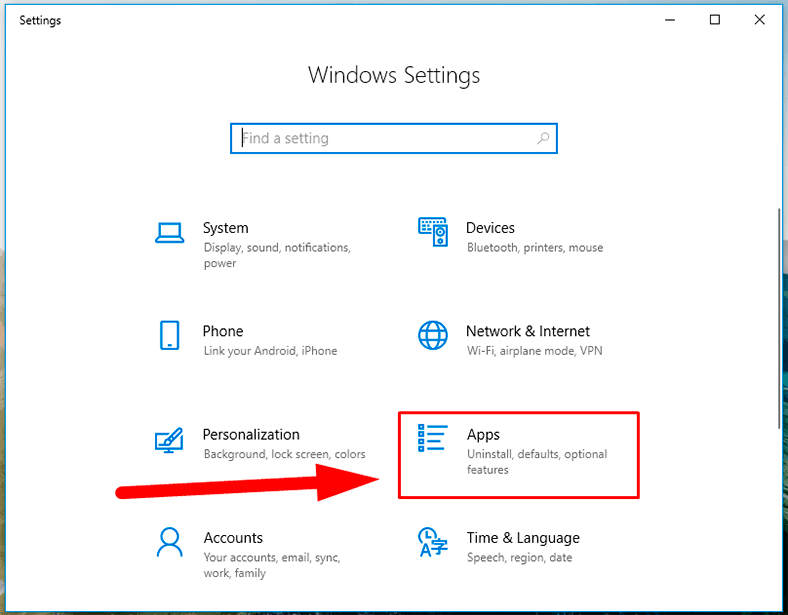
In the main window, navigate to Apps. In the new window, look to the left and select Default apps. On the right, scroll down until you see Choose default apps by file type and click on it.
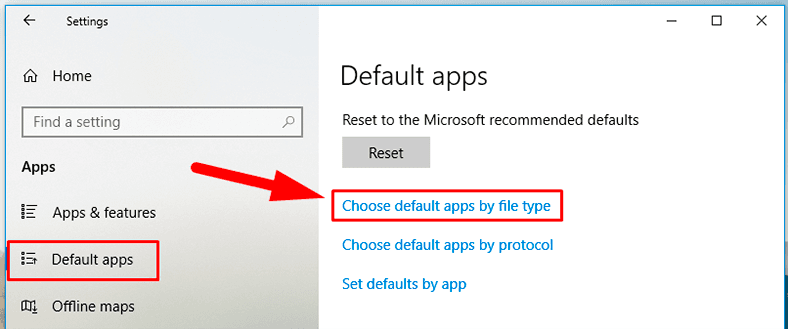
The new window will show you a long list of file extensions. Use the scroll bar to find the .iso extension. Opposite the icon, look to the right and click any app that is currently associated with the .iso file extension. In the pop-up menu, select Windows File Explorer.

Step 4. How to make your own ISO file from an optical disk?
Creating an ISO file from a disk lets you have a digital backup copy of any physical disk. After that, you can use the new ISO files for installation of software on other computers which don’t have an optical disk drive. In the future, you will be able to create additional copies of this ISO file without having to use the original (physical) disk, And, of course, share this ISO image with other people.
While MacOS and Linux operating systems come supplied with pre-installed tools to create an ISO image of a physical disk, the Windows family of operating systems lack this feature.
Instead, you will have to use third-party apps to create an ISO file in a Windows operating system. On the Internet, you can find lots of apps to create an ISO image and choose the one that suits you best. All tools of the kind have the standard set of functions, and feature some extra options to stand out against the competition. Depending on your needs, you can select an application that you think is the best choice for further use.
The Windows operating system lets you perform a basic set of operations with ISO files without having to install additional tools. You can always mount, burn or copy an ISO image on your computer, quickly, easily, and free of charge.


