Avast Antivirus Removed Files: Recovery Guide
Discover what to do if Avast Antivirus removed or quarantined your files with our essential guide. Whether it’s a false positive detection or an unintentional action, it can be distressing to have your files flagged by your antivirus software. In this comprehensive tutorial, we’ll walk you through step-by-step instructions and expert techniques to help you recover your files safely and efficiently. Don’t let Avast Antivirus disruptions hinder your productivity—watch our guide and regain control of your files today.
- Method 1. Recover files from the quarantine of your antivirus
- Method 2. Recover files deleted by Avast antivirus with the help of professional software tools
- Conclusion
- Questions and answers
- Comments
Antivirus products are designed to monitor threats and eliminate them, as well as remove infected items or place them into a special safe storage for further treatment. Sometimes viruses can damage or infect files that contain important user data. The antivirus may remove them or place them into the quarantine for isolation, when trying to cure the operating system or repair consequences of a virus attack.
In such situations, access to the information inside infected files is limited or there is no access at all. However, it is still possible to restore the data if it’s important for the user. In today’s article, we will describe two effective methods to bring such files back.
| Parameter | Description |
|---|---|
| Name | Avast Antivirus |
| Purpose | Protects the system from viruses, malware, phishing, and other online threats. |
| Access | Launch the Avast application from the Start menu or system tray. |
| Functionality | – Real-time protection against viruses and malware
– Scanning of files and internet traffic – Protection against phishing and fraud |
| Features | – Antivirus and antispyware protection
– Wi-Fi network protection – Password manager – Ransomware protection |
| Advantages | – High efficiency in threat protection
– User-friendly interface and easy setup – Free version with basic features |
| Limitations | Some features are available only in paid versions. |

The Best Free Antivirus Rating in 2019 - 360, Avira, AVG, Avast, Malwarebytes 🥇🛡️💻
Method 1. Recover files from the quarantine of your antivirus
In most cases, specialized software by Avast is the main and the only element of protection against hacking attempts and malware attacks for computing devices. Too often, following its internal security settings when running a system scan and detecting an infected or suspicious file which behaves in such a manner that it raises doubts as to its safety, the antivirus can remove it by placing such potentially dangerous or infected file to the safe storage, the Virus Chest (quarantine). All blocked threats which may have negative effects on the operating system and user files will be placed into the Virus Chest, until the user decides on further actions.
As long as suspicious or dangerous files are quarantines, they cannot harm the computer as any of their activities will be blocked.
Previously, the Virus Chest was located in the main screen of the user interface, for quick access to isolated files, in case they were blocked by mistake and don’t carry a threat of infestation. In latest versions of this antivirus, the quarantine is hidden and it takes a few simple steps to access it.
As an example, we’ll be using a free product Avast Free Antivirus 2023, but all the operations you see in this article will be similar for all modern antiviral solutions by Avast.
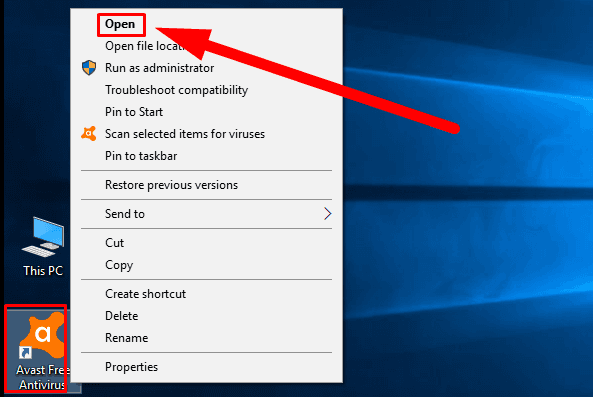
There are two simple ways of opening the Virus Chest. In the first case, open the antivirus, for example, by double-clicking its desktop icon, or right-click on it and select Open from the context menu.
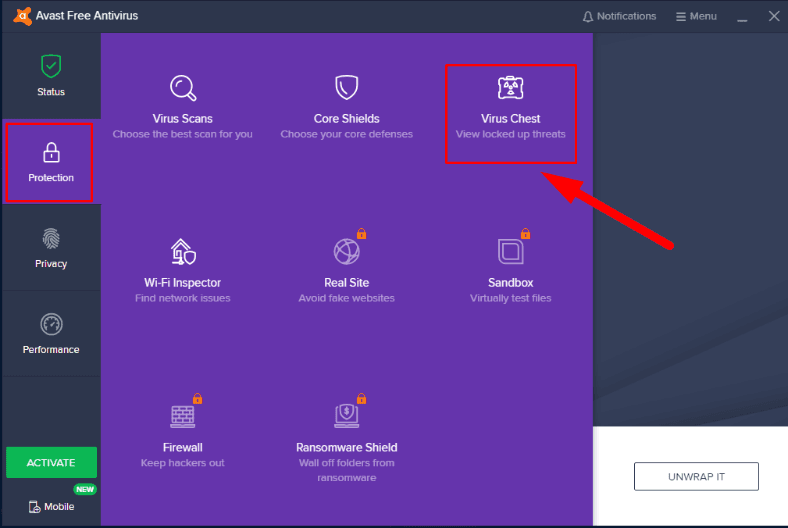
In the antivirus window, look to the left and select the tab Protection, then go to the central panel to click on Virus Chest.
Another way is to right-click on the antivirus icon on the Taskbar in the lower right corner of the screen (the icon may be hidden in the notifications area). From the list of available actions, select Quarantine.
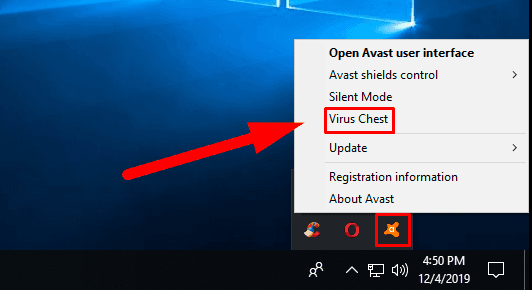
This action will open the Virus Chest, which may contain infected or suspicious files or may be empty, and you will see the message saying Sit back and relax. Your Virus Chest is empty.
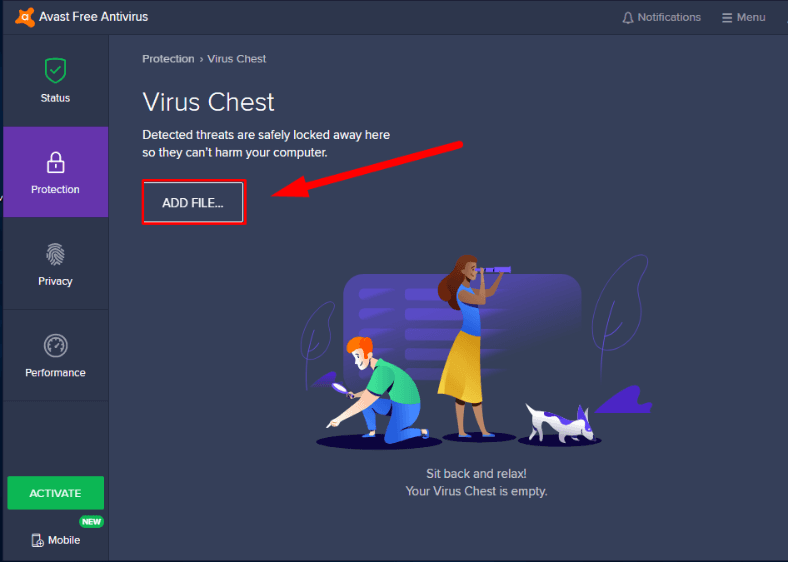
Below, you can see the button Add File…, which you can use to quarantine a suspicious file on your own.
In the Virus Chest you can decide what to do to the files stored inside it. When you select the files in the quarantine, there are several commands that can be applied to them:
-
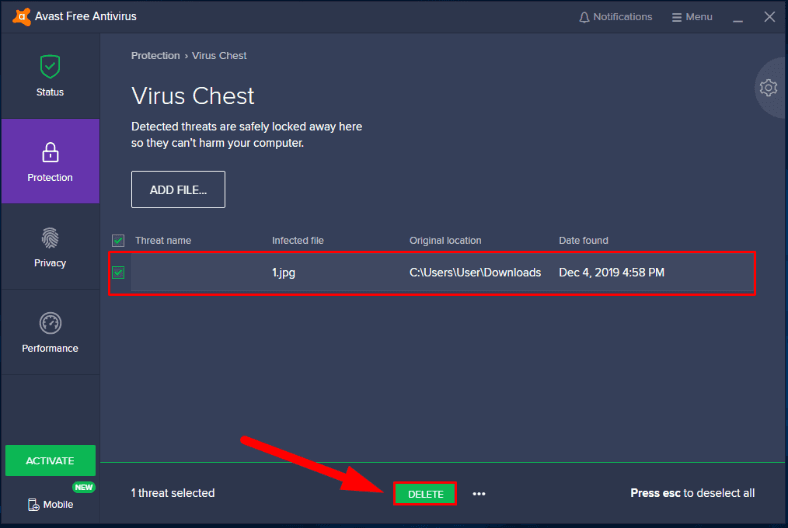
Delete – by selecting this command and clicking the green button below, you will remove the selected files from the Virus Chest. The removal only suggests cleaning the quarantine. Also, information on the selected files including their size, location and sectors they occupy on the hard disk will be erased from the file allocation table of the hard disk. However, the selected files ill not be actually erased from the hard disk, and their contents remain intact until overwritten with new data. In case of removal by mistake, such files can be recovered with professional data recovery tools – and this topic will be covered in more detail in the next part of this article.
-
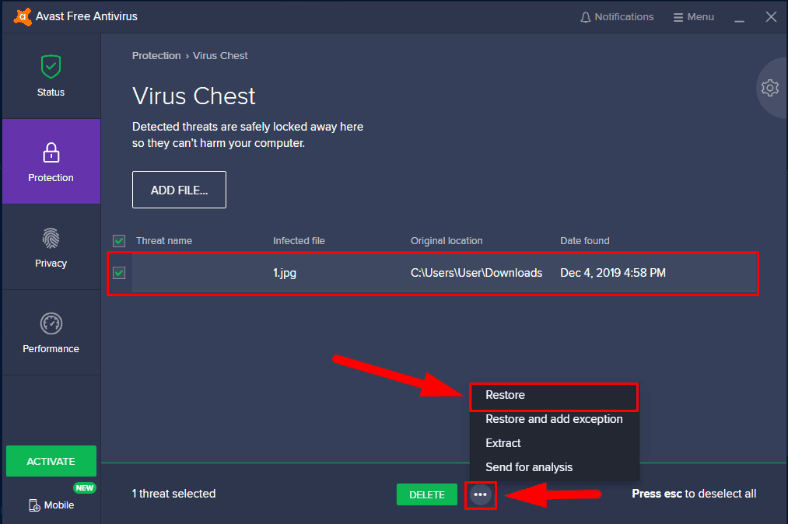
Restore – the selected files will be extracted from the Virus Chest and returned to their previous location from where they have been moved to the quarantine. As well as the two previous commands, this command will be available when you click on the three dots of the nested menu next to the button Delete.
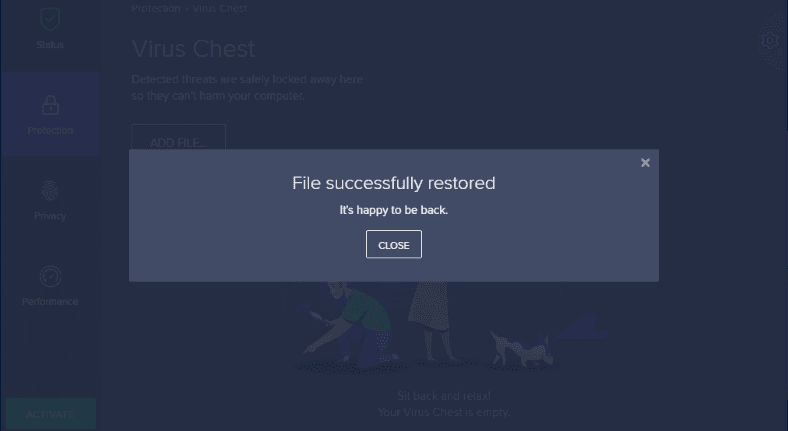
When the process is over, a system notification will inform you on the successful restoration of the files and their readiness for use.
-
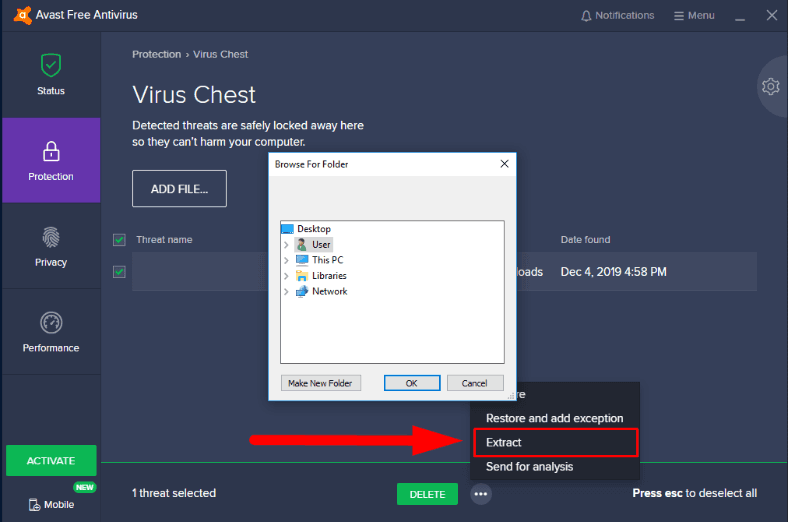
Extract – this command will copy the selected files to a directory you specify in the Browse For Folder window, but the original files will remain in the Virus Chest without any changes.
-
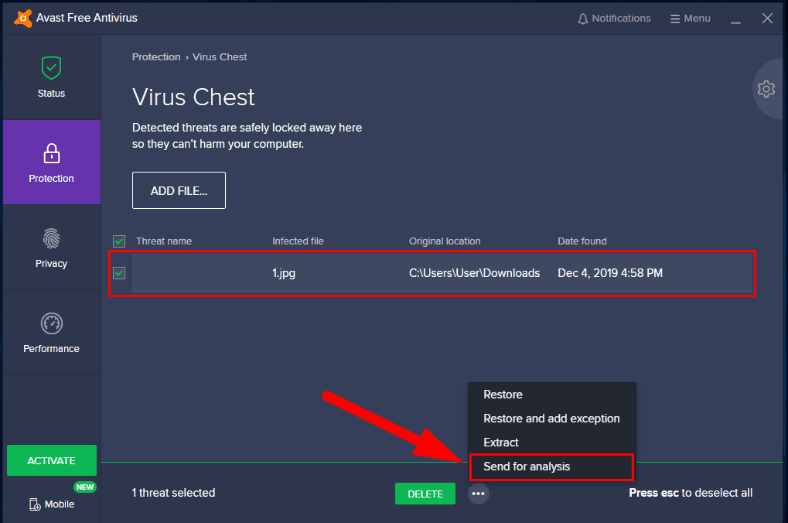
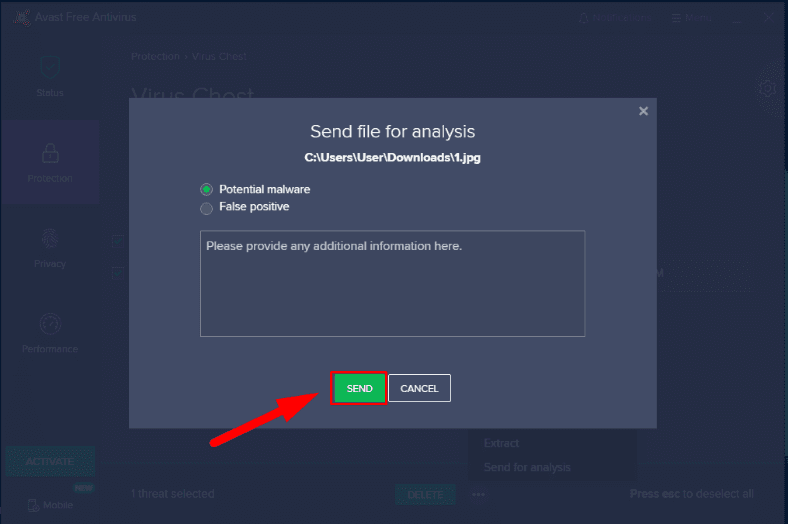
Send for analysis – this command sends all suspicious files to the Avast antivirus lab, and you can add any additional information to the files you send.
When you click Send the selected files will be submitted for analysis.
You can manage the quarantined files easily and perform certain actions to them as you think fit. If the files which don’t pose a security threat for the computer have been moved, they can be restored easily.
Method 2. Recover files deleted by Avast antivirus with the help of professional software tools
The most effective method to search and recover deleted files is using professional software tools. Sometimes you can bring back the files deleted by an antivirus by just making use of tools integrated into Windows 10.
However, an important condition for successful recovery of any deleted data is to enable corresponding system settings in time, and one of such settings is the backup feature. In most cases, backup tools copy information of certain folders (often given by default), and these folders do not always contain the data that users would like to restore. It is especially relevant if such data was created only recently and has not been backed up yet. That is why every user should consider getting a program for file recovery to help them restore the required data quickly and effectively.
These days, the Internet is full of offers for specialized programs able to recover deleted data. However, all these tools vary greatly, and one of the most distinctive differences is the successful recovery rate for deleted files.
The exquisite combination of rich functionality, convenient user interface and innovative algorithms for analyzing disk space and restoring data that all add up to the highest file recovery rates make it worth considering the best offer on the market, Hetman Partition Recovery by Hetman Software.
This is the company’s flagship product and a versatile tool for solving all kinds of issues related to bringing back deleted data or accessing information which is inaccessible/unavailable because of physical damage or logical errors.
Hetman Partition Recovery is based on a powerful high-performance core which enables it to restore files removed from any storage media (HDD hard disks, USB flash drives, memory cards of any format etc) or lost from various devices, such as desktop computers, laptops, media centers, digital cameras and so on.
The program is perfectly capable of restoring data after formatting physical disks or their partitions, removing logical disks or modifying the file system. The use of low-level analysis and advanced search algorithms based on file signatures enables Hetman Partition Recovery to restore information after system failures or non-volatile memory errors which restrict your chances to boot the operating system properly, or make it merely impossible.
The outstanding advantage of Hetman Partition Recovery is its ability to restore any data: deleted, damaged or lost after harmful effects of malware activities, and even if disk system structure has been blocked or destroyed.
You can learn more about effective methods for cleaning your computer from Trojans, keyloggers or any other malware by watching a video tutorial on our channel:

How to Delete Any Viruses: Trojan, Rootkit, Ransomware, Spyware For Sure ☣️🛡️💻
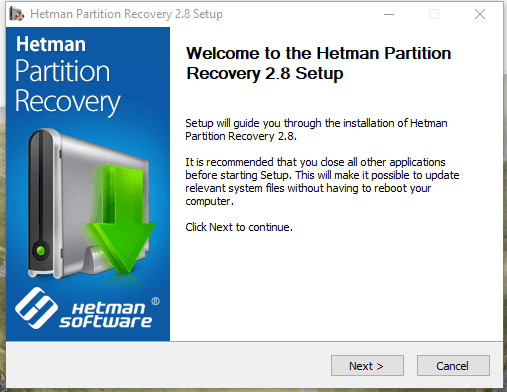
The installer for Hetman Partition Recovery is available for download from the Hetman Software official website. The step-by-step wizard will take you through the few simple steps needed to install the program and configure it for successful data recovery.
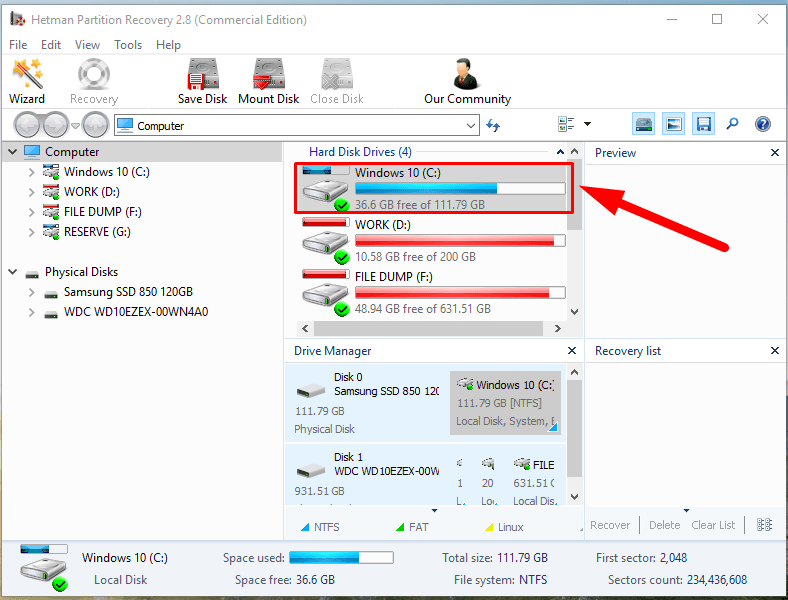
When started for the first time, Hetman Partition Recovery will search and identify all connected storage devices, determine their capacity, file structure and status.
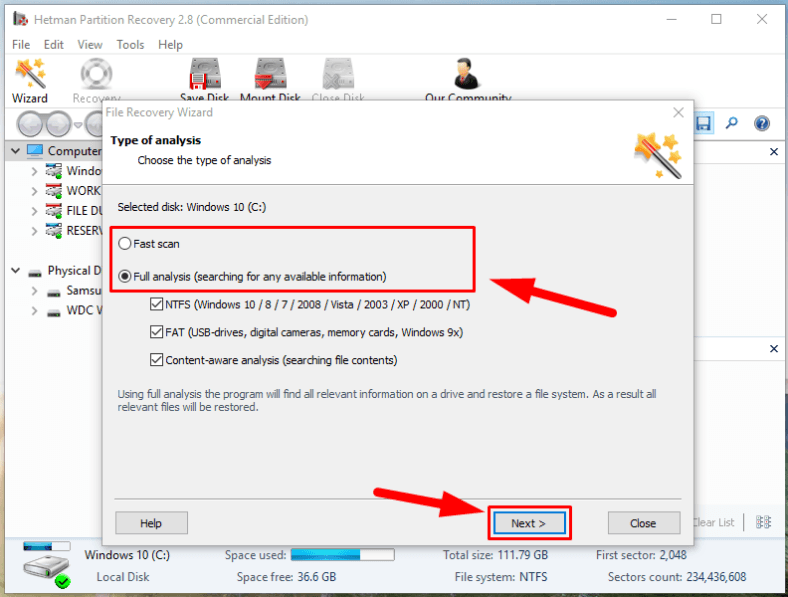
When you decided which disk or partition to scan, double-click on it to start the process. It starts the File Recovery Wizard that will ask you to choose the type of analysis for restoring data from the selected device. You can choose one of the two options: Fast scan or Full analysis. Fast scan is good for locating and recovering recently deleted files. The second option suggests searching for all available information after the disk file system is restored. Select the analysis type you prefer and click “Next” to continue.
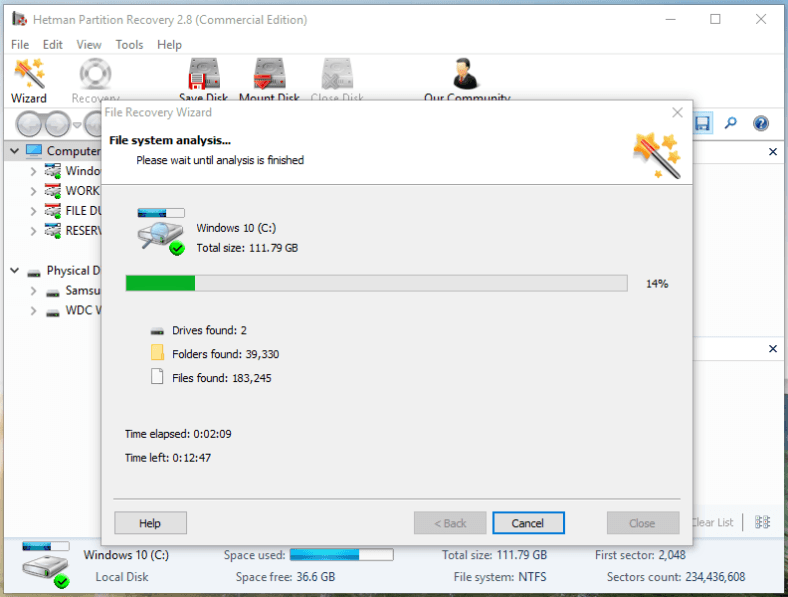
Analyzing the file system of the selected partition may take some time depending on a few factors such as the disk size, the number of damaged files, the cause behind data loss etc. The status bar will indicate the progress of analysis and the estimated time of completion.
When the process is over you’ll be able to see the scan results and view the contents of every detected file in the Preview window to find the required file in the quality you prefer. Having found the necessary files, drag them to the Recovery List and then click on the Recovery button fashioned like a life ring.
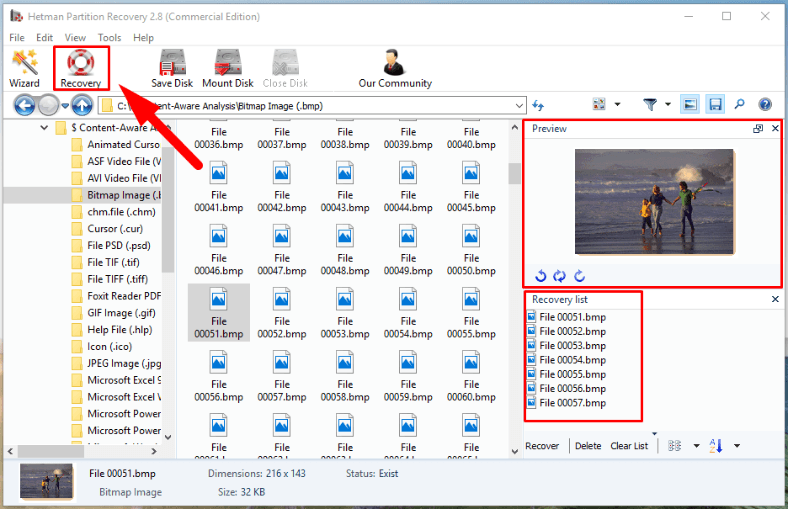
It activates the File Recovery Wizard, which applies standard presets and offers you to choose one of the available file saving methods. Check the saving option you prefer and click Next to continue.
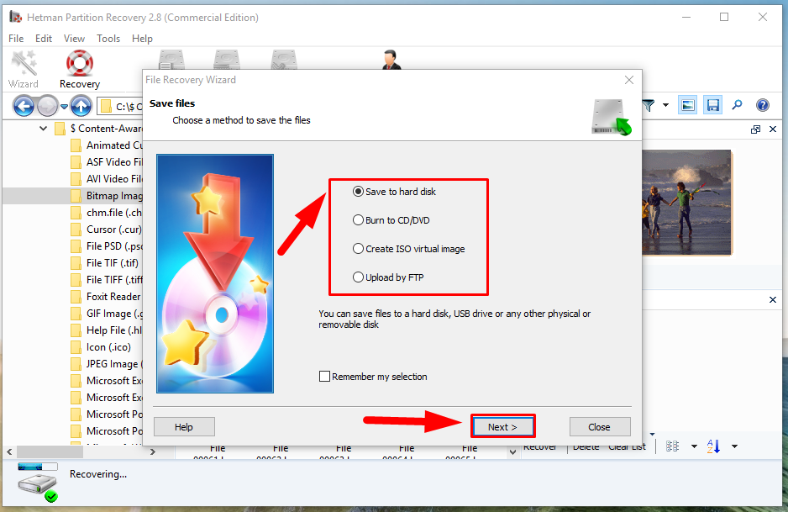
Give the path to save the files and specify several settings depending on the saving method you have chosen, then click Recovery.
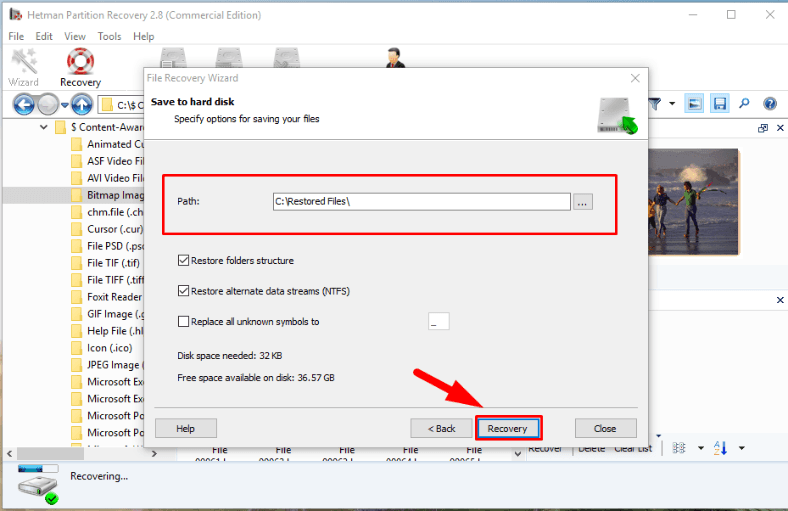
This is actually the final step in recovering files. The files you have recovered will be located in the directory you chose in the program’s settings and available for further use.
You can learn more about the opportunities provided by Hetman Partition Recovery, its algorithms and advantages in our video guide on YouTube:

🔥 How to Recover Deleted Files With Hetman Partition Recovery Software in 2021 ⚕️
Conclusion
Files can get deleted for a number of reasons, but sometimes it happens as a result of the antivirus activities. Using infected removable media to store data, installing questionable third-party apps, viewing fake websites and other actions may result in a situation when important data gets infected and therefore removed by the antivirus.
Regardless of the level of security and comprehensive protection provided by an Avast antivirus, there is always a chance of unexpected or accidental removal of important files if they get infected by viruses or other malware; another possible option is that such files may be quarantined by the antivirus.
For such cases, the Virus Chest you can find in antivirus products by Avast has the option for recovering or extracting files from this quarantine, if need be.
However, if the quarantine has been cleaned and the files there are deleted, you can try to restore them from a backup copy – provided you have created one in advance. Sometimes, you can find the necessary files in cloud storage services like OneDrive, on other external storage devices or as attachments in your email.
After all, if nothing works, you can always restore your files with the help of the versatile professional tool, Hetman Partition Recovery, and bring the lost data back even in the most complicated cases.
If you still have any questions about restoring data from the quarantine of your Avast antivirus or about recovering deleted data, leave your comments under this article. We always read every comment and try to give an exhaustive answer.


