Recover Crashed RAID 5EE: Controller or Disk Failure Guide
Learn how to recover crashed RAID 5EE after controller failure (Adaptec ASR-6805T) or multiple disk failures with our essential guide. If you’ve encountered data loss due to a crashed RAID 5EE array, it’s crucial to understand the steps for successful data recovery in such critical situations. In this comprehensive tutorial, we’ll walk you through step-by-step instructions and expert techniques to help you retrieve data from a crashed RAID 5EE array after controller failure or disk failures. From identifying the root causes of the crash to implementing recovery strategies, you’ll learn everything you need to know to ensure successful data retrieval. Don’t let RAID 5EE failures lead to permanent data loss—watch our guide and reclaim your valuable data today.
- How to create a RAID 5EE system based on an Adaptec ASR-6805T controller
- Case 1. How to replace a failed drive and rebuild a RAID array
- Case 2. How to recover data from a RAID array with a dead controller
- SATA Expansion Card
- Case 3. Recovering data in a case of dead controller and one hard disk
- Case 4. Recovering data in a case of dead controller and two hard disks
- Conclusion
- Questions and answers
- Comments
Compared with conventional storage devices, RAID arrays offer much more disk space for all your files and folders. Also, they guarantee data integrity and safe extraction of any materials you store there, even if one of the drives within the storage system fails. Despite the high reliability of such systems, though, important information sometimes gets damaged, lost or inaccessible.

🏆 How to Recover a Crashed RAID 5EE After Controller Failure or Multiple Disk Failure 🏆
Losing important data is something that you can never predict. Though RAID 5 is considered a very reliable solution to store digital materials, still it doesn’t give you a 100% guaranteed protection against possible data loss. At any time, one or several disks may fail, and this is also true about the controller, or other hardware involved in the process. This situation renders the whole RAID system inoperable, and you will have to find a way to get your data back.
How to create a RAID 5EE system based on an Adaptec ASR-6805T controller
First of all, let’s explore the process of creating a RAID system, the important aspects to be considered when building it, and the settings required to make data recovery possible. Our RAID will consist of six disks working with the controller, Adaptec ASR-6805T.
| Parameter | Description |
|---|---|
| Controller Type | RAID controller |
| Interface | PCI Express 2.0 |
| RAID Support | RAID 0, 1, 5, 6, 10, 50, 60 |
| Maximum Number of Disks | 32 |
| Cache Memory | 512 MB (expandable) |
| Maximum Transfer Speed | up to 6 Gbps (SATA/SAS) |
| Disk Support | SATA and SAS |
| Hot Swap Support | Yes |
| Compatibility | Windows, Linux, VMware |
| Additional Features | AES-256 encryption support |
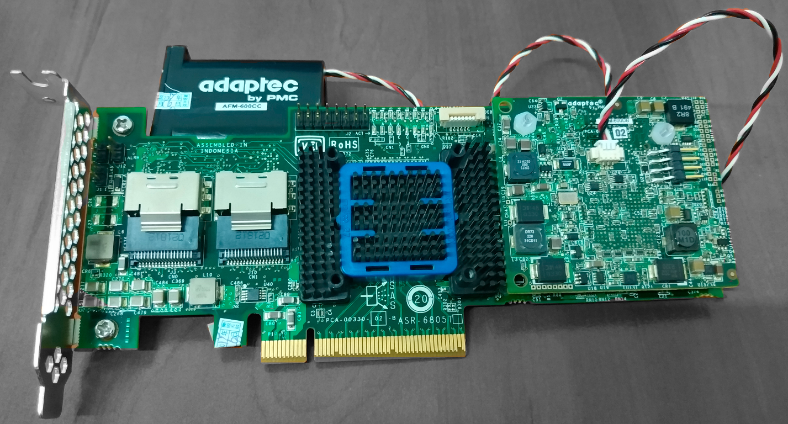
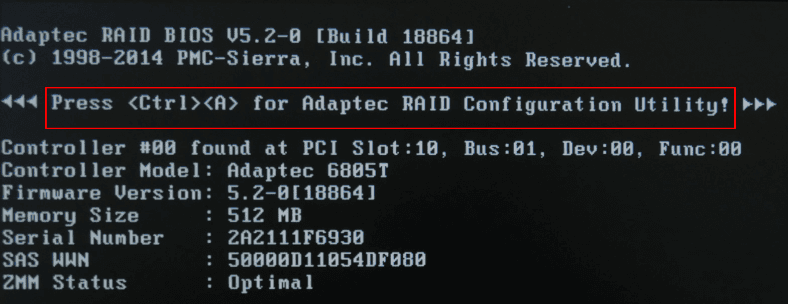
In order to access the controller’s BIOS after hardware initialization, you should press the key shortcut Ctrl + A while the computer is booting.
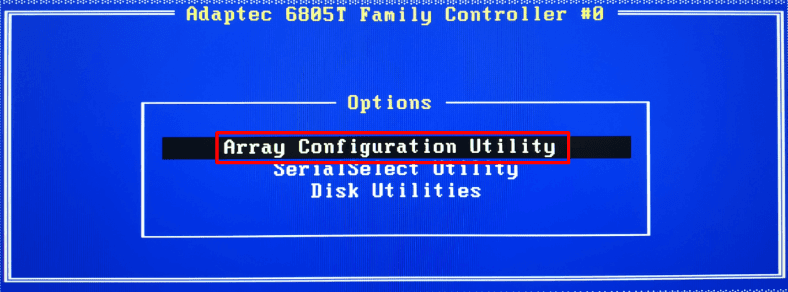
In the menu, select Array Configuration Utility.
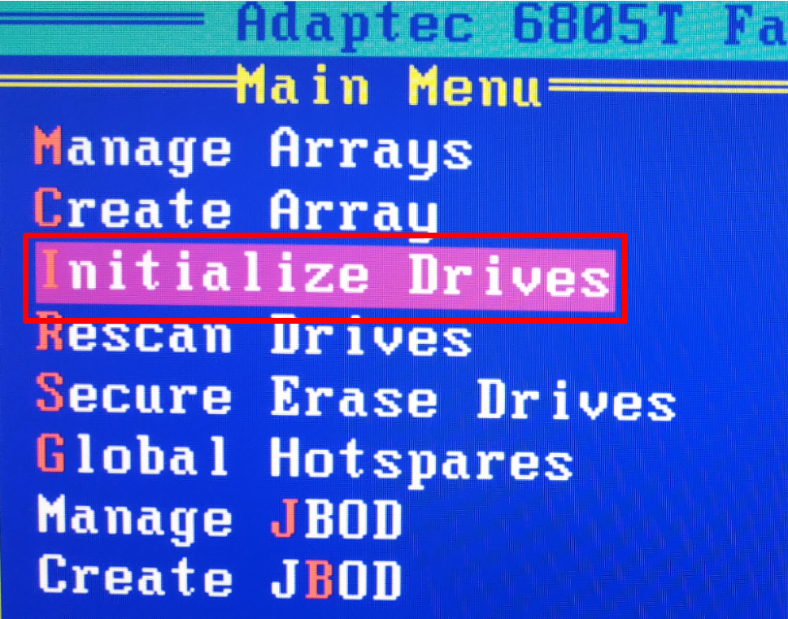
In the new window, you need to initialize the disks in order to tell the controller which of them will be used in the array. Find and open the line Initialize Drives.
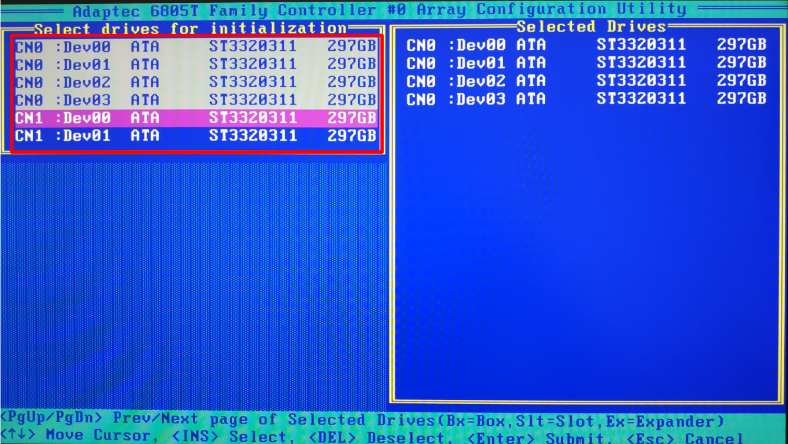
Use the Space or Insert key to select each of the disks, and then press Enter.
As a result, you will see a notification warning you that information on all initialized disks will be erased. Enter Yes to confirm your choice and launch the initialization process.

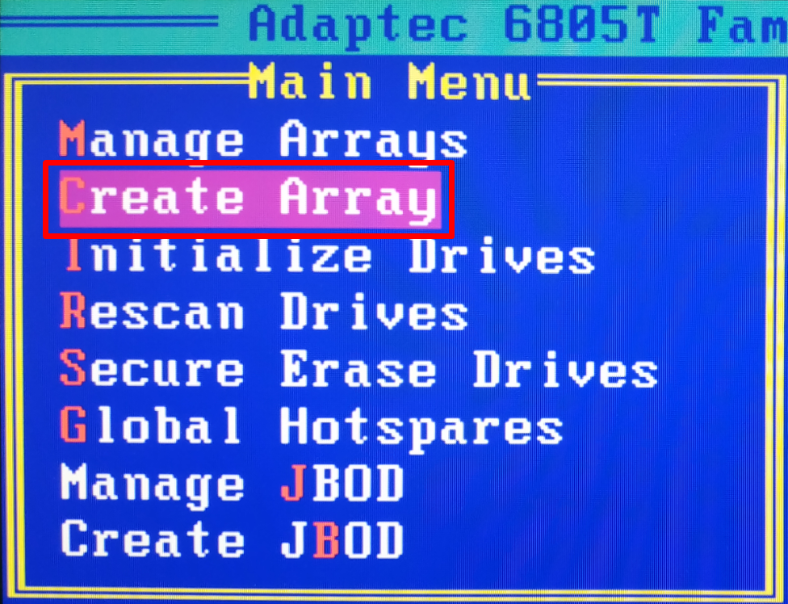
After initialization, we can start creating the array. In the main menu, open Create Array.
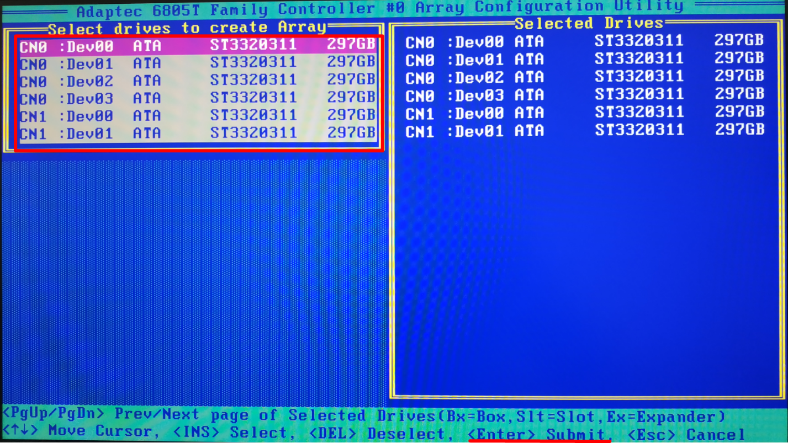
In the next page, look at the left panel in the window Select drives to create Array to select the drives which will make up the RAID, and then press Enter.
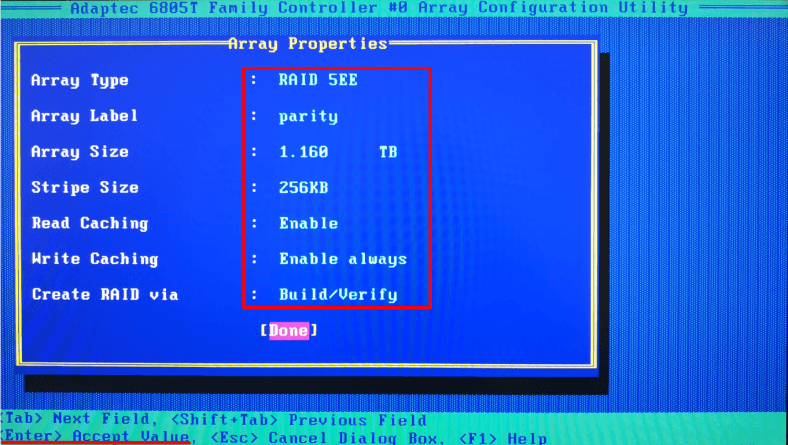
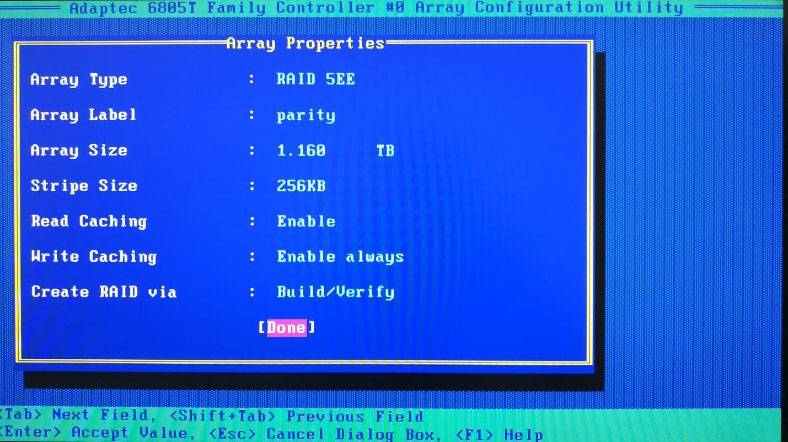
Now it’s time to configure the array properties. The new page will contain important properties that should be memorized. You will need this information later when you try to recover data from the disks.
Specify the array type, its name and size, block size, caching settings and other properties. In our case, we performed all operations on a RAID 5EE based on an Adaptec hardware controller and including six drives 300 Gb each.
| Parameter | Description |
|---|---|
| RAID Type | RAID 5EE (Enhanced RAID 5) |
| Number of Disks | Minimum 3 (recommended 4 or more) |
| Disk Space Utilization | (N-1)/N, where N is the number of disks |
| Security Level | High (allows for the loss of one disk) |
| Write Speed | Average (decreases with the increase in the number of disks) |
| Read Speed | High (quite good with an increase in disks) |
| Additional Features | Data recovery support, enhanced reliability |
| Usage | Ideal for servers with critical data |
| Compatibility | Supported by most RAID controllers |
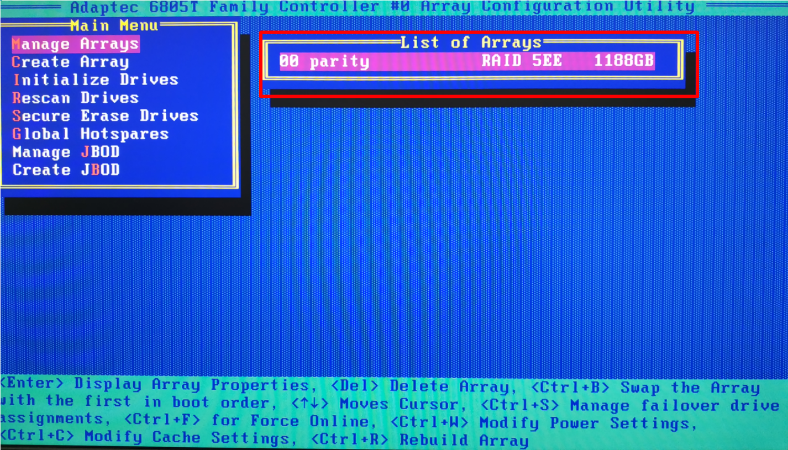
Now the RAID system has been created. It will take some more time to finish the building process, and soon you will be able to boot your computer and use the disk array to store your data safely.
In the next part of the article, we will find out how to replace a faulty drive and rebuild a damaged array.
Case 1. How to replace a failed drive and rebuild a RAID array
At this stage, we are going to simulate a scenario when one of the drives fails. RAID 5 is designed in such a way that the whole array remains operable if one of the storage devices breaks down.
After a drive fails, the array becomes degraded, and while the computer is booting, you will see a message like this.
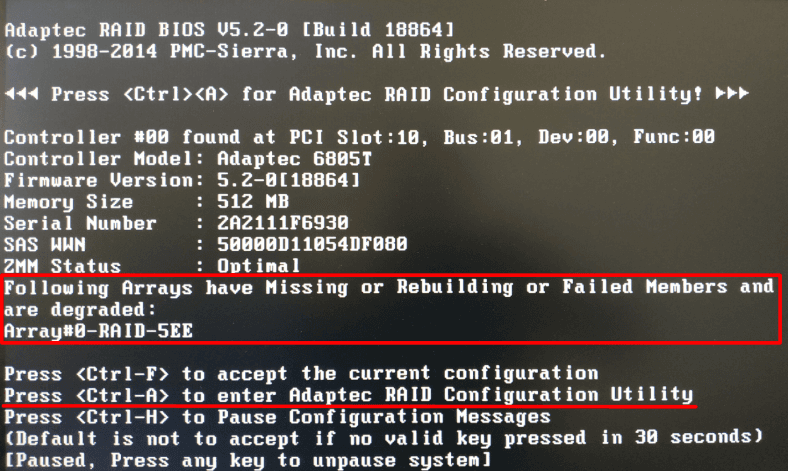
Before you take any action, it’s better to back up all important data. This is crucial because anything may happen during the array rebuilding process (one more disk may fail, the process may freeze, or there might be a hardware issue) and cause a total loss of data. Later on, we will explore what should be done in case of system errors or failures, but now we are about to look into the process of rebuilding the disk array.
Connect a new disk to the controller, turn on the computer, and open controller properties. To access then while the computer is booting, press the key shortcut Ctrl + A. In the window that opens, select Array Configuration Utility. Your first step is to initialize the new disk, so open Initialize Drives.
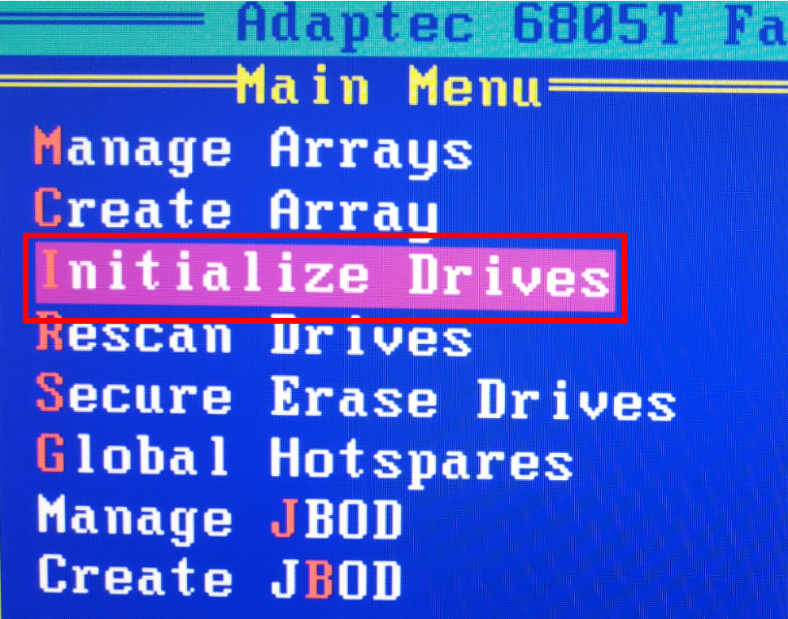
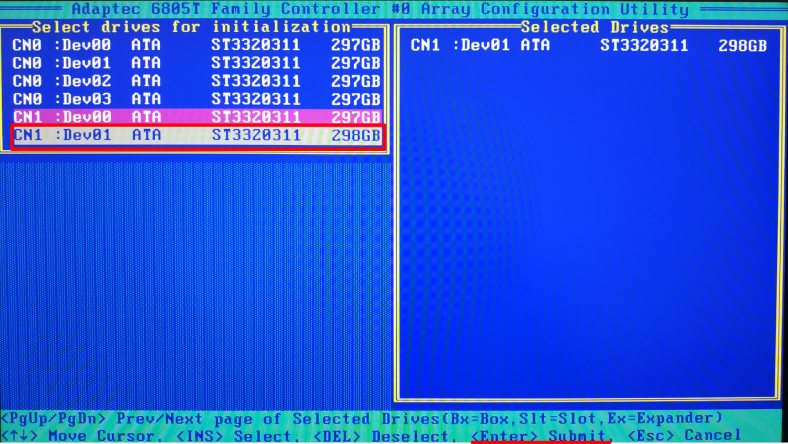
In the next page, select the new disk by pressing the Insert or Space key and hit Enter.
The operating system will show you a warning saying that one or several drives belong to an array and initialization will destroy the data. Make sure that you selected a new empty drive and type Yes.

Then type Yes again to agree that the data in this storage device will be erased.

Now the initialized drive should be added to the RAID. Open the menu line Manage Arrays, press the key shortcut CTRL + S and access the management page.

Use the Space or Insert key to select the new drive, and then hit Enter.
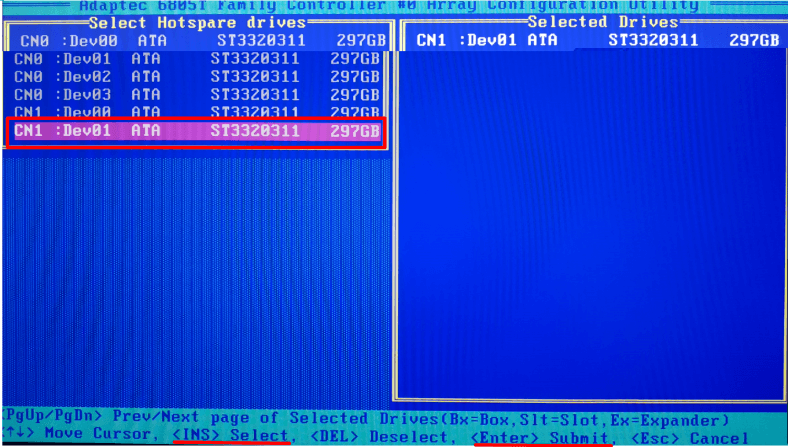
A new system notification appears. In the special field, type Yes to confirm.
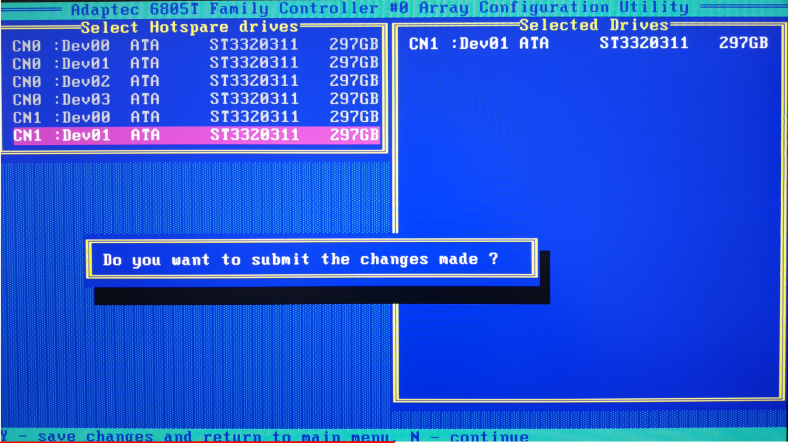
After this sequence of steps, the rebuild process should start.
From now on, you can boot the server in normal mode and continue your work. A complete RAID rebuild is quite a long process and it depends on a number of things – the performance of your controller/drives, current controller load/disk load, etc. The time required to rebuild the array will be reduced, and the whole process will go faster if you don’t start using the array right after a new drive was added. If possible, let the controller finish the rebuilding process and only then start using the array the way you prefer.
By now, we have explored the situation when only one drive within the array failed. But what shall we do if several drives no longer work properly, or the controller is dead, or the operating system won’t boot after you added a new drive to the array?
This is when it’s better to use Hetman RAID Recovery.
This tool lets you recover data from crashed RAID systems or disks that were used in such array; it reads all the information about the controller, the motherboard, or the software used to create a disk array. Also, this product can rebuild the crashed RAID and it lets you copy all important information from there.
Case 2. How to recover data from a RAID array with a dead controller
If the controller fails, you won’t be able to access the information on the disks. When they are connected directly to the computer, the operating system will ask you to format the disks for further use.
In this case, you will either need a controller of the same model (which doesn’t guarantee the success of this operation, though) or a software tool capable of uniting these disks into a RAID system, displaying and restoring your data.
Connect the hard disks to a properly working Windows computer. In such drives, the file system can’t be identified, so the operating system will label them as RAW.

The Disk Management tool will suggest initializing the RAW drives, and the Windows Explorer will ask if you want to format them.
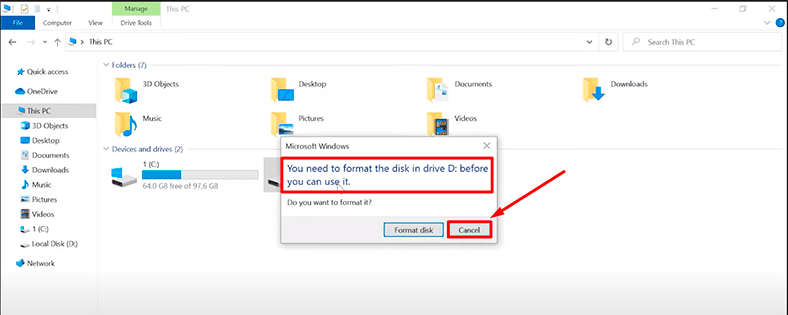
If you value the data on that drive, don’t agree to either option, as it may result in complete data loss.
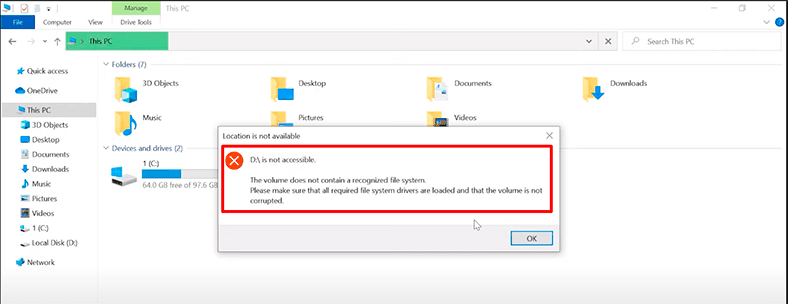
Download, install and run Hetman RAID Recovery. A lot of various service data is written to the storage devices included into a RAID system. For example, what disks make up the array, in what order they are connected to the controller, the RAID type, block size and the procedure of writing blocks, number of disk groups, and the data on the array size.
Having collected all the available information from the system and connected disks, the utility displays the automatically built arrays immediately, as soon as the program starts. In most cases, the program manages to restore RAID on the fly and suggests you to analyze the identified partitions and save any available data.
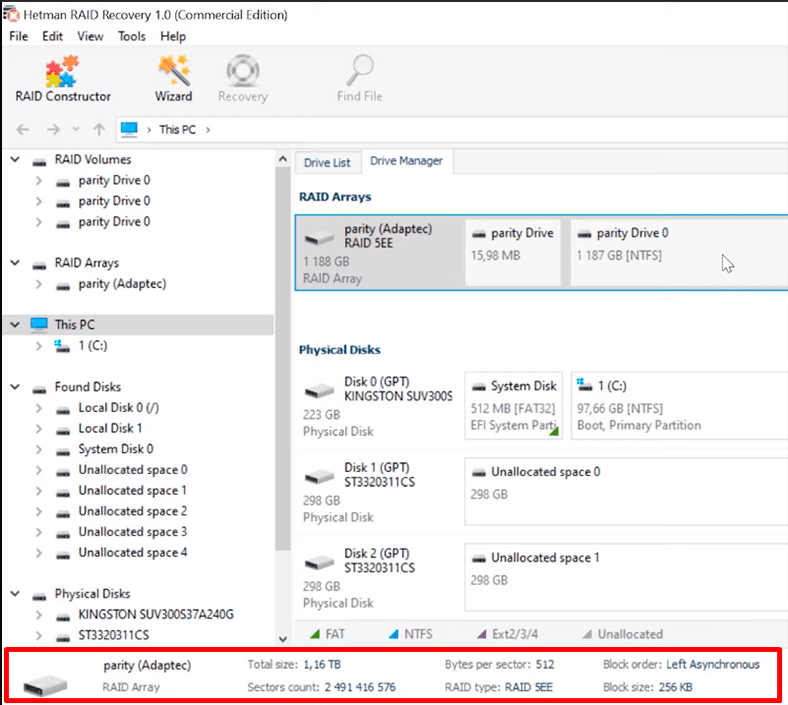
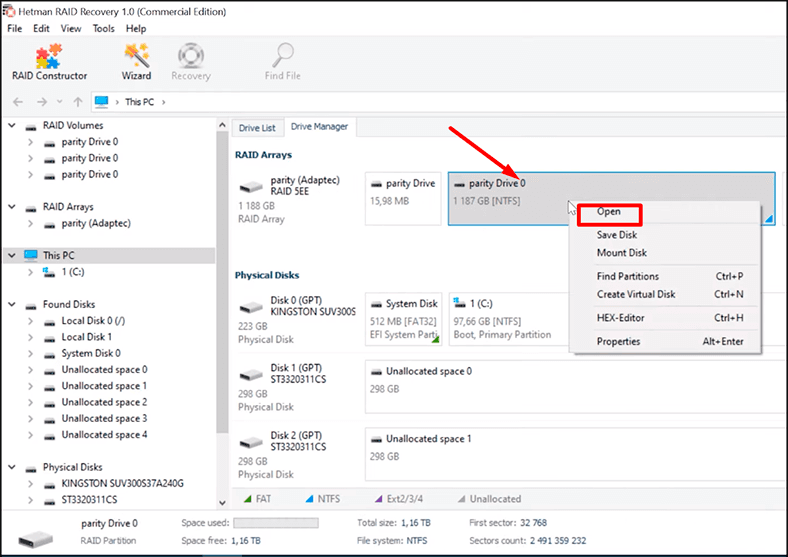
Open the Drive Manager tab, and find the line RAID Arrays to select your storage system from the list. Right-click on it and choose Open.
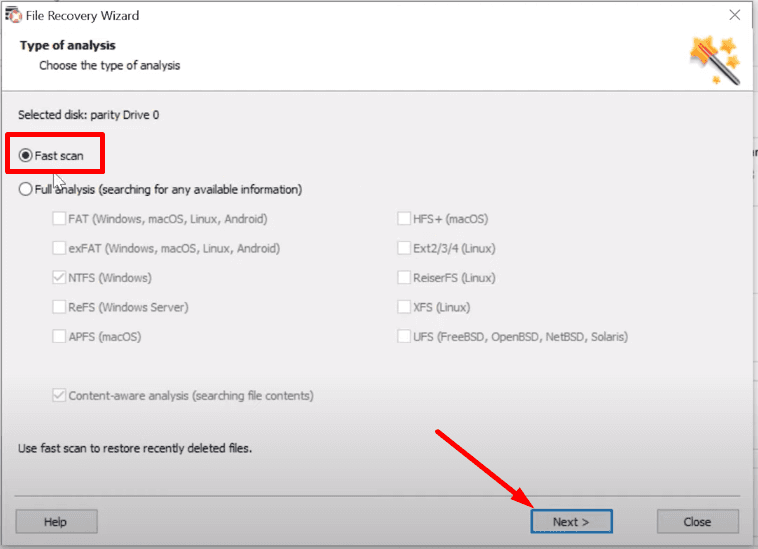
Try Fast scan first: if the disk structure is not damaged, this scan type will suffice.
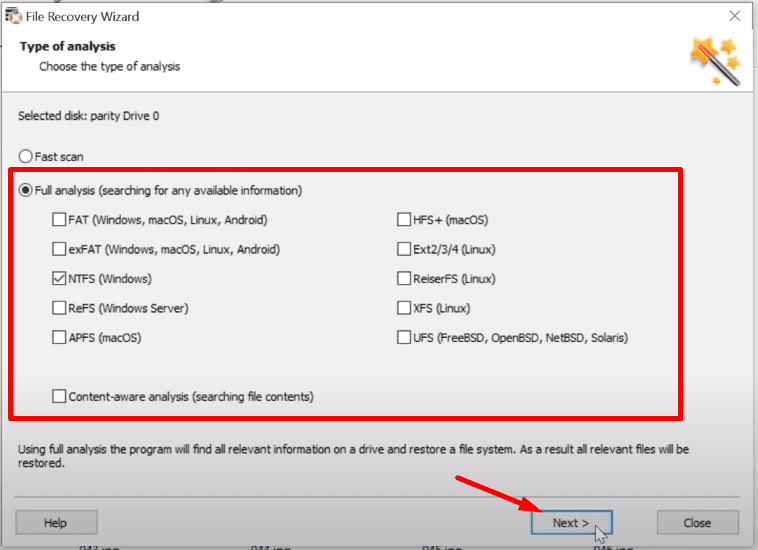
If the Fast scan doesn’t help to find the data, then go for Full analysis.
When it’s over, the program will display the results in the right side of the window.
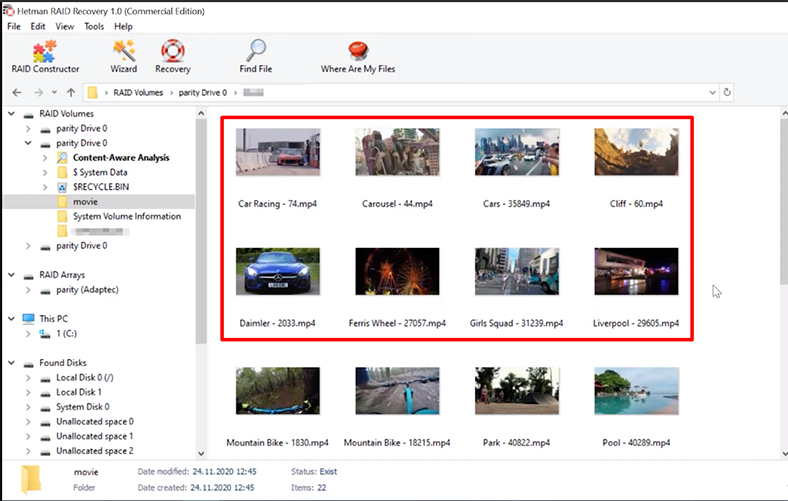
The program has built the RAID without effort and it can now display all the information still available on the disks. In this case, you don’t have to buy a controller of the same model – and as we know, even when you have it, there’s no guarantee you can build the RAID again without losing its information.
SATA Expansion Card
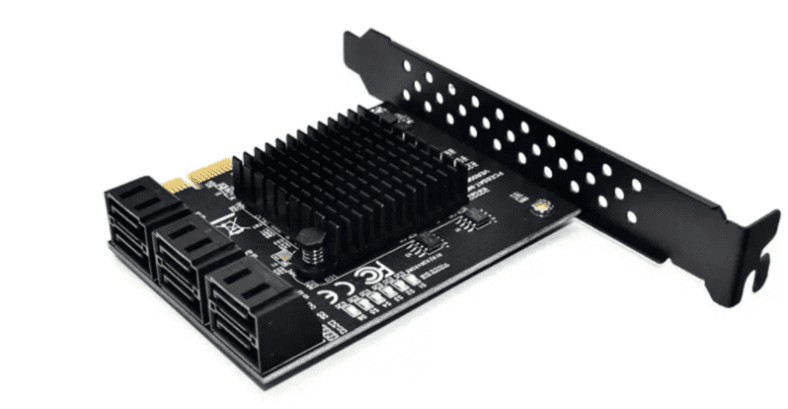
If your motherboard doesn’t have enough SATA ports to connect all the drives that used to be included into your RAID system, you can solve the problem by using a SATA expansion card. There is a wide choice of them, and you can get a card from any specialized store or buy it online – for example, on Aliexpress.

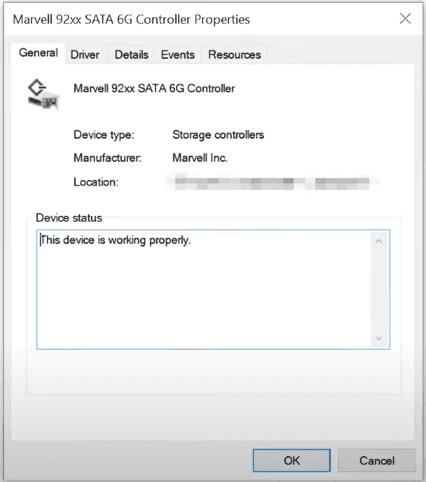
To have all the disks connected to the computer, we used an expansion card Marvell mv92xx (PCE6SAT-M01) with six ports.
Initially, the computer was only able to detect 4 disks, and to make it “see” all the disks connected to the expansion card, we had to install corresponding drivers.
Expansion cards may have 2, 4, 6 or 8 ports.

With a card like this, you can connect from two to eight drives. Supposing you have a few vacant ports on the motherboard and a good power supply unit, you can easily connect a dozen storage devices.
Case 3. Recovering data in a case of dead controller and one hard disk
After that, we simulated a situation, when both the controller and one of the hard disks failed. This RAID type should remain absolutely operable when only one drive is down. However, there is no way to access the information without additional software tools once the controller breaks down too. Still, our program coped with the task. We have connected the remaining five disks directly to the motherboard.
Hetman RAID Recovery detects the RAID type automatically, and displays all the information available about this array.
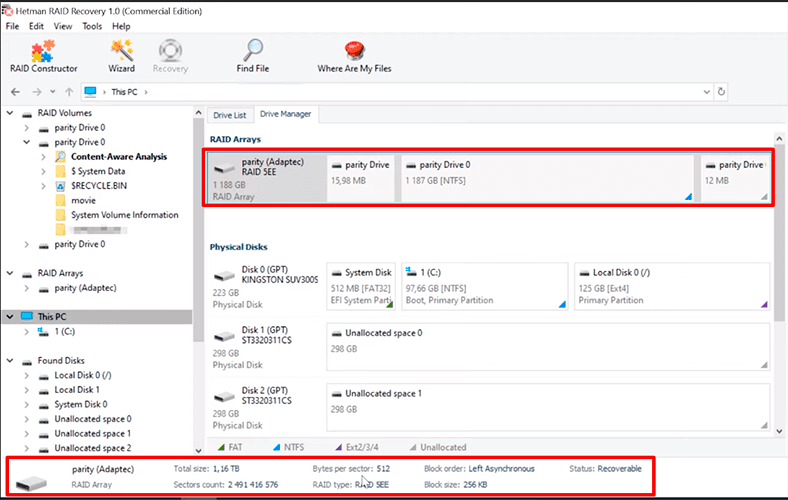
To display the contents of the disk, right-click on it and select Open.
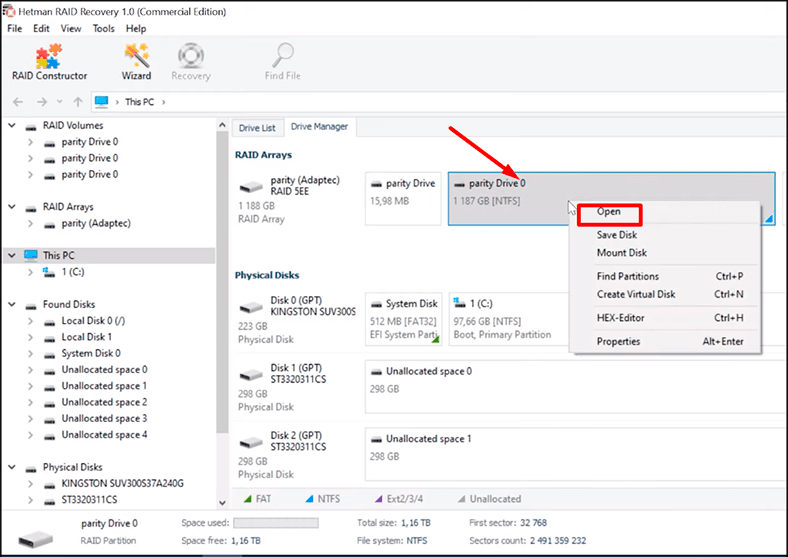
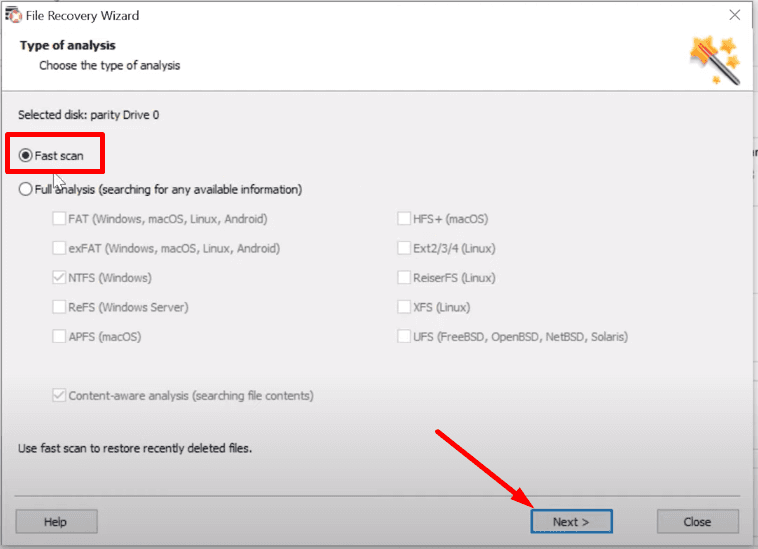
For starters, select Fast scan.
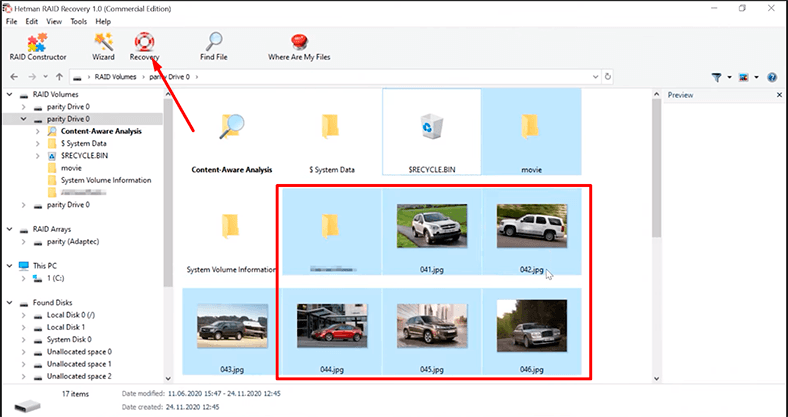
The program has found all the files that have been written to the array.
To recover them, select the ones you need, and then click Recovery,
specify the path to another healthy disk, and click Recovery again to save the data.
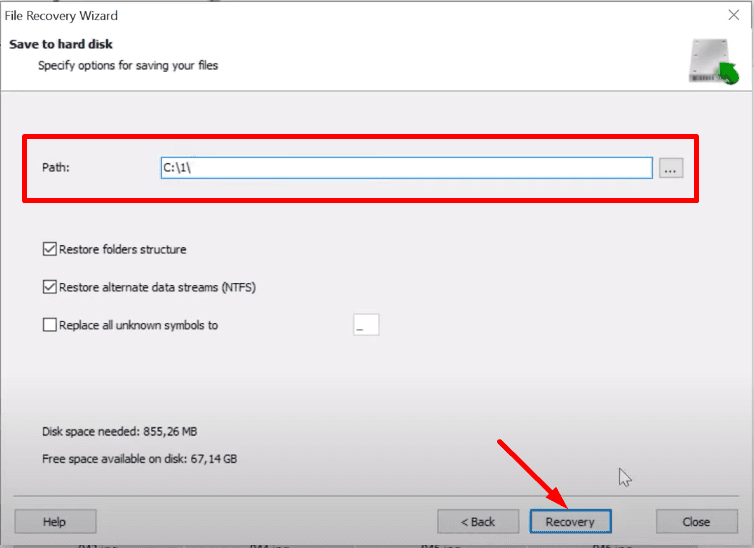
The program will recover all the selected files and put them into the specified folder.
Case 4. Recovering data in a case of dead controller and two hard disks
Then we simulated a situation with a dead controller and two disks that failed at the same time. This scenario should render this RAID type completely inoperable. Replacing the failed hard disks is not going to change anything. The information will be lost anyway.
Now we have four disks connected to the motherboard directly. If you don’t know which disks are still healthy, and which are not, connect all the drives. In our test scenario, we just disconnected two disks out of six.
To restore information from the remaining disks in this array we start Hetman RAID Recovery. In our case, the utility identified the RAID type automatically.
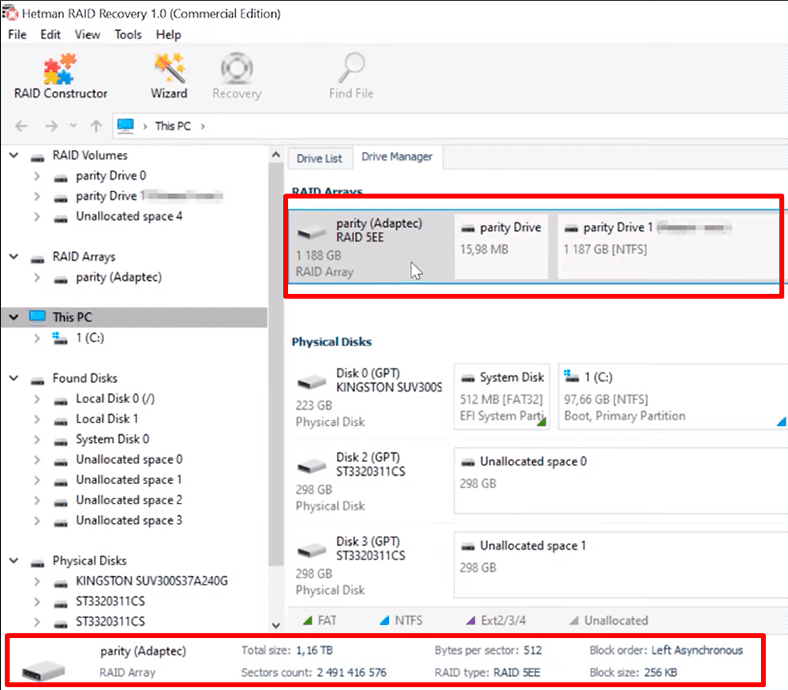
If your array is not shown on the list of storage devices, use RAID Constructor.
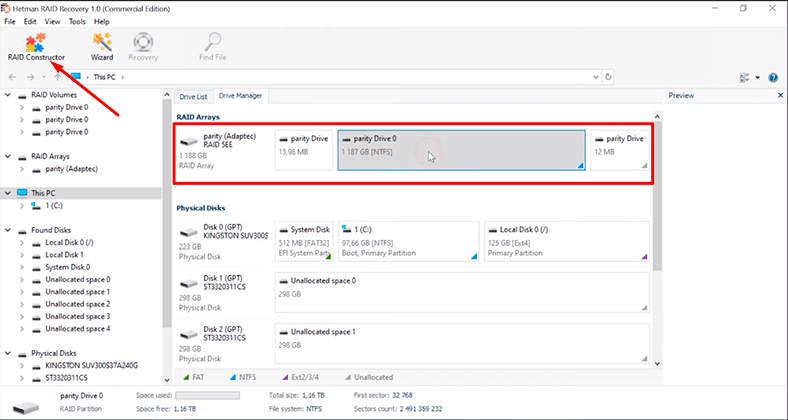
To rebuild the array in manual mode, you will need all the information you have on this damaged RAID system. Previously, we have described the way of obtaining the required information and suggested memorizing all the important properties.
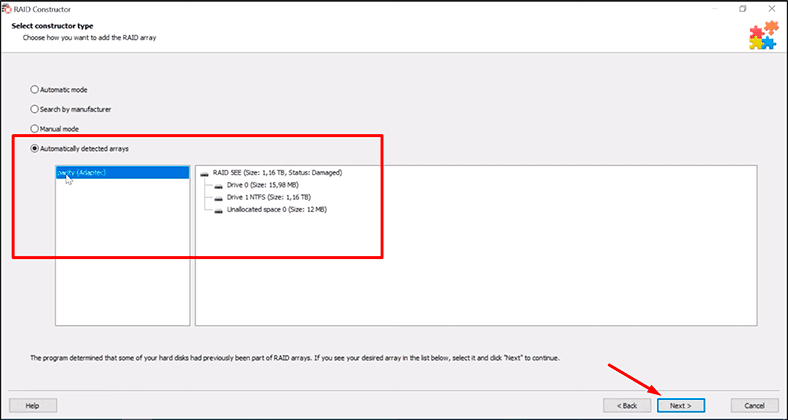
If the program has detected the array type automatically, view the information in the next window to make sure that all the properties were detected correctly.
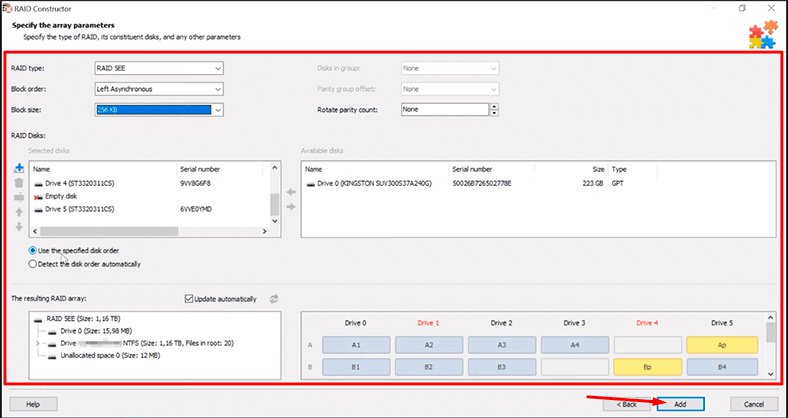
This is the factor that determines how much data can be recovered. If one of the properties is incorrect, change it. After that, click Add and start scanning the disk array.
In this situation, the program has found the data, but a part of the information is damaged.
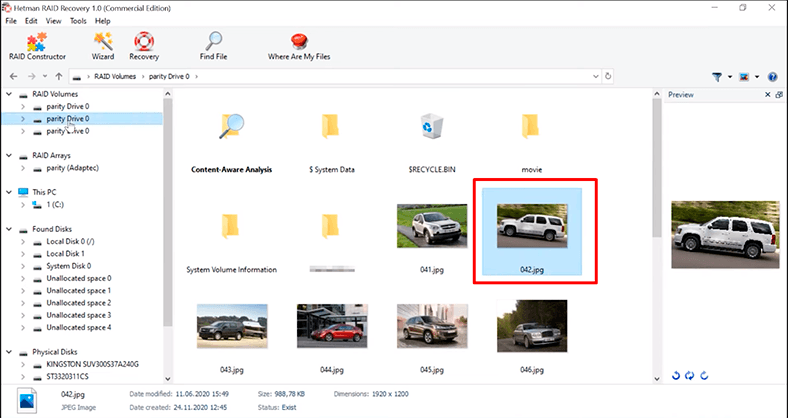
If the files you need are damaged or not found, run Full analysis. Then the program will be able to find more data which is still intact.
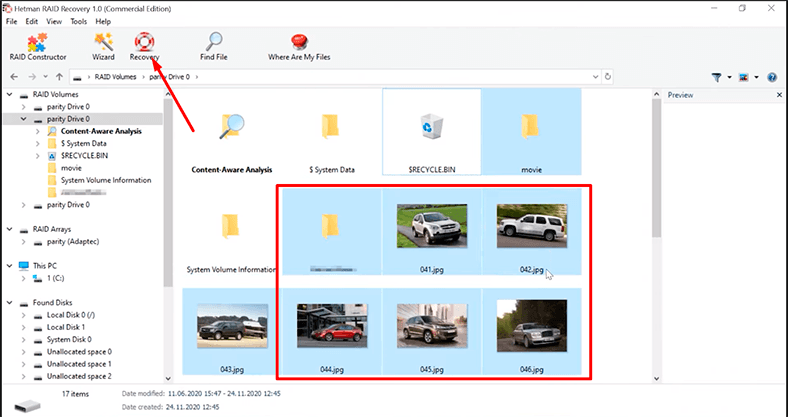
Select the files to be restored, and then click Recovery.
Specify a directory for saving the recovered data and click Recovery.
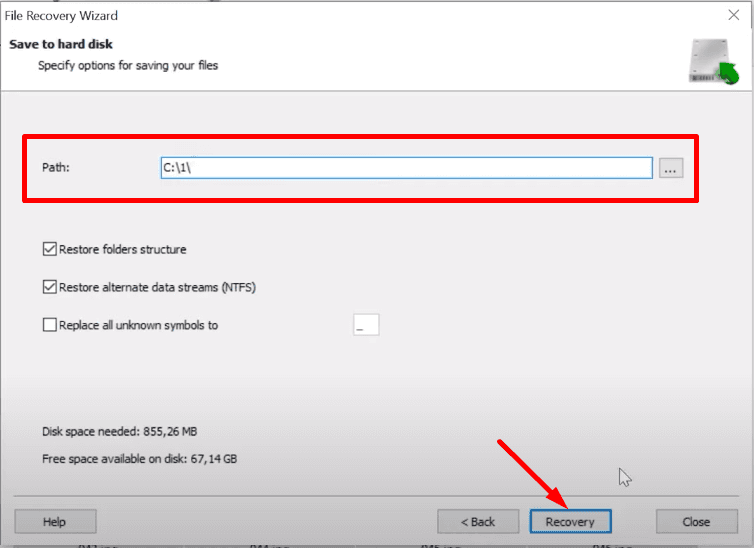
The selected files will be recovered. You will find them in the directory you have specified.
Conclusion
In this tutorial, we have presented two ways of recovering lost information from damaged arrays. Even when two drives and the hardware controller were down, we managed to recover a part of the data. It’s not always that successful, though, because losing two hard disks makes a RAID 5EE system completely inoperable and all the information is lost.
Also, it is always important to back up your files regularly. This is the option that almost always secures your information against all kinds of nasty things you may experience when it is lost. No matter what kind of error or failure occurs, you will be able to rebuild your RAID system and restore it from a backup copy.


