Unraid OS Data Recovery: How to Retrieve Data from a Crashed Disk Array
Learn how to recover data from a crashed disk array on Unraid OS. Whether you’re a system administrator or a user facing data loss due to disk array failure, we’ll explore the best methods and techniques for retrieving your valuable data. From troubleshooting to advanced recovery strategies, we’ve got you covered.
- How to build a RAID with drives on Unraid OS
- How to recover data from a crashed Unraid OS array
- Pros and Cons of Unraid OS
- Conclusion
- Questions and answers
- Comments
Before starting data recovery operations, let’s explore what is Unraid OS and how it works.
Unraid OS is an integrated operating system designed to create reliable data storage solutions. To ensure improved storage reliability, the operating system lets you combine several hard disks into a single array.
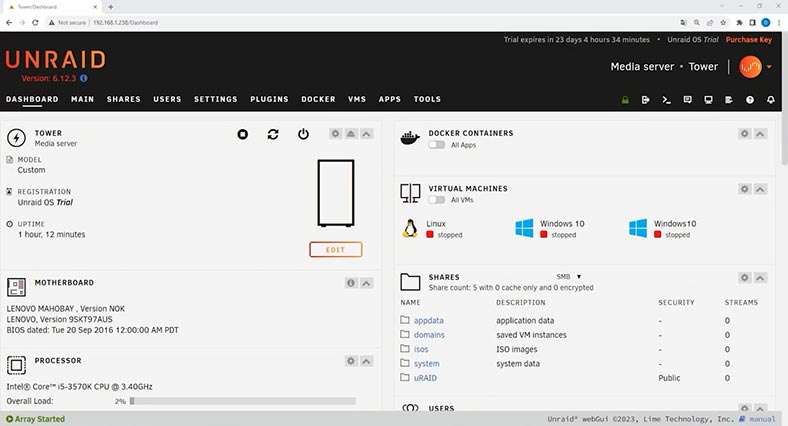
However, a disk array in Unraid OS is different from that in conventional RAID systems. Instead of using classical methods of combining hard disks such as RAID 1, 5 and so on, Unraid uses an idea of creating arrays without typical RAID requirements.
This approach lets users combine disks of various capacity, and each of them is treated as an individual one. Instead of creating a strict set of rules for data distribution, Unraid allows each disk to store its data independently.
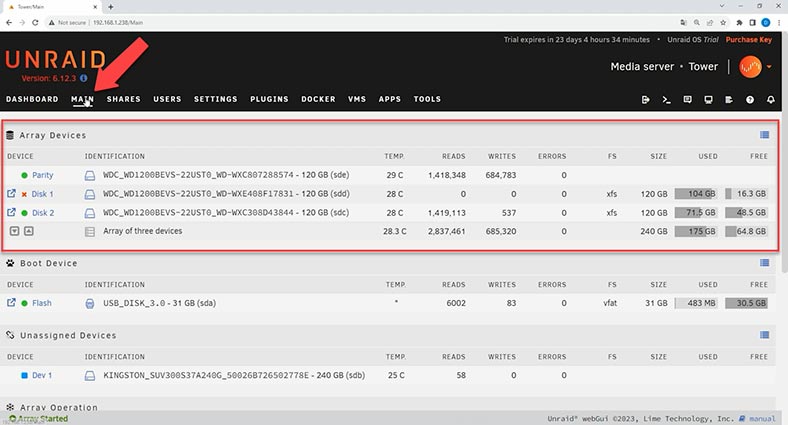
The main advantage of this approach is that even if one hard disk is out of order, only the data stored on this specific disk will be lost but the data on other disks is just inaccessible. This means you are not going to lose all your data, as is the case with classical RAID systems.
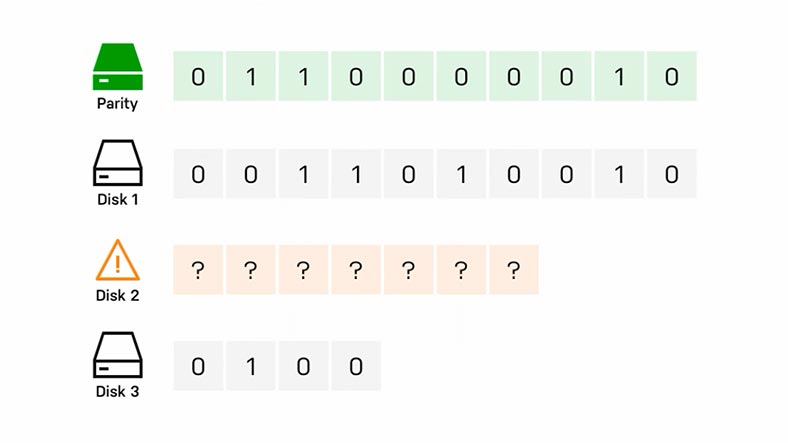
If one of the disks in an Unraid array is down, you can replace it with a new one and recover data with the help of integrated tools. Such approach allows for a more flexible way to manage data and ensure safety at a minimal risk of data loss.
Nevertheless, such technology cannot entirely exclude chances of data loss, so from today’s article you’ll learn how to recover files from a crashed RAID when the disk array cannot be accessed.

How to Recover Data from a Crashed Disk Array on Unraid OS
How to build a RAID with drives on Unraid OS
For better understanding of how to build a disk array on Unraid OS, let’s explore how to create one when you have four hard disks. For illustration, I’ll show you how to create a disk array similar to RAID 5, with one hard disk reserved for parity, and a disk array similar to RAID 6 with two parity disks.
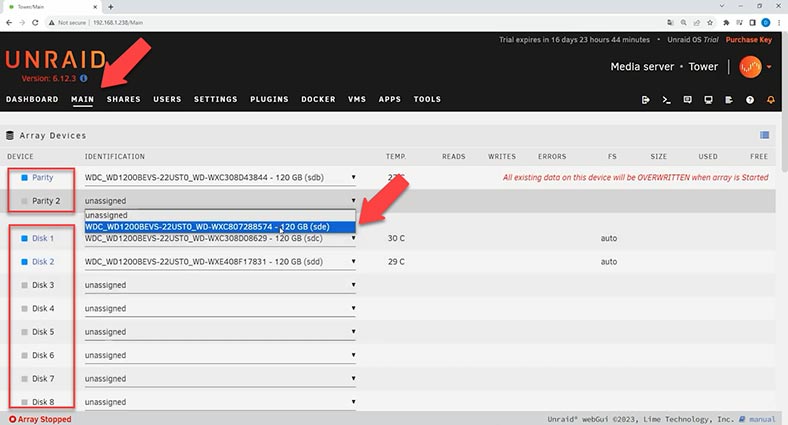
Let’s start by opening the web management panel for Unraid OS and then jump to the Main tab, where you should choose disks for Parity, and then for storage. Choose the drives from drop-down lists.
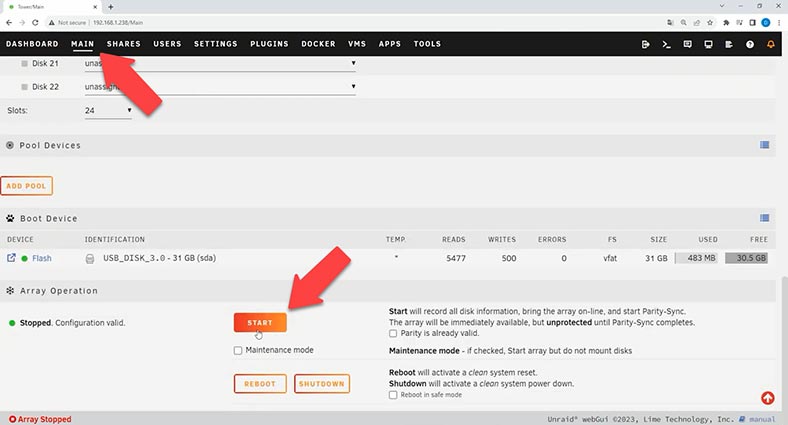
Look down to find and click the Start button to unite them into a disk array. By default, disks for storage will be formatted in XFS file system.
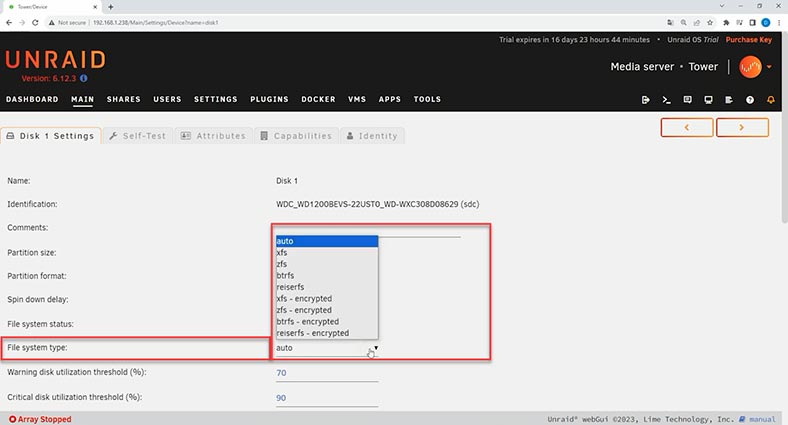
To choose a different file system, open the disk settings and choose an item from the list – btrfs, zfs, refs and so on.
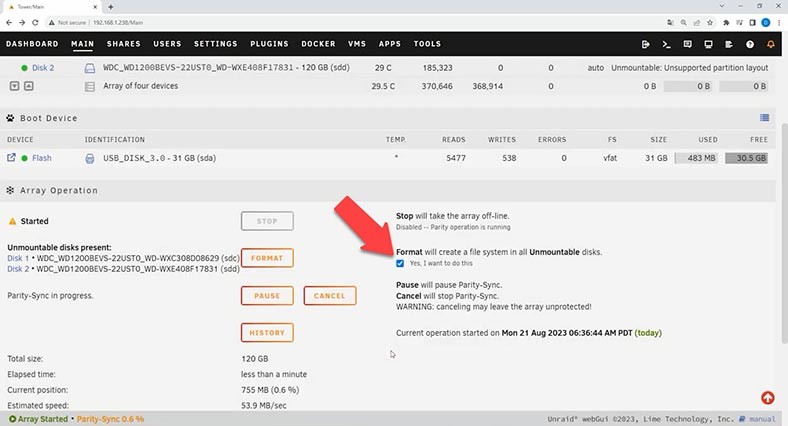
In the previous window, check the box next to the format option. Click OK in the disk format warning window. Then click on Format. Wait until the parity check process is complete, as it can take some time.
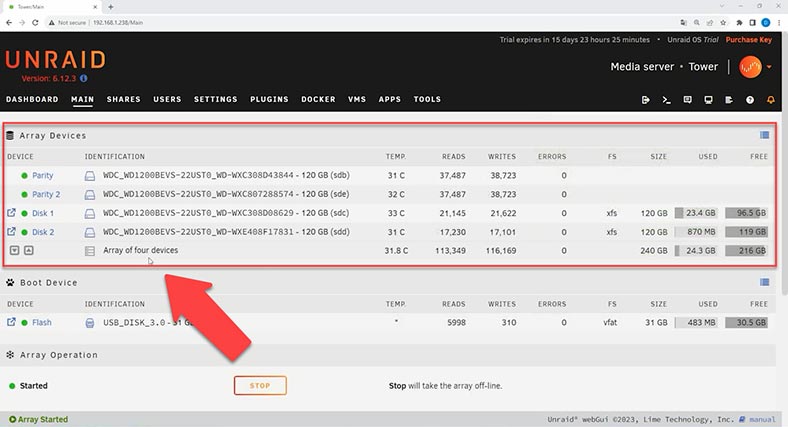
The array is built; now you can add a shared folder and upload some data to your disk array. While data is written, we can see that information is written to one of the disks within the array, and when a certain level of disk space usage is achieved, the rest of the information is then written to another disk.
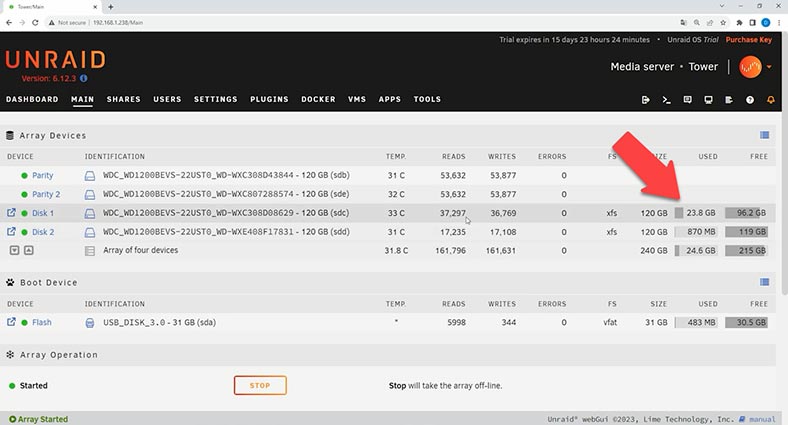
Such technology lets individual disks be independent from others. If one hard disk fails, you can replace it and the recover a part of the lost data from the remaining disks.
However, when a hard disk is down and the operating system on the boot device is damaged, a part of the data becomes inaccessible since it is located on the parity disk. In order to get all files from the disks, you will need a software tool capable of rebuilding the damaged disk array and retrieving your files.
How to recover data from a crashed Unraid OS array
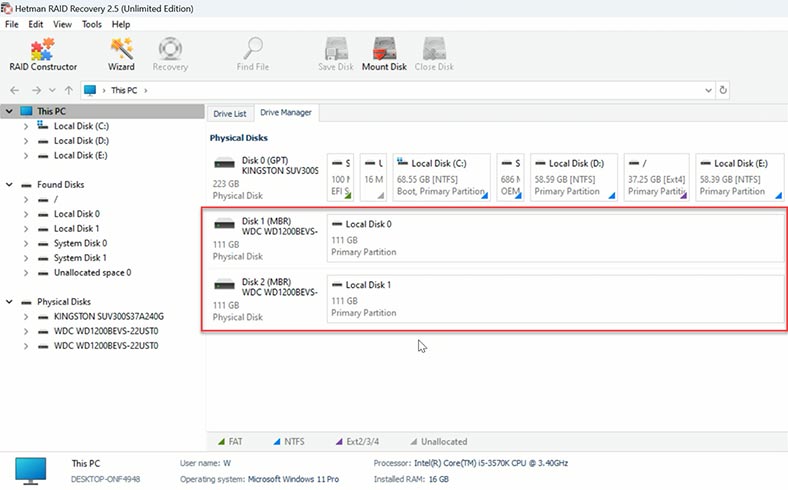
To retrieve data from Unraid OS, use Hetman RAID Recovery. It supports most popular file systems and RAID levels, including the Unraid OS technology. For recovery, take the disks out of your Unraid OS storage system and connect them to a Windows computer. The program fails to rebuild the RAID automatically and shows it as a bunch of individual drives.
| Step | Description | Tips | Notes |
|---|---|---|---|
| 1. Assessing the Array Condition | Check the current state of the disk array in Unraid OS to understand the extent of the damage. | Review system logs to identify possible causes of failure. | Use SSH or the Unraid interface to access disk status information. |
| 2. Ensuring Data Preservation | Shut down the system to prevent further data loss. | Ensure the system is fully disconnected from the power source. | Avoid attempting to recover the array on your own without proper preparation. |
| 3. Creating Backups | If possible, create backups of data from intact disks before starting any recovery actions. | Use specialized software to create disk images. | Save backups to a separate device or cloud storage. |
| 4. Recovering Data with Unraid | Try to recover the array using the built-in recovery features of Unraid OS. | Ensure all disks are connected and properly recognized by the system. | Use “Check Filesystem” to diagnose and repair the filesystem. |
| 5. Using Third-Party Software | If recovery through Unraid fails, use third-party software to recover the data. | Popular tools include Hetman RAID Recovery, R-Studio, UFS Explorer, and others. | Conduct the recovery on a separate device to avoid further data damage. |
| 6. Saving Recovered Data | After successful data recovery, save it to a secure storage device. | It’s recommended to store the data on multiple devices for increased reliability. | After this, you can start the process of rebuilding the array. |
Method 1. How to recover data from a dual parity RAID array
In my case, there are only two parity disks left, and their data cannot be retrieved without using third-party software tools, because the two disks containing data are lost. First of all, you need to build the array with the available disks. To rebuild the array, start the RAID Constructor.
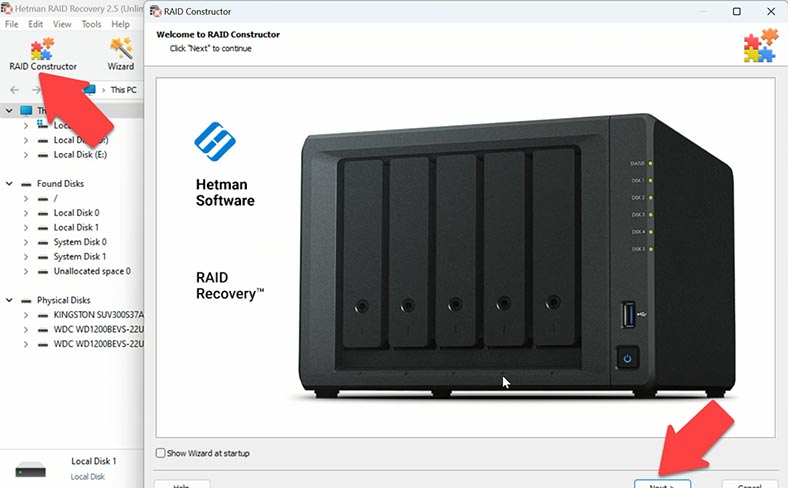
There are several ways to build an array including determining the configuration by manufacturer or building the array manually – for advanced users.
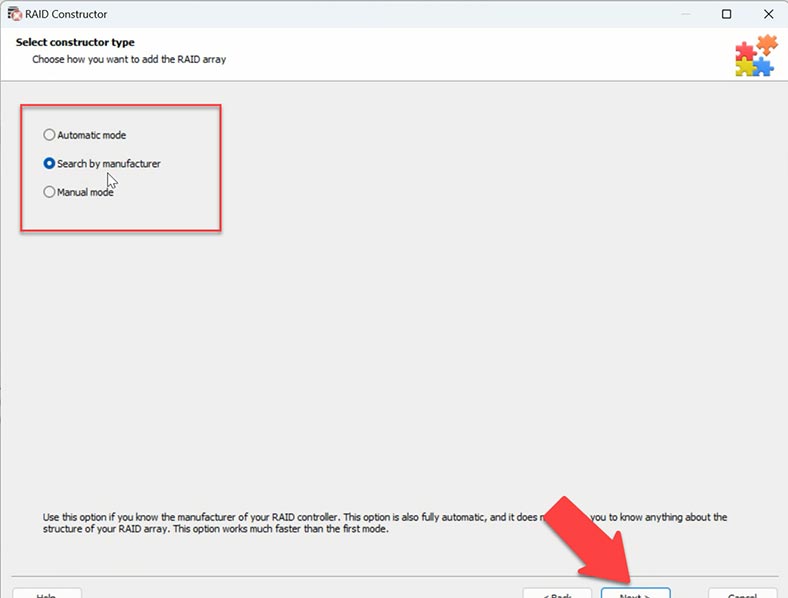
When you search for configuration by manufacturer, the program will use its collection of algorithms typical for certain manufacturer to give you a few array configurations to choose from.
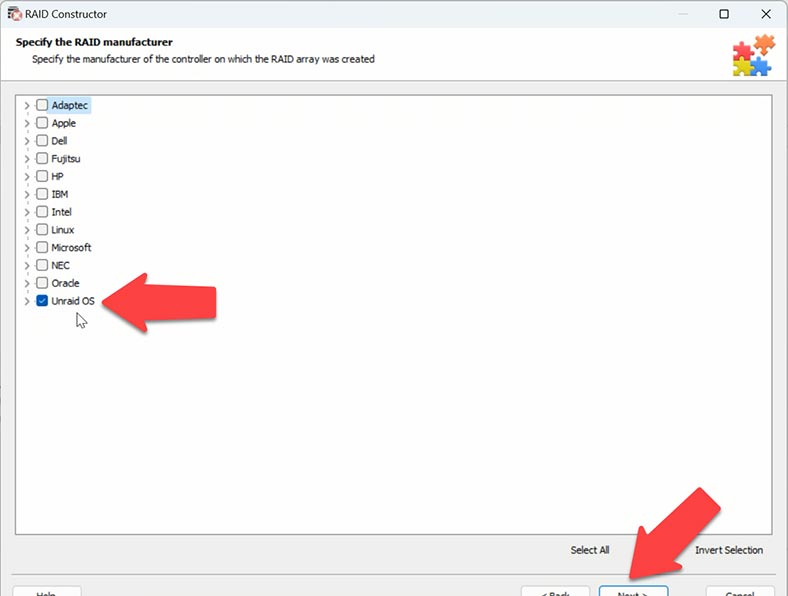
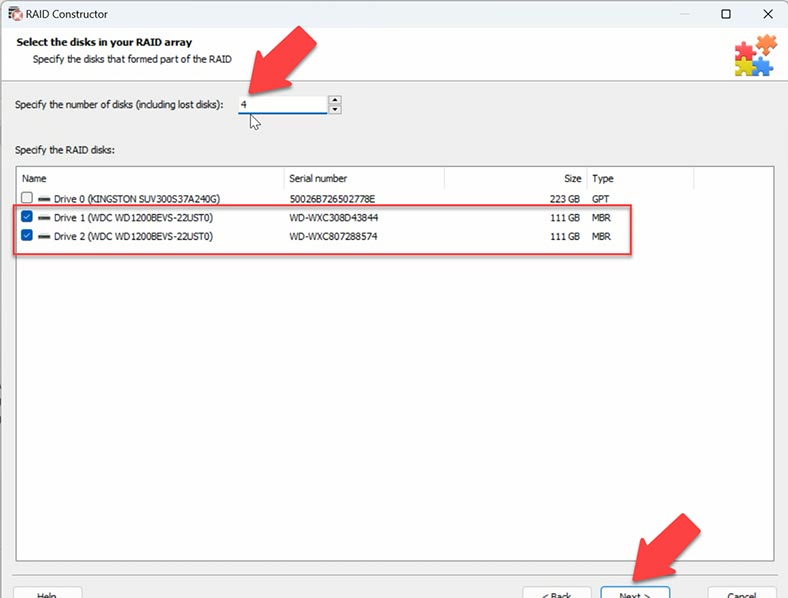
The program will ask you to specify the number of disks that your RAID used to consist of, including non-operable ones.
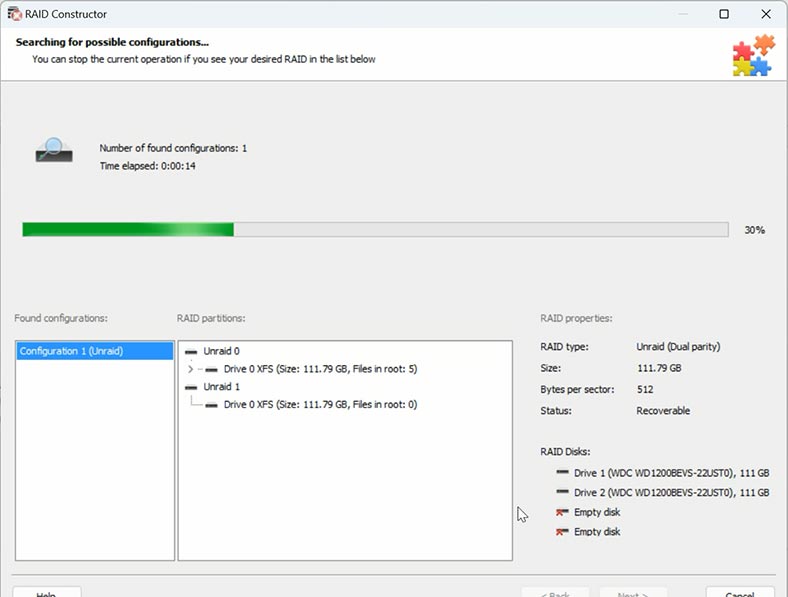
After that, the program will look for possible configurations and show you the search results. The best variants will be highlighted.
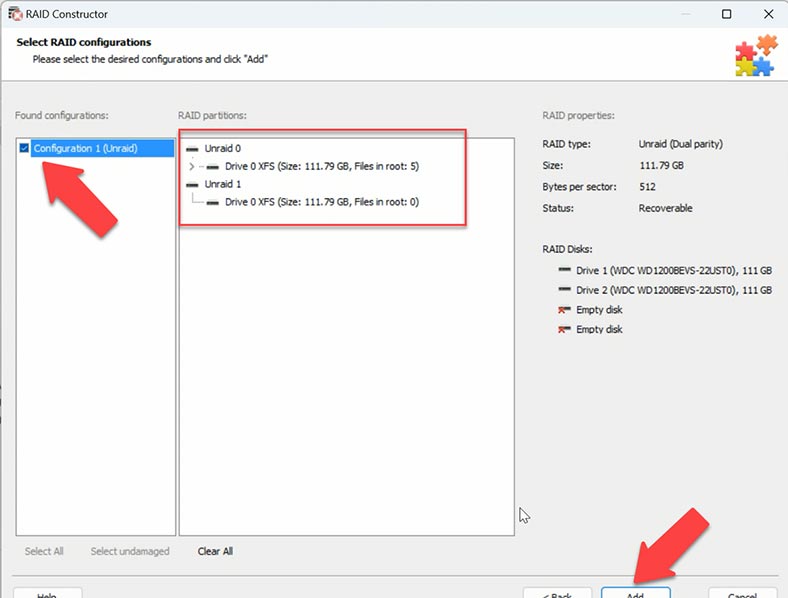
Check the box next to the required configuration and click Add. After that, the hard disks will appear in the Drive Manager.
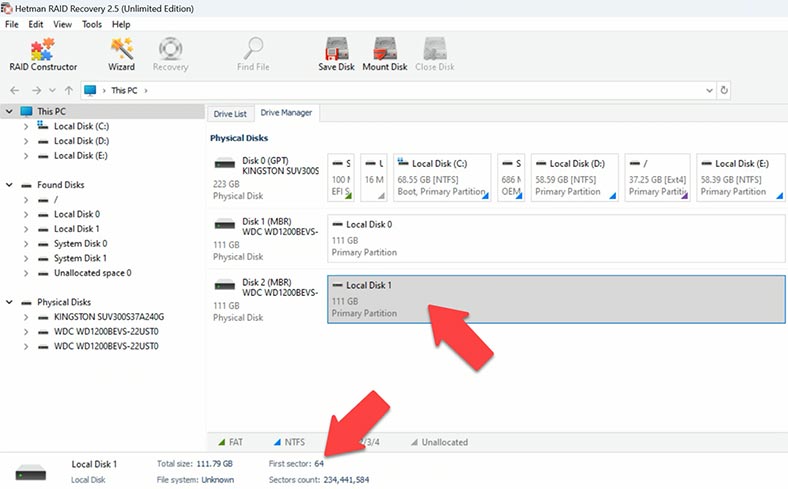
The second method is meant for advanced users and lets you build precisely the configuration you need. For starters, you need to know the offset of the disk beginning. When you select a disk, you can see that its records start from sector 64. The developer says this starting point can either be sector 64 or 2048. In our case, the offset is 64.
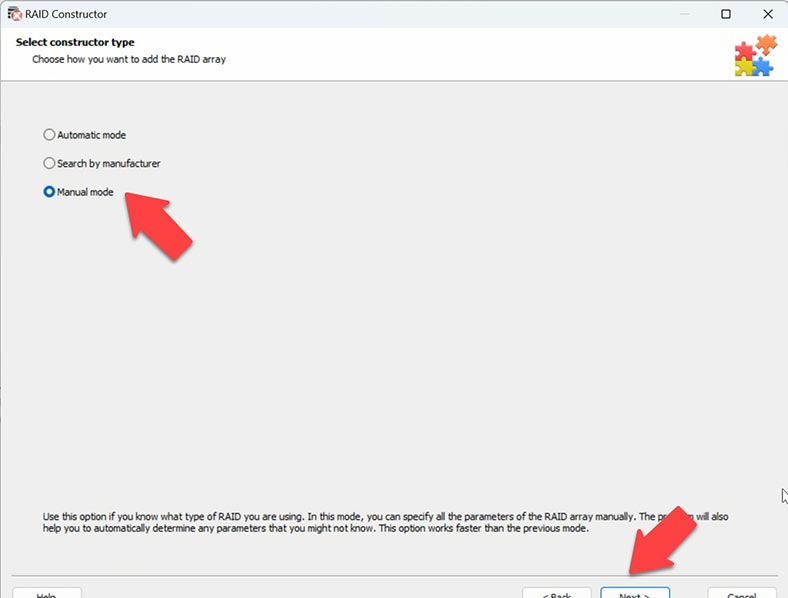
Now start the RAID Constructor – Manual Mode, and add the available disks. Select the type – we know it’s Unraid, and it’s Dual Partity.
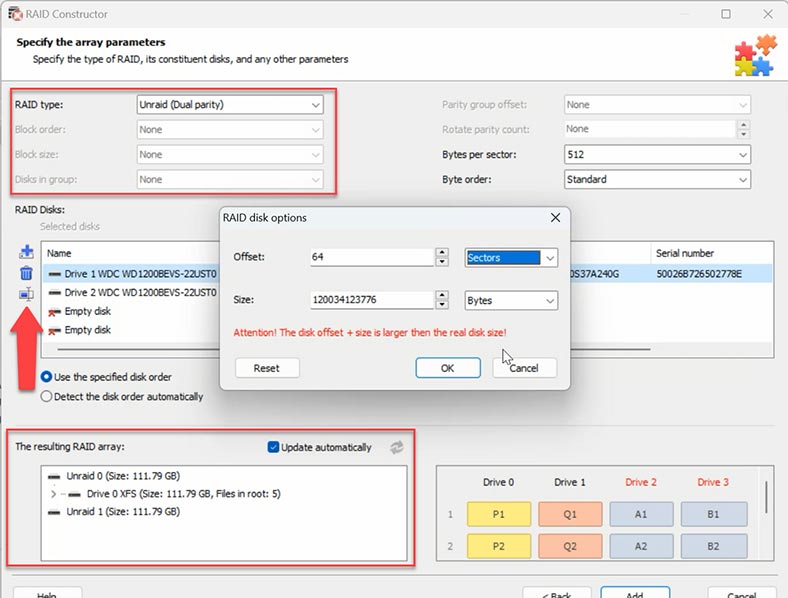
We also know the number of disks, so add empty drives instead of the missing ones by clicking on the plus button. Now give the offset which we already know – sector 64.
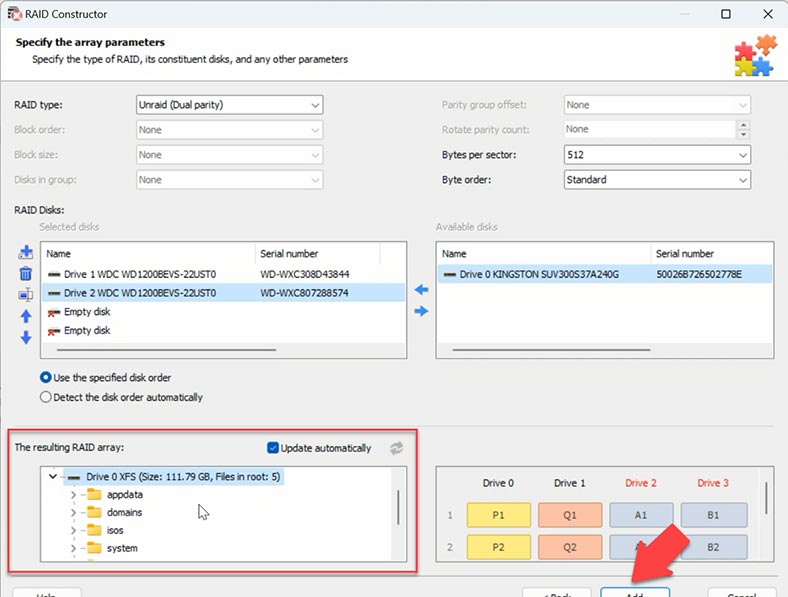
When you give all the parameters you know, you will see the preview of your array, and if all information is correct, you can unfold it to see its folders. After that, click Add, and the hard disks will appear in the Drive Manager. The last step is to start searching for files.
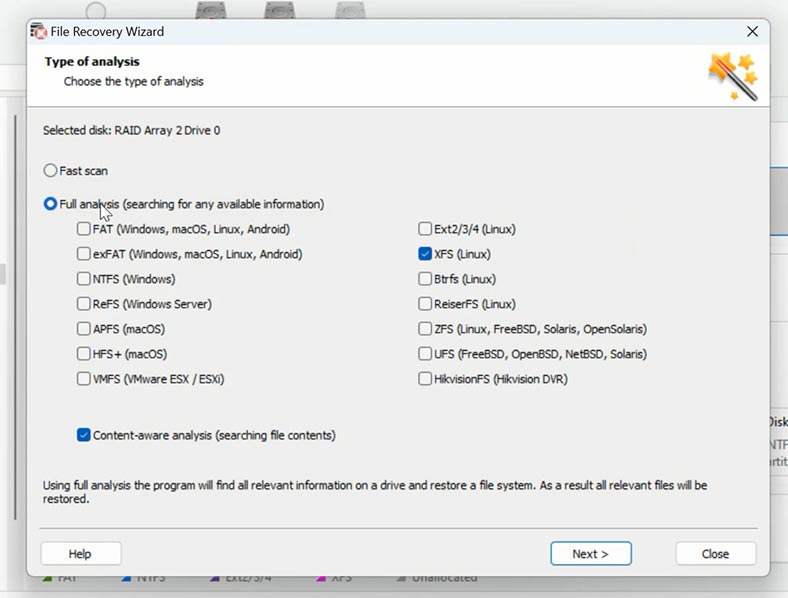
To do it, right-click on a disk and choose Open. After that, select the scan type – Fast scan or Full analysis. When one disk is lost, Fast scan is enough. If the program failed to find the necessary files, then run Full analysis. To do it, return to the main menu, right-click on the disk and choose Analyze again, Full analysis, and Next.
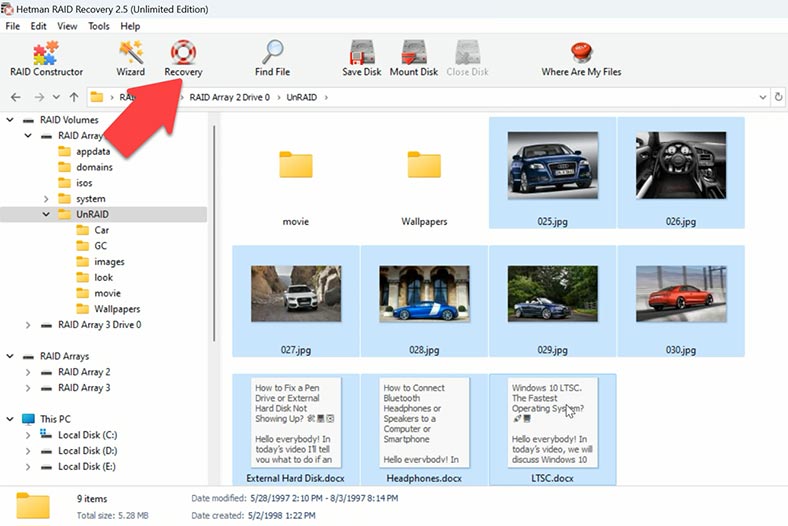
Open the folder where your files for recovery were stored, select them and click Recovery.
Then choose where to save them (the disk and folder) and hit Recovery again. When the entire process is over, you will find the recovered files in the folder you have chosen.
Method 2. Recovering data from a single-parity RAID
If your array was created with single parity (one parity disk), then you can only retrieve a part of your data if one of the disks is down and the bootloader is damaged, and you’re not using a data recovery tool. The matter is that the information will be stored in its original form only on one disk.
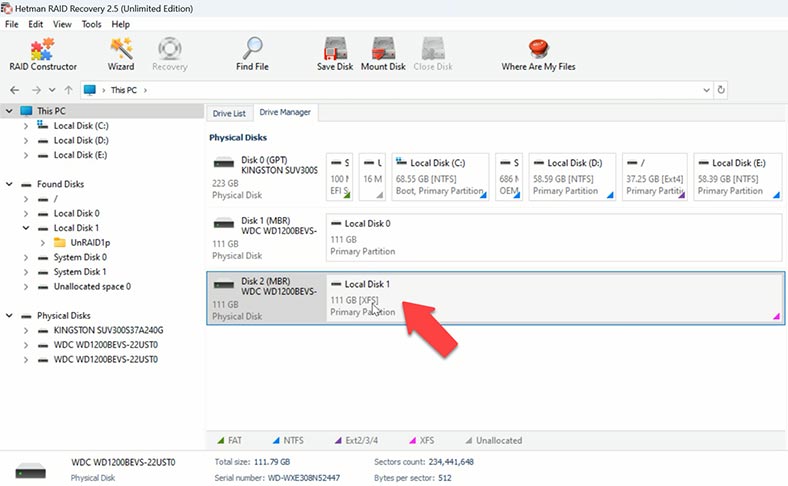
Just like in the previous case, the program can’t build the array automatically, and it displays a parity disk with an unallocated area and a disk with the file system, while one disk from this array is lost. In the end, you have a drive containing some data that can be retrieved easily without any special tools, and a parity disk which needs recovery software for its files to be retrieved.
To get the files from such disk, you need to build a disk array manually. Open the Constructor just like you did it before. Choose a suitable building method, by manufacturer or manually. Choose Unraid OS, give the number of disks.
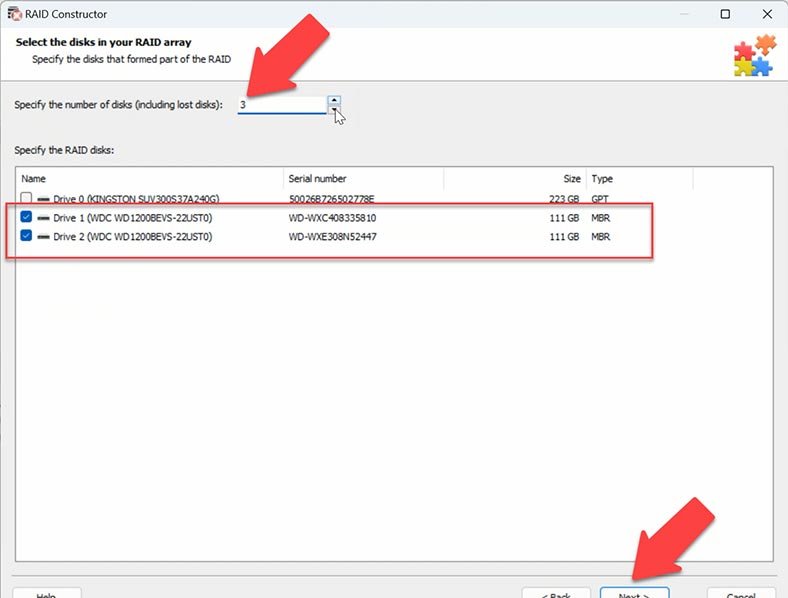
Choose a configuration suggested by this tool and add it, then click Scan.
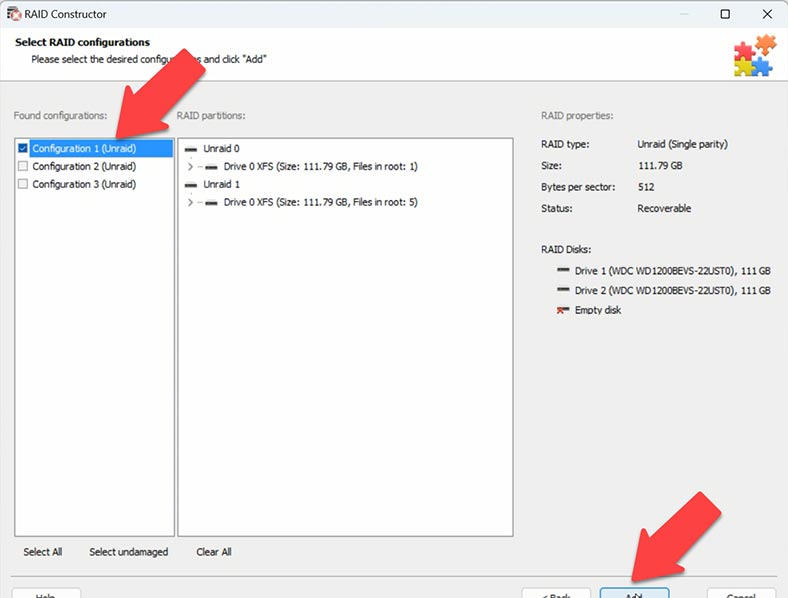
Alternatively, you can choose the other method – building the array manually. Choose the type, select disks, give the same offset for sector 64, arrange the disk order and click Add.
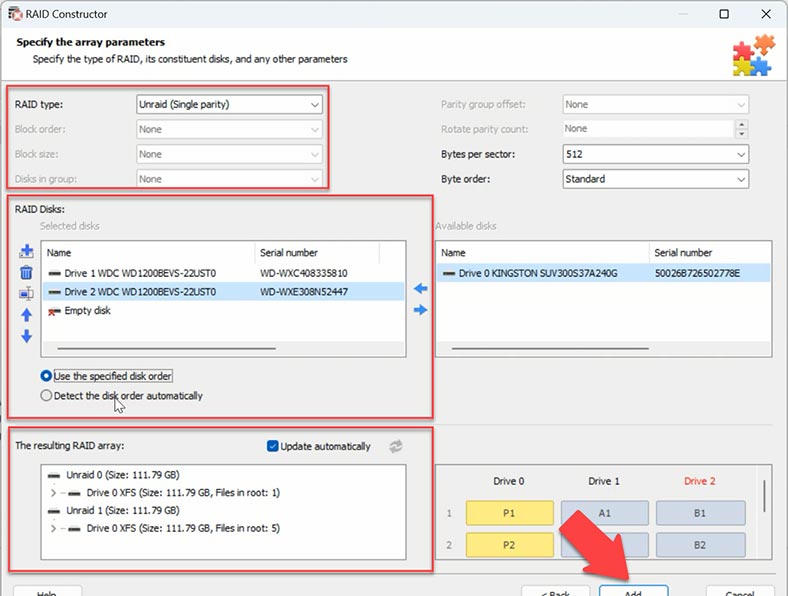
You can see the same disks as before. Scan them and recover your files.
Pros and Cons of Unraid OS
Pros:
- User-Friendly Interface: Unraid OS offers a user-friendly interface, making it accessible even to users with limited technical expertise. This ease of use simplifies the setup and management of the server and NAS.
- Flexible Storage Configuration: Unraid’s unique storage system allows users to add hard drives of varying sizes and types to the array, providing flexibility and scalability without the need for RAID configurations.
- Docker and VM Support: Unraid OS supports Docker containers and virtual machines, enabling users to run a wide range of applications and services within isolated environments, enhancing functionality and versatility.
- Data Protection: Unraid’s filesystem and parity protection mechanisms help safeguard data against drive failures, ensuring data integrity and minimizing the risk of data loss.
- Community Support: Unraid boasts a supportive community of users who actively engage in forums and discussions, providing assistance, troubleshooting tips, and recommended practices to help users get the most out of the platform.
Cons:
- Limited General Support: While Unraid has a dedicated user community, general support options may be limited compared to larger operating systems like Linux or Windows, potentially posing challenges for users seeking comprehensive technical assistance.
- Trial Limitations: Unraid’s trial version may have limitations, such as a maximum number of hard drives or restricted access to certain features, which may hinder users from thoroughly evaluating the platform’s capabilities before making a purchase decision.
- Complex Restore Procedures: In the event of data loss or drive failures, restoring data on Unraid OS may require thorough procedures and manual intervention, especially when attempting to recover from filesystem or drive issues.
- Plugin Dependency: While Unraid offers a variety of plugins to enhance functionality, users may become dependent on these plugins for essential features, potentially complicating system management and updates.
- Security Concerns: Unraid’s reliance on plugins and third-party applications may introduce security vulnerabilities, especially if users install unsupported or unverified plugins, requiring users to remain vigilant and thoroughly vet plugins for security risks.
Overall, Unraid OS provides a user-friendly and flexible platform for building servers and NAS systems, but users should consider the limitations and potential challenges associated with the platform before deployment.
Conclusion
In the end, if all you have is two disks with data, you don’t have to build a RAID. Just analyze them, and get your files back. If there is only one disk with data, the scan will only retrieve the files which were written to this specific disk. If you add a parity disk to your data disk and build an array, you can retrieve the remaining information which was stored on the lost disk.
Following the steps described in this article, you’ll be able to ensure the safety of your data and recover it when necessary. Our instructions and recommendations will help you to bring the required files back without effort.


