How to Format a Hard Drive in Windows
Whether you’re preparing a new drive for use, troubleshooting disk errors, or simply looking to erase all data securely, this step-by-step guide will walk you through the process. From selecting the right formatting method to understanding file systems and partitioning options, we’ll cover everything you need to know to format your hard disk effectively.
In this article, we would like to mention several most frequently used ways of formatting the hard disk. To begin with, here is a little introduction on what formatting is and what file systems are the most popular today.
- A Bit Of Theory
- Hard Disk Formatting With Windows Tools
- Disk Partitioning and Formatting When Installing Windows
- Afterword
- Questions and answers
- Comments

How to Recover Data After Formatting, Deleting or Creating Partitions in 2020 📁🔥⚕️
A Bit Of Theory
On the whole, the term “formatting” denotes the process of marking the hard disk, during which a kind of a file system (table) is created. With the use of this logical table all information will be written to and read from the disk surface.
These tables can be different which is completely logical because information can be arranged in all kinds of ways. The type of table you are going to have will depend on the file system.
During formatting of the disk you will have to specify the file system (it is a must). Today, the most popular file systems are FAT and NTFS. Each one has its own peculiarities. Probably the main difference for an average user is that FAT 32 does not support files bigger than 4 GB. It is too little for modern films and games, if you install Windows 8/10.
Quick And Full Formatting, What Is The Difference?
In case of quick formatting, everything is extremely simple: the computer believes that the disk is empty and creates a new file table. That is, physically the data is still there, but the system no longer sees the parts of the disk where it is written as occupied. This is the principle that lays the basis for the work of software for recovery of deleted files.
In case of full formatting, hard disk sectors are checked for bad blocks. Such formatting may take a long time especially if the hard disk is large. Again, the data is not physically deleted from the disk.
Is frequent formatting harmful for the HDD health? No, it is not. With the same result, you could suggest that writing or reading files to/from your disk is harmful.
| Feature | Quick Formatting | Full Formatting |
|---|---|---|
| Time Required | Faster (typically a few seconds to a minute) | Slower (several minutes to hours, depending on size) |
| Data Deletion | Removes files from the file system but does not wipe data completely | Wipes data completely, making recovery more difficult |
| Surface Check | Does not check the disk for bad sectors | Checks the disk for bad sectors and tries to repair them |
| Performance Impact | Less impact on system performance | More intensive, as it checks and erases all data |
| File System | Recreates the file system structure without checking for errors | Recreates the file system structure and checks for errors on the drive |
| Use Case | Used for quick, everyday formatting (e.g., preparing a drive for reuse) | Used when preparing a drive for reuse or troubleshooting, or for a fresh start |
How To Physically Delete Data From The Hard Disk?
It sounds so easy – just write other data instead. There are also special programs to delete all data so that it cannot be recovered by any utilities.
Hard Disk Formatting With Windows Tools
There are three ways to format the hard disk within a Windows operating system. At least, these are the most widespread.
Method 1. With This PC
This is the easiest and most well-known method. First of all, go to This PC. Then right-click on the necessary hard disk or flash drive volume (or another device) and select the line Format.
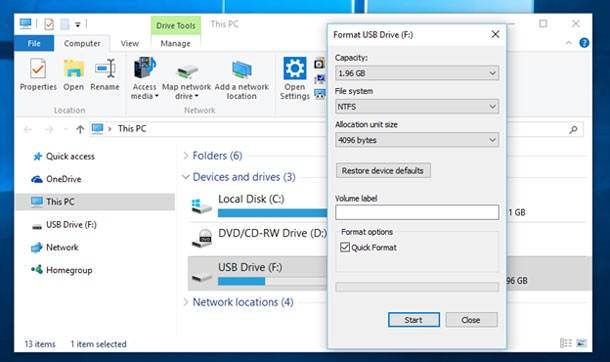
Then you should specify the file system to be created: NTFS, FAT, FAT32; quick or complete, and add the volume label. After you have finished with the settings, click Start. Basically, that is all. In several seconds/minutes the operation is complete and you can start working with the disk.
Method 2. With Disk Management Panel
Let us study it with the example of Windows 10. Go to Control Panel and type in Disk in the search menu (in the upper right line). Look for the heading Administrative Tools and select the item Create and format hard disk partitions.
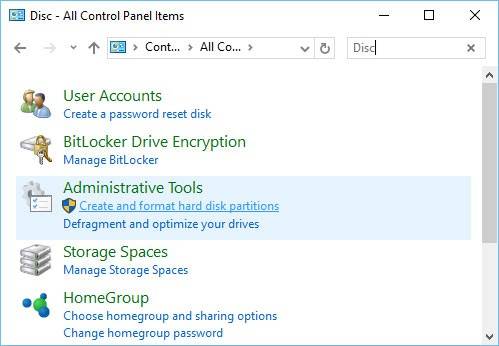
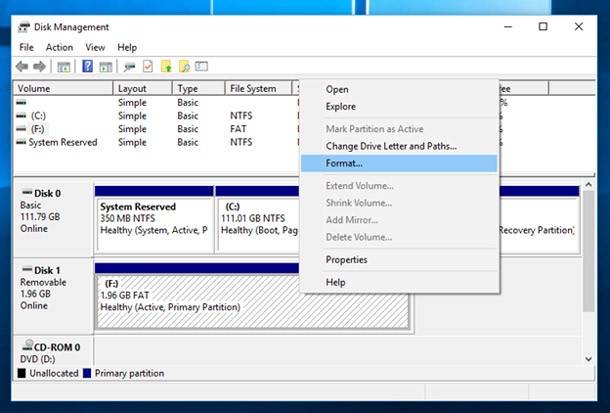
Then you should select the disk and the necessary operation – in our case, it is formatting. Specify settings and click Start.
Method 3. With The Command Prompt
First of all, launch the Command prompt. The easiest way to do it is through the Start menu. For Windows 10 users, we are providing this example.
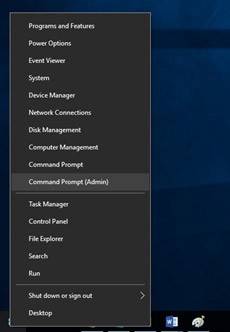
Now that you are in the command prompt, type in format d: where d is the letter assigned to the drive which you need to format. Now press Enter.
format d:
Be very careful as the program is not going to ask you if you really want to format the disk partition.

Disk Partitioning and Formatting When Installing Windows
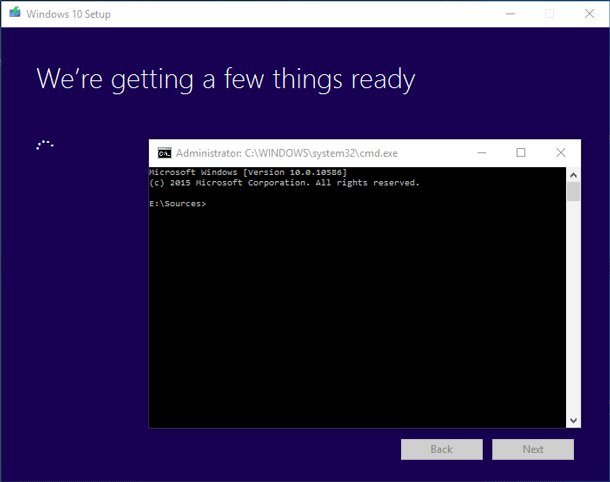
When installing Windows OS it is very convenient to split the HDD into partitions, formatting them as you go along. After all, the system partition where your operating system is installed cannot be formatted in any other way but with the use of boot disks and boot USB drives.

How to Reset Windows 10 or 8 PC to Factory Default Settings (All Methods) 🔄💻📀

How to Reset Windows 10 or 8 PC If The Operating System Won't Boot 🔄💻📀
On the whole, when you are installing Windows and reach the stage of partitioning your HDD, you will see something like this:
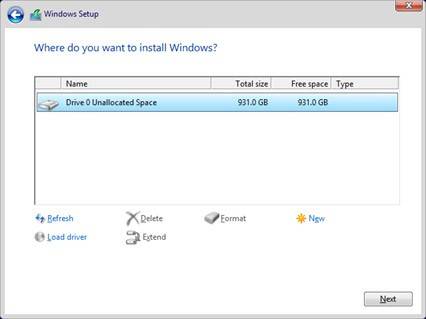
Instead of Next, click New. Then you will see buttons to edit your HDD. You can create 2-3 partitions in the disk, format them into the file system you need and then select the partition where you want to install your Windows OS.
Afterword
In spite of so many ways of formatting out there, never forget there might be some valuable data on your HDD. It is so much easier to save backups to other media before you start any serious procedures with your hard disk. Often many users realize their mistakes only in a day or two and then have to regret their careless and hasty actions.
Anyway, until you have written new data to the disk, a lost file can be recovered in most cases. The earlier you start the process of recovery, the higher are your chances to succeed.


