Check Hard Disk SMART Data in Windows 10: Prevent Future Problems
Learn how to check SMART data of your hard disk in Windows 10 with our essential guide. SMART (Self-Monitoring, Analysis, and Reporting Technology) provides valuable insights into the health of your hard drive, allowing you to detect potential issues before they escalate. In this comprehensive tutorial, we’ll walk you through step-by-step instructions and expert techniques to help you monitor disk health using SMART data in Windows 10. From interpreting SMART attributes to identifying warning signs, you’ll learn how to leverage SMART technology to ensure the longevity and reliability of your hard drive. Don’t wait for problems to arise—watch our guide and stay proactive about your disk health today.
- Method 1. How to detect a potential hard disk issue with the Command Prompt
- Method 2. How to determine a possible hard disk failure with Windows PowerShell
- Method 3. How to analyze disk performance and health with Performance Monitor
- Conclusion
- Questions and answers
- Comments
In addition to checking the operating system regularly and fixing logical errors and other problems, Windows 10 users are recommended to run diagnostics for hard disk drives (HDD) or solid-state drives (SSD) from time to time for monitoring purposes, so that they can always know if the storage devices are healthy and can avoid unexpected hardware failures that may result in a sudden loss of data.
The only limitation to the process is that Windows 10 doesn’t have a feature that would monitor the status of hardware without the user’s participation. However, we can still use such preinstalled tools as Command Prompt, Windows PowerShell and Performance Monitor to access the information based on the self-monitoring, analysis and reporting technology (SMART) that is available in most storage devices, and always know if the hard disk is healthy or not, ready for work or suffering from hardware problems.
If the SMART data says the disk is about to fail soon, you will have a chance to look for a replacement and copy your data to the new disk before it’s too late.
Today’s tutorial will show you how to use built-in Windows 10 diagnostics and prediction features to advantage, and you will also learn a few quick methods to check the SMART readings and find out if your hard disk is healthy or nearing its doomsday.
An important note. Though most hard disks support the SMART technology, some models can’t fully benefit from that if you use the instructions we give here (SMART is a part of the ATA protocol, while USB flash drives are based on the SCSI protocol and don’t have this function).
| Parameter | Description |
|---|---|
| Reallocated Sectors Count | The number of reallocated sectors that have been replaced by spare sectors due to damage. |
| Raw Read Error Rate | The frequency of errors when reading data from the disk. |
| Spin-Up Time | The time required to spin the hard drive’s spindle up to its operational speed. |
| Start/Stop Count | The number of disk start and stop cycles. |
| Power-On Hours (POH) | The total number of hours the drive has been powered on. |
| Temperature | The operational temperature of the hard drive. |
| Seek Error Rate | The frequency of errors during head positioning on the disk. |
| G-Sense Error Rate | The number of errors caused by shocks or vibrations. |
| Power Cycle Count | The number of times the hard drive has been powered on and off. |
| Current Pending Sector Count | The number of sectors waiting to be reallocated. |
| Uncorrectable Sector Count | The number of sectors with uncorrectable errors. |
| Load Cycle Count | The number of load/unload cycles for the drive heads. |
| Drive Health Status | The overall health status of the drive based on SMART parameter analysis. |

💽 Nine Common Causes of Partition Loss, and Data Recovery Methods to Use 💽
Method 1. How to detect a potential hard disk issue with the Command Prompt
With the command prompt console, you have at least two ways to check the SMART data and see if there are any hardware issues with your hard disks.
Get to know the disk status
To check the SMART status of a hard disk quickly with the Command Prompt using Windows Management Instrumentation (WMIC for short), follow these steps.
-
Open the Command Prompt with administrator rights in any way you know. For example, click on the Start button in the lower left corner of your desktop, on the Taskbar and open the main Windows menu. Use the scroll bar or the mouse wheel to navigate the list of all applications installed on this computer, find and open the section Windows System. Under this title, find and right-click on the line Command Prompt. In the context menu that appears, click on More; a new context menu appears, and the option Run as administrator is what you need.

-
In the Command Prompt window, type the following command for the operating system to check if the hard disk is having any issues, and press Enter on the keyboard to run the command (remember there must be no quotation marks):
wmic diskdrive get status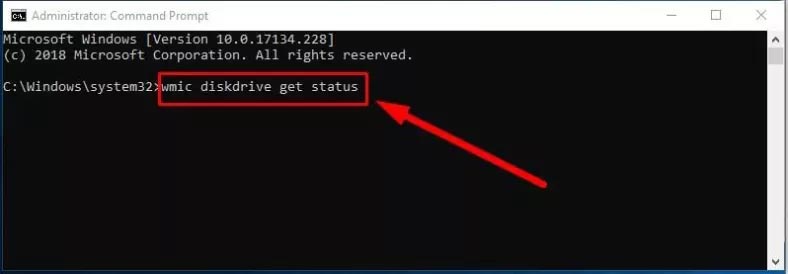
-
Windows 10 will analyze the disk data and display the result in the Status column; in my case, all the storage devices are healthy.
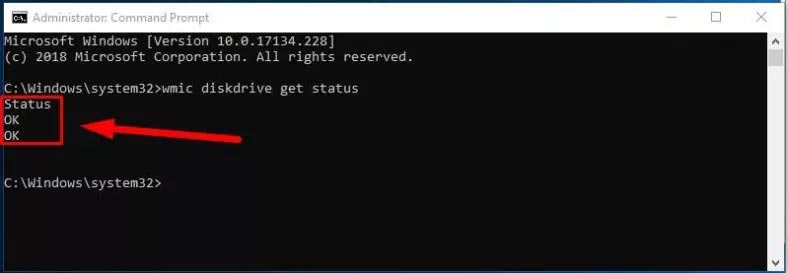
A bit of explanation. When every drive status is displayed as ОК, you can be sure that all storage devices are healthy and work properly. On the contrary, if there is any other status displayed (for example, bad, unknown or caution) it means there’s a potential problem or disk error, or the command has difficulty receiving information from the disk, which also suggests some sort of trouble.
Predict future disk errors
Here are the steps to take if you want to know the chances for possible failure of your storage device or to learn how healthy the disk is from the viewpoint of the operating system.
-
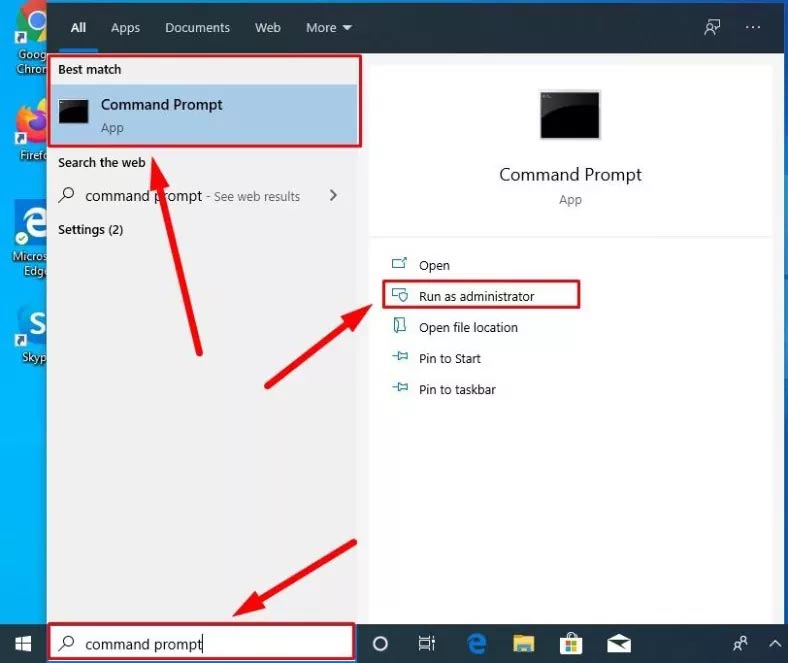
Just as before, you need to open the Command Prompt with administrator rights. Click the Search button fashioned like a magnifying glass on the Taskbar (you can find it in the lower left corner of the screen) to open the search panel. Type Command Prompt in the corresponding field. The system will run the search and the Best match section will show you the result you were looking for. Right-click on it and select Run as administrator from the context menu. Otherwise, click on the corresponding button in the right-side menu of the search panel, and the application will be launched.
-
Type the following command to read the SMART status data for the hard disks, and press the Enter key to run it (make sure there are no quotation marks):
wmic /namespace:\rootwmi path MSStorageDriver_FailurePredictStatus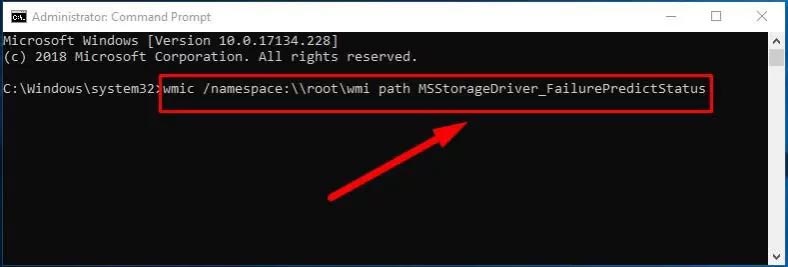
-
When the command is processed, you can see the result in the PredictFailure column. If the status is FALSE, then your hard disk is healthy and works correctly.
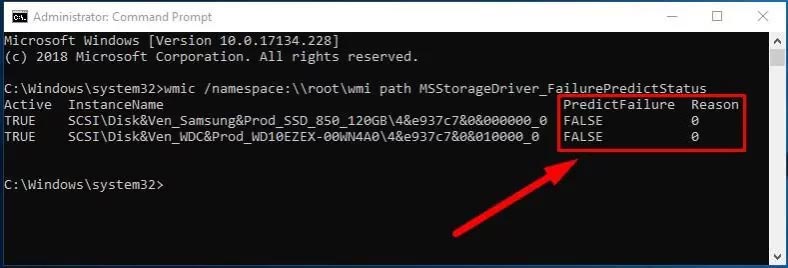
If the status is TRUE, it’s time to have a closer look at such hard disk because it means the SMART readings predict a failure soon. The Reason column may show a digit other than zero. If that’s the case, you should contact the hard disk manufacturer to explain the meaning of the code, as the actual meaning of this value differs depending on the manufacturer.
Method 2. How to determine a possible hard disk failure with Windows PowerShell
Similarly to the Command Prompt, you can use another tool by Microsoft - Windows PowerShell - for the same purpose, to check your computer’s hardware and SMART reports. Step by step, here is what you should do to test your hard disk for possible issues.
-
There are several ways to open the Windows PowerShell app. The quickest one is to open the Power user menu. For example, right-click on the Start button that you can find on the Taskbar, in the left lower corner of the desktop, or press the keyboard shortcut Windows + X instead to open the context menu, and select the line Windows PowerShell (admin).

-
In the new window that opens, type (or paste) the following command to see if the hard disk is prone to failure, and press the Enter key (remember there should be no quotation marks):
Get-WmiObject -namespace rootwmi –class SStorageDriver_FailurePredictStatus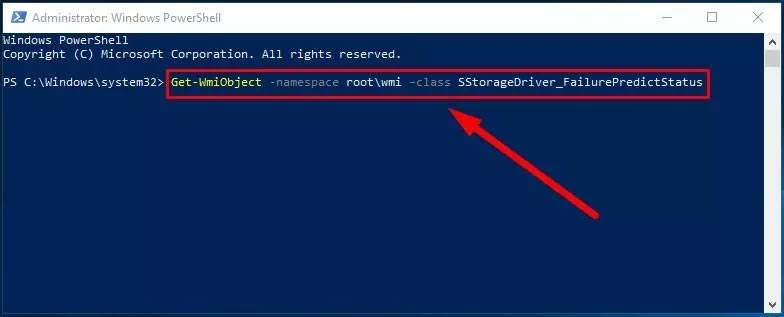
-
View the report, and pay special attention to the line PredictFailure. If it says FALSE, your hard disk is fine and there is no reason to worry about possible failures yet.
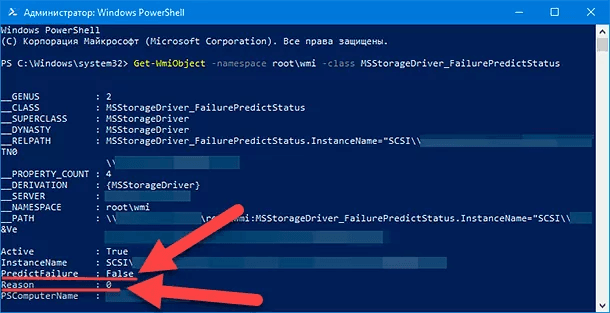
On the contrary, if you see TRUE in the line PredictFailure, it means that the SMART data is bad enough to expect a failure anytime. Similarly to the case with the Command Prompt, if the field Reason contains a value other than zero, you should ask the manufacturer for explanation, as the meaning of this code may differ depending on the actual manufacturer of the hard disk you are using.
If you see that the hard disk has a problem or a failure should be expected anytime, the best solution would be to start looking for a new storage device to replace the faulty one. Whatever happens, today online stores offer a wide range of hard disks to choose from according to your preferences, so you can always find a model with the required performance rate, capacity and read/write speed at an affordable price.
Method 3. How to analyze disk performance and health with Performance Monitor
Besides the two methods based on using the Command Prompt and Windows PowerShell apps that we have just described, there is one more tool to help you check the SMART data and detect hardware disk errors - Performance Monitor.
Here is what you do to see if your hard disk is about to fail with Performance Monitor.
-
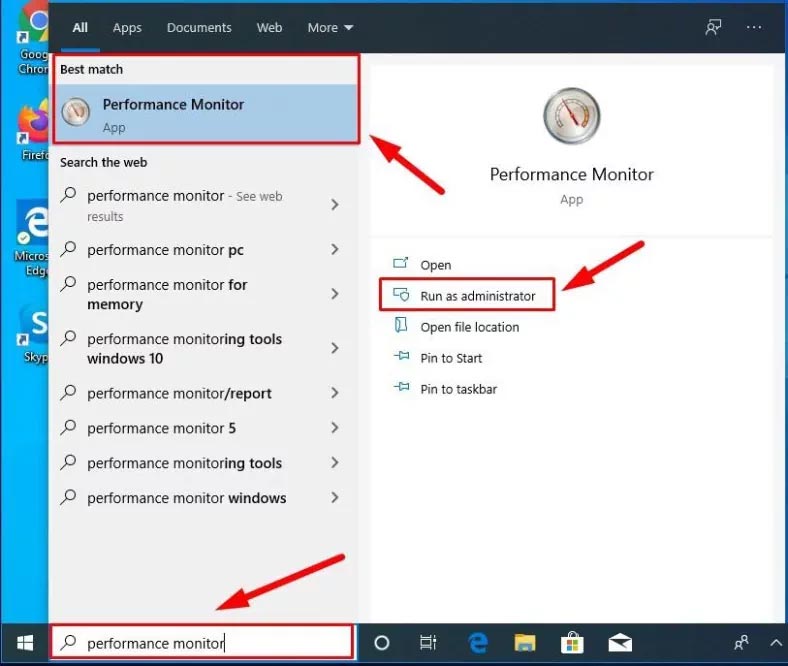
First of all, the application can be started in one of the several ways. For example, click on the Start button in the lower left corner of your desktop, on the Taskbar, and open the search panel. Type Performance Monitor in the search field, and you will see the result under Best match. Click on it or on the Open button in the right panel, and the Performance Monitor app will be launched.
-
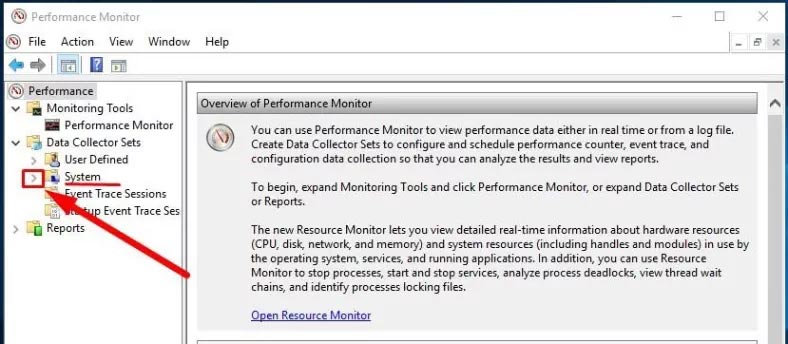
In the left-side panel, click on the right arrow sign in the line Data collector sets to display the nested elements.

-
As the new list unfolds, click on the right arrow again to open the nested options in the line System.
-
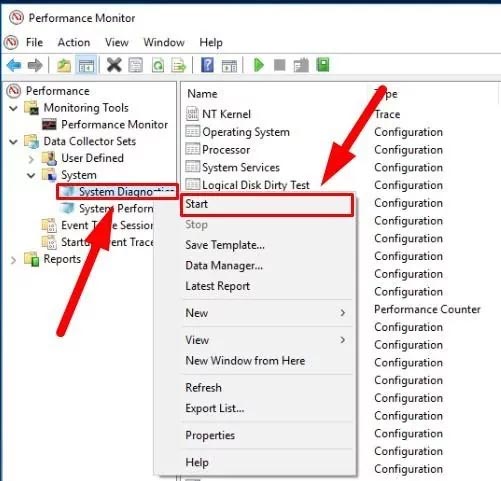
Now jump to System Diagnostics and right-click on it to bring out the context menu, then select Start.
-
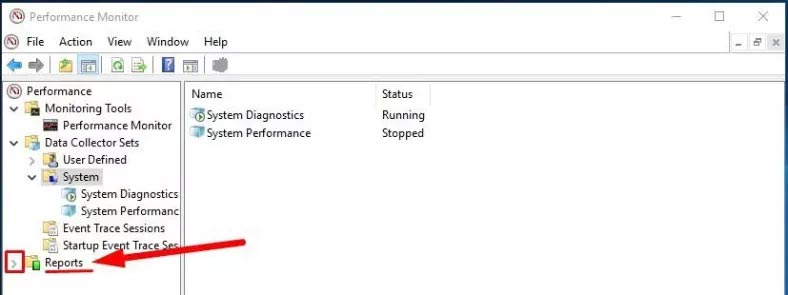
Go down and click on the right arrow in the line Reports.
-
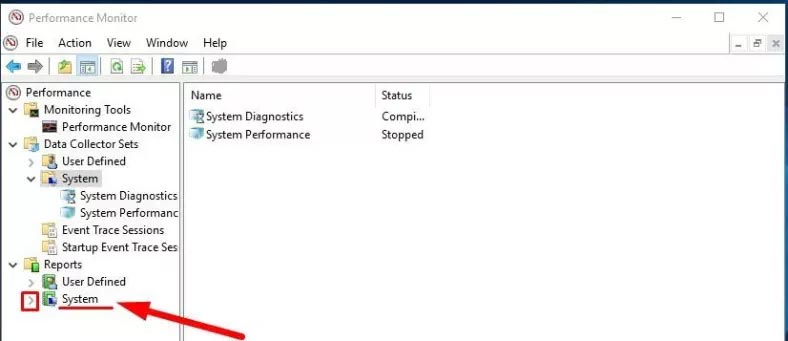
When another list unfolds, find the line System and open its contents by clicking on the right arrow.
-
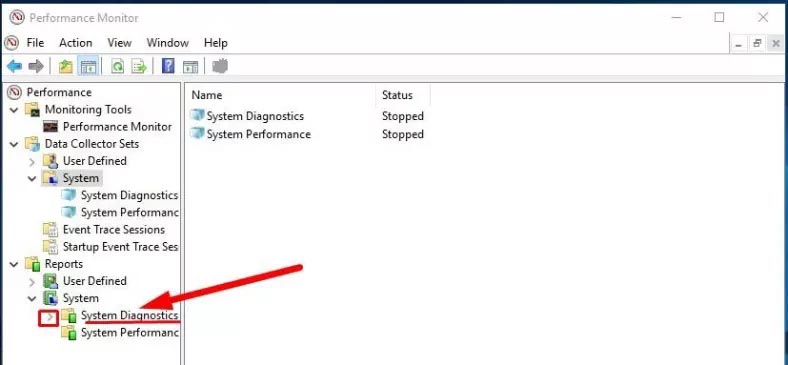
One more time, click on the right arrow in the line System Diagnostics to see what’s inside.
-
Finally, click on the report the title of which contains your computer’s name. (You may have to wait a little while the operating system runs the diagnostics).
-
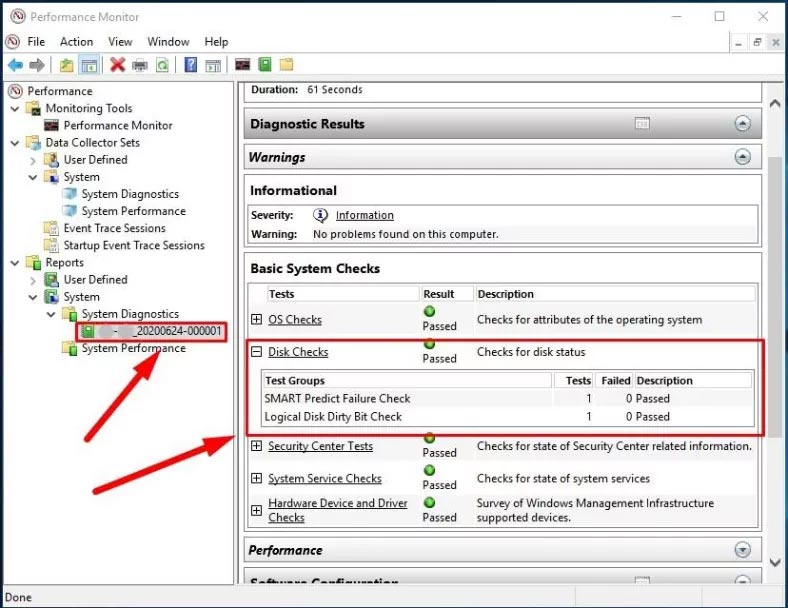
In the right panel of the Performance Monitor window you will see a detailed report. Find and open the section Warnings, then go to Basic System Checks and in the Tests column, click on the Plus (+) button next to Disk Checks, to see the hidden table containing test results.
-
In the table, find the line SMART Predict Failure Check. If the Failed column for this line contains zero, and the column Description next to it says Passed, then the hard disk has no issues for you to worry about.
By following the steps we have described, you can quickly find out if the hard disk in question is healthy, or should you expect it to fail at any moment.
If the SMART readings say failure is possible, and you can still access the faulty disk, the best solution would be to back up the important information from that disk so that you can prevent data loss. You can always copy important files to another disk which is healthy, or use the backup feature integrated into Windows 10.
Conclusion
To protect your data against unexpected loss you should check your hard disks regularly, especially if there are symptoms suggesting they are no longer as healthy as they used to be. Windows 10 operating system features several preinstalled tools that can determine how healthy your storage devices are and predict if it is going to fail in the nearest future. The methods we have described in this article are simple enough even for a novice user to take advantage of, and they will certainly help you save your files from a faulty hard disk and avoid loss of important data.


