Windows Tutorial: Mirroring Android to PC Made Simple with Miracast
Connect Your Android to PC: Learn How to Mirror Your Device using Miracast! Want to view your Android device screen on a larger display? Mirroring your Android phone or tablet to your PC using Miracast is the perfect solution! In this comprehensive tutorial, we’ll show you step-by-step how to mirror your Android device to your PC using Miracast. Whether it’s for presentations, gaming, or media streaming, Miracast offers seamless screen mirroring without the need for cables. From enabling Miracast on your PC to connecting your Android device, we’ve got you covered.
| Parameter | Description |
|---|---|
| Purpose | Wireless transmission of video and audio from one device to another (e.g., from a laptop to a TV). |
| Compatible Devices | Smartphones, tablets, laptops, TVs, projectors, and adapters supporting Miracast. |
| Supported OS | Windows 8.1 and higher, Android 4.2 and higher. |
| Transmission Technology | Wi-Fi Direct (does not require a router). |
| Maximum Resolution | Up to 1080p Full HD with 5.1 audio support. |
| Ease of Setup | No additional apps or software required — uses standard device functionality. |
| Advantages | – No need for cables – High transmission speed – Easy to connect |
| Limitations | – Dependent on Wi-Fi quality – Limited range (up to 10 meters) – Possible delays during streaming |
| Alternatives | Chromecast, AirPlay, HDMI cables. |
Wi-Fi limitations (Miracast)
Android received Miracast support as of version 4.2, on October 29, 2012. The first consumer devices certified to support Miracast were such smartphones as LG Optimus G, Pantech Vega iRon, Samsung Galaxy S III, Google Nexus 5. Therefore, this is not a function that is supported essentially by any Android device.
In Windows 10, this feature has been introduced with the Anniversary update, and any OS versions before that don’t support this function either.
Talking of Wi-Fi adapters, for Miracast you need a device supporting the standard 802.11n. Any devices that didn’t support this technology before can be compliant now as long as they have received corresponding firmware updates.

How to Connect Your Android (iOS) Phone 📱 to Your TV 📺
How to cast a phone screen to a PC
To have a phone screen displayed on a PC you should have both devices connected to the same Wi-Fi network.
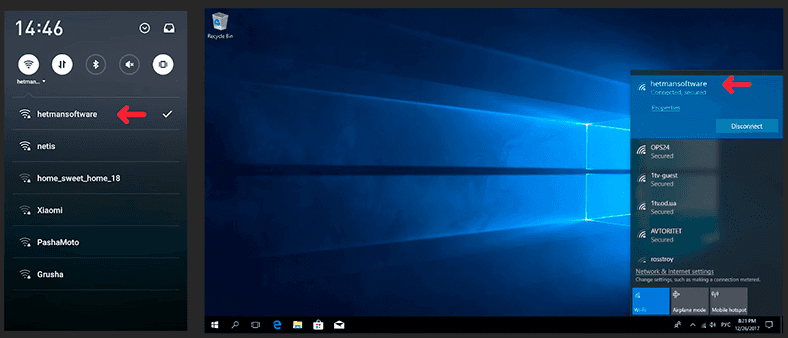
Make sure that the devices are connected to such network, then click on the notifications icon and choose Connect in the new window that opens.

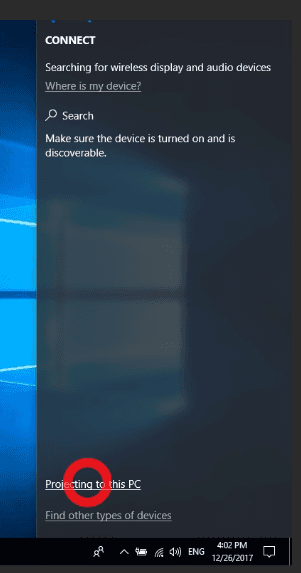
If you don’t see the icon Connect, most likely your computer lacks the Anniversary update. After you click on that icon, one more window opens, where you should click on Projecting to this PC.
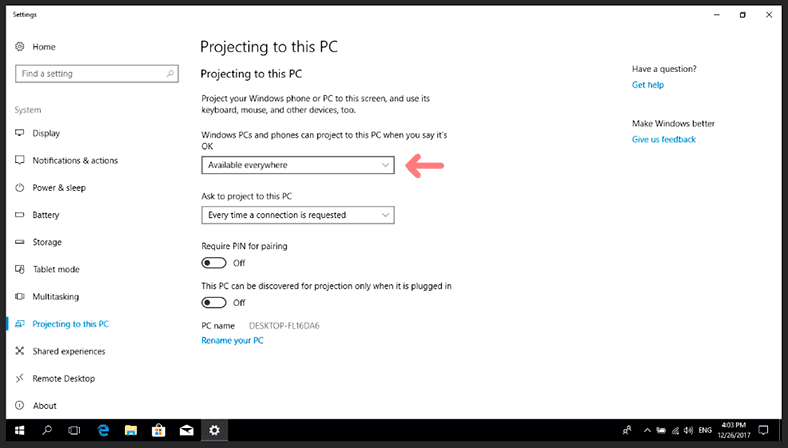
Now change the corresponding settings to Available everywhere and Every time a connection is requested; if you want, you can also enable PIN request for additional protection.
Now take your phone: open Settings / Networks & connections and tap on More / Wireless display.

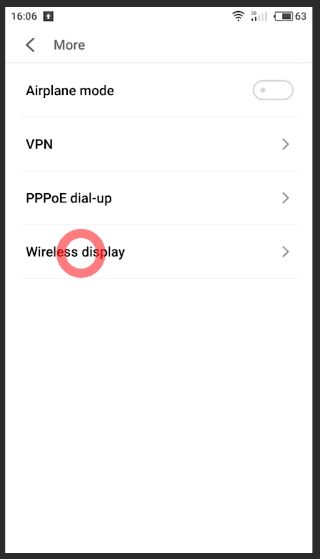
Turn it on. You will see the list of available devices where the phone screen can be displayed. Select a device and get connected.
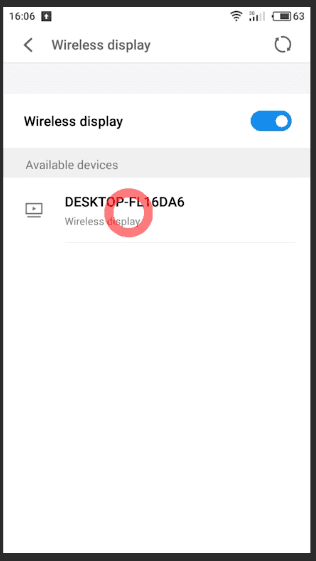
Your monitor will show a pop-up window asking for permission to connect a new device – click Yes.
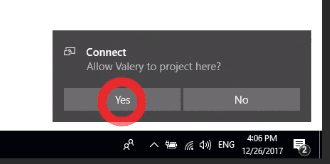
The projecting preparation window should appear.

Soon it will change to display the screen of your phone. However, protected contents won’t be available for viewing, and you can’t use the mouse to control the screen images.
You can see more by watching a video on our YouTube channel, Hetman Software.

How to Move 📲 From One Android 🤖 Phone to Another and transfer all the data


