USB Port Not Working on Laptop/Desktop: Troubleshooting Guide
Experiencing issues with a USB port on your laptop or desktop? Don’t worry, we’ve got you covered! In this article, we’ll walk you through the steps to diagnose and fix a malfunctioning USB port. Whether it’s not recognizing devices or simply not working at all, our troubleshooting guide will help you get your USB port back up and running in no time!
- Step 1. Physical examination
- Step 2. Restart the computer
- Step 3. Use the Device Manager
- Step 4. Check USB controllers
- Step 5. Check the computer’s configuration
- Step 6. Remove USB Host Controllers
- Step 7. Clean the Device Manager
- Step 8. Disable USB selective suspend setting
- Step 9. Repair the damaged hardware
- Conclusion
- Questions and answers
- Comments
The essential requirement for testing and eliminating possible issues in a USB port is signing in to Windows with an administrator account. If the computer is your own machine, you are likely to be using this type of account while you are reading this. For a computer you are using at work (that is, an office machine) it’s different, and you should contact your system administrator.

💽 How to Fix a Pen Drive or External Hard Disk Not Showing Up? 💻
Step 1. Physical examination
The first step is to check the USB port for possible physical damage.
Testing is easy: insert a USB drive into the port, and move it slightly from side to side to see if it sits tight in the port connector. However, move the drive very carefully to avoid hardware issues, if you haven’t encountered them before. If you don’t know how tight the contact should be in a USB port, perform this procedure with another port which works properly, and then compare the results you get when testing both ports.
If the connector is loose-fitting and the contact with the port seems poor, scroll down to the end of the article to find the solution for hardware issues in a USB port. Otherwise, proceed to the next step.

👨💻 How to Unlock a Write Protected USB Drive, a SD or Micro SD Memory Card or a Hard Drive in 2021
Step 2. Restart the computer
Before doing anything more serious, try a well-proven method for fixing hardware issues: turn the computer off, and then turn it on again. Sometimes it helps as it makes the operating system scan the hardware, for example, the USB port, and restore its operability.
If this trick doesn’t work, it’s time to use the Device Manager app.

How to Fix a Flash Drive for a Computer, TV or Car Audio in 2019 🛠️👨💻🤔
Step 3. Use the Device Manager
This application contains data on all devices connected to / installed into your personal computer, and lets you configure, adjust and monitor each of them.
Right-click on the Start button which you can find in the lower left corner of the Taskbar. Select Device Manager from the list of possible apps in context menu that appears.

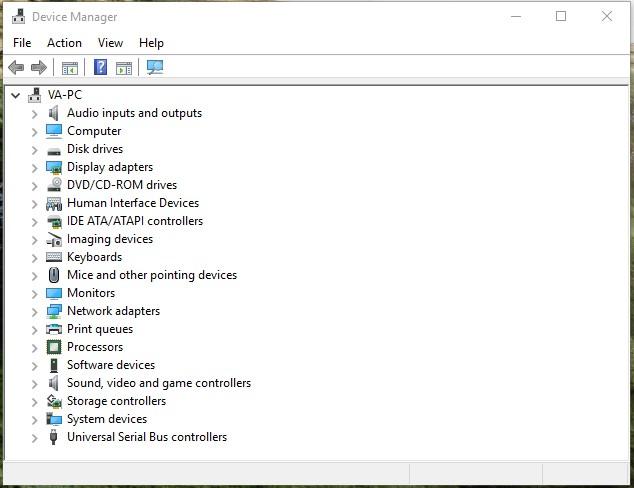
When the Device Manager starts, you will see this window:
Step 4. Check USB controllers
The Device Manager displays all categories of devices that make up your computer. Right now, you need to have a look at universal serial bus controllers. Click on the arrow next to the line Universal Serial Bus controllers to unfold the list of devices. You will see a list of available controllers, just like in our example:
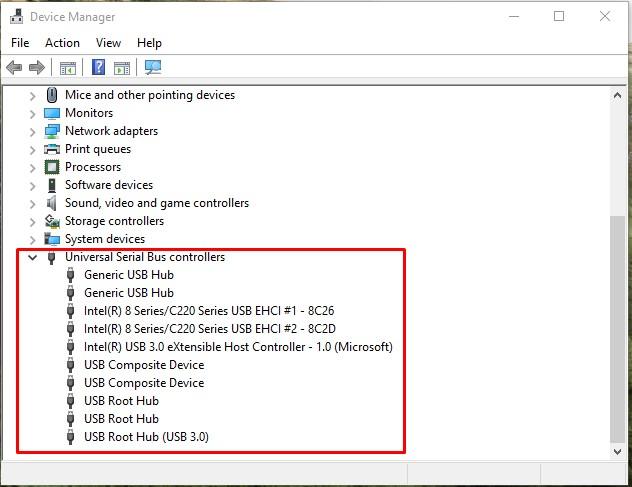
In fact, all these entries do not matter much in your case, Except for one specific line: Intel(R) 8 Series/C220 Series USB EHCI.
This is a special type of USB controller for the specific computer we are using, and in your case, some symbols in its name may differ. However, the key word is USB EHCI which stands for USB Enhanced Host Controller Interface. Find it in your Device Manager. If it is absent, this could be the core of the problem.
Step 5. Check the computer’s configuration
Click the button Scan for hardware changes (you can find it in the toolbar, under the main menu of Device Manager as shown in the picture below). This will make your computer check all the hardware again and update the information if necessary. Doing it may help you see the USB Enhanced Host Controller on the list. If the controller doesn’t show up, it means the problem is still there.

Step 6. Remove USB Host Controllers
At this stage, everything starts getting more complicated. You will have to remove all controllers in the Device Manager. Remember: when you work on a computer using a mouse and a keyboard connected via USB ports, they will stop working as soon as you remove the controllers.
In the section Universal Serial Bus controllers, right-click on the first host controller. From the list of available actions, select Uninstall device.
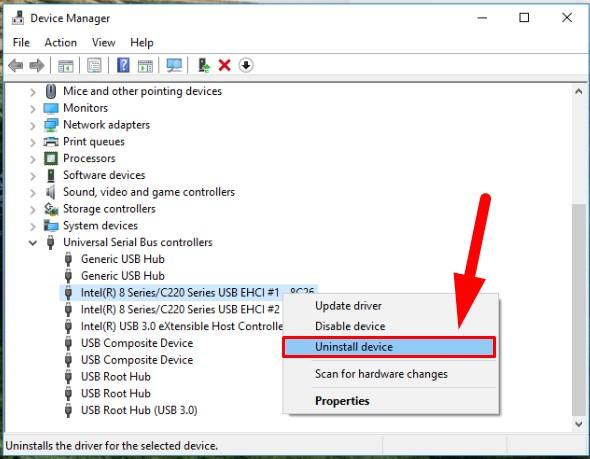
Repeat this step for every USB Host Controller. Now restart the computer. It will make the operating system reinstall and reconfigure these controllers, which can fix the specific controller that is not responding at the moment.
Step 7. Clean the Device Manager
There is always a chance that the Device Manager may still display previously installed devices which are no longer connected to your computer. Sometimes, device drivers remain on your computer for a long time after the device was disconnected. It’s high time to check and clean the Device Manager, by removing drivers that are old or no longer used.
If this method doesn’t help you, try another one below.
Step 8. Disable USB selective suspend setting
USB selective suspend setting is a power-saving option in the Windows operating system which suspends power supply to a USB device in order to extend the period of a computer’s work on battery. This is a good function to help you save power, but sometimes it may block a connected USB device.
You can disable USB selective suspend setting in one of the two ways: using the power options or configuring certain things the Registry Editor.
Method one: Use Power Options
Open the Settings app. Click on the Start button in the lower left corner of your desktop, and open the main Windows menu. In the side panel, click on the gearwheel icon. Alternatively, drag the scroll bar down until you find the line Settings.
One more way is to use the key shortcut Windows + I to open the Settings app immediately.
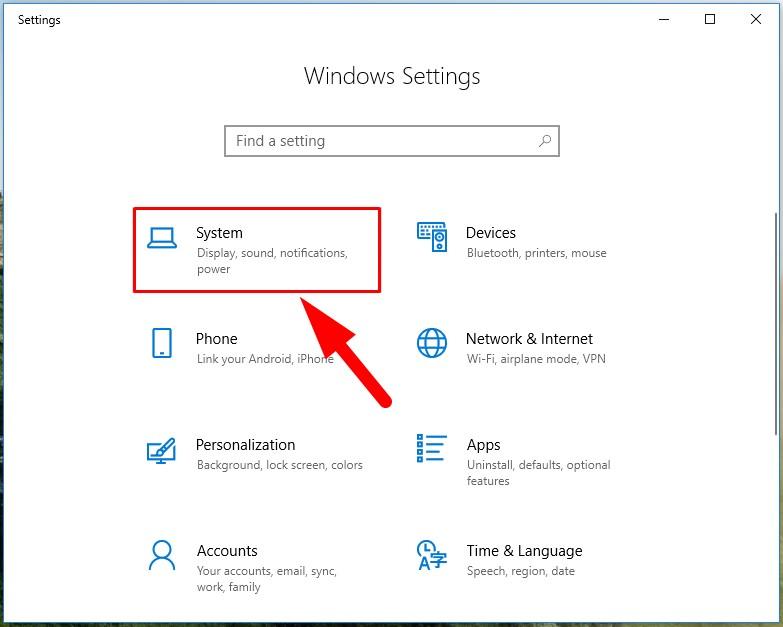
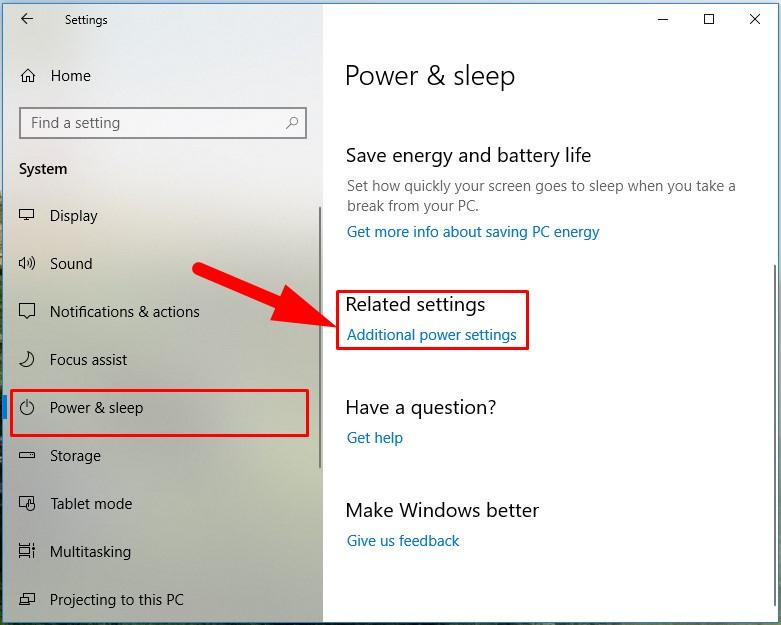
In the main window, select System as shown in the picture above. In the new window, look to the left to find Power & sleep. On the right, scroll down until you see Related settings and click on the link Additional power settings.
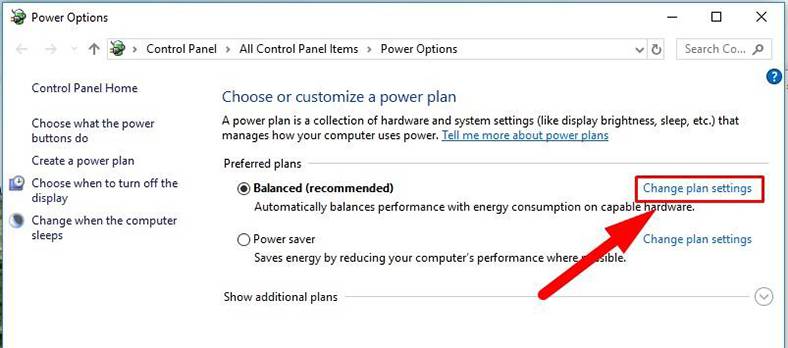
In the Power Options window that opens, choose the link Change plan settings.
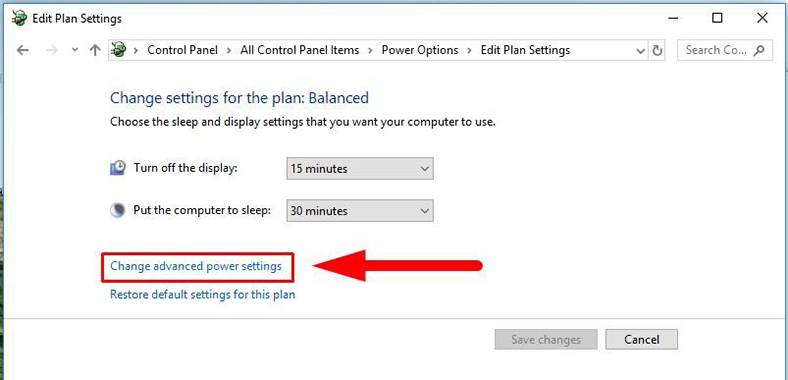
In the new window, click on Change advanced power settings.
Use the scroll bar to find the section USB settings. Open the section by using its control element (the plus symbol inside a rectangular box), and then do the same to open the subsection USB selective suspend setting. Configure the settings for both options, On battery and Plugged in, by selecting the value Disabled for each option.
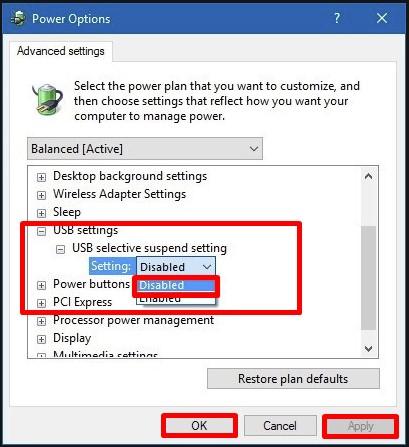
Then click Apply and ОК to save the changes you have made. Now the operating system will now disable its USB ports temporarily to save power.
Method two: use the Registry Editor
Note: You should always remember that any actions in the registry require great care because consequences can be irreversible. You make incorrect changes to the registry, the operating system may fail, and there can also be problems with certain services of your computer; it may even stop booting, or the operating system may crash. So before changing anything, it’s a good idea to back up the registry using the integrated options of theRegistry Editor. In the main menu of the Registry Editor, choose the File tab and select Export. Give a name to the registry backup copy and save it to any directory that you prefer. If necessary, you can always use this copy to restore the registry.
Open the Run dialogue box (for example, by pressing the key combination Windows + R), and type the command regedit in the Open line, then click ОК or press Enter.
regedit

When the pop-up notification from Windows User Account Control asks Do you want to allow this app to make changes to your device? click Yes and open the Registry Editor window.
In the left-side part of the window, follow the path:

You can choose to either find and open manually every item in this path, or copy this line:
HKEY_LOCAL_MACHINE\SYSTEM\CurrentControlSet\Services\USB\DisableSelectiveSuspend
and paste it into the address bar under the main menu. This way, you can avoid possible mistakes: the window you see contains many similar directories, so it’s quite easy to choose a wrong key.
If the USB key is absent from the registry, you will have to create it.
To do it, go to the last available part of the key HKEY_LOCAL_MACHINE\SYSTEM\CurrentControlSet\Services, then click Edit in the main menu. In the pop-up menu that appears, select New and then Key.
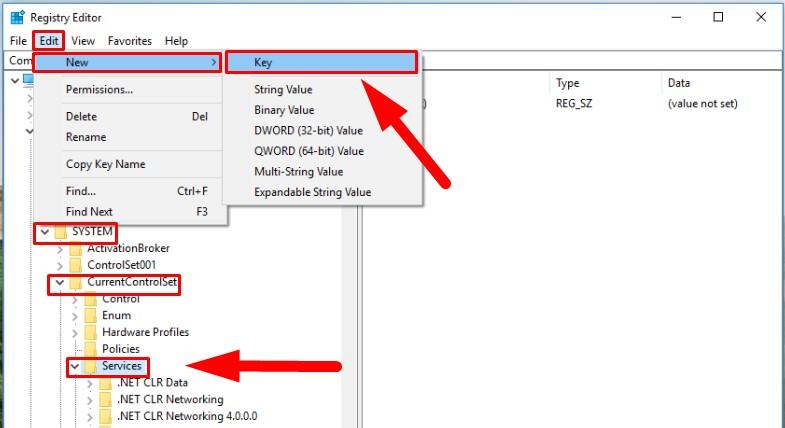
Give this key the name USB. In this key, look to the right and create a new value DisableSelectiveSuspend. Right-click on an empty area, open the nested menu New and select DWORD value (32 bit).
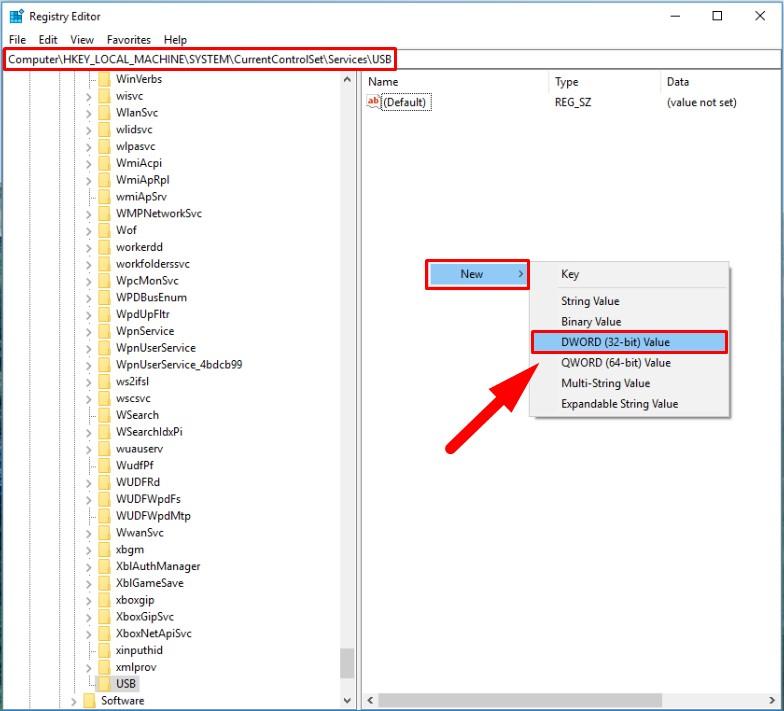
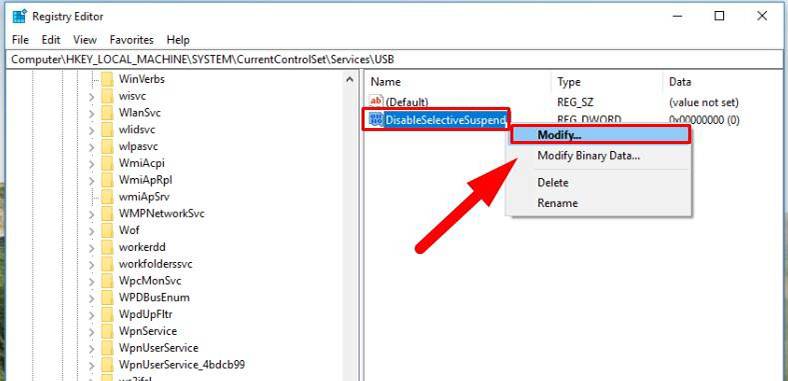
Right-click on the new value DisableSelectiveSuspend you have created and select Modify in the menu that appears.
In the new window for changing this DWORD value, type 1in the Value data field. Then click ОК to save the changes you have made.
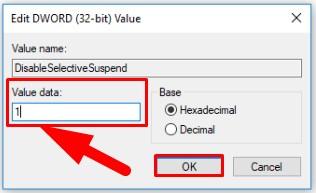
Now the USB selective suspend setting is disabled for your computer. For the changes to take effect, the computer needs to be restarted.
Now check the faulty USB portto see if it can work properly now. If it’s still inoperable, the most probable cause is physical damage to this USB port.
Step 9. Repair the damaged hardware
If the port still doesn’t work, it must be a hardware problem. USB ports are quite easy to break, and USB flash drives may act as a lever of pressure to destroy electrical contacts inside the ports. Quite often, it happens to laptops when users put them into their bags but forget to remove a USB drive sticking out from the side of their portable computer.
Still, this is a simple mechanical defect that can be eliminated. Most likely, you will contact a PC repair specialist or try doing it on your own after googling some advice on the Internet. However, the second method is more suitable for people who have sufficient experience in repairing computing devices.
Conclusion
There are several ways to bring an inoperable USB port back to life. The simplest and the cheapest solution is to solve a USB port problem if it’s about driver or operating system issues. When if there is a problem at the hardware level, it can be fixed quickly and at a cheap price.
If you have more advice on fixing problems with USB ports, or if you have ever repaired a USB port, or just in case you know any software tools that can eliminate USB port issues, you’re welcome to share that experience by leaving a comment below.

⚕️ How to Recover Deleted Files from a USB Drive after Formatting or a Virus Attack in 2021 🔥


