How to Recover Deleted Files From Flash Drives, Memory Cards?
Trying to recover files removed from the Recycle Bin, but don’t know where to start? Looking for a way to recover information from a flash drive or memory card? Deleted a bunch of files and want to get them back? Undelete files and recover information one step after another with Hetman Uneraser by Hetman Software. To get started, download and install the memory card recovery software.
Select Drive To Recover Files
Before you begin using Hetman Uneraser, it is essential to learn a few simple security precautions. First, when downloading Hetman Uneraser, do not save it to the disk you’re about to recover. Second, when installing Hetman Uneraser, use some other disk, and not the one that holds the files you’d like to undelete. That’s it!
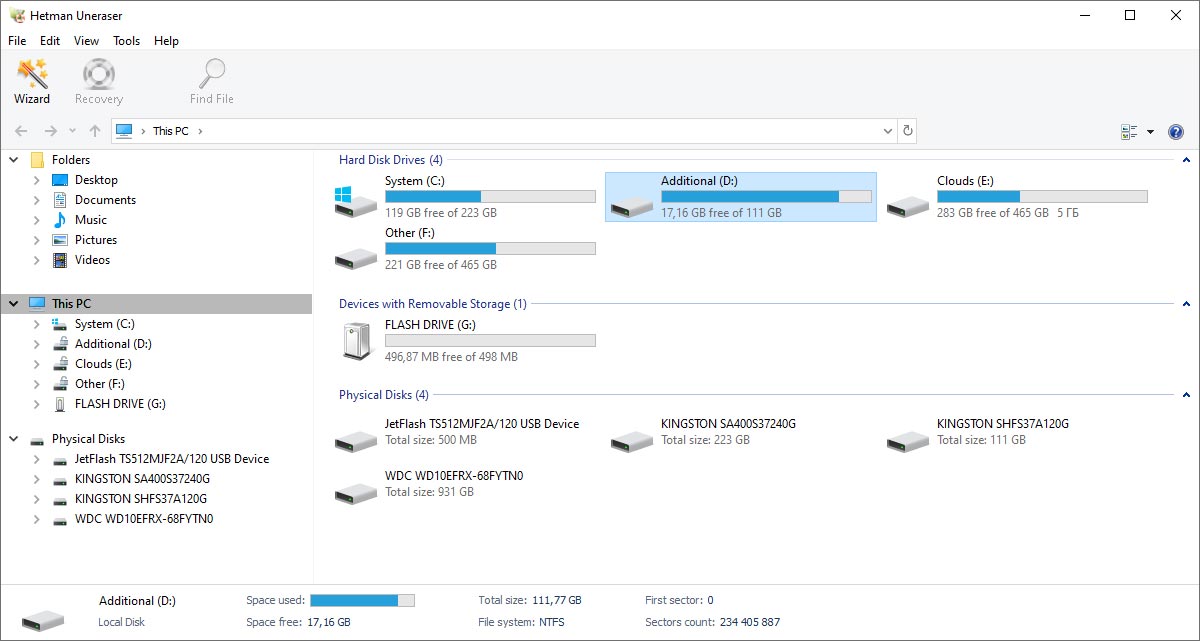
When launching Hetman Uneraser for the first time, you’ll see the list of logical (drive letters) and physical (actual hard disks, flash drives, SD cads etc.) devices. Select the disk or device that contains files you’d like to recover, the tool will begin scanning the disk for accidentally deleted information automatically.
Search For Deleted Files
Just click on a logical disk or physical device to begin the scanning process. The tool will automatically scan the entire volume or device, displaying the list of all existing and deleted files and folders discovered on the device. Deleted files and folders will be marked with a red “x”.
Restore Lost Data From SD, MicroSD Memory Cards
Use Card Reader to connect memory cards to your computer or laptop. The memory card will be displayed in the card data recovery software as a regular disk and will be available for scanning.
Virtual Disk Images
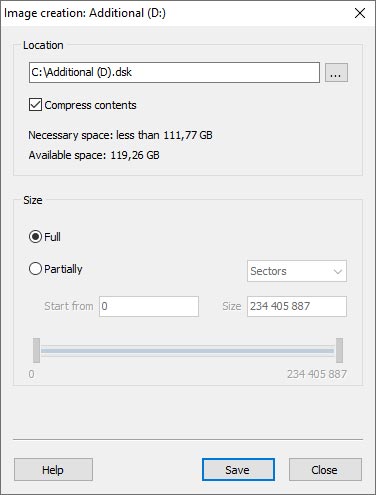
Virtual disk images are bit-precise snapshots of physical devices or partitions. Virtual images come handy when you want the safest recovery possible. While it’s always a good idea to work on a copy of actual data instead of the original, another major consideration making virtual disk images a great idea is that the tool creates such images by using a single long read command instead of scanning the disk with many random read operations. This helps a lot when you have a hard drive that unreliable or is physically failing.
You can capture an image of the entire physical device or a certain partition. To create a virtual disk image, select the disk in the folder tree and use the “Service” – “Save disk” menu command. You can specify the location of the resulting disk image and choose whether to compress its content. Advanced options include initial offset and length of the image. Make sure the destination device has enough space to store the newly created disk image, and click “Save” to begin.
To recover information from existing disk images, click “Service” – “Mount disk” in the main menu, then specify path to the DSK image. Hetman Uneraser will mount the image and add it as a new volume into the folder tree. You will then be able to scan or analyze that disk just like you were using a physical device.
Finding Partitions
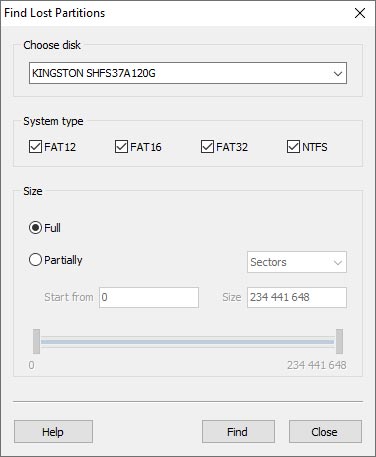
You can locate all previously deleted volumes by scanning the physical device. The discovered partitions will be added to the list of available volumes.
In order to scan the device for deleted partitions, select the physical device and click the “File” – “Find partitions” command in the main menu. Advanced options include volumes’ file system and approximate location. However, it is recommended that you scan the entire device for all types of file systems in order to maximize the change of discovering all partitions.
By default, the tool will engage the quick scan mode. If your partitions are not discovered after the quick scan, you can run comprehensive analysis of the device. Note that this comprehensive mode is slow as it reads the entire surface of the hard drive.
View Recovered Files
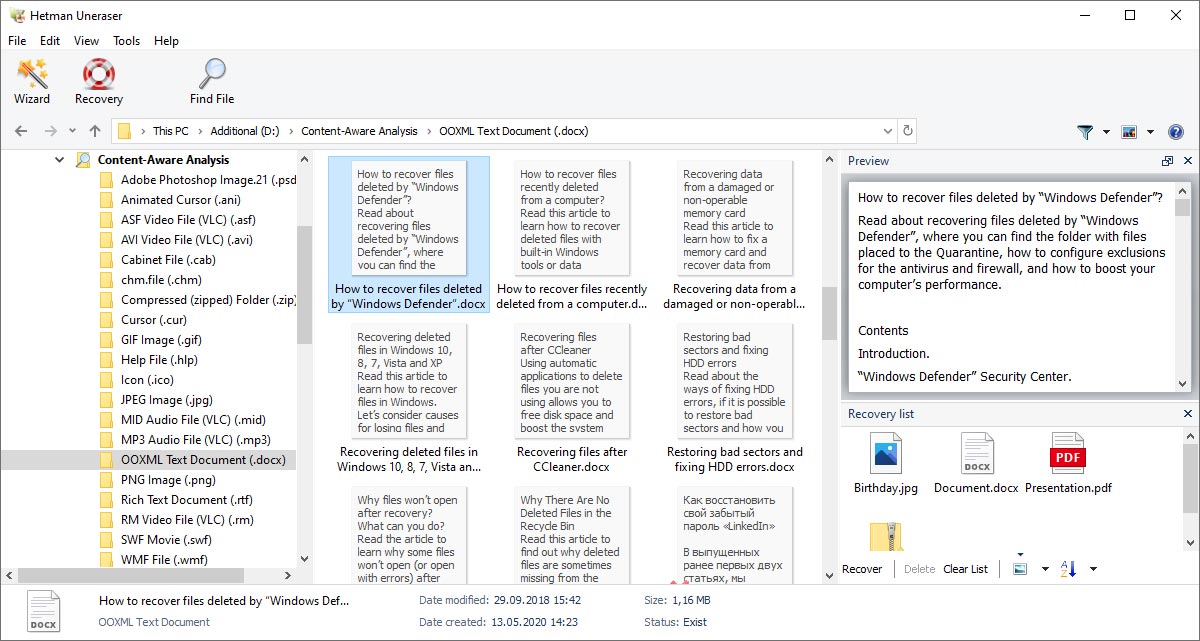
A major convenience feature of Hetman Uneraser is the ability to display the content of deleted before actually recovering them. This allows quickly finding files that can be actually recovered, as the preview accurately represents the file’s health state.
"$Lost and Found" Folder
Sometimes it is simply not possible to determine the original name or location of a file. Such files are then placed into the "$Lost and Found" folder. If you can’t see the files you’re looking for, make sure to check this folder before resorting to comprehensive analysis.
File Search by Signatures
In Quick Scan mode, the tool only checks the file system to locate deleted files. This method is blazing fast, but won’t return anything if there’s no record of a given file in the file system. If you can’t see the files you were about to recover, try running Comprehensive Analysis. In this mode, the tool scans the entire disk surface, engaging content-aware detection algorithms looking for files of known types by their characteristic header structures and persistent signatures (e.g. “FF D8” for JPEG files). To run a comprehensive analysis on your system, simply open the “$Content-Aware Analysis” folder in Hetman Uneraser. Please note that in this mode the entire disk surface will be read. Depending on the size and speed of your disk, the analysis may take some considerable time.
Pre-Recovery Preview
The pre-recovery preview function supports a wide range of formats including digital images, archives, documents, spreadsheets, executable files, video and audio files. If the file looks good on the preview, then its recovery is pretty much guaranteed. Note that pre-recovery preview does not use any external software or libraries, so you can easily preview e.g. Word documents without having Microsoft Office installed.
Restoring Files from Different Folders
When recovering multiple files that were deleted from a bunch of different folders, use the “Recovery list” feature. This panel is located at the bottom right hand of the main window. You can add files and entire folders into the recovery bin by simply dragging and dropping. When you’re finished adding files into the list, click the “Recovery” button on the main toolbar.
Saving Analysis Data
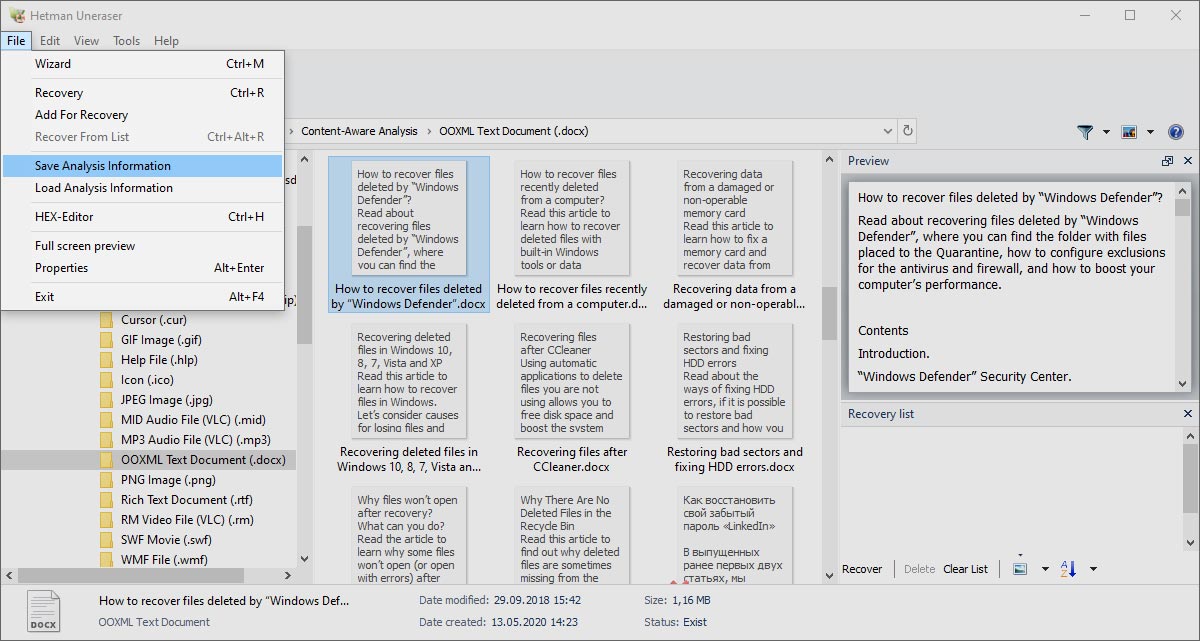
Did analyzing the storage device take too long (because of its high capacity or the low-end computer running the scan for hours), and you need to stop working with the utility for some reason? To save the trouble of having to rescan the hard disk, flash drive or memory card again, save the information on the analysis you have completed. Later, you can load the analysis information at any time you find convenient.
Go to the menu «Save Analysis Information», and save the file containing the analysis data (*.dai).
Go to the menu «Load Analysis Information», and open the file containing the analysis data (*.dai). After that, save the recovered files.
Search The List of Recovered Files
Sometimes locating a certain deleted file may not be easy. Hetman Uneraser helps you find exactly what you’re about to recover by offering comprehensive multi-dimensional sorting, filtering and searching functionality.
When you’re done choosing the files to recover, clock “Recover” to run the wizard that will help you save those files to a safe place. The wizard will make sure you’re using a new device to store information being recovered in order to avoid damaging or overwriting deleted data. Note that you can only save the files after purchasing a license. The free demo version is limited to pre-recovery preview. Note, however, that you will NOT need to restart the tool or scan the disk again after purchasing the license. Simply enter your product key in the registration form, and you’ll be able to proceed to the saving step immediately.
Filtering Recovered Files
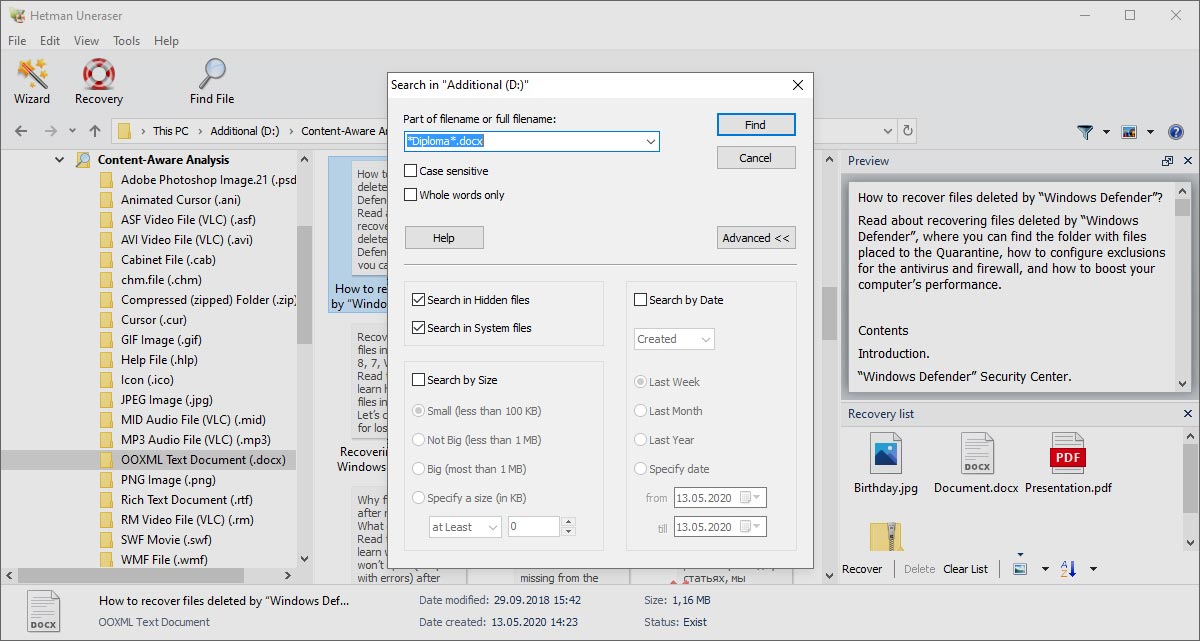
You can easily hide or display existing (non-deleted) files by using the “View” – “Filter” command from the main menu. The search can be started via the “Edit” – “Search” command. You can search files by any combination of file name, size, create date, modification date and last access date.
Sort Results
Default sorting mode arranges files by the name. You can use a different order by right-clicking the file area and selecting desired sort mode.
Saving Recovered Files
Make sure you have a spare disk, flash drive, or external storage media to save information being recovered. If you attempt to save that information onto the same disk that contains deleted information, you may simply destroy the very information you were recovering.
So if you’re undeleting files from disk “C:”, make sure you select disk “D:” to save their undeleted copies. This is essential for successful recovery operation.
Saving Into a Folder
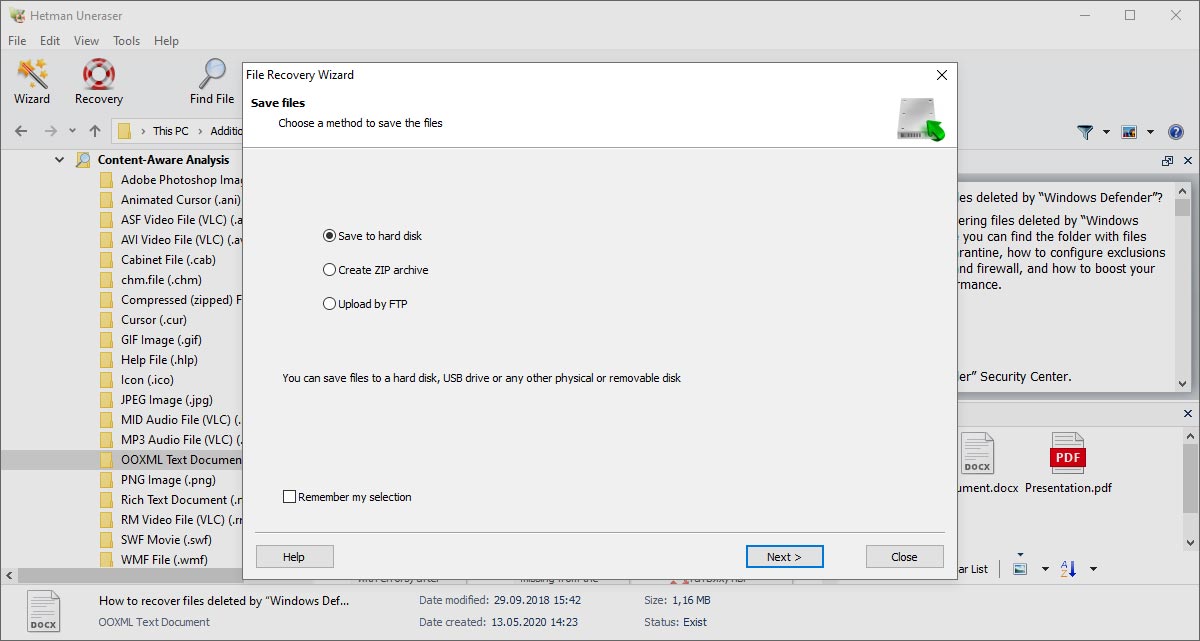
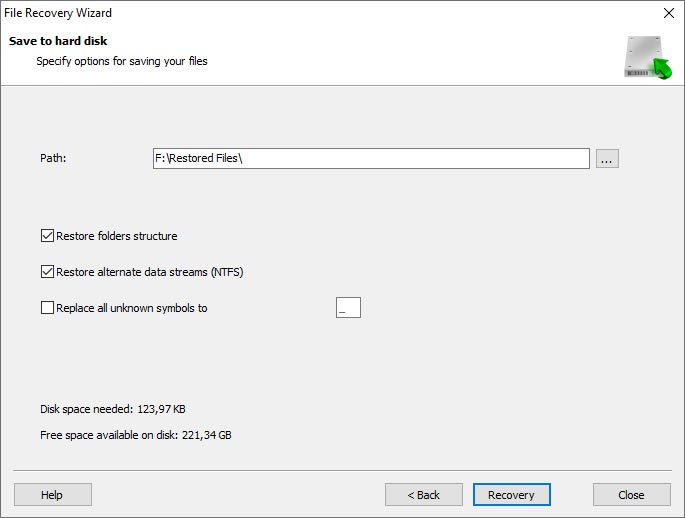
Saving the files being recovered into a folder on a disk is the easiest way. All you need is another disk, or a flash drive, or some other type of storage media.
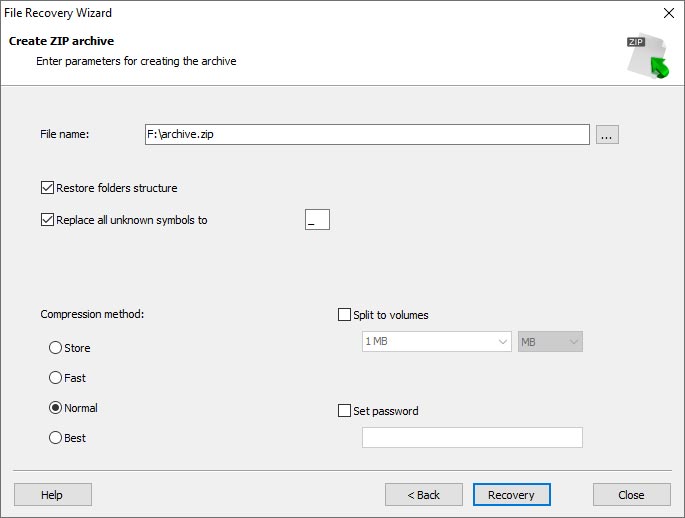
Hetman Uneraser allows to preserve the original folder structure, keep NTFS file streams, and replace unknown characters in the files’ names with something legible by choosing the corresponding options.
Creating ISO Images
If you’re recovering files for a customer, creating burnable ISO images is a popular choice. The options are similar to those available when burning the actual CD/DVD media, e.g. you’ll be able to specify the disc label and file system, and opt to keep or discard the original folder structure.
Using FTP to Upload Information to a Remote Server
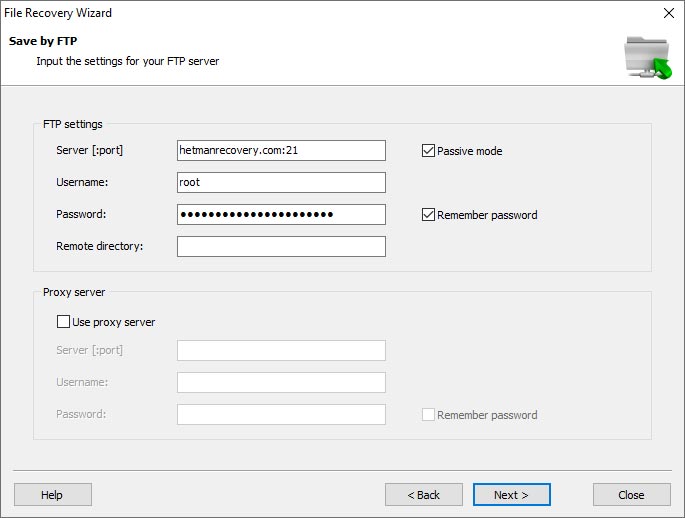
You can specify a remote FTP server as a final destination for the files being recovered. Specify server name, port and address, enter login and password, and specify whether active or passive transfer mode will be used. Hetman Uneraser supports FTP proxies. Just as in other methods, you can opt to keep or discard the original folder structure of your data.
Quick Start
This video tutorial will help you learn all the essential features of Hetman Uneraser at a glance. It recovers files from HDD, SSD, digital cameras, memory cards (SD, MicroSD, etc.) and exernal USB disks or Flash drives. Note that all files correctly displayed in the preview can be fully restored – guaranteed!
-
What file systems are optimal for a USB stick or memory card?
The optimal choice of a file system for USB sticks or memory cards depends on the user’s needs and working conditions:
- FAT32: for Windows, macOS, Linux and most mobile devices.
- exFAT: supports large files and volumes of data; for Windows, macOS, and Linux.
- NTFS: for large volumes of data and long file names; for Windows.
- APFS (Apple File System): for Apple devices; the standard for macOS.
- EXT4: the standard for Linux.
-
How can I troubleshoot a USB stick if it doesn’t work correctly?
Here are some diagnostic utilities for USB sticks to help you identify problems and check the device condition:
- H2testw
- CrystalDiskMark
- USB Flash Drive Tester
- Check Flash
- Victoria
-
How can I recover deleted files from a memory card in a mobile device?
To recover deleted files from a memory card in a mobile device, do the following:
- Stop using the memory card.
- Connect it to the computer with the help of a card reader or a special memory card adapter.
- Use a recovery software tool: Download and install Hetman Uneraser.
- Scan the memory card: Choose in-depth or full scan for better results.
- Recover deleted files: When the scan is over, the utility will show you the list of files that can be recovered.
- Save recovered files: It is recommended to store recovered files on your computer or another reliable device rather than the memory card so that you can avoid overwriting or loss of data.
-
Do USB flash drive and memory card manufacturers offer their own utilities to recover data or troubleshoot storage media?
Many USB flash drive and memory card manufacturers offer their own utilities to recover data or troubleshoot storage media.
- SanDisk RescuePRO: A recovery tool for USB sticks and memory cards SanDisk.
- Kingston DataTraveler Vault Privacy (DTVP): A recovery tool for protected Kingston USB sticks.
- Transcend RecoveRx: A recovery tool for Transcend USB sticks and memory cards
- Samsung Magician: A specialized diagnostics and management tool for SSDs and other storage devices by Samsung. It includes benchmark and troubleshoot options.
- Lexar Image Rescue: A photo and video recovery tool for Lexar memory cards.
- ADATA SSD Toolbox: A diagnostics and management utility for ADATA storage media. Although it is designed with SSDs in mind, it can be used with memory cards of the same brand.
- PNY USB Flash Drive Recovery Tool: A recovery tool for PNY USB sticks.
- Patriot SSD ToolBox: An SSD diagnostics utility that can also be used with other storage media by Patriot.
-
Can I recover files removed from a USB stick or memory card if I use standard operating system tools?
It is possible to recover files removed from a USB stick or memory card with standard operating system tools, but such tools only offer limited functionality. Here are several variants:
- Recycle Bin.
- The chkdsk command: it can help you fix file system errors and probably recover some of the lost files.
- Disk properties: right-click on a USB stick or memory card, choose Properties, then go to Tools, and click Check to scan the disk for errors.
Post a testimonial
Read user reviews of Hetman Software programs or share your experiences. Your review will be published after being moderated. We value your opinion! Total reviews: 5. Average ratings: 4.2.


Recommended tools
We recommend that you familiarize yourselves with the opportunities offered in other Hetman Software utilities. You can significantly save on the purchase or buy a program with the features that best suit your needs.
-
Partition Recovery™ 4.9
- The tool recovers data from any devices, regardless of the cause of data loss.
-
- Languages:English, Nederlands, Deutsch, Français, Italiano, Español, العربية, 中国, 日本語, Polskie, Русский, Українська
- Release date:
-
Internet Spy™ 3.8
- The program for analyzing and restoring the history of web browsers.
-
- Languages:English, Nederlands, Deutsch, Français, Italiano, Español, العربية, 中国, 日本語, Polskie, Русский, Українська
- Release date:
-
File Repair™ 1.1
- The program to fix errors in damaged files. List of supported files in the program description.
-
- Languages:English, Русский
- Release date:
