Why Choose ZFS? Exploring Its Impact on Linux Ubuntu Systems
Discover the reasons why the ZFS file system in Linux Ubuntu stands out as a top choice for users. From its advanced data protection features to its scalability and flexibility, learn why ZFS is considered superior. Read now to unlock the benefits of ZFS and optimize your Linux Ubuntu experience!
- ZFS advantages
- ZFS limitations
- Installing ZFS on Ubuntu
- How to create RAIDz
- How to create, roll back and remove ZFS snapshots
- Send and receive ZFS
- ZFS data compression
- Conclusion
- Questions and answers
- Comments
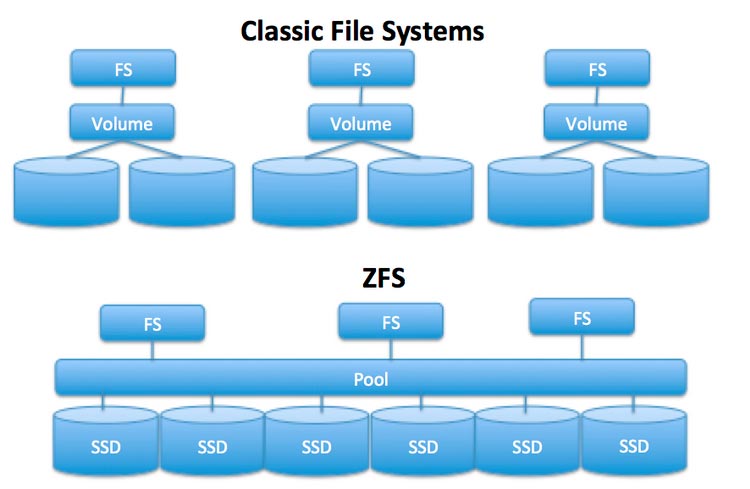
ZFS or Zettabyte File System is a special file system initially created by Sun Microsystems for the operating system called Solaris. It supports huge amounts of data, combines the concepts of a file system, physical disk and volume manager, and offers simple management methods for storage volumes.
It is a next generation file system initially designed for NAS solutions with improved security, reliability and performance. Unlike many other systems, ZFS is a 128-bit file system offering a virtually unlimited capacity. ZFS is an open-source project licensed under CDDL (Common Development and Distribution License).
| Feature | Description |
|---|---|
| Support for Large Data Volumes | ZFS supports extremely large data volumes, allowing storage of up to exabytes of information. |
| Integration of File System and Volume Management | Combines file system and volume manager, providing simplified disk space management. |
| Instant Snapshots | Allows creating snapshots of the file system for quick data recovery without significant resource overhead. |
| Data Corruption Protection | Built-in data integrity verification mechanisms using checksumming to prevent corruption. |
| Data Redundancy (RAID-Z) | Provides various levels of data protection through built-in RAID-Z functions to safeguard against loss. |
| Data Compression | Offers effective data compression, helping to save disk space. |
| File System Cloning | Allows creating cloned copies directly from snapshots for testing or development. |
| Encryption | Supports data encryption to protect sensitive information. |
If you want to use ZFS “out of the box”, you’ll have to install either FreeBSD or an operating system using the illumos kernel (illumos is a fork of the OpenSolaris kernel).
If you want to use ZFS on Ubuntu, you need to add the support features manually – but that’s a pretty easy thing to do and it involves running a few commands. We will explore it in detail a bit later, but now let’s talk about pros and cons of this file system.

ZFS File System on Linux Ubuntu and Its Key Advantages
ZFS advantages
Talking of ZFS advantages, the following can be distinguished:
Advantages. It has a simplified pattern of administration.
It combines management of volumes, RAID arrays, and the file system. All you need to manage volumes, redundancy levels, file systems, compression ratios, and mount points is just a few commands.
This approach also simplifies monitoring as there are less levels to be considered.
Advantages. Another advantage is related to ensuring data integrity.
While some data is written, its checksum is calculated and written as well. Later, when the data is read, the checksum is verified again. If the checksum does not match the read data, ZFS identifies an error. After that, the file system tries to repair such an error automatically.
Also, ZFS is perfectly scalable with the possibility of adding new storage devices, cache management options and so on.
Advantages. The copy-on-write feature.
In most file systems, data is lost forever when overwritten. On the other hand, in ZFS the new information is written to a different block.
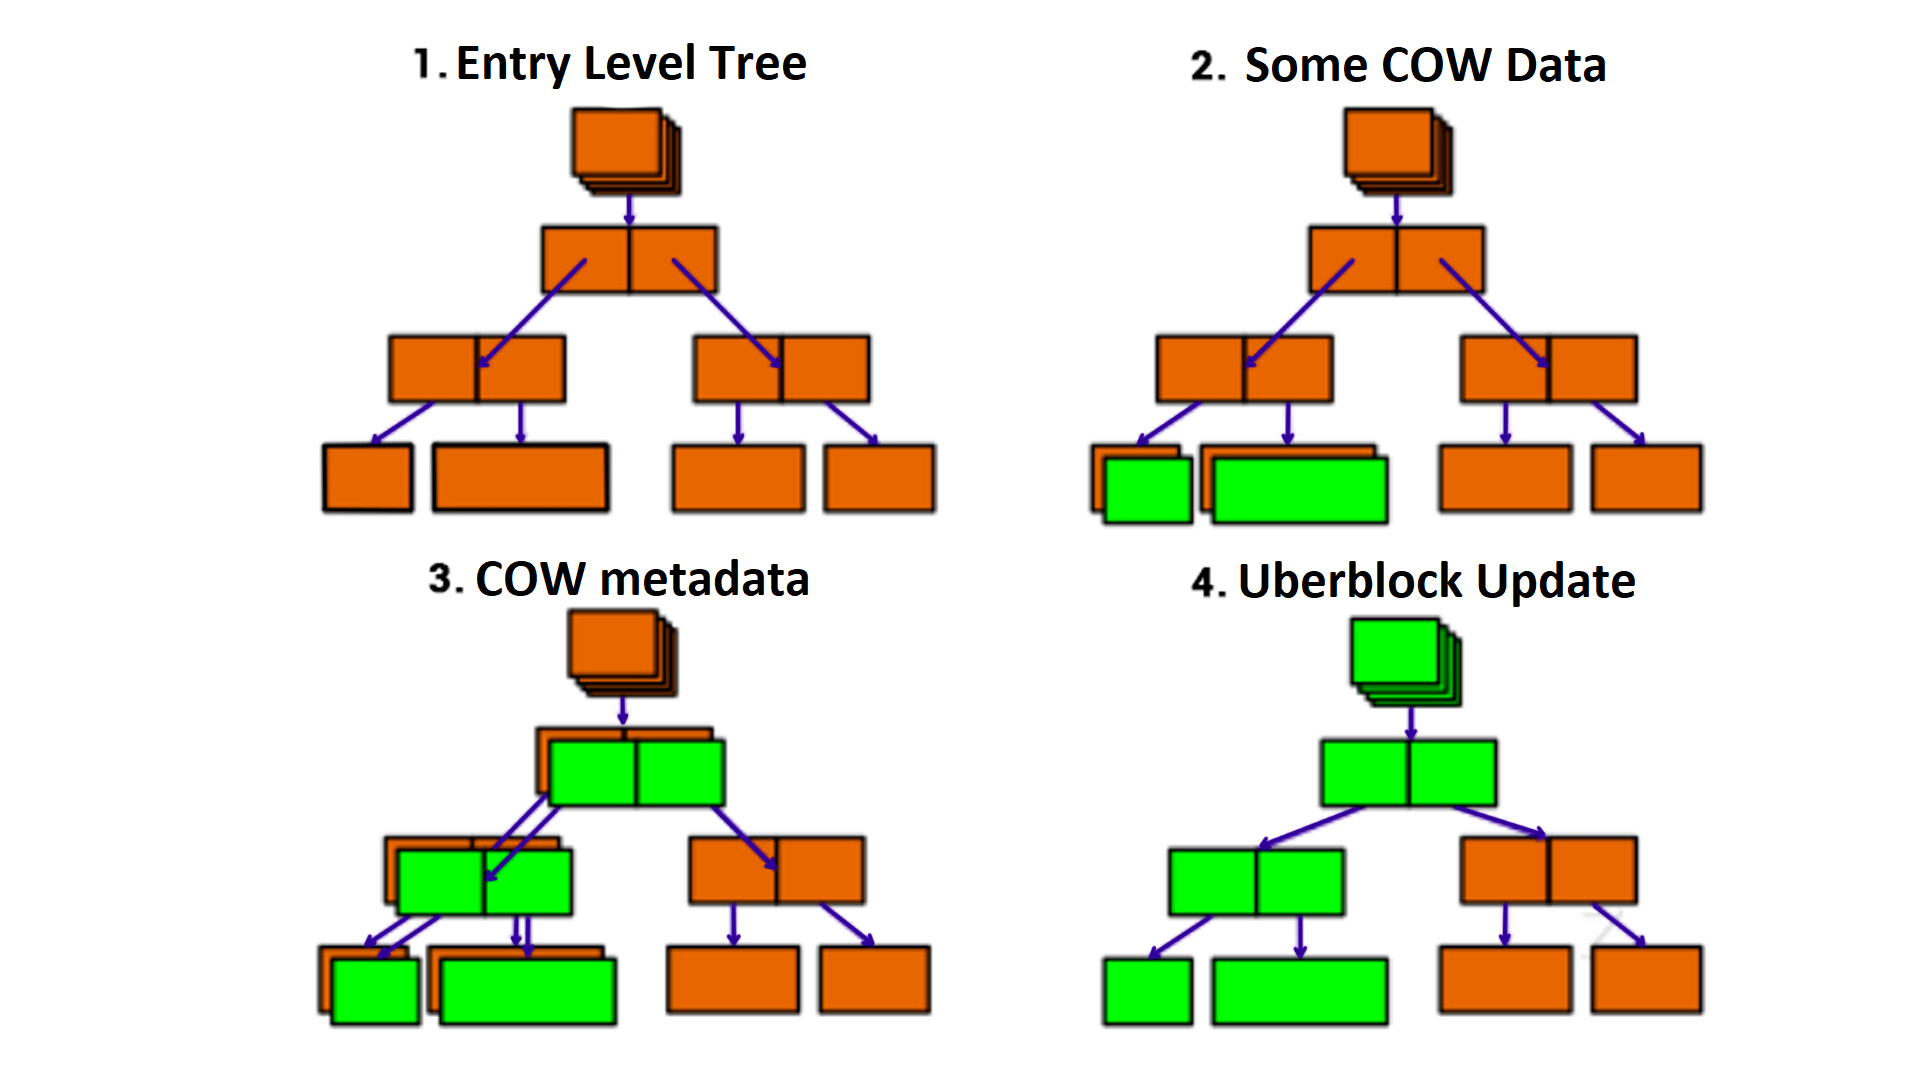
When the write operation is complete, the file systems metadata is updated to point to the new information. This helps to preserve the old data if the system crashes (or another unfortunate event happens).
Advantages. This file system features integrated storage options
Replication – the process of creating copies of something.
-
Deduplication – a technique for eliminating duplicate copies of repeating data and reducing the storage load.
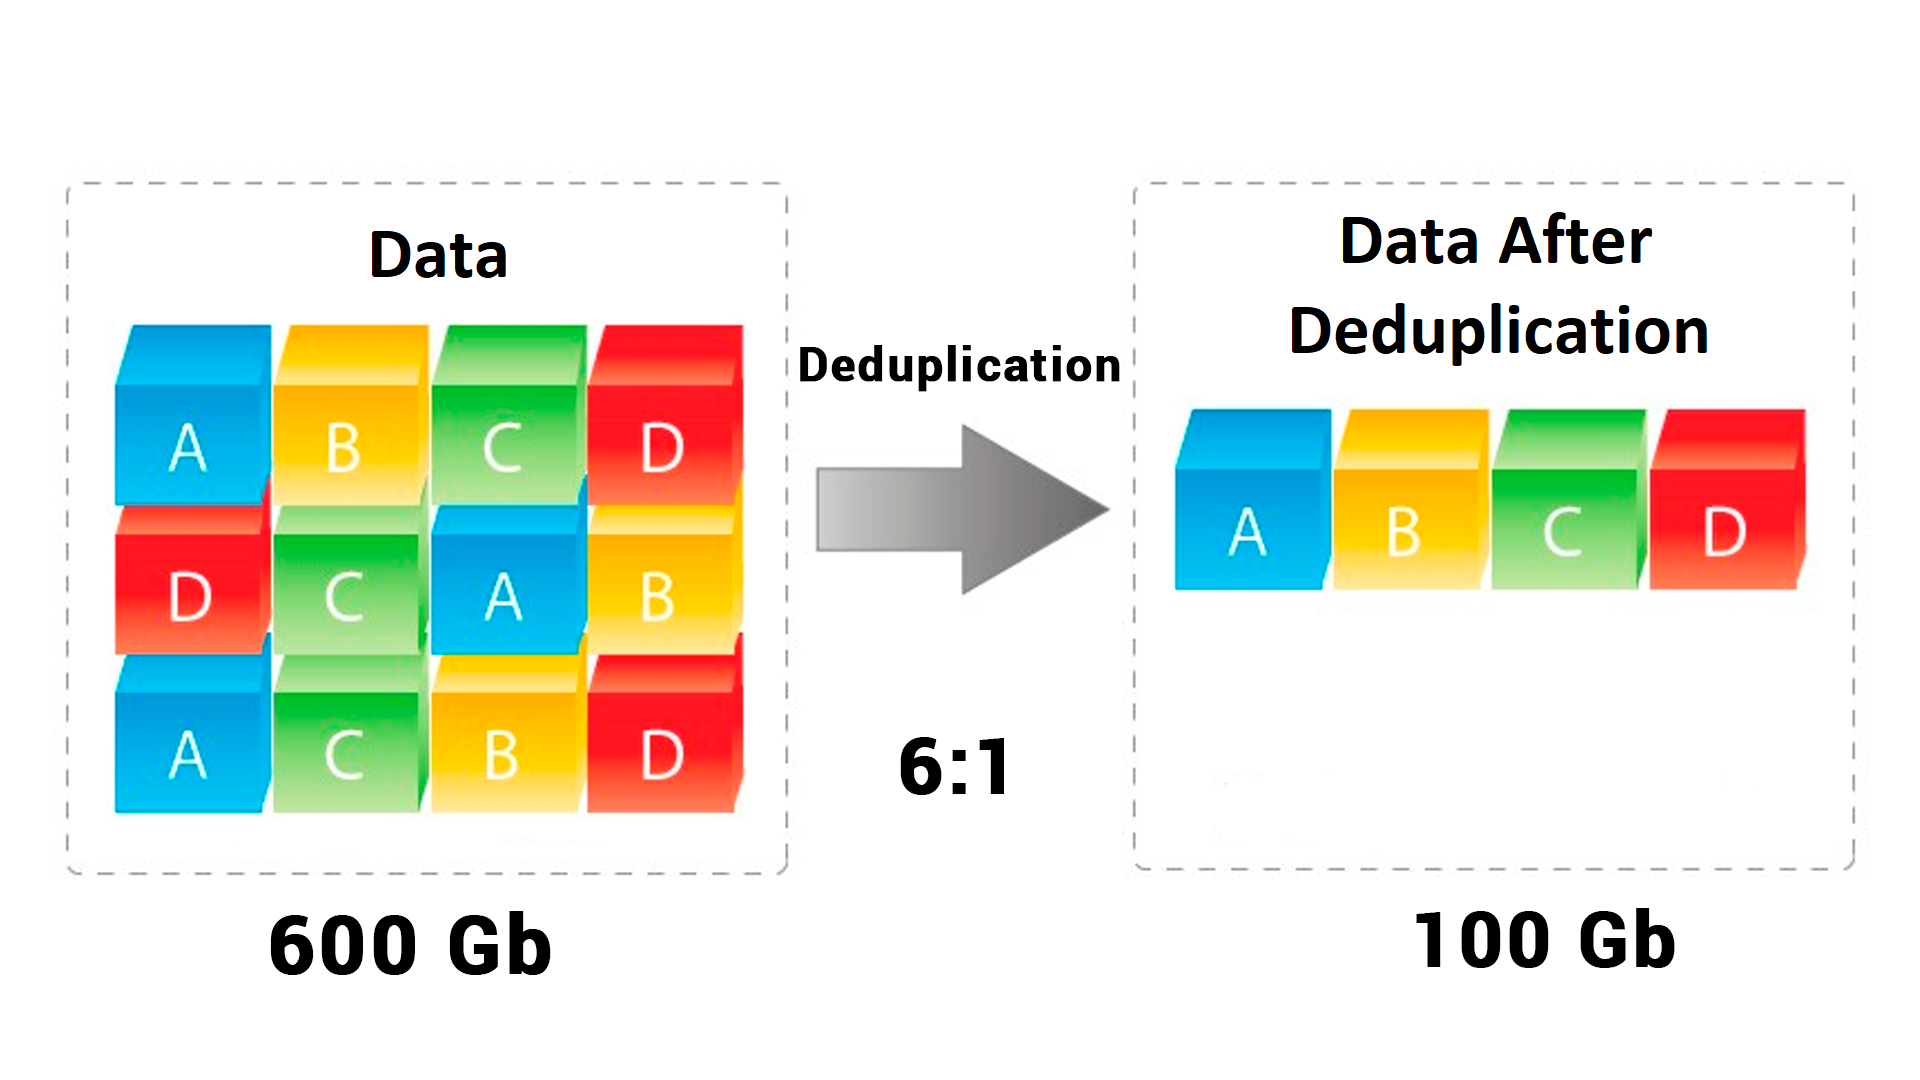
Compression is the option that saves disk space and adds more speed, as the number of bits required to represent data is reduced.
-
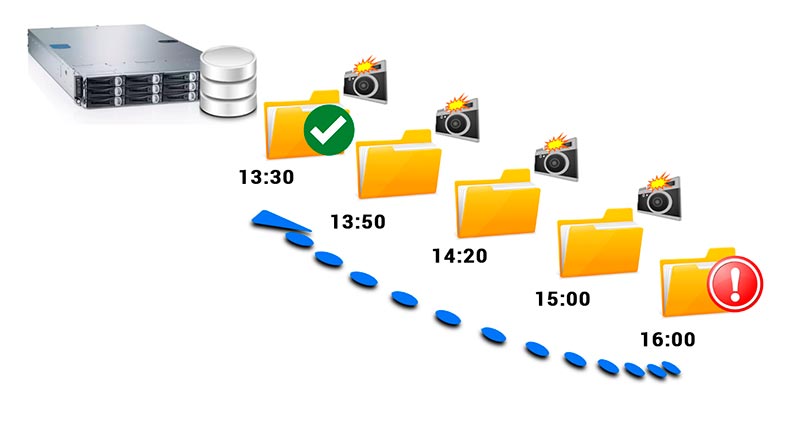
Snapshots are consistent reflections of the entire data representing the form it existed in at a single point in time.
-
Clones are identical copies of something.
ZFS limitations
However, just as any other file system, ZFS does have a few drawbacks.
Limitations. When its storage capacity is used by 80% or more, the ZFS performance tends to degrade heavily.
This is a commonplace problem for many file systems. When the current pool eats up 80% of the available storage, you should either expand the pool or migrate it to a storage system with a larger capacity.
Limitations. No opportunities to reduce the storage pool.
You cannot remove devices or vdevs (which stands for virtual devices) from the pool after they have been added.
Limitations. Also, there are limitations in changing the redundancy type.
Except for switching a single disk-based pool to a mirroring pool, you cannot change the redundancy type. Having chosen the type of redundancy, the only solution is to destroy it and create a new one, while restoring data from backups or another location.
Installing ZFS on Ubuntu
Now let’s explore how to install ZFS on a Linux operating system, with the example of Ubuntu version 20.04.
You’ll need the Terminal for installation, so press the key shortcut Ctrl + Alt + T to open it.
Then run this command:
$ sudo apt update
to check application updates. When the command is entered, the system will ask you for the root password; type it and press Enter.
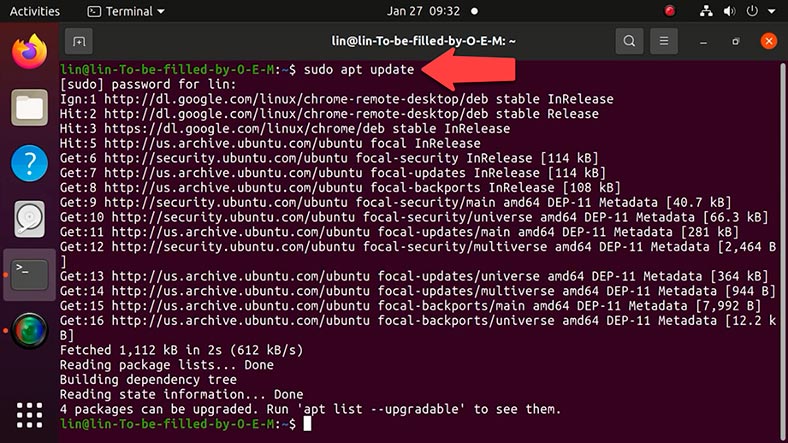
And this one, for installation:
$ sudo apt install zfsutils-linux
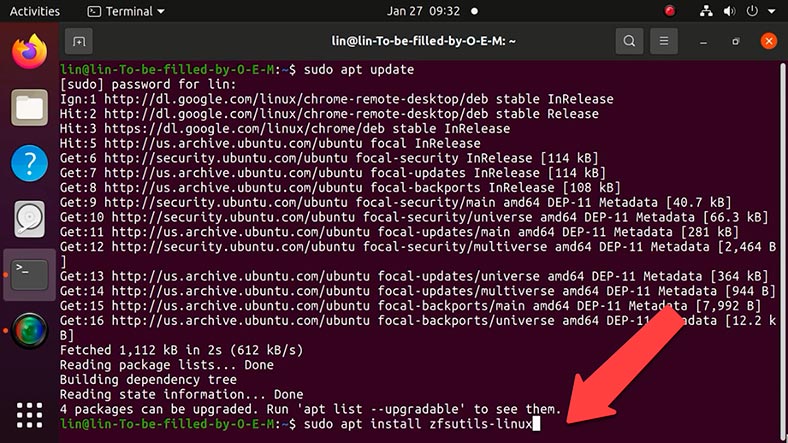
Type y to confirm the installation command and press Enter. It starts the software installation process.
To check ZFS installation, use this command:
$ zfs –version
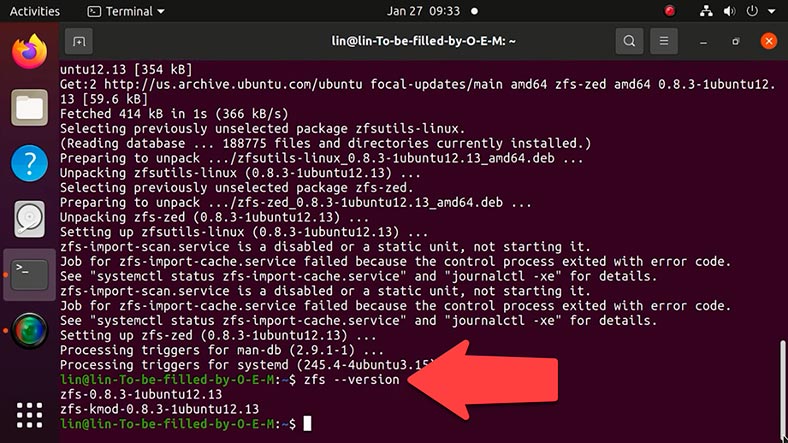
As a result, the program's version will be displayed. Now you can create a storage pool with a vdev, a virtual device.
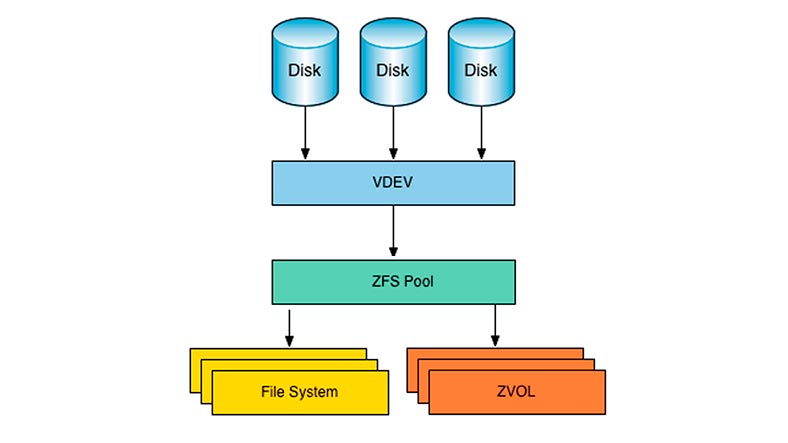
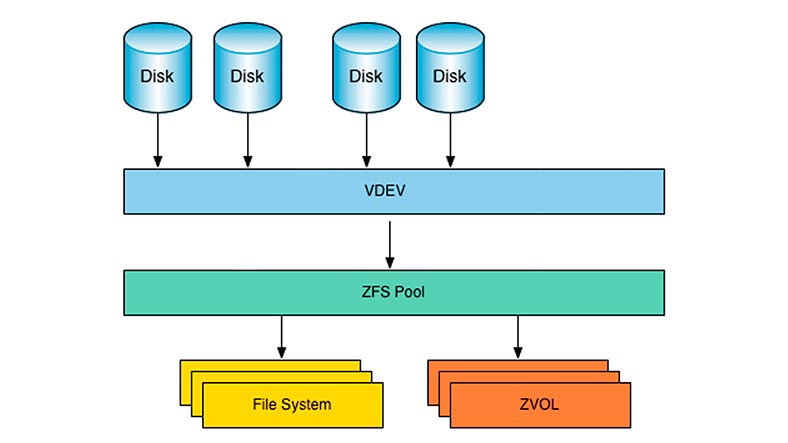
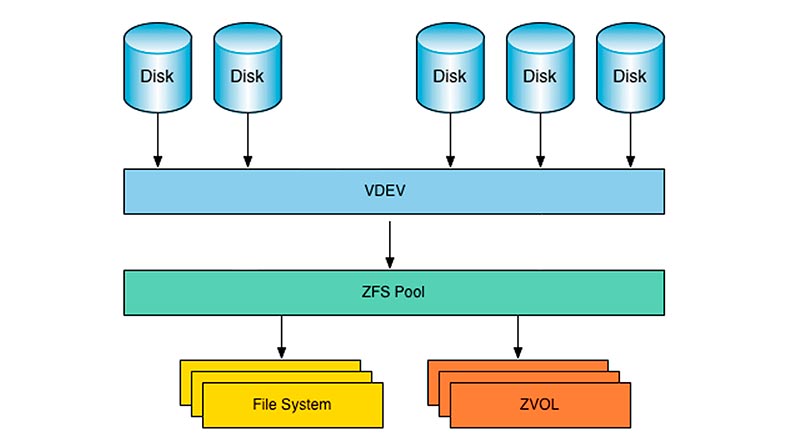
A storage pool is a set including one or several virtual devices where data can be stored. A ZFS pool, also known as Zpool, is a top-level data container in this file system. It is used to create one or several file systems (datasets) or block devices (volumes). These file systems and block devices are then capable of using the remaining pools pace. All operations in partitioning and formatting will be performed by ZFS.
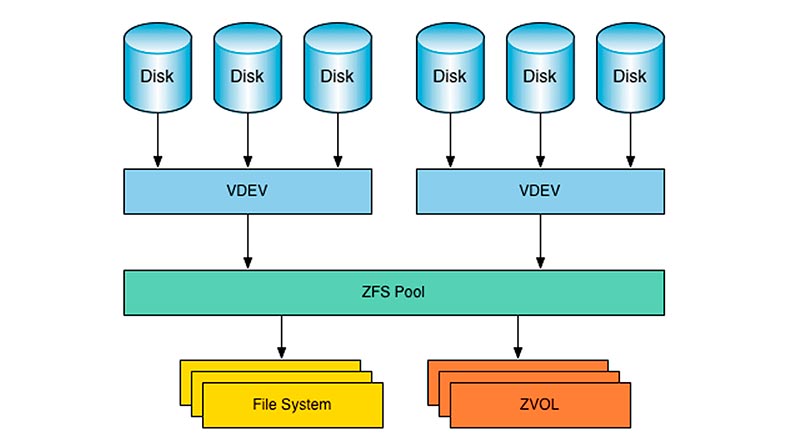
A virtual device (vdev) may consist of one or more physical devices. It can be a pool or a part of it, and it can have various redundancy levels - mirror, three-way mirror, RAIDZ, RAIDZ-2 or RAIDZ-3.
RAID-Z is an implementation of a modified RAID-5. In ZFS, it is designed to overcome the write hole error, which often affects conventional RAID-5 systems. RAID-Z1 requires at least three disks: two for data storage, and one for parity.
RAID-Z2 should have at least four disks - two for storage and two for parity.
Finally, for RAID-Z3 you need at least two disks for storage, and three disks for parity.
How to create RAIDz
Now let’s find out how to build a RAID-Z system with a bunch of drives. First of all, let’s decide which drives should be included.
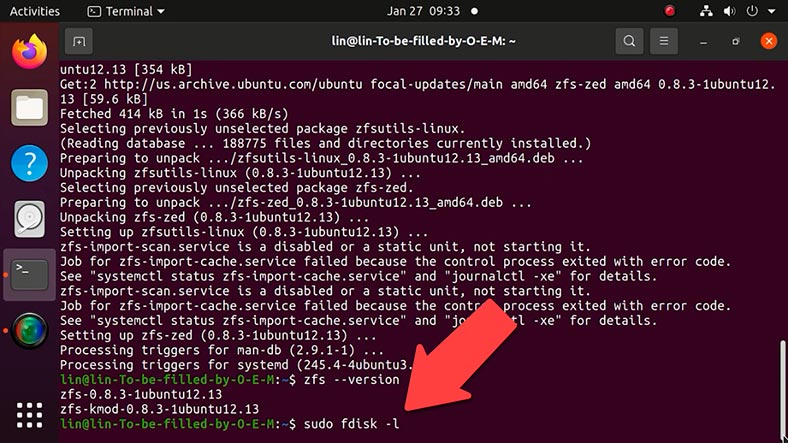
Use the fdisk utility to see what drives are connected, and which of them are suitable for your purpose. Run this command to list the drives:
$ sudo fdisk -l
As a result, you’ll see a list of drives with detailed information on each one.
For illustration purposes, I’ll show you how to build a RAID-Z1 - it’s an equivalent of RAID 5 with one parity drive. Its design lets you use the array and have your data intact even if one of the drives fails.
I have three hard disks listed as /dev/sdd, /dev/sde and /dev/sdf. I’ll create a pool with the name “zdata”. Here is the command to use:
$ sudo zpool create ith2-zfs-raid-1p zdata /dev/sdd /dev/sde /dev/sdf
$ sudo zpool create zdata raidz /dev/sdd /dev/sde /dev/sdf
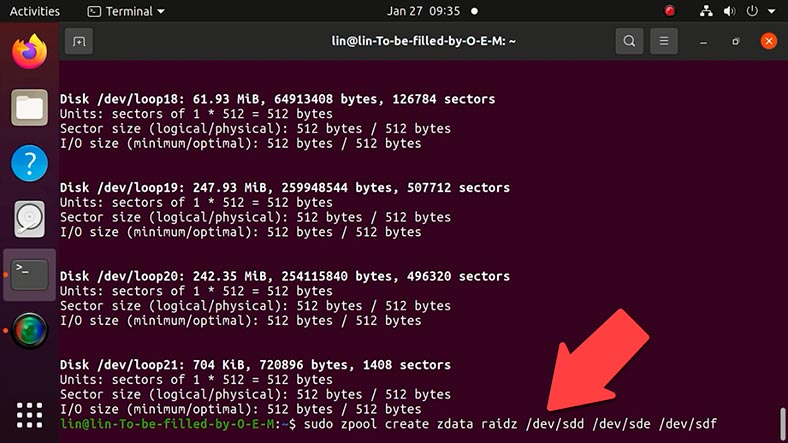
If there is an error, you can run this command adding -f after “zpool create” - it forces the command.
$ sudo zpool create -f ith2-zfs-raid-1p zdata /dev/sdd /dev/sde /dev/sdf
To find the mounting point, run the command df -h after the pool is created:
$ df –h
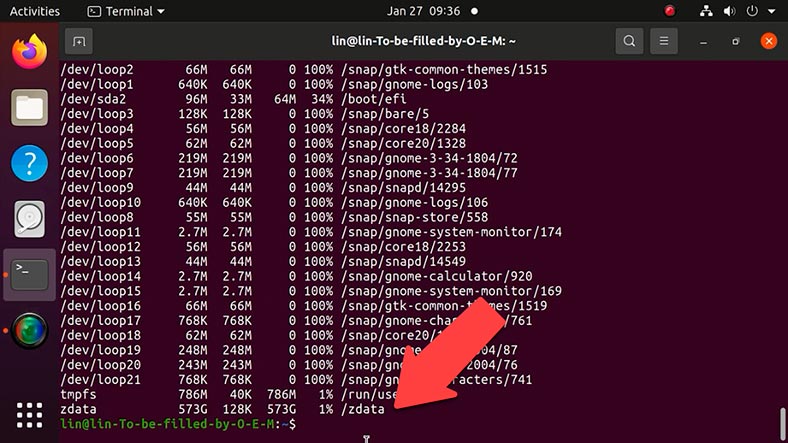
The pool is mounted in /zdata. To modify the mounting point for your pool, use the following syntax:
$ sudo zfs set mountpoint =<path> <pool_name>
In this example, I used /var/pool as a new mount point.
$ sudo zfs set mountpoint=/var/pool zdata
Let’s check the new point:
$ df –h
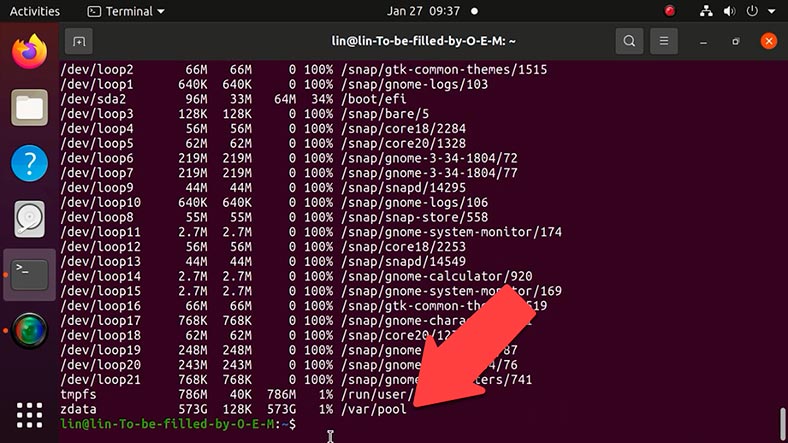
You can create directories in the storage pool. For example, let’s create a directory with the name mydata.
$ sudo zfs create zdata/mydata
To view all ZFS storage pools in this system, run the following command:
$ zpool list
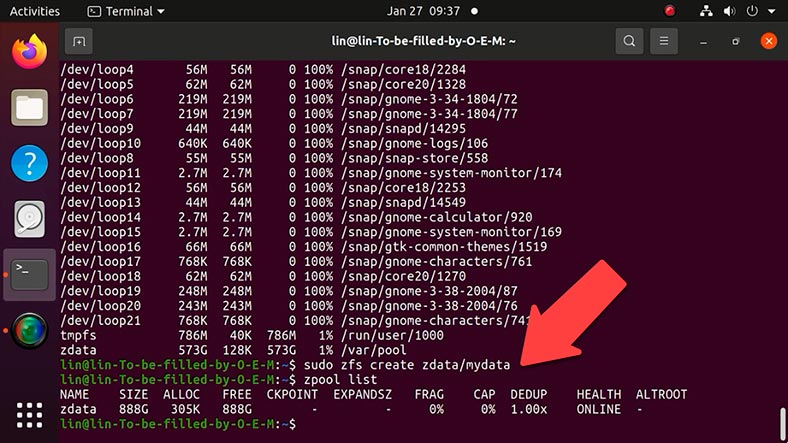
To see the configuration and status of every device within the ZFS pool, use the status command.
$ zpool status
To view events and eliminate issues, there’s one more command:
$ sudo zpool events zdata –v
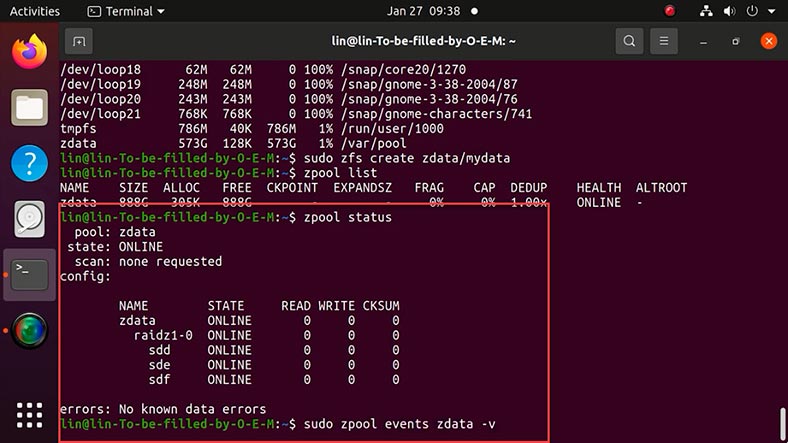
If you need to add one more hard disk to ZFS storage pool, you should run this command with the name of the disk that has to be added.
$ sudo zpool add zdata /dev/sdb
After the disk is added, let’s view the pool status:
$ zpool status
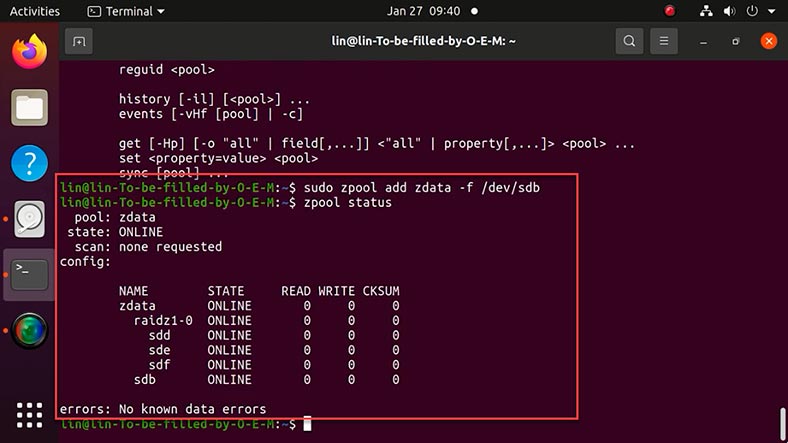
Finally, the last command that can be used to remove a ZFS storage pool.
$ sudo zpool destroy zdata
How to create, roll back and remove ZFS snapshots
This file system lets you create snapshots of your pool.
A snapshot is a read-only point-in-time copy of the file system created in a certain moment. You can create snapshots of whole datasets or pools. A snapshot includes an original version of the file system together with all changes made after creating this snapshot. In other words, it’s a read-only copy of differences.
For creating snapshots, use the command - zfs snapshot, followed by the snapshot name. In this example, I used zdata/mydata to create a snapshot.
$ sudo zfs snapshot zdata/mydata@snap1
Use the following command to check the snapshot:
$ zfs list -t snapshot
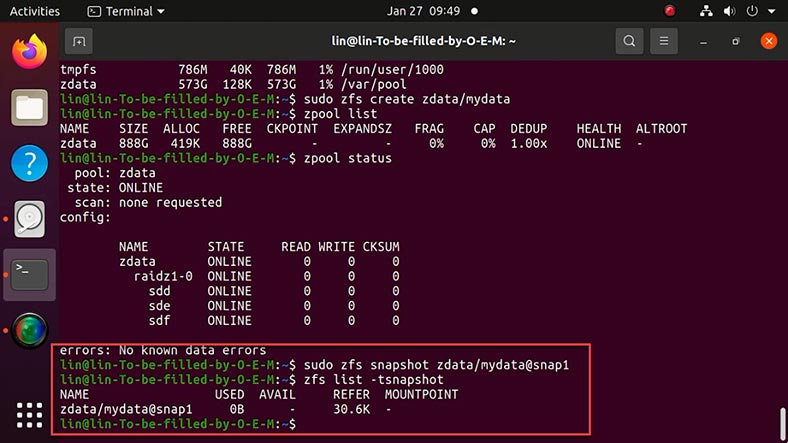
The snapshot can be renamed if necessary:
sudo zfs rename zdata/mydata@snap1 zdata/mydata@snap2
You can cancel the changes by rolling back the snapshot. However, it means you’re going to lose all changes that took place after the snapshot was created.
To go back to a certain snapshot, run the command zfs rollback with the name of a certain snapshot. This will cancel all actions in this directory that were taken after the snapshot was created.
$ sudo zfs rollback test-pool/mydata@snap1
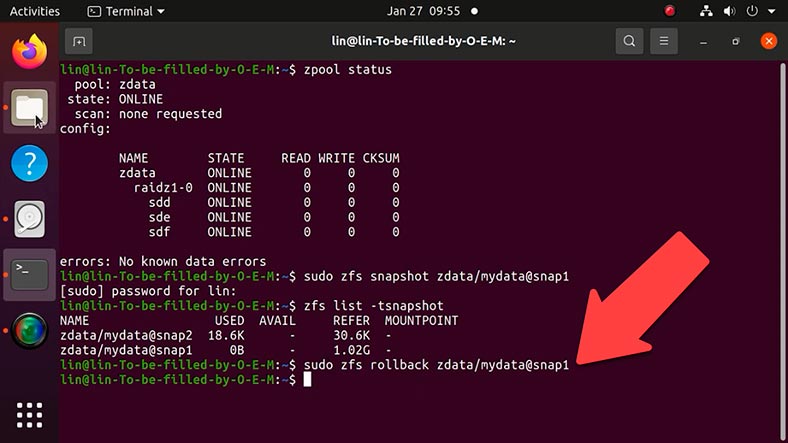
This command will roll the system back to a certain date.
When the rollback operation is complete, you can check the directory for availability of files that were deleted after the snapshot was created.
Send and receive ZFS
Snapshots can be saved to a file and then recover it, which is perfect for creating backups or for sending copied over the network (for example, with SSH) to copy the file system.
The “send” command sends a file system snapshot that can be redirected to a file or to another machine in the stream. The “receive” command receives such stream and writes a snapshot copy back to ZFS file system.
For example, let’s create one more snapshot and save it to a file, using this command:
sudo zfs snapshot -r zdata/mydata@snap3
sudo zfs send zdata/mydata@snap2> ~/mydata-snap.zfs
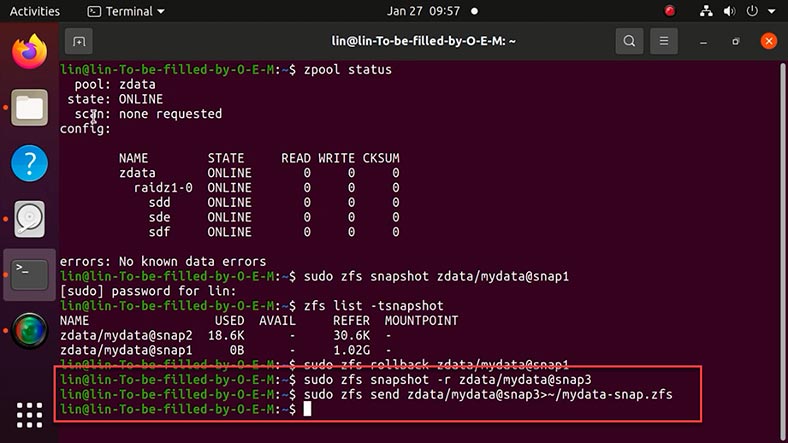
And then let’s restore it with another command:
sudo zfs receive -F zdata/mydata-copy < ~/mydata-snap.zfs
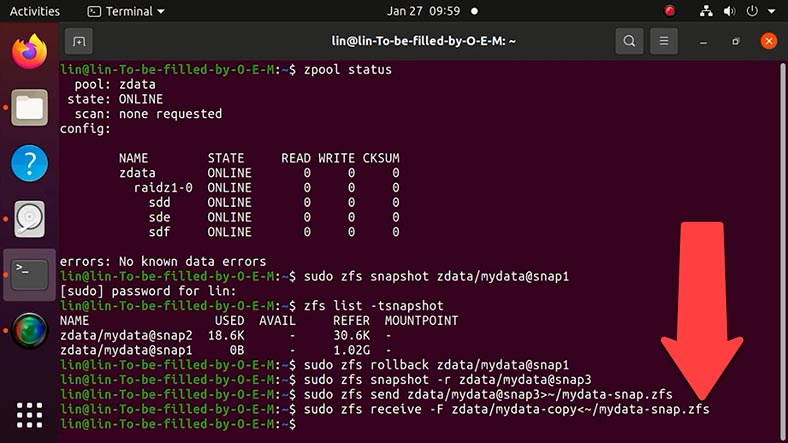
Using additional scripts, you can configure the file system to create snapshots automatically and send them to a server with SSH protocol.
ZFS data compression
As I mentioned before, ZFS lets you compress data automatically. Taking into account the computing power of present-day CPUs, this option is very useful, because the reduced volume of data means there is less data to be read and written physically, which results in faster input/output operations. ZFS offers a wide range of compression methods. The default option is lz4 (a high-performance substitute for lzjb) that provides faster compression and extraction in comparison with lzjb, while using a somewhat higher compression ratio. To change the compression ratio, use this command:
sudo zfs set compression=gzip-9 zdata
Or even change the compression type with another command:
sudo zfs set compression=lz4 zdata
You can check the currently used compression ratio with this command:
sudo zfs get compressratio
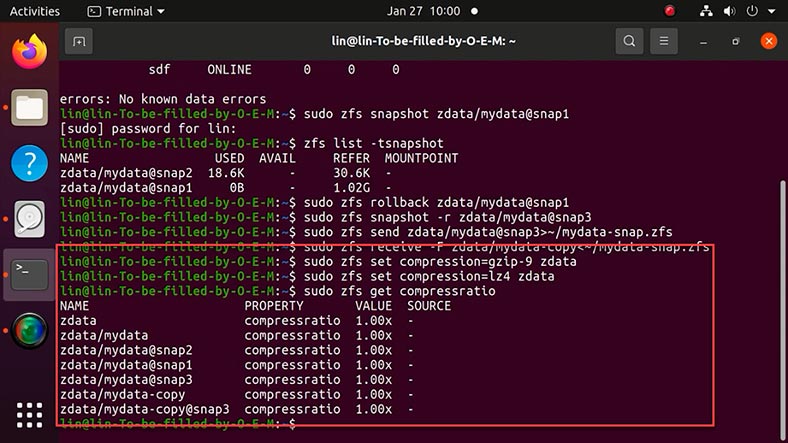
The safest choice is lz4, as it is much faster than other options, while it retains a very good level of performance.
Conclusion
All things considered, ZFS is obviously the file system to offer you a wide range of opportunities. Not only does it let you manage your data in a very effective and innovative way, but it can also recover data without interrupting your work, should an emergency situation arise. What is more, if there is a system error or failure, the whole system can be restored easily with the snapshot feature, so you’ll just roll back to the condition it was in at a certain moment of time.
If you have any problems with loss of data from ZFS and RAID-Z, try Hetman RAID Recovery. It will certainly help you recover accidentally deleted files from ZFS file system, or access the data stored in a damaged RAID-Z array. This program will come in handy if your information is gone after errors, formatting, overwriting, or other popular scenarios of data loss.
| Feature | Description |
|---|---|
| RAID Array Support | The program supports various RAID array types, including RAID 0, RAID 1, RAID 5, RAID 10, and custom configurations. |
| Automatic Parameter Detection | Automatically detects array parameters such as block size, disk order, and other key characteristics. |
| Data Recovery | Ability to recover data from damaged or deleted RAID arrays, as well as recovery after configuration errors or failures. |
| File Preview | Allows previewing files before recovery to evaluate quality and verify data. |
| File System Support | Supports file systems like FAT, NTFS, ReFS, HFS+, Ext2/3/4, XFS, ZFS and others. |
| User-Friendly Interface | Easy-to-use interface with a step-by-step wizard for data recovery. |


