Formatted a Hard Disk or External HDD by Mistake? Here’s What You Can Do
Read this article to find out what to do if you formatted a disk by mistake or accidentally and erased all of its data. Can the lost data be still recovered? How can you prevent such misfortune? What are the possible ways to bring the data back?
- Introduction
- Quick Format for a Storage Device
- How to Prevent Formatting a Disk by Mistake or in a Wrong Way
- Peculiarities of Formatting Solid-State Drives (SSD)
- Recovering Data from a Backup
- Recovering Data with Third-Party Apps
- Conclusion
- Questions and answers
- Comments
Introduction
Sometimes due to a user’s mistake of for a number of other reasons the information on a hard disk or external drive becomes inaccessible. Quite often it happens because of formatting the device accidentally, when you select a wrong disk and erase all the data it contained.
After you ran a quick format operation on a hard disk or another storage device, it may seem the files are lost for good. Fortunately, things are not so bad. The data only becomes invisible and inaccessible for users. Yet if you apply specialized tools, it can be recovered. Below, we will see what happens when you format a hard disk, how data loss can be prevented, and what you can do to bring the lost files back.

🆘 Windows 11 Error: You Need to Format the Disk in Drive Before You Can Use It. How to Fix It?
Quick Format for a Storage Device
Every device used for reading / writing data was formatted at least once. Formatting is basically the process of marking the data storage area and building a file system structure to enable access to such data. Without a file system, any operating system installed on a computer will not be able to interact with the hard disks, USB drives, memory cards and perform operations to save data. In other words, using a storage device without a file system is impossible.
There are many file system types. Windows uses NTFS, MacOS works with HFS +, Linux employs a series of various file systems (e.g., Ext3, ZFS etc). A USB flash drive and older versions of extremal hard disks will have FAT16 or FAT32. At first sight, all file systems share a common principle. However, they operate differently and have their own peculiarities, which makes some of them able (or unable) to interact with others.
For example, if you have a computer with a Windows operating system and connect a storage device with a file system that Windows cannot recognize, the operating system will suggest to format the device to able to access it. If you agree, you will lose all the data the device contains.
In other cases, when hard disks have certain issues with their physical elements or firmware, or there is no connection with the disk when the operating system tries to access it, the disk space is recognized as unallocated area, Windows will advise you to start formatting to eliminate the problem.
The process of formatting the hard disk will quickly free the disk space so you end up with an empty storage device. Yet the information it used to store is not removed. In fact, formatting only makes some changes to the file structure of the disk so the area where the files are kept is marked as available for new data to be written.
The first physical sectors of a hard disk (or another memory device) contain the file allocation table. When the disk is formatted, the data in these sectors is overwritten. Meanwhile, the majority of user data is still intact and it will be available for recovery until it is overwritten with new information.
Yet if you start writing new data to an accidentally formatted hard disk, the operating system will place it onto the old data (because the file system says the disk space is empty), and the older data can get overwritten easily, which significantly reduces the chances for its successful recovery.
So if you ever happen to format a disk by mistake, stop using it at once not prevent losing the old data due to overwriting.

💾 How to Recover Data After Formatting a Hard Disk, USB Drive or a Memory Card 💾
How to Prevent Formatting a Disk by Mistake or in a Wrong Way
From time to time, disk formatting can help to solve quite a number of problems such as boot issues, low performance, disk recognized as RAW, little free space left and so on. Therefore, formatting is a powerful tool to tackle disk issues and get the storage device ready for writing new data. However, if formatting was performed in a wrong way, with an incompatible file system or on a faulty disk, people can face all kids of unpleasant consequences, one of them being complete loss of data. In order to prevent this misfortune both now and in the future, note the following effective methods to protect your data from accidental formatting.
Back up your disk regularly
Talking of preventing personal data loss, the most effective way is backup. You will always be able to restore the lost data (though it could be not the latest version, if you modified or edited the information after the last backup). Regardless of what caused a data loss (for example, such commonplace things as accidental or incorrect disk formatting), you can use a previously created or regularly updated backup to have your files back. In the latest version of Windows operating system, you can find several options for creating a backup and restoring data from there, and this is what the next part of the particle is about.
Double-check the disk before formatting
Accidental and incorrect formatting actually result from being not attentive enough. So the easiest way to prevent data loss is to be very cautious when formatting a disk – and the warning messages shown by Windows will help you stay alert. For example, when you are going to format a hard disk or a specific partition, you should double-check your choice and make sure the correct disk is selected, and the data was copied to another device – or that it is of little value and can be erased.

Enable overwrite protection
Sometimes, especially when you deal with USB drives or various memory cards, there is a write-protect option to prevent accidental formatting. For example, most memory cards have an integrated switch to protect them from unauthorized overwriting. If a card is write-protected, you cannot save any files there, and, accordingly, formatting is out of the question too.
Choose a proper file system
Besides the incorrect formatting of the wrong disk, another widespread cause of data loss is formatting into an incompatible file system. Therefore, before formatting a disk you need to decide on the operating system you would like to use with the storage device, and then select a corresponding file system for it. For example, if you want to use a hard disk in MacOS, you should format it into Hierarchical File System (HFS). If the disk is meant for Windows, to have your storage device recognized properly it should be formatted into NTFS or FAT.
Don’t interrupt the formatting process
The last but not least, make sure that the device is not exposed to any external influences. Don’t let anything interrupt the formatting process. For example, if you are trying to format an internal hard disk in your laptop, make sure itis connected to a power outlet and the computer will not shut down because of low battery alarm. If the disk in question is an external one, wait until the formatting process is over and do not disconnect it from the computer. If you do, the storage device may be damaged, and the data inside it can be lost.
You can learn more about recovering files from USB drives by watching a video tutorial «How to Recover Deleted Files from a USB Drive after Formatting the Drive or a Virus Attack».

⚕️ How to Recover Deleted Files from a USB Drive after Formatting or a Virus Attack in 2021 🔥
Peculiarities of Formatting Solid-State Drives (SSD)
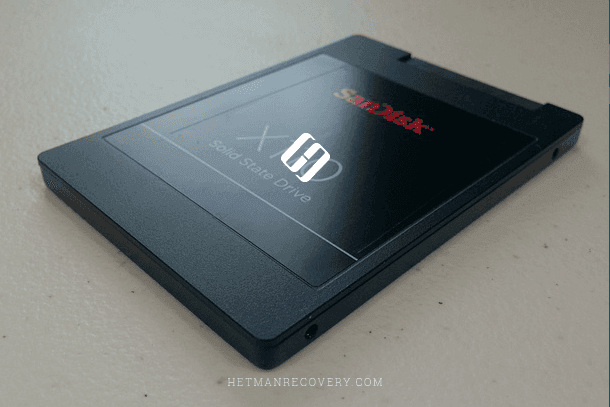
The principle behind SSDs (solid-state drives) is different from that for conventional hard disks (HDDs) and is based on using NAND flash memory to store data. There are two main peculiarities. The first is that new data can be written to empty memory cells only. When a cell contains some data, it should be emptied before any new information can be entered. The second is that solid-state drives are much quicker to write data into empty cells than to clean cells in order to prepare them for writing operations.
That is why if an SSD is new or empty, write/read operations are very quick. When more data is written and removed, the write speed can decrease considerably in comparison with the brand new disk. Of course, such situation is unacceptable, so a special command TRIM was developed to initiate emptying the memory cells right after the command to delete files was given. This command is performed automatically, and right after deleting the files, cells are cleaned from data and ready for writing new data long before you actually add some information to your SSD. As a result, the disk performance is retained and the initial write speed is still as good as it was.
The command TRIM which is typical for any SSD, is applied by the operating system when deleting a file, formatting a disk, modifying the structure and number of partitions, or when applying other ways of freeing the disk space. It shows the disk controller the specific memory cells that have to be cleaned.
The process of physically cleaning the cells takes almost no time (according to the disk characteristics) and almost excludes a chance for subsequent recovery of data lost or removed as a result of formatting – except for a few conditions. Sometimes, the command TRIM is not applied which leaves some room for hope that data could be restored – for example, when a storage device was connected via USB (which is not supported by TRIM), when the storage device or its file system is damaged. Yet in most cases data recovery after formatting an SSD is impossible so the users will have to admit it is lost forever.
Visit our channel to watch a video review on possible ways to recover data from solid-state drives: «Recovering Data from an SSD After File Deletion or Disk Formatting».

⚕️ Recovering Data from SSD After File Deletion or Disk Formatting in 2021
Recovering Data from a Backup
The Windows operating system is designed to ensure safe processing of any user data and their protected storage due to having specialized integrated tools. One of such tools is creating backups of user data which you can use to restore your files if necessary.
The main and obligatory condition to benefit from such backups is to enable the backup options beforehand. So as long as you have turned backup function on and did it before an internal or external hard disk was accidentally formatted, there must already be a backup which you can use to restore your data. If there is no backup (because you did not enable the corresponding option) you can still restore the information lost after formatting with the help of specialized professional tool, Hetman Partition Recovery, which we will cover in the next part of this article.
Talking of tools which you can use to recover data from a backup in Windows, there are several options to consider:
Recovering Files with Windows 7 Backup and Restore Tool
If enabled in due time, this tool will be able to restore files after accidental formatting the hard disk and if the backup was not stored on the formatted disk.
You can access the Windows 7 backup and restore tool in several ways, from Settings or from Control Panel. The latter is the universal one that works for any version of this operating system beginning with Windows 7 so that is why we will be using this particular method.
Click on the Start button in the lower left corner of your desktop, on the Taskbar, and open the main Windows menu. Use the scroll bar to examine the list of available apps, find the group Windows System and open the nested menu to select Control Panel.

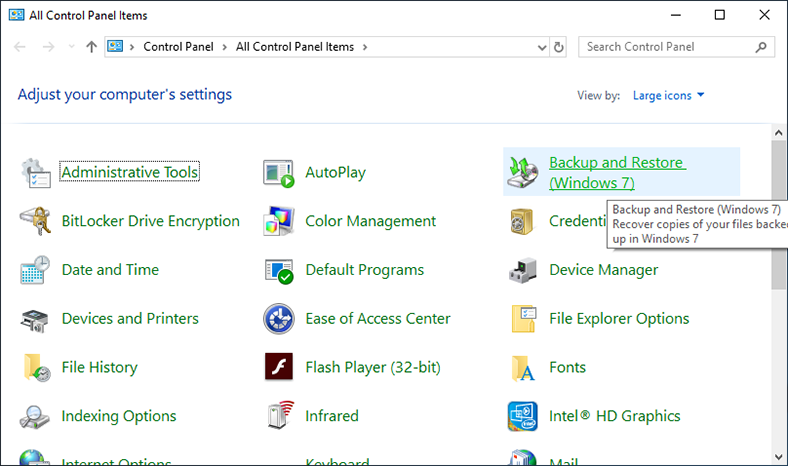
In the window that opens, find and open the section Backup and Restore (Windows 7).
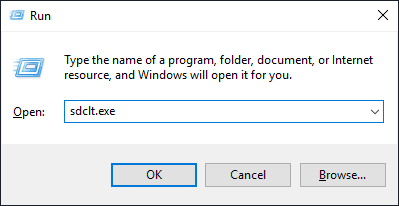
Otherwise, open the backup tool directly with the Run tool, (which you can open by pressing the key shortcut Windows + R), type the command sdclt.exe, and click ОК or press Enter.
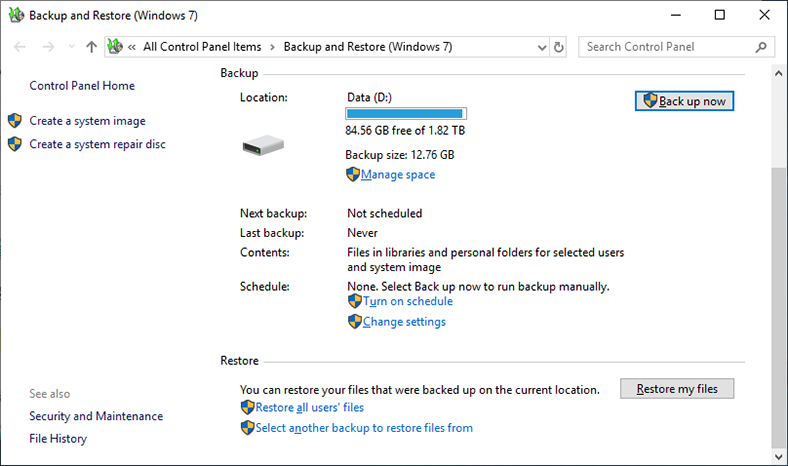
In the next window, scroll down to the Restore section and click on Restore my files.
The Restore Files app will run in a separate window. Use the control buttons Search, Browse for files and Browse for folders to add the files and folders to be restored. You can select the latest versions of the files or choose files for a certain backup date from the list of available saves by clicking on Choose a different date.
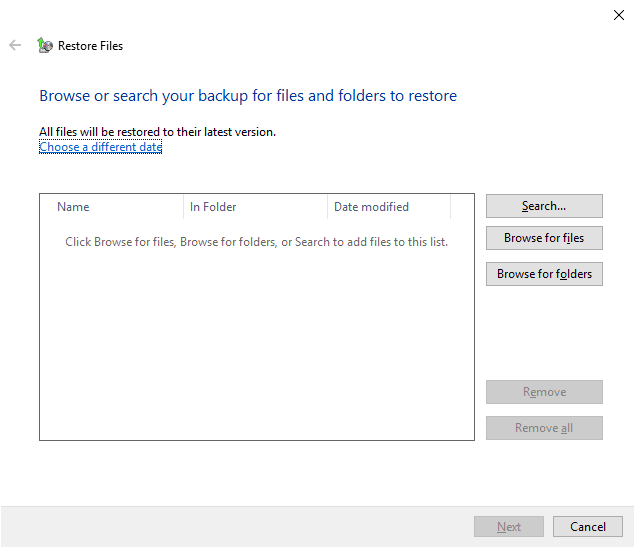
When the files and folders are found, click Next to continue.

In the next window, decide where to save the restored files. There are two options to save from: In the original location and In the following location. In the first case, files will be restored to the last location where they were kept at the time when the backup was created. In the second case, you need to specify a new directory for the restored files on a storage device – be it internal or external. Check the option you prefer (and specify the new location if you go for the second variant), click Restore to complete the recovery process.

Now the files have been restored according to the settings you have chosen so you can view them in the specified directory.
Recovering Lost Data with File History
The settings of this tool let you change the number of folders selected for backup to add new folders or exclude certain elements. If the hard disk was formatted by mistake, you can always restore the lost data from a previously created backup.
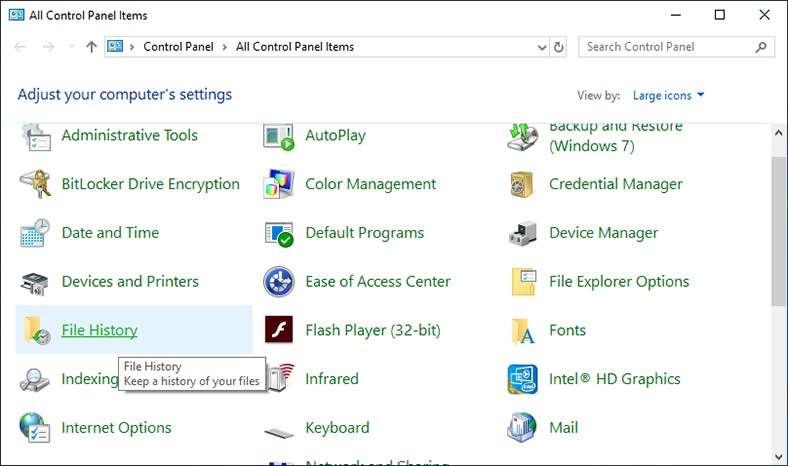
In the Control Panel app window, select File History.
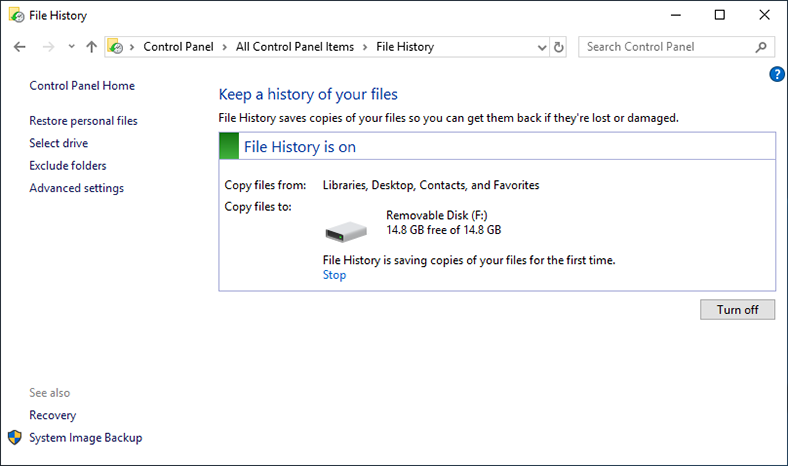
In the next window, look on the left and click on the text link Restore personal files go go directly to the File History app.
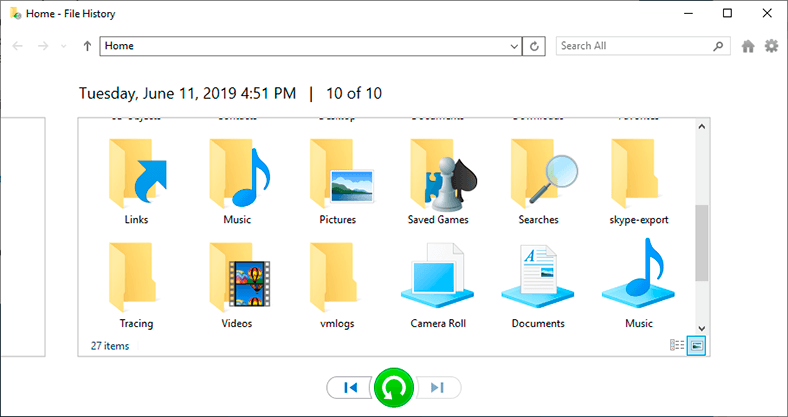
The home screen will show you all archived versions of the selected folders that Windows has saved automatically according to your preferences. The archives will be kept for an unlimited period of time which gives you considerable chances for successful search and recovery of the files you may need. Below, there are navigation buttons which you can use to view and select various versions of file backups for a certain date. When you decide on the date of the backup copy you need and select the necessary files and folders, click on the green round button with the circling arrow inside – Restore to original location. The selected elements will be restored immediately and ready to use.
You can learn more about using File History to backup and restore data in Windows by visiting our channel and watching the video guide «How to Set Up and Configure File History in Windows 10 and 8».

How to Set Up and Configure File History in Windows 10, 8 📝📁💻
Recovering Data with Third-Party Apps
Users do not always back up all files. Very often they follow operating system directions and perform a partial backup – important files only, which leaves a lot of other data overboard. In most cases, people take this approach because they need quite a lot of disk space to keep the backups (while they already have tons of other files to store). With the amount of digital information growing every day, most data never gets backed up, and there tend to be less backups you could use just in case something happens.
However, if you did format a disk by mistake, there are specialized tools to help you out. The data recovery software market is very rich, with dozens of developers offering their utilities. Their solutions differ by many features and special options designed to make them stand out among the rivals. One of the essential criteria to evaluate effectiveness of a specific program is the percentage of user files it can successfully recover. With this factor in mind, the leading position rightfully belongs to Hetman Partition Recovery by Hetman Software.
This multipurpose tool is the company’s flagship product and combines all the best things the data recovery software has developed. Innovative low-level search algorithms coupled with signature-based file identification lets the program recover user files from internal and external hard disks, and any other storage devices using FAT and NTFS file systems, determine attributes, contents and the original directory tress of the examined disk.
Hetman Partition Recovery is extremely easy to use and offers a safe way to handle any recovery tasks regardless of why exactly the data was lost:
Deleted user data: it recovers information after ordinary and permanent deleting (for example, the one performed with the key shortcut Shift + Delete), erasing files with third-party software or after emptying the Windows Recycle Bin. Detect and recover data from any media: internal and external hard disks, USB flash drives, memory cards of any format and size, and restore lost data from all kinds of computer devices (desktop and laptop computers) and gadgets (cameras, media centers etc).
Formatted disk space: it recovers almost entirely any data from logical partitions and hard drives which were formatted accidentally or deliberately, as well as does it after updating or changing the file system, and even restores lost data in case of file allocation tables being empty, damaged or absent.
Harmful effects of various malware: its progressive algorithm extracts data even after malware actions such as destruction, elimination, blocking, modification, removal and even when the disk system structures are damaged or unavailable.
System issues: it saves data that has become inaccessible or were deleted after system failures, hardware errors, driver issues, firmware failures and other similar things.
Broken or faulty disk: the utility restores data after a hard disk gets damaged due to an operating system crash or a power failure, provides access to and recovers successfully any data from unreadable, inaccessible and dead disks.
To recover data lost after accidentally formatting an internal or external hard disk, visit Hetman Software official website and download the installation file for Hetman Partition Recovery to your computer.
The step-by-step wizard initiated when you launch the installation file will take you through the simple few steps needed to install the program and configure it for successful data recovery.
Start Hetman Partition Recovery and it will run an initial system analysis to detect all connected storage devices. All detected storage devices will be shown in the main window – which looks very much like Windows File Explorer so users can easily work with the integrated tools and recover their files.
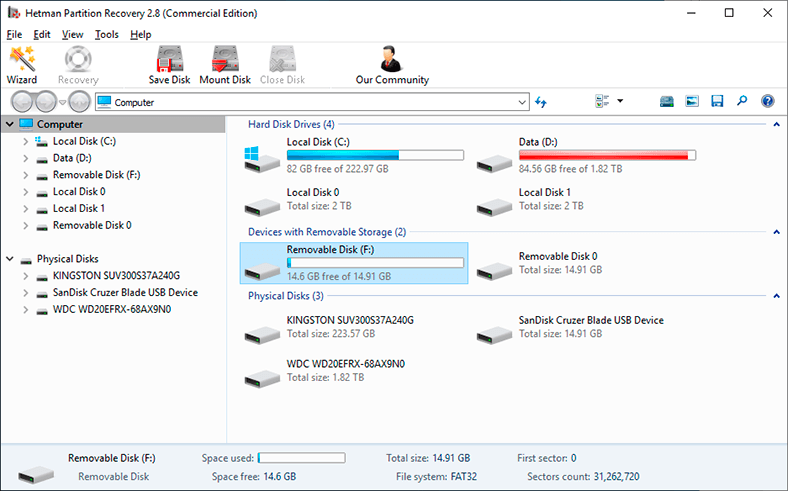
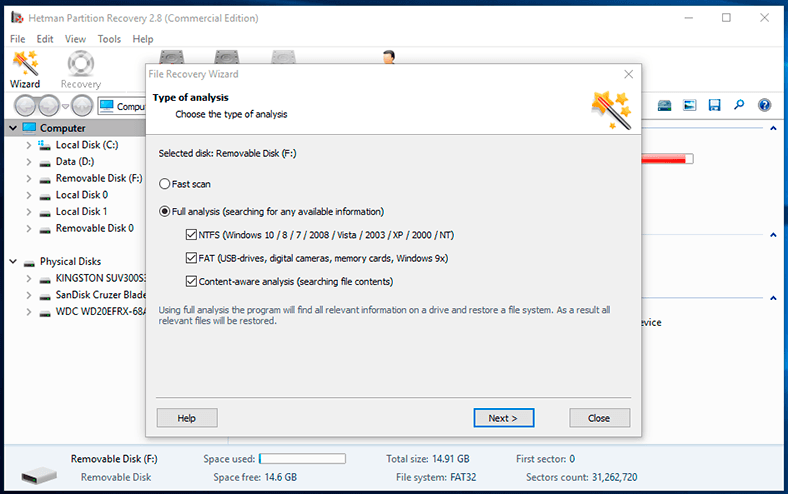
From the list of connected devices, select the logical partition or an entire disk which was formatted by mistake and double-click on it. The file recovery wizard starts to help you select the necessary analysis type to bring your data back. To recover files, you can choose between Fast scan and Full analysis. Fast scan is good for restoring recently deleted files, While Full analysis goes deeper for a through scan to find and restore the file system and find all files that can be brought back. Check the option you prefer and click Next to continue.
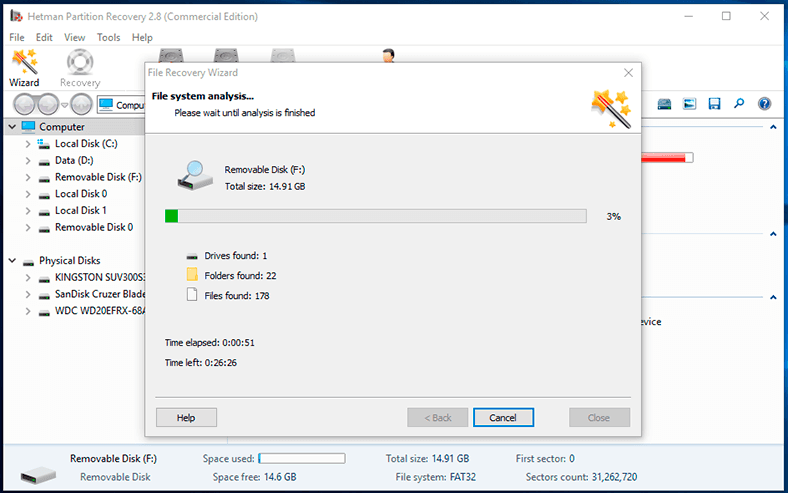
Depending on whether the files are more or less damaged, the size of the disk, analysis type and other additional circumstances like what caused the data loss, the recovery process may take from a few minutes to several hours. You will be able to see the estimated time required for the process and the progress bar will indicate how quickly the recovery proceeds.
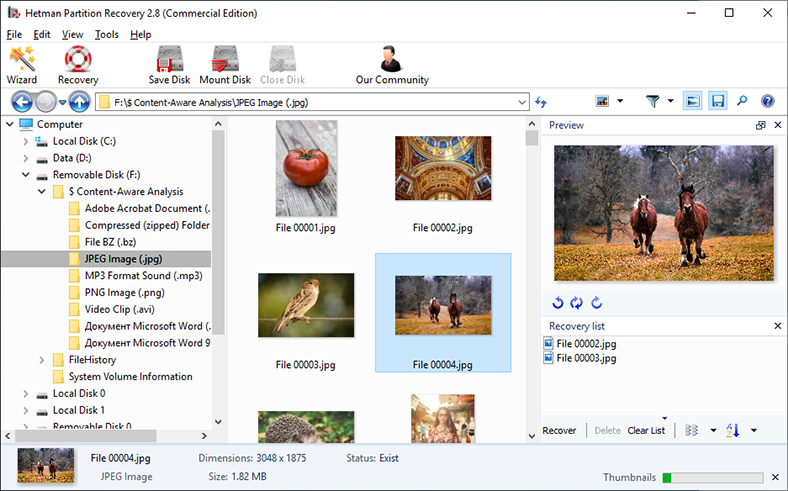
When the analysis is accomplished, all detected files will be shown in the program window. You can examine contents for all files by viewing or listening to it in the Preview window, and choose what exactly you need to recover. Having selected the necessary files and placed them onto the Recovery List by dragging and dropping, click on the Recovery button.
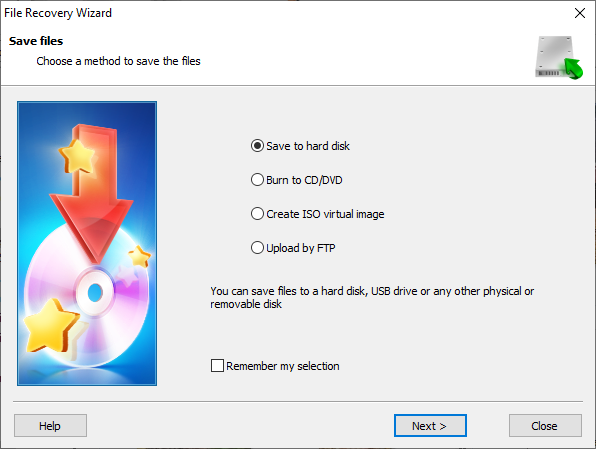
Hetman Partition Recovery will start the file recovery wizard to help you choose the best method of saving the recovered files. There are four options to choose from: Save to hard disk, to save the files to an internal, external or removable disk, Burn to CD/DVD, Create ISO virtual image or Upload by FTP to save the files to an online storage. Check the option you prefer and click Next to continue.
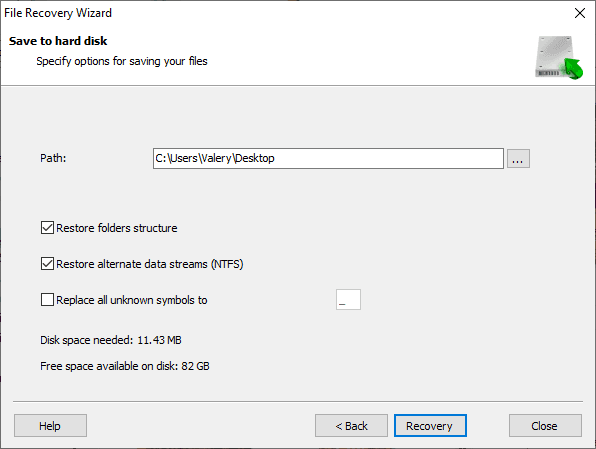
Specify the path for saving the selected files (keep to the default path or set your own), and check some other settings depending on the file saving method, and then click Recovery to finish the process.
Now the files have been recovered in accordance with your settings, and ready to use.
Conclusion
The ever-increasing number of users brings on the immense amount of digital data that has to be stored on computer-type devices. Connecting new storage types, configuring them and arranging their inner structure requires, from time to time, to format memory devices to eliminate possible issues or move on to a more progressive file system type.
Having several disks or other storage devices connected to a computer may cause a user to format a wrong disk by mistake – and that means losing all the data it contained.
When it happens, you can use integrated data protection services inside your Windows operating system and restore the lost data from previously created backup. However, backups do not always help, especially when they include a limited number of files, or when you back up your data only once in a while.
Even if you can’t restore files with the help of standard tools within your operating system, there is still the multipurpose tool you can resort to – Hetman Partition Recovery – and get all the necessary data back.


